Builds Benjamin’s 3D Prints Build (7 Viewers)

This site may earn a commission from merchant affiliate
links, including eBay, Amazon, Skimlinks, and others.

BenCC

Supporting Vendor
Joined
Aug 26, 2011
Threads
4
Messages
1,269
Greetings. This is a half build and half promoting thread. I want to document my 3d printed parts/accessories and share the design/fabrication process.

List that shows what is currently available to purchase:

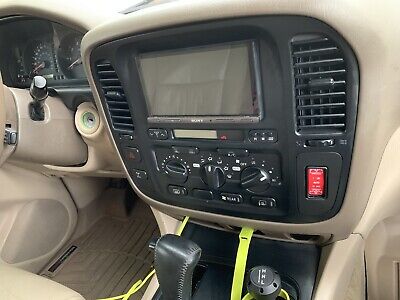
Make 1: Scangauge II Mount for Toyota Land Cruiser 100 Series​
Make 2:​
M2 V1: Rocker Switch Mount for the Lower Right Center Console Panel​
M2 V2: RAM Ball Mount for the Lower Right Center Console Panel​
M2 V2 LEFT: RAM Ball Mount for the Lower Left Center Console Panel​
M2 V3: Magnetic Mic Mount​
Make 3: Scangauge II Mount for Toyota Tacoma Gen 2​
M3 V1 Scangauge II Mount for Toyota Tacoma Gen 2 Type 1​
M3 V2 Scangauge II Mount for Toyota Tacoma Gen 2 Type 2​
M3 V3 Rocker-switch Mount for Toyota Tacoma Gen 2 Type 1​
M3 V4 Rocker-switch Mount for Toyota Tacoma Gen 2 Type 2​
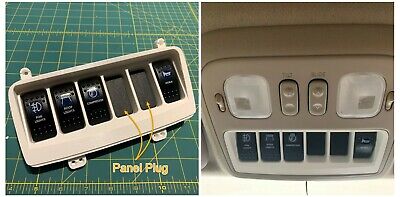
Make 4: Multiple Rock Switches Mount for Toyota Land Cruiser 100 Series​
M4 V1: Six Rocker Switches​
M4 V2: Five Rocker Switches + One Map Light​
M4 V3: Extra Clearance (ARB Style Automotive Rocker Switches)​
M4 V3T: Extra Clearance (Toyota OEM Switches)​
M4 V4: Extra Clearance with one Slot for Dimmer​
Make 5: Scangauge II and Rock Switches Combo Mount for Toyota Land Cruiser 100 Series​
Make 6: Change Pocket Mount​
M6 V1-V5: Change Pocket Mount​
M6 V6: Change Pocket RAM Ball Base Mount​
Make 7: Rear Cooler Switch Hole Mounting Plate​
Make 8: Voltmeter Mount​
Make 9: Kenwood TM-V71A Remote Head Mount​
Make 10: Multi-switch Mount with 12V Outlet or USB Ports​
Make 11: Scangauge II Mount with 12V Outlet or USB Ports​
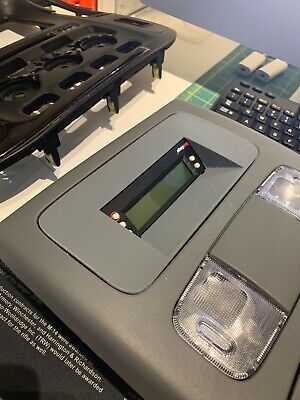
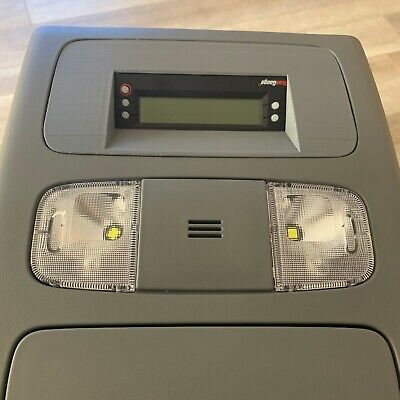
Make 12: Scangauge II Mount for Mini-Homelink Overhead Console​
Overview of three versions​
M12 V1: Round-up​
M12 V2: Square-off​
M12 V3: Minimalist​
Make 13: Transfer Case Lever Cap​
Make 16: Third Row Ashtray Replacement Panel​
Make 17: Sub-woofer Cover​
Make 18: Third Row Cup Holder Replacement Panel​
Make 19: Fot Light Mount​
Make 19 V1: Fog Light Mount (Rigid D2)​
Make 19 V2: Fog Light Mount (Baja Designs Squadron)​
Make 19 V3: Fog Light Mount (Diode Dynamics SS3)​
Make 21: Overhead LED Replacement​
Make 22: Kenwood TM-D710G Remote Head Mount​
Make 23: YAESU FTM-400XD Mount​
Make 24: EZFix of door switch panel​
Make 25: Door Step (Door Trim Protector)​
Make 26: Wheel cap for Method NV Wheel​
Make 27: Mic Adapter in Rocker-switch Format​
Make 28 V1: Cupholder (Butterfly version) Instruction
Make 28 V2: Cupholder (Non-Butterfly version)​
Make 29: Second-row Cupholders Replacement​
Make 30: Keystone Device Mount in Rocker-switch Format​
Make 33: Center Storage Insert​
Make 34: Hazard/DiffLock Switches Swap Kit​
Make 35: Switch Pros SP-9100 Switch Panel Mount​
M35V1: For regular overhead console​
M35V2: For minilink overhead console​
Make 36: ICOM IC-2730 Mount​
Make 37: Icon Compression/Rebounds Wheel Caps​
Make 40: Small Rocker Switch Mount for Mini-Homelink Overhead Console​
Make 41: RAM Mount Compatible Multi-function Fixture​
Make 42: Dummy Flange​
Make 46: Center Storage Deep Hole Utilization​
Make 50: Hood Struts Safety Clip​
Make 53: TJM T17 Baja Designs S2 Mounting Kit​
Make 59: AUXBEAM Switch Panel Mount​
Make 60: sPOD Switch Panel Mount​
Make 63: LX470 Foglight Mount​

1588957777755.png
1591336473167.png
1593141347114.png
1593142106144.png
1591336676127.png
1591336693693.png
1591336844548.png
1591337074463.png
1591337188403.png
1591337735900.png
1591338087802.png
1591338043807.png

1708270086910.png


1578442150580.png


1578442180611.png


1578682947074.png


1627185137982.png


1578683525184.png


1589939202420.png

1589933424528.png

1591288486062.png

Suggested Project List:
  1. Ashtray mount for rocker switches or USB ports.
  2. Third row AC redirection duct.
  3. A panel to replace the original panel by the left knee.
  4. Rocker switch mount at the center console pocket (See Make 6).
  5. USB charging port at the back of the center console (See Make 7).
  6. Cup holder
  7. Kenwood TM-V71A remote head mount (See Make 9).
  8. Multi-switch mount with 12V outlet (See Make 10).
  9. Scangauge II mount with 12V outlet (See Make 11).
  10. Something in Door Ashtray Slots (by savirc).
  11. Scangauge II mount for the mini HomeLink console (See Make 12).
  12. Third-row Ashtray Panel (See M16 V1).
  13. Third-row Cup Holder Panel (See Make 18).
  14. Subwoofer Panel
  15. Shifter Knob
  16. Morimoto XB universal kit mount ( from @spaber05)
  17. 7in round headlight replacement (from @jay3253)
  18. Variation of M2 to mount a Ram ball (from @geanes and @gregnash) (See M2 V2)
  19. "...my overhead DVD played didn’t work when I bought the truck. I have no idea what could go there, but it would be pretty cool to see what you come up with! Maybe a pocket for CB radio with some lights on the sides? Or maybe just a piece that holds some LEDs that can be wired into the cargo lights so they come on when the doors open? " (from @aaronrules)
  20. something to fill part of the door slot @Otter
  21. A snap on cover that prevents items from blocking or restricting air intake for those with rear A/C @James Bentley
  22. "Ben, I was thinking about the ash tray in front. I know if I pull the tray out my iPhone 11 (pro) will fit. I was wondering if you could fab up a shelf that could have a built in Qi charger. A person could then enter, slide the phone in and it would charge (and if you had wireless CarPlay or whatever the android version is) you’d be coed free and the phone would be out of the way.“ @CBdeJ
 
Last edited:
That's really nice. Any chance you'll ever design something to replace the piece that the ash tray fits through? I can see that area holding a lot of USB ports.
 
That's really nice. Any chance you'll ever design something to replace the piece that the ash tray fits through? I can see that area holding a lot of USB ports.
I have been looking at that place. It is good place for holding a trailer controller, or USB ports. I will definitely work out something.
 
I would definitely be in for a scanguage Mount with 1 or 2 switches as well up there.
 
Make 2 V1: Single Rocker Switch Mount for Toyota Land Cruiser 100 Series

1 Overview of the Final Product

1591336473167.png


Fig 1 Solidworks Model.jpg


Fig 2 Final Product.jpg


2 Introduction

I was looking for a place for the Blue Sea dual battery switch. And the black panel on the passenger side seems a perfect place for it. The mount holds any standard automotive rocker switch. The curved edge contour and surface need to be matched. The original panel is connected by two snap hooks. The space between the hooks is too small to fit a rocker switch. An alternative mounting method has to be devised. The mount is connected to the main panel by utilizing three existing holes.

Fig 3 Intro.jpg


3 Purchase List to Complete the Installation

None. The mount is shipped with all sanding and painting completed, and with fasteners.

4 Purchase Link

$100 + Shipping (USPS Priority). Printed in black PETG. PM for Direct Paypal Payment or
 
Last edited:
Make 3: Scangauge II Mount for Toyota Tacoma Gen 2

3.1 Overview of the Final Product

1591336676127.png


1591336693693.png


Fig 0 Solid.jpg


3.2 Introduction

After the modeling work is done on the Scangauge II mount for Land Cruiser, I was asked to make the similar mount for Toyota Tacoma Gen 2. As for now, two different overhead consoles were shipped to me. And two types of mounts have been developed. I am only briefly documenting this work.

3.3 Design and Fabrication

The plastic container on Tacoma cannot be removed since it is riveted. This leads to very confined design space. The Scangauge can only be partially inserted into the mount. A more tight clearance is used for better grip. The white cylindrical parts are nylon spacers.

1652287867314.png


Fig 0 Product.jpg


3.4 Purchase List to Complete the Installation

None.

3.5 Purchase Link

$100 + $7.9 (USPS Priority). Printed with ABS. PM for Direct Paypal Payment or

Type 1


Type 2

 
Last edited:
Make 4 V1: Multiple Rock Switches Mount for Toyota Land Cruiser 100 Series

M4V1.1 Overview of the Final Product

1591337074463.png


2019-11-06_11-51-17.jpg


2019-11-07_23-04-12.jpg


M4V1.2 Introduction

The multiple-switch mount is modeled based on one of the requests. Six rocker switches can be mounted.

M4V1.3 Design and Fabrication

The space behind is limited. The depth of a rocker switch is actually much larger than that of a Scangauge. And there has to be some additional space between the roof and the metal blades of the switch to accommodate the wires. Several prototypes have been made to make this right. Starting from Prototype 6, one additional switch pocket is added. Thanks to @anhizer. Any comments are welcomed and appreciated.

2019-11-07_17-23-41.jpg


2019-11-15_21-25-48.jpg


M4V1.4 Purchase List to Complete the Installation

Rocker Switches

Panel Plugs

M4V1.5 Purchase Link

$49 + $7.9 (USPS Priority). Printed with ABS. PM for Direct Paypal Payment or
 
Last edited:
Amazing work! Any plans to 3D print the master power window switch bezel trim as well as the passenger side for 1998-2002 100 series? Mine are shot and prices for used replacements is through the roof.

s-l1600 (1).jpg
 
Thanks for doing this, I just got a 3d printer and I've been playing with it. I know the scan gauge mount and the switch insert for the passenger side panel is available to print. I however had trouble printing the passenger blank upside down because of the curvature, what can I do to print this right?

What I'd like to see is the same insert but blank. I don't know if that makes any sense, the OEM one is thin and brittle a resin would make a great replacement to drill for other things such as a USB plug etc.

It also would be cool to make an insert for the rear passenger insert at the foot of the center console.

Will to pay for these of course if that's the direction you are going
 
Last edited:
Amazing work! Any plans to 3D print the master power window switch bezel trim as well as the passenger side for 1998-2002 100 series? Mine are shot and prices for used replacements is through the roof.

View attachment 2126816
This would be awesome mine are shot as well but I'm not willing to pony up 600+$$$
 
Thanks for doing this, I just got a 3d printer and I've been playing with it. I know the scan gauge mount and the switch insert for the passenger side panel is available to print. I however had trouble printing the passenger blank upside down because of the curvature, what can I do to print this right?

What I'd like to see is the same insert but blank. I don't know if that makes any sense, the OEM one is thin and brittle a resin would make a great replacement to drill for other things such as a USB plug etc.

It also would be cool to make an insert for the rear passenger insert at the foot of the center console.

Will to pay for these of course if that's the direction you are going

FDM printers (printers that use plastic filament) would have difficult making thin structures. Even if you could print it, the part is very fragile. Cured resin is much stronger.

The original panel is black. Why not just use it to drill for other things? Neither PLA, ABS, or cured resin is good for drilling. Cured resin can be sanded though.

Lots of inspirations from the forum. I will take a look.
 
Amazing work! Any plans to 3D print the master power window switch bezel trim as well as the passenger side for 1998-2002 100 series? Mine are shot and prices for used replacements is through the roof.

View attachment 2126816

Would you like to send me your shot bezel trim? The modeling will take several of weeks. Price is probably 49-69 per piece.
 
FDM printers (printers that use plastic filament) would have difficult making thin structures. Even if you could print it, the part is very fragile. Cured resin is much stronger.

The original panel is black. Why not just use it to drill for other things? Neither PLA, ABS, or cured resin is good for drilling. Cured resin can be sanded though.

Lots of inspirations from the forum. I will take a look.

Good to know. The original becomes very fragile after drilling and will eventually crack. This was my experience anyway.

1573071580007.png
 
Good to know. The original becomes very fragile after drilling and will eventually crack. This was my experience anyway.

View attachment 2126845
Drilling on thin cured resin panel is not a good idea.
Do you want to send me your panel with the gauge and indicator? I can take measurement and modify the CAD file to have the mouting holes. Then I can print a panel using tough engineering resin.
 
Nice work! What printer are you using?
Thanks. I have three key shells from you. You did great work.

My FDM printer:
Prusa MK3S
Sindoh 3dwox 1
Makerbot Z18

My SLA printer:
Phrozen Shuffle

I was thinking the other day, if YotaMD could print the keyshell with tough engineering resin.
 
Last edited:

Users who are viewing this thread

Back
Top Bottom