Builds 1991 FJ75 moving to America (2 Viewers)

This site may earn a commission from merchant affiliate
links, including eBay, Amazon, Skimlinks, and others.

You need to split the case and remove gears to unbolt inner case half from trans. You can rebuild on the truck, but for the first time, it is easier to drop the trans/tcase assembly and reassemble on a table.

This is a great rebuild video from Georg.


Overall, just patience and a press for the mainshaft gearset/bearings. Rest can be done with basic tools and a torque meter for the preload.


Very helpful. Thanks!
 
So on my last trip out I ended up with loads of muck/water sprayed up into my engine bay. All the Toyota 4x4's I've owned do a pretty good job of keeping crud out of the engine bay if you keep their original equipment splash guards and fender liner skirts in place. My Troopy lacks a lot of that stuff as discussed in the splash guard thread. So I ordered what I could.

I cleaned my engine bay this past weekend along with the frame and inner fenders and installed the parts.

I also had some perfectly sized M8 gold-cad flange-head bolts leftover from an older set I ordered from @davework. I freakin' love his hardware.
303bolts.jpg


And mounted.
304splashguard.jpg


And it has been raining pretty good here. Drove through a good amount of it today. This has already helped reduce splash into the engine bay.
305rain.jpg


Also did the inner fender skirts. Before installing them I cleaned the areas thoroughly and sprayed some rubberized undercoating in. I like how it turned out so I'm going to do more cleaning, some masking, and coat the entire inner wheel well.

306leftskirt1.jpg

307leftskirt2.jpg

308rightskirt1.jpg

309rightskirt2.jpg

310rightskirt3.jpg


I need to figure out a solution for that last little area without skirting. The original piece seems to be NLA. I'll have to make something on my own.

Small quick project... bolt on and snap on... but a big difference in keeping the engine bay clean and keeping muck out of components and parts.
 
Looks great. You can order small sheets of rubber off McMaster Carr and likely match the OEM skirt material; or at least come pretty close. Not the cheapest source but they sell a lot of materials in 12" square sheets which is probably enough for that spot.

Quite a bit of my fender well undercoating has been sandblasted off over the years. I need to find an undercoating to use on mine before I bring it out of the desert and into the rain.
 
My faith in the truck is growing... a trip last weekend up north (my wife actually drove the Troopy) and this weekend a little short trip 15 minutes up the road. We hit a sand bar on New River, deployed the awning, unfolded chairs, and let the kids play. I can neither confirm nor deny that I may have helped with the small rock dam my kids undertook.

313newriver.jpg


Brewed up some fresh coffee while the kids played in the river...

314coffee.jpg


All in all, the Troopy is proving a worthy successor to our 80-series. Enabling us to get outside with any amenities we may want. As well, with the interior in a barren state the kids can jump in with dirty shoes/feet, wet clothes, etc. and I'm not really bothered. I keep it vacuumed and clean, but the interior is very utilitarian at this point. The next step are some trips further afield with nights spent out.

315newriver.jpg
 
Last edited:
So on my last trip out I ended up with loads of muck/water sprayed up into my engine bay. All the Toyota 4x4's I've owned do a pretty good job of keeping crud out of the engine bay if you keep their original equipment splash guards and fender liner skirts in place. My Troopy lacks a lot of that stuff as discussed in the splash guard thread. So I ordered what I could.

I cleaned my engine bay this past weekend along with the frame and inner fenders and installed the parts.

I also had some perfectly sized M8 gold-cad flange-head bolts leftover from an older set I ordered from @davework. I freakin' love his hardware.
303bolts.jpg


And mounted.
304splashguard.jpg


And it has been raining pretty good here. Drove through a good amount of it today. This has already helped reduce splash into the engine bay.
305rain.jpg


Also did the inner fender skirts. Before installing them I cleaned the areas thoroughly and sprayed some rubberized undercoating in. I like how it turned out so I'm going to do more cleaning, some masking, and coat the entire inner wheel well.

306leftskirt1.jpg

307leftskirt2.jpg

308rightskirt1.jpg

309rightskirt2.jpg

310rightskirt3.jpg


I need to figure out a solution for that last little area without skirting. The original piece seems to be NLA. I'll have to make something on my own.

Small quick project... bolt on and snap on... but a big difference in keeping the engine bay clean and keeping muck out of components and parts.
the last picture with the short splash guard is where the exhaust runs through on most diesel models.
 
I showed some cut plywood a few posts back... and they were the start of a rear platform to serve as a foundation for building out and organizing the back. There is so much room in the back of a Troopy even after the addition of the transverse bench seat. It's nearly a big empty cube of area except for the wheel wells.

I use t-nuts in the top surface of the plywood to secure platform from underneath. M8 bolts with nice wide fender washers stick up through existing holes in the bottom of the tub. And t-nuts on the bottom surface of the plywood let me secure eyebolts into the top for securing our fridge.

296anchors.jpg


297tnuts.jpg


I've used this turnbuckle and cable arrangement to hold this fridge in two previous platforms... in our 80-series and before that an FJ Cruiser. The fridge has never budged with this arrangement.

298layout.jpg


I've created a platform next to the fridge that extends over the passenger wheel well. This empty slot is 4' deep and will likely become a drawer.

299slot.jpg


I've created several areas that I'll need to get creative in using...

300cubby.jpg

301stowage.jpg

302behindfridge.jpg
 
Battery; Battery Cables
The state of my electrical situation under the hood has needed help...

The battery actually is pretty solid, but the connections and cables were out of sort.
316existingbatt.jpg


The positive terminal connection... ugh...
317pluslug.jpg


And a bunch more of Oman's fesh-fesh was caked under the battery and the tray...
318soiled.jpg

321undertray.jpg


The harness was barely attached and the fusible link was bypassed (not sure why they left it on!).
319harness.jpg


I need to figure a good way to create a new fusible link. This part is NLA. Have toyed with ordering a newer one from a later model 70-series and wiring it in.
320fusible.jpg


The tray cleaned up surprisingly well. I also repainted the brackets.
322cleantray.jpg

323paintedbrackets.jpg


And new battery cable lugs.
324newlugs.jpg


And prepping for new cables.
325newgrounds.jpg


And back together...
326cleaninstall.jpg

327batteryin.jpg


A quick and simple clean up job. I swear my headlights got brighter...
 
Oh man.....the wiring. Lol. I think your truck and mine had the same "mechanics".
 
The state of my electrical situation under the hood has needed help...

The battery actually is pretty solid, but the connections and cables were out of sort.
316existingbatt.jpg


The positive terminal connection... ugh...
317pluslug.jpg


And a bunch more of Oman's fesh-fesh was caked under the battery and the tray...
318soiled.jpg

321undertray.jpg


The harness was barely attached and the fusible link was bypassed (not sure why they left it on!).
319harness.jpg


I need to figure a good way to create a new fusible link. This part is NLA. Have toyed with ordering a newer one from a later model 70-series and wiring it in.
320fusible.jpg


The tray cleaned up surprisingly well. I also repainted the brackets.
322cleantray.jpg

323paintedbrackets.jpg


And new battery cable lugs.
324newlugs.jpg


And prepping for new cables.
325newgrounds.jpg


And back together...
326cleaninstall.jpg

327batteryin.jpg


A quick and simple clean up job. I swear my headlights got brighter...

Nice work! So did you end up using a circuit breaker for a fusible link? Thinking of doing similar on some of our projects.
 
Oh man.....the wiring. Lol. I think your truck and mine had the same "mechanics".

It's low-wage import labor asked to keep things running and given no cash to invest in appropriate tools or supplies... often times I marvel at the "innovation" of the solutions while also being horrified by the implementation. Ha!

Nice work! So did you end up using a circuit breaker for a fusible link? Thinking of doing similar on some of our projects.

No. The circuit breaker you see on the firewall was being test fit for another project.

I've not solved the lack of fusible link. Fusible links are basically a slow-blow fuse. For some sort of sustained current draw that doesn't blow a fuse and yet stresses the harness. The fusible link will warm up and fuse before any part of the harness. It's kind of a back-up protection to save the harness. A circuit breaker doesn't offer that same protection. The whole harness will warm up before the breaker trips. I'm thinking of just buying the fusible links for a late-model 70-series or even an 80-series. But these would be higher amperage ratings than it would have had in 1991... but that may suit me better since I'm upgrading the alternator.
 
Rear Power; Onboard Air Compressor
With the battery terminations brought up to standard it was time to get some power to the back of the truck... for at least my fridge/freeze and on-board compressor. This setup mimics what I'd done in my 80-series in the UAE. Very helpful and practical upgrades.

Started with a 100-amp circuit-breaker protected run of 4AWG cable running through the truck...

Runs from the battery to driver's side of the truck and then into the cabin via the harness gasket.
339cablestorear.jpg


Runs under the front mat along the doorsill, up into the back of the cabin and into the rear panel area, and terminates at the intended location of the accessories. Running with the power cables is an extension of the relay control for the compressor.
340terminations.jpg


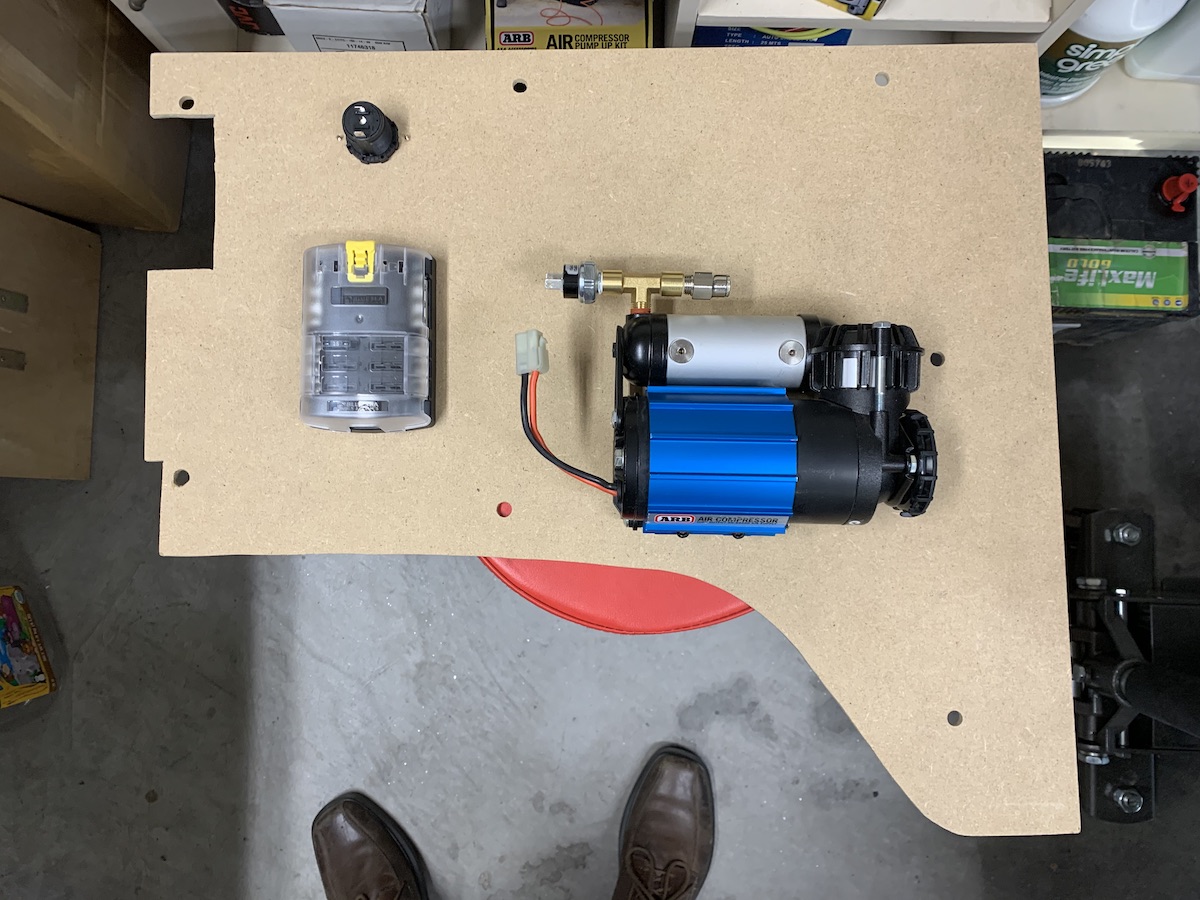
Here are the accessories mounted on some MDF cut to make a panel. This is a temporary setup to see how well I could get things mounted and cut to fit. I'm going to do some nice plywood for all panels at some point. A Bluesea fuse block, Bluesea 12V socket, and an ARB compressor. The fuse block will eventually power a few more sockets, USB outlets, and interior lighting.
341mounted.jpeg


Four mounting the panel I was tempted to use rivnuts in the existing holes intended for the snap-in plastic pieces. But instead I used cage nuts (an idea from the Troopcarriers of Australia CAD file). These are M6 cage nuts from McMaster Carr, similar to those used in service racks. Take the round holes and file them square...
345round.jpeg

346square.jpeg


And cage nut pops right in and gives you a semi-floating nut to screw into... which gives you some looser tolerances in the alignment of your panel mounting holes.
347cagenut.jpeg


And then I used some flathead screws and countersunk washers for securing the panel.
348panel.jpg


I'm a bit bummed by the mounting hardware for the compressor and fuse block giving the panel a busy appearance, but I'm unsure how to mount without that happening. And this is a function-over-form setup for now.

I cleaned up my ARB quick-disconnect and painted up the mounting bracket (same one I used on my 80). Bought some @NLXTACY kit... a pacifier for the disconnect, as well as 3/8" tube and push fittings. If you have an 80-series there's lot of good stuff available from him.
342disconnect.jpg


The compressor fits into the panel cavity area really well.
343compressor.jpg


And the disconnect is mounted to the inside of the rear crossmember and plumbed through the same gasket as the rear harness.
344mounted.jpg


Switch has been wired in to the left of the steering wheel in one of the blanks. It illuminates with the other instruments and gauges and is only hot when the ignition is hot.
349switch.jpg


And now I've got full time power for my fridge freeze and on-board air. Handy.
 
The state of my electrical situation under the hood has needed help...

The battery actually is pretty solid, but the connections and cables were out of sort.

The harness was barely attached and the fusible link was bypassed (not sure why they left it on!).

I need to figure a good way to create a new fusible link. This part is NLA. Have toyed with ordering a newer one from a later model 70-series and wiring it in.

A quick and simple clean up job. I swear my headlights got brighter...

Hello,

POs have a tendency to fry fusible links and then leave the mess.

Yes, the part is discontinued. You can use the one for the 1HZ engine, 82627-60020.

Hope this helps.


Juan
 
Hello,

POs have a tendency to fry fusible links and then leave the mess.

Yes, the part is discontinued. You can use the one for the 1HZ engine, 82627-60020.

Hope this helps.


Juan

Thanks for the pointer on that!
Is there some sort of terminal block that terminates to?

I'm also considering some of the Cooper Bussman fusible link wire that I can self-terminate into my harness.
 
You might ping @Coolerman and see if he has a solution. If I recall fuseable links color tells you the size, and I know I bought some sections years ago to be able to replace sections.

anyway, coolerman has made several different ones over the years.

 
You might ping @Coolerman and see if he has a solution. If I recall fuseable links color tells you the size, and I know I bought some sections years ago to be able to replace sections.

anyway, coolerman has made several different ones over the years.


Man, I'm really not sure why I didn't think of this... I've got one of his links in my 40 (and a spare in my glovebox). And I just ordered an 80-series alternator plug from him for an upgrade to the Troopy (like the 60-series guys do).
 
Thanks for the pointer on that!
Is there some sort of terminal block that terminates to?

I'm also considering some of the Cooper Bussman fusible link wire that I can self-terminate into my harness.

Hello,

A picture here. The upper part bolts on to the battery terminal.

FZJ73 9.11.17 2.JPG


The harness can bolt on to one of the two lower terminals. For the other you need a connector.

Hope this helps.


Juan
 
Hello,

A picture here. The upper part bolts on to the battery terminal.

View attachment 2306514

The harness can bolt on to one of the two lower terminals. For the other you need a connector.

Hope this helps.


Juan

I don't have the two lower terminals. I'd also need to source the other end of the connector. My harness only has two wires fed by fusible link.

I'm exploring a couple options... will up date on what I do to resolve this.
 
Last edited:
Absolutely correct. You may not get caught, but why risk it?

It's OK to import a vehicle with the original petrol (gasoline) engine to the USA (i.e. it will meet all Federal NHTSA, EPA, and Customs requirements), you just won't likely be able to register it once you get it here (because it won't conform to State and Local emissions requirements) . The solution is obvious, especially if you want a diesel anyway--import it with the original petrol engine, then do your motor swap before you register it.

Could you elaborate on this? I understand waiting to do the engine swap until after the vehicle is imported. But why is it important to do the engine swap before you register it?

In Texas, registering a vehicle 25 years or older is pretty straightforward. I’m not even sure “engine type” is information the State of Texas is gathering during registration.
This would be for getting through customs, just in case someone looks closer. Once past customs I guess do what ever you want, as far as your state/city will allow.
 

Users who are viewing this thread

Back
Top Bottom