Builds 79 Aussie BJ55 build (7 Viewers)

This site may earn a commission from merchant affiliate
links, including eBay, Amazon, Skimlinks, and others.

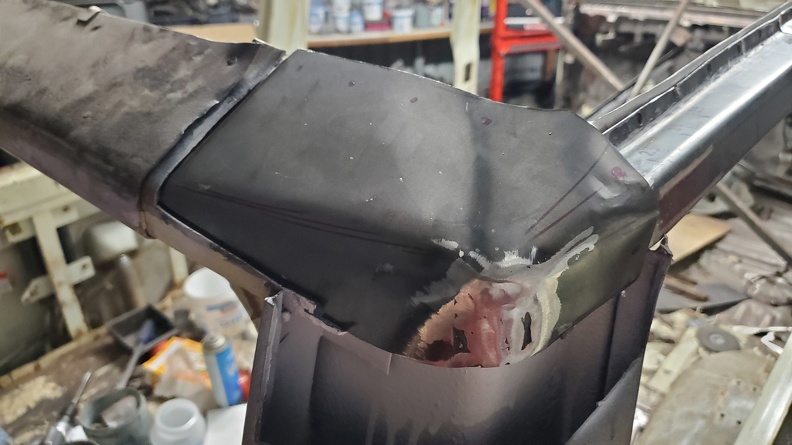
It was difficult to get the flap disk in to clean the welds up and you can see its not the greatest. I was trying hard not to grind through the thinner panel of the 55 but anyway.. some body filler should help come paint time..

20200119033611-849834bc-me.jpg

20200119033638-2efa1e5d-me.jpg
20200119033643-368f7e77-me.jpg

20200119033627-f717bdad-me.jpg


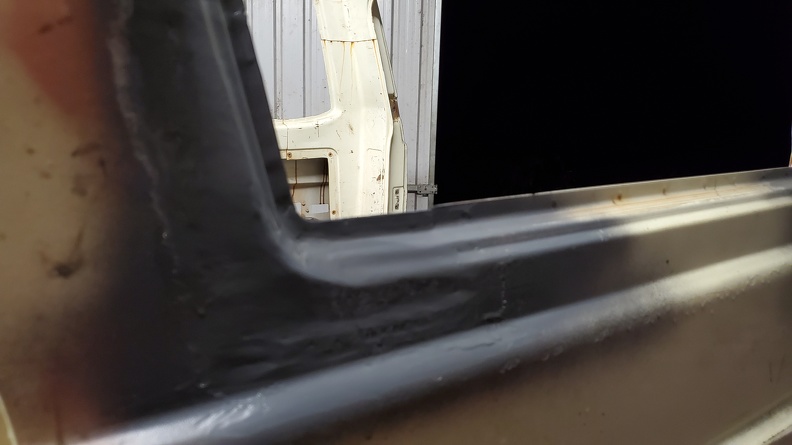
I also used my new air hammer and chisel bit to remove the drivers side roof channel in record time..
20200119033556-dff23f52-me.jpg

20200119033602-34ca9ee1-me.jpg
20200119033622-61304930-me.jpg
20200119033607-df5090e9-me.jpg

The inside of the roof channel at the driver is so pitted its got pin holes so that may need replacing too.
 
In other news, the wife has named my pig.. FRANKEN-SWINE!... I think its fits rather well with its barstardised upbringing.
I've also had the last two nights off from the shed.. the wife is heading away with 2 of 3 kids tomorrow so I was loitering around to be helpful but have not been needed. at least i get some early nights..
 
Last edited:
Tonights effort.. the channel above the rear glass was measured up, cut out and bent up.. a little more massaging required but not too bad of a result..
20200122040412-95c56754-me.jpg

20200122040849-80601f73-me.jpg


And the other bits of the window channel to put together..
20200122040854-8ee2051f-me.jpg


I'll try and get these all glued together ready for installation on friday as I have the day off.. otherwise it shouldn't take much to get it sorted by the weekend at least.
 
Man you are an animal, I get tired just looking at all your good work.

This pig wont fix itself! with the wife and girls away I had a great sleep last night and feel pretty darn refreshed, ready to smash out the next few days
 
Got my bits glued together tonight.. need some new flap disks to clean them up proper..

20200123034058-013b9512-me.jpg


Also got the replacement 20T jack in for the press last night.. and then tonight i notice this..
20200123034102-24c3a4a4-me.jpg

Yay for quality ebay goods from china!

Also a photo of the pitting just after the A Pillar:
20200123034053-0a0ac792-me.jpg


I've been running off a to do list recently with the "next few things" to do on the build, except since hitting the drivers side roof channel have been a bit generous with my descriptions in whats required.. I've found that by breaking down things into bodies of smaller bits of work its easier to plan, execute and move onto the next bit.. helps with planning too..
 
Tonights installment..

B and C pillar outers welded in
20200106041731-325cf998-me.jpg

20200106041713-2c3e8e38-me.jpg

20200106041725-fccc9d01-me.jpg


And fixed the inside upper windscreen support:

before..
20200104024245-6ff7aa54-me.jpg


replacement bit:
20200106041708-e1ece527-me.jpg

20200106041658-5e5b49ba-me.jpg
20200106041652-28dffefb-me.jpg
20200106041645-a6aa2024-me.jpg


oh and welded some captured nuts for 80 series A pillar grab handles.
20200106041703-d5a9f941-me.jpg

Your work is about 1 step shy of PFM...
 
roof repairs 5
Late start (again woke at 8.30am.. a consequence of your 6yr old alarm clock on holidays) and hit the shed about lunch time..

Removed the rust n crap above the B and C pillar
20200123215643-8b5823f9-me.jpg

20200123215649-d0ba6f7d-me.jpg

20200123215653-eb18cf0d-me.jpg


Inner channel channel cleaned up and first coat of primer
20200123215717-37dfad87-me.jpg
20200123215721-c3be7850-me.jpg

20200123215739-76da2c7e-me.jpg


quick mock up of the roof sections going in
20200123215703-3a2920de-me.jpg
20200123215708-9186bac8-me.jpg
20200123215713-3321844c-me.jpg


Lasty finished up the roof channel outers ready for paint.. (end relief is for the d pillar corner to overlap and tie in)
20200123215730-b4e9233a-me.jpg

20200123215735-87aa7cd3-me.jpg


And this is the tie in from the rear window section to the door sections..
20200123215745-c9dd4268-me.jpg

20200123215750-1b4b4a2c-me.jpg


These bits are all cleaned up and copping a few coats of primer..

also removed the seat belt mounts from my donor.. I need to work with the engineer to figure out how I can hot glue these in for the 2nd row.
20200123215725-5d54083e-me.jpg
 
Navy term = Pure F’n Magic
Used when explaining complex procedures or systems!

I know right!!!!
I haven't seen this degree of dedication since Tat Tat...

You guys are too kind! I'm just an IT nerd hack trying my best to glue metal into a working Pig :p
 
Formed the D pillar inner section tonight..

(what it used to look like)
20200125050149-175a19ed-me.jpg

20200125050210-69cffca9-me.jpg


20200125050144-ff3f1018-me.jpg
20200125050153-4dacae1a-me.jpg

20200125050157-17a2855c-me.jpg


And outer D pillar too!
Before
20200125050236-9aa03a0d-me.jpg

after!
20200125050202-f13dd66e-me.jpg

The outer overlaps pretty good.
20200125050215-d3a5ce1f-me.jpg
20200125050220-15d706d2-me.jpg


main roof channel painted, drilled and weld through primered
20200125050231-11b55cb8-me.jpg
 
This is the result of 3.5hrs in the shed.

Drivers side inner panel rust removed and replaced (still needs cleaning up)
20200126050655-321d0686-me.jpg

Top of b-pillar (still need some trimming, massaging and finger filing)
20200126050701-18fa1276-me.jpg
 
Been sealing the rust at the top of the B and C pillars with my rust converter/sealer/primer throughout yesterday.. the boy was a bit slow with dinner and bed and it was past 9pm before i had a chance to head to the shed so gave it a miss lasts night.. will try and get in there tonight though to start sticking bits together..
 
Got the roof channel on tonight and D pillar welded out, was going to tackle the B pillar but pretty beat and its late.. it'll keep for tomorrow night!
20200128042334-7731ae9e-me.jpg

20200128042407-754ba2b5-me.jpg

20200128042402-b29731c7-me.jpg
20200128042343-81408dce-me.jpg
20200128042348-4c093bc0-me.jpg
20200128042357-1aeb3855-me.jpg
 
B and C pillars done
20200129043805-48951080-me.jpg
20200129043809-ee1e97f0-me.jpg
20200129043815-46d58da7-me.jpg
20200129043819-b16da34c-me.jpg

The B pillar needs more love with a grinder and flap disk
20200129043825-760eb0ab-me.jpg

Theres a few holes on this that need following up with after too..

next on to the A pillar! YAY!
 
roof repairs 6
Started on removing the crud from the A pillar tonight.. didnt get an overall shot of progress tonight but will tomorrow.. tonight its just bits of rust.. yay

Starting from the top down
20200130035729-9f497c2e-me.jpg

20200130035744-90300742-me.jpg

20200130035817-40d89953-me.jpg


inside the mid section.. the thickness looks pretty good here so this might clean up well.. i'll have to see.. Still pretty heavy surface rust.
20200130035806-958eb3c2-me.jpg

Bottom of A Pillar
20200130035735-c466e339-me.jpg
20200130035754-fcceca6f-me.jpg
20200130035800-0765e5f7-me.jpg
20200130035748-e6039337-me.jpg
 

Users who are viewing this thread

Back
Top Bottom