Builds 1991 FJ75 moving to America (29 Viewers)

This site may earn a commission from merchant affiliate
links, including eBay, Amazon, Skimlinks, and others.

We tried to go camping a few weeks ago... loaded up, headed up on the Mogollon Rim and Forest Road 300... it was pouring rain, lightning, thunder, etc. It had been raining on and off all week and everything was just saturated. We bailed and headed back home. But hey, misty photo of the Troopy while up at elevation in the storm clouds!

608mistywoods.jpg
 
More progress on the interior clean-up.

Back when I did the initial cleaning of the cabin interior roof I stopped short of the rear AC unit and middle ceiling crossmember. I left some of the old foam and dirt/residue in the forward section of the cab for "later". I removed the secondary AC a few months back as it took up space and with window tinting the front AC is plenty. This made it possible to get the front cleaned up.

So before commencing I stripped out the rear deck and all the seats. I love that with the removal of 16 bolts the Troopy interior looks like this:
609stripped.jpg


Was pleased to find more shell casings than when I originally bought the truck. This is mostly owing to my kids squirreling away a bunch of them and spilling them at some point.
610shells.jpg


While I had things like this I also had some additional work to do patching a few remaining holes in the floor. One of which was the large hole that the second AC hoses passed through. So I used my "sheet metal and construction adhesive with a coat of Master Series" treatment. I cut pieces of sheet metal to fit over the holes. I grind/sand around the wholes to expose bare metal. I coat the bare metal with Master Series. Then I glue down the patch with Liquid Nails Fuze It. Finally, I take a flap disc to the finished patch to smooth it out and do a final coat of master series.
611bighole.jpg


And there were a few holes in the transmission tunnel.
612tunnelholes.jpg


And sadly, with the clean up of the roof I found a bunch of rivets/holes in the front of the cab roof. I went ahead and removed the rivets and implemented my "patches" there as well. Not a final solution. But this stops water ingress and takes care of things til I have time/inclination to properly weld in new metal and repaint.
613roofholes.jpg


When the time comes for me to really have a go at fixing the tub I can easily knock my patches off with a grinder or flap disk and do a proper welded fix. But in the meantime, this seals up the cab and keeps me trucking. This also abates rust issues. The Troopy isn't meant to be a beauty queen... it's meant to keep my family reliably exploring AZ and the Southwest.

Here's the final coat of Master Coat on the roof.
614mastercoat.jpg


And following that I've added more Damplifier Pro.
615moredamplifier.jpg

616finaldamp.jpg


Next step will be a coating of Spectrum over the whole roof area.
 
While I had things opened up this far I went ahead and wrapped up my interior panels. I'd done most of the measuring/cutting previously but just hadn't gotten things wrapped up. I'm just using eucaboard at this point as it let's me get a feel for fit/finish of my measurements and mounting holes. I'm still squaring out the mounting holes and adding M6 cage nuts then securing the panels with M6 button heads and countersunk washers.

While in here I ran wiring for additional 12V outlets as well as cleaned up some issues with the existing rear harness.

617panelswiring.jpg


Got OEM parts to run the front retractable belts through the panels.

618seatbelttrim.jpg

619trimscrews.jpg


Panels completed and installed. The kids' bench seat has a dual USB port on one side and a 12V on the other. The rear already had a 12V port for the fridge and I added another 12V to the passenger side at the very back. Handy for plugging things in right at the back of the truck and near the barn door I plan on putting a flip down table on. All power ports are wired into a Blue Sea fuse block.

620drvpanels.jpg

621passpanels.jpg

622cavern.jpg
 
Coming along nicely!
 
Earlier this year when I dove into the dash and installed my new heater assembly and core it was late Spring and I really didn't need a heater. So, I capped the lines and left the heater pull cable hanging.
623roughedin.jpg


Well, colder weather has set in. Also, we had a trip to go up on the Rim and cut down our own Christmas tree which meant colder mountain weather. Last year we were all freezing in the Troopy the first part of the drive back down the mountain... a heater is needed.

The currently available OEM 70-series heater valve fits like a glove... bolt hole, heater pull, and outlet from heater core. However, the inlet is on the wrong side of the valve.
624valve.jpg


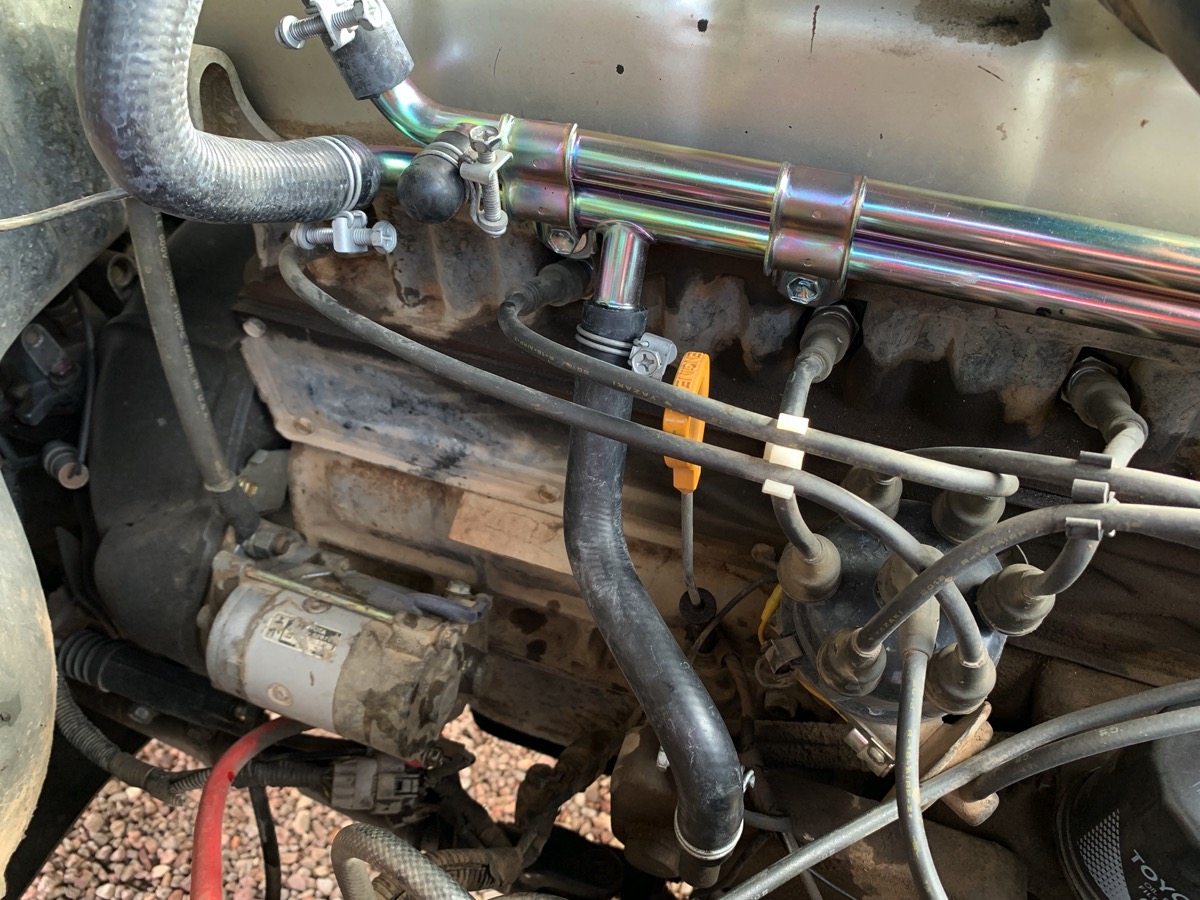
That wrong-sided inlet necessitated some creative hose routing with some pre-formed Gates hoses.
625rearplumbing.jpg


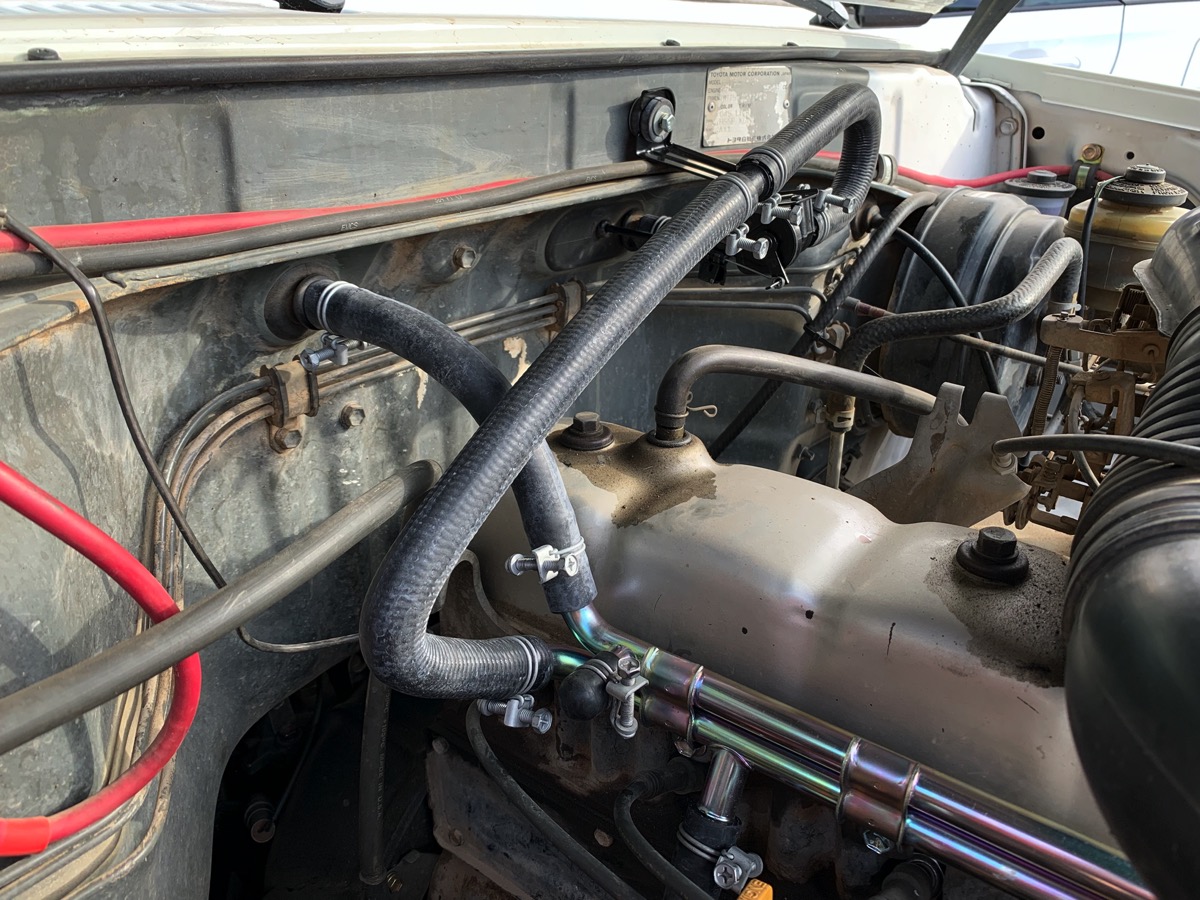
A new heater hose pipe provides for all the required routing including the oil cooler.
626oilcooler.jpg


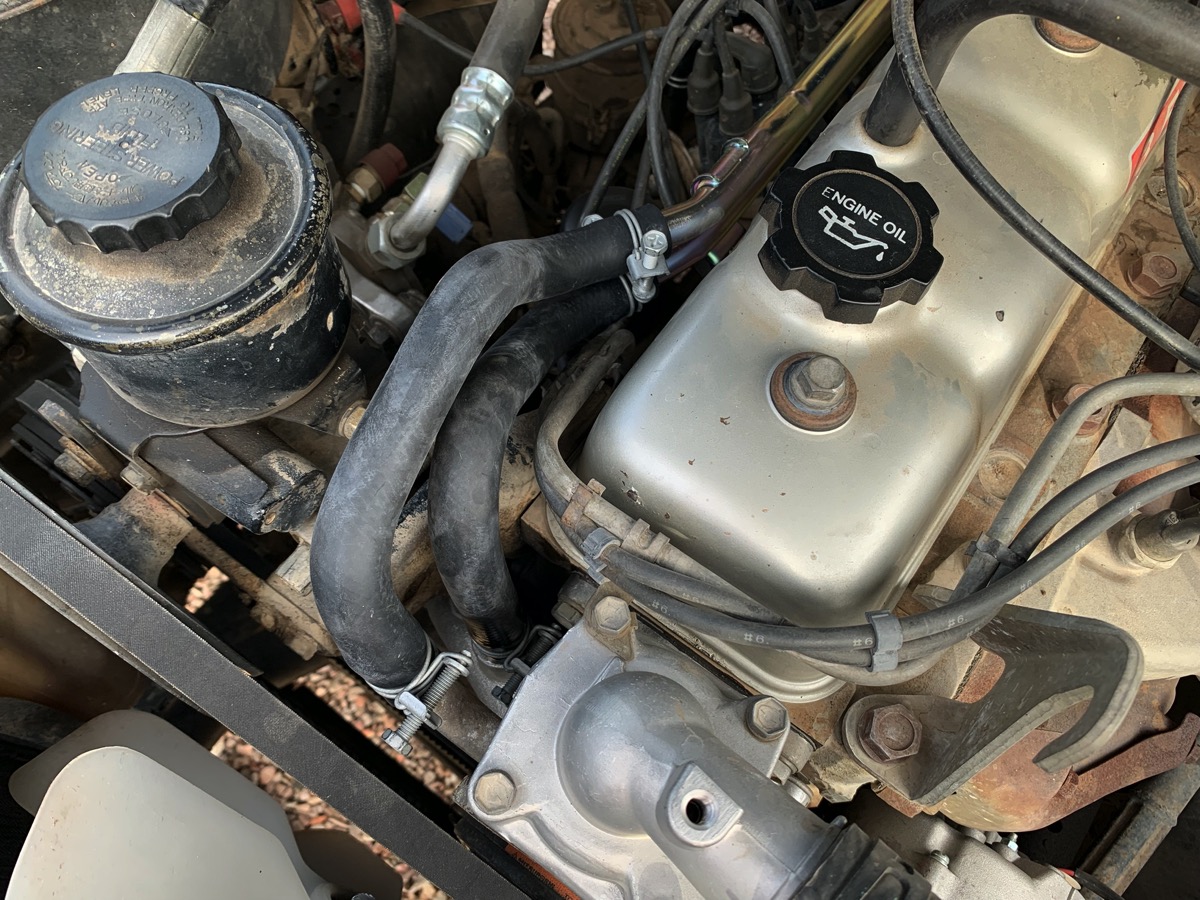
And the front hoses to the water pump/thermometer housing.
627frontplumbing.jpg
 
Last edited:
My Omani troopy does not even have holes in the firewall for the heater pipes. I've got a heater box and rebuilt and tested heater core ready to go but I need to cut the holes in the firewall. There are two styles of pre-2000 70 series heater boxes I have seen, one where the tubes are far apart, like yours, and the other where they are close together. I will be using one like yours, where the piping through the firewall is far apart. Still mulling over how to cut the oblong hole.

In Jr. High school in metal shop we used a nibbler exactly like this:
1638956113747.png

Made by Adel Tool Co. Now it comes up as 'vintage'. Not sure it would be up to the firewall thickness sheetmetal that Mr. Toyoda's engineers used.

They have a website but the ebay listing shows as ended a year ago. I used that thing a lot in metal shop.... Makes me sad sometimes to think that kids don't get that kind of experience in school much any more.
 
My Omani troopy does not even have holes in the firewall for the heater pipes. I've got a heater box and rebuilt and tested heater core ready to go but I need to cut the holes in the firewall. There are two styles of pre-2000 70 series heater boxes I have seen, one where the tubes are far apart, like yours, and the other where they are close together. I will be using one like yours, where the piping through the firewall is far apart. Still mulling over how to cut the oblong hole.

In Jr. High school in metal shop we used a nibbler exactly like this:
View attachment 2858795
Made by Adel Tool Co. Now it comes up as 'vintage'. Not sure it would be up to the firewall thickness sheetmetal that Mr. Toyoda's engineers used.

They have a website but the ebay listing shows as ended a year ago. I used that thing a lot in metal shop.... Makes me sad sometimes to think that kids don't get that kind of experience in school much any more.
Mine did not have the holes either… I drilled them out. Have a look at Post 482 in this thread.

There were pre-formed bulges in the firewall corresponding to where the openings should be.

I used a step drill bit to drill them out. For the wider hole I actually drilled two holes and then used a Dremel cut off wheel to join them up and get the correct size. I primed the new exposed edges before putting the grommets in.
 
Looking great!

Boy troopies are cavernous.

It's crazy how much space there is with nothing inside. With everything removed like that the kids love to climb in and play inside.

With a combined heat/AC system now in place I needed a new control panel face. I still had the old heat-only face installed from my earlier work. And since @svsisu had already hooked me up with some new skinny knobs, I sprang for knew knobs on the fan/AC switch.
638controls.jpg

639newcontrols.jpg


Testing out the heater... blowing plenty hot. This was running at idle while burping the coolant. Ambient temp was about 75-degrees.
640heat.jpg
Thanks for posting the Toyota part numbers for the A/C controls. I'm about to do this same task. Following for wiring tips!
 
Thanks for posting the Toyota part numbers for the A/C controls. I'm about to do this same task. Following for wiring tips!
What wiring questions do you have?
 
While I had everything stripped down I finally got around to troubleshooting my dome lights. I had the main cabin one but the rear was missing, so I ordered that up:
644rearlamp.jpg


And dove into the rear harness...
641harness.jpg


And with some luck I found two spots where the dome light circuit had fused a long time back... and moisture had corroded those spots badly.
642fusedwire.jpg

643fusedagain.jpg


I replaced the fused sections with a closed-barrel butt splice and rewrapped the harness.

And I have dome lights!
645domes.jpg


This has been a huge improvement. A few nights ago I had to fetch something out of the truck in the driveway and when I opened the door and the domes kicked on I had the biggest grin. SO nice to be able to see in the dark of the car.

I put LED lamps in... but they aren't matching. I need to straighten that out.
I need to do this, my dome lights haven't been working since I got the Cruiser back on the road and with the darkness of winter it is really starting to annoy me!
 
I need to do this, my dome lights haven't been working since I got the Cruiser back on the road and with the darkness of winter it is really starting to annoy me!
Find the wiring diagram for your truck before you start troubleshooting this... unless you have an obvious bit of damage. The two different dome lights in my Troopy are wired differently for "ON" vs. "DOOR" which was throwing me for a loop when I was trying to find continuity and voltage.

Also, I actually fixed it twice. I found the first fused spot, cut it out and spliced, and then found I still had no continuity. So when you find "the spot" go ahead and check both sides of the fault for continuity to make sure you don't actually have a second problem spot.
 
Here's the diagram actually... you can see that for the main cabin light "OFF" shorts to ground. Whereas with the second light "ON" shorts to ground. This doesn't make a lick of sense until you see the way the main cabin light is made. The main thing is that without understanding this I was chasing an "issue" with the switched circuit that just wasn't there.

655domediagram.jpg
 
very nice Honger,,,, i have a few parts yet to collect but am just about ready to get heat in mine, heater valve came from a toyota car during a junkyard day with my son.

i also got domes working, thanks in part to the very same junkyard day in Phx, toyota car to the rescue again, combined with the LED parts Odd Iron sells, VERY bright, perfect for camping.

which we need to do BTW.
 
Back when I did the dash teardown/rebuild I installed a plastic project box on top to hold my solar controller bluetooth dongle as well as a GPS antenna. GaiaGPS has been super helpful as we explore the state, particularly in charting out the game and Christmas tree hunting zones. I'd grabbed a usb charger meant for motorcycles to hardwire and provide power to the GPS antenna.

I tapped in behind the cigarette lighter. Properly crimped and then heat shrunk.
647powertap.jpg


Then inside the dash I ran the usb charger up into the housing.
646usbpower.jpg


This charger is pretty nice... it has a built in voltmeter as well as it's own on/off button. The Bad Elf GPS antenna is plugged into the power and there is a cable from the Bad Elf to the lightning connector (for iPhone or iPad). This lets either device have full GPS functionality even when out of cell range (kind of the point of getting out there!).

The Bad Elf has it's own interface app.
648badelf.jpg


And it runs in the background so that GaiaGPS has full functionality. Coupled with the ability to download map sets by destination/area, we have a nice set of maps ready to go even while out in the sticks.
649gaia.jpg


And I can also check on my solar set up.
650solar.jpg
 

Users who are viewing this thread

Back
Top Bottom