Builds Travis’s PNW LX570 (6 Viewers)

This site may earn a commission from merchant affiliate
links, including eBay, Amazon, Skimlinks, and others.

The rear cargo box is a sweet fix. Easy to store when not in use.
My apologies

I didn’t even see the rear cargo box! I was looking at the roof box and was wondering why you were quoting me, when I said I had the 21 cubic feet roof box already same as yours :D

Now makes sense. Sorry after Thursday night of debauchery, unbeffiting any Ih8mud meMber, I wasn’t seeeing things right


Rear cargo box would be great fit, but that’s where my 4 bike rack goes :(
I’m in the same boat . I think a off-road trailer is my next purchase. Load the trailer up bikes /camp/fish gear etc. and go. My kinds a little right now but I’m a couple years I’ll need a bigger boat.
Not always but sometimes.
 
I’m in the same boat . I think a off-road trailer is my next purchase. Load the trailer up bikes /camp/fish gear etc. and go. My kinds a little right now but I’m a couple years I’ll need a bigger boat.
Not always but sometimes.
I have a motorcycle trailer for my Ducatis

I plan to use that on my next vacation :)
 
Lesson learned!

I wanted to swap out my OEM fogs for yellow bulbs. Instead of going with Hella bulbs like I had planned, I took a chance on some LEDs. Mistake.

First of all, they weren’t that rich, contrast-enhancing yellow. More like neon. Or maybe pee. Undecided.

50T3f8a.jpg


Second issue: the housings fogged up after a few days with condensation:

SanSH5m.jpg


Today I pulled the LEDs and found them to also be full of moisture:

rCi97Kd.jpg


I stuck my air compressor nozzle into each hosing and blew out as much moisture as possible. Ideally I would have let them dry for a few days, but’s it’s perpetually wet this time of year in PNW.

I tossed those bulbs and got the genuine Hella 55w optilux bulbs. This time I put a thin film of dielectric grease on the seals hoping it will keep hosings dry.

Quality of light and color are so much better:

TDJ3y5H.jpg
 
Drawers
I've fallen deep down the rabbit hole and decided to build my own drawer system-despite having zero wood working/carpentry experience. My initial plan was to wait for Dave, but he's a very busy man and there isn't currently a timeline for 200-specific KISS drawers.

Step 0: Research

I'm a product designer in my professional life, so I approached this like any other problem and started by trying to educate myself.

8yAOydv.png


These three resources really helped me:

Aside: Deconstructing Dave's KISS drawers made me really appreciate the amount of care he put into designing them. So many little details in his design.

Step 1: Constraints

First, I need to understand the footprint I had to work with. I took some measurements and scaled a trunk mat to get the approximate layout. The only critical measurement is the 41.5" between the wheel wells. I decided to make my drawers 40" long to leave plenty of room for the power second row (my kids constantly fidget with it).

9wLJaOU.jpg


Next is to establish drawer height. My wife and I are short (I'm 5'6") so anything too tall would mean we couldn't reach our ARB 50L fridge. We got a good bit of perspective checking out the Adventure Ready 80 series. It has a ~3" lift and ARB drawers (which are about 12" high):

CBhBWMa.jpg


Even with the drop slide (which is crazy expensive!), the fridge was a touch reach for us. So I went home and started making some physical mockups. I wanted to visualize a 10" drawer height—this tub was closest thing I had (~11" high):

8Mm723u.jpg


The killer AHC feature is comfort access, which drops the rig to her bump stops on exit. This will be very helpful for two shorties like us. If my calculations are correct, the fridge opening should be between 26-28" off the tailgate on level ground. We can work with that.

oQcN7X2.jpg


Next, I had to convince my wife that our s*** would fit into 2 drawers. More physical mockups:

LqQlKIh.jpg


VmET0QZ.jpg


We still have tents and bags and chairs, but those will go on the roof. Success.


Version 1: Copy what Dave did

I didn't get very far here :) 
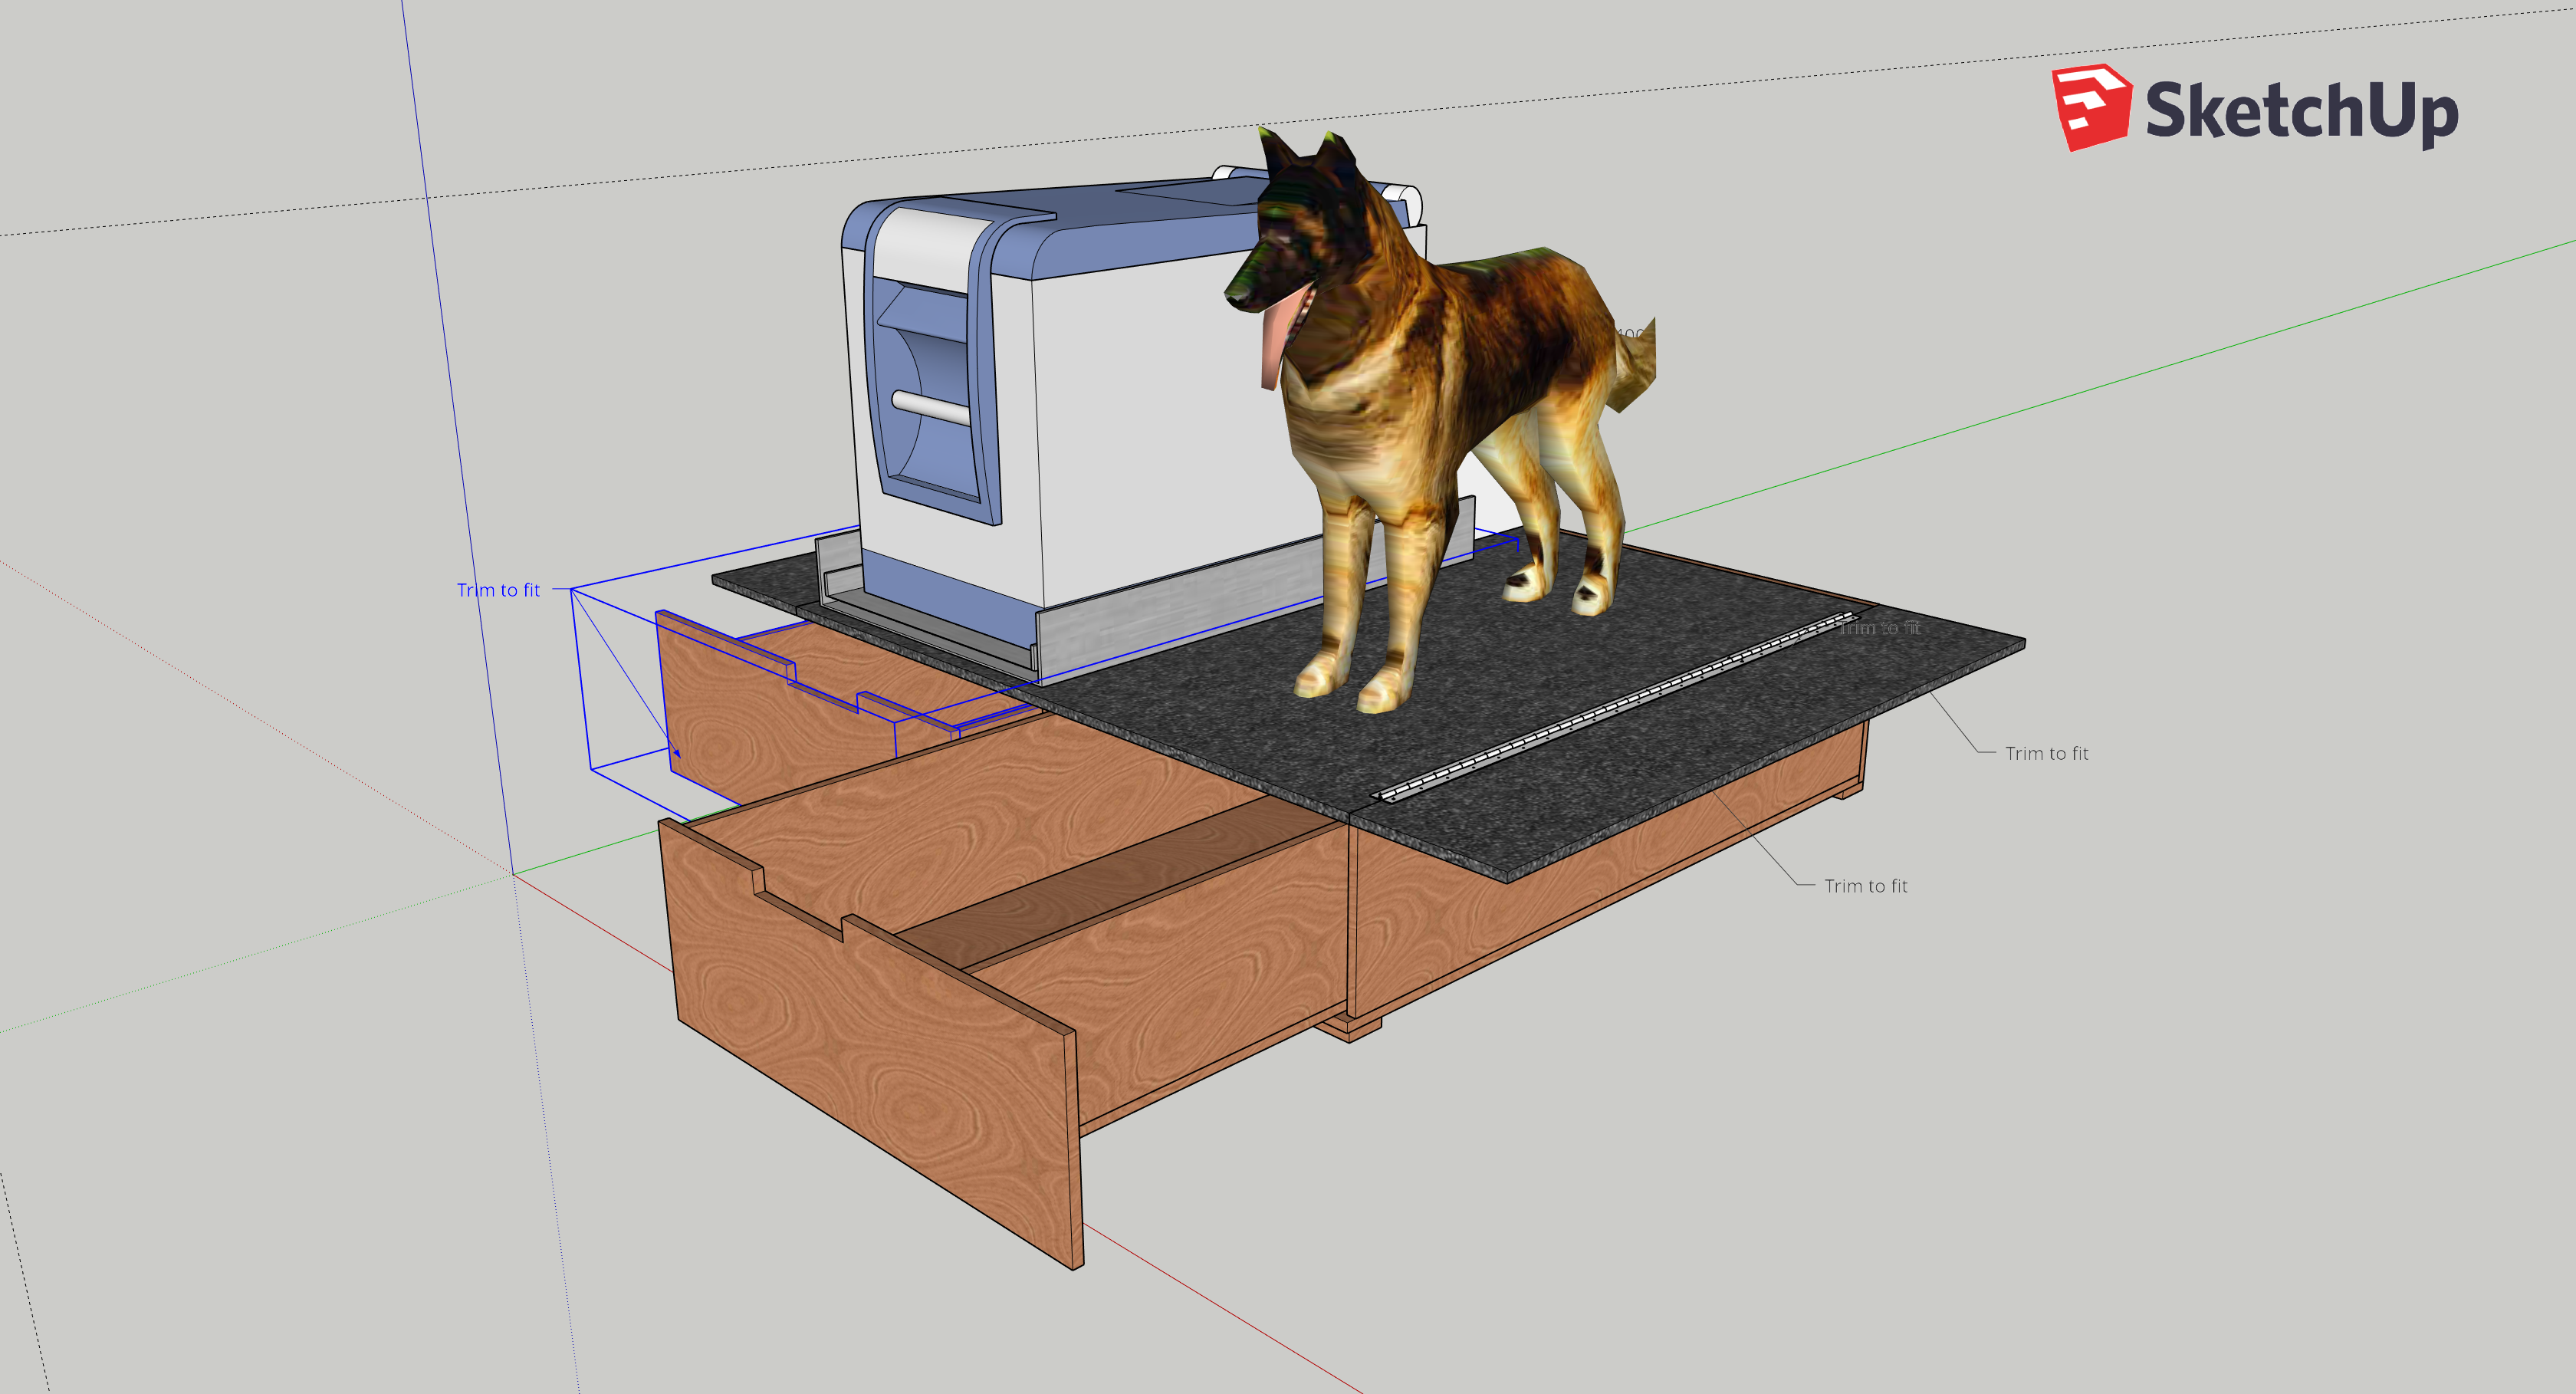
I got a mostly complete list of 8020 parts my shopping cart was nearing $300. Not including birch and hardware. I aborted. Plus, as a product designer, it felt wrong to try to copy Dave. Maybe that's just my hangup.

Version 2: Just a box

This time around, I was determined to learn Sketchup to help my visualize my plans. My initial though was to not do wings and just build a big ass box with HPDE "runners" under each drawer instead of slides:

m5UfCFy.jpg


This version was really just practice-I made a bunch of mistakes here including making my drawers the same size as the opening. No bueno.

Version 2

I decided that I really want the wings. I plan on storing my tool bag and compressor outside of the drawer, so having them covered is desirable. I also found a model of my fridge—really helped me visualize scale :)

aoTylRr.png


Triangular "brackets" would support the wings:

yOeSc30.png


Version 3:

After looking at plywood, I decided that I wanted to use 3/4" for the top instead of 1/2". I also hacked up cardboard to make a template for my wings:

4Q65ieF.jpg


Not sure what I'll do about the inverter yet...Having this mocked up was helpful because it showed me how much space my "brackets" would eat up in the void between the wheel wells and the drawers. This time around I decided that a 1"x1" stock could support the wings. I also figured out the radius of the hatch opening and incorporated them into my design:

GWph7I2.jpg


9JvWf4i.jpg


CtmQF1Y.jpg


NAspo7r.jpg


I'm still undecided how I'll finish the drawers—stain, carpet, rubber, paint, etc. First step will be to get box built over next few weekends.

Stay tuned, and wish me luck!
 
Last edited:
Made a ton of progress on my drawers over the last couple of weeks.

I made a couple of design changes
  • I decided against doing wings. I want to move to the Jerry-can style water containers and the just happen to fit on the sides. I also like the idea of lugging the drawers to a campsite away from the car. I was worried that the extra material on the drawer faces that make the front of the wings might make them fragile.
  • I made the drawers an inch wider than plan so they would fit more snuggly and not move laterally.

So box it is!

Z25GLfa.jpg


Fit is snug but just what I wanted:

PvmCIHe.jpg


Y’all I made so many rookie mistakes...

diO9Uoh.jpg


HPDE “slides” are in. Ended up adding some to the sides to better locate the drawers side to side:

Edc6Mm0.jpg


I used a Kreg rip cut to break down the 5x5 sheets of birch:

ce0fDEu.jpg


One drawer down! It’s honestly not totally square :/

d3BqIIF.jpg


I’m using a remnant rug liner to line the drawers. They are rubber backed and don’t slide.

I sanded and extra sheet of HDPE and made a little track in the drawer for a camp cutting board:
iHZHLr2.jpg


Final assembly. My work is rough but very happy that the drawers open and close :)

EOEI25X.jpg


Using kayak handles as drawer pulls:

203yr7m.jpg


I’m found a rubber backed Indoor outdoor rug that I like for the top. I’ll glue it down and add some aluminum trim to finish finish off the edges:

qtEV8Z2.jpg


I’m painting the drawers dark grey to match my interior. The finish is supposed to be matte hammered but it came out more satin:

8LUyboL.jpg


I also scored a cheap dometic slide that was an amazon warehouse deal:

Sww3tkO.png


I expected it to be banged up or a return, but nope. Totally pristine:

4sk5ZEN.jpg


My plan is to finish paint next weekend, then get it in my Lx so I figure out the placement of the slide.

Stay tuned!
 
Home stretch!

Mocking up the placement of the slide and fridge:

1Tk6bKE.jpg


This was mainly to show me how high the fridge would be. I ended up adding an inch under the rear to tilt the nose of the fridge down a little more. I’ll need to add 1/4” under the front so the drawers clear the tailgate trim but no big deal.

In pleasantly surprised that the height closely matches with the back seats. This will be great for sleeping when I go out solo:

OTGzPpL.jpg


I got two coats of paint on and laid the carpet and trim on just to see what it looks like. Super happy with all of my choices so far:

YJbrulH.jpg
 
Catching up on a bunch of stuff I've posted elsewhere.

1. Installed Hella optilux fogs and Hikari LED headlights:

45424Wl.jpg


2. Adjusted my front AHC to level the nose a bit. Totally in love with it:

VRIk3ZO.jpg


3. Finished my drawers and installed a fridge slide:

SF0QLDZ.jpg


4. Swapped everything out for LEDs including the mirror puddle lights:
wpDI0YW.jpg

G95FZNQ.jpg


Hard to photograph, but LEDs are nice and white.

Today I installed an OEM trailer harness puck (hat-tip @TeCKis300 for guiding me in the right direction)

RWGW7sp.jpg
 
Nice looking rig. I was debating on those wheels for a while, they look sweet.
 
Looking good. Can you drop your design file in GitHub so I can fork it?

Also, When are we going to Tahuya again?

Great idea on both points!

I’m waiting for @grinchy to cut off his boards so I can work up the nerve to do it to :) I smashed my running boards hard coming out of the rock garden last time I went to Tahuya.

MsHyV7T.jpg


At some points but I’ll put them out of their misery and order sliders.
 
TLC roof rack
Slowly gearing up for a busy summer of camping! One (the only one) thing I miss about my Suburban is the space. Even with the new drawers we don’t have enough room for bags and tent and dog.

Only logical solution was to get a roof top cargo box. I found a great used Thule but it was too big for the neutered Lexus rack:

GNOavUR.jpg


I had been watching Craigslist for a box this size and they were few and far between so I got it anyway.

Next order of business was swapping the rack for the TLC one. Finding one on eBay was easy. Installing it was harder than it should be.

Long story short, I screwed up and lost two of the captive clips down in the headliner. I couldn’t dig them out (although others who were in this predicament have been able to retrieve them). After much swearing and losing sleep I was able to rivnut/nutsert new hardware into place and secure everything:

3Ia0DR2.jpg


Knock on wood - no leaks. Been through rain and the car wash and everything is dry. The big Thule fits perfectly:

hUMqax1.jpg
 
Last edited:
My brakes have been pretty lousy since I got the truck last fall. The bite was okay but pedal travel and feel were awful. I swapped the fluid and it helped a bit. Sigh.

About a month ago I could hear the wear indicators so I knew it was time. I had intended on ordering some Terrain Tamers and slotted rotors, but I just ran out of weekends and budget.

I had to get it done so I took a chance on some Autozone duralast extreme duty’s.

Installation was very straightforward. It took me about 30 minutes a corner.

lC01X2a.jpg


The difference in bite was night and day and my pedal travel reduced quite a bit. Very happy so far. We’ll see how long they last.

2 :banana: Job.
 
You’re much faster than me. Must be the impact wrench! I ran 3 or 4 hours the driver rear, and about an hour passenger rear. I did muck around with the e brake for a while.
 
You’re much faster than me. Must be the impact wrench! I ran 3 or 4 hours the driver rear, and about an hour passenger rear. I did muck around with the e brake for a while.

Impact did help quite a bit :)

I’m not happy with my parking brake so I may be back in the rear soon. I adjusted so that I could just get rotors on but must have backed them off too much.
 

Users who are viewing this thread

Back
Top Bottom