
Renogy solar panel
Navigation
Install the app
How to install the app on iOS
Follow along with the video below to see how to install our site as a web app on your home screen.
Note: This feature may not be available in some browsers.
More options
Style variation
You are using an out of date browser. It may not display this or other websites correctly.
You should upgrade or use an alternative browser.
You should upgrade or use an alternative browser.
Member Builds and Stories
This site may earn a commission from merchant affiliate
links, including eBay, Amazon, Skimlinks, and others.
- Status
- Not open for further replies.

Blue Sea panel
- Thread starter
- #102
Last year I installed an ARB fridge outlet on the front of the fender hump behind the second row seats. It works great but really wanted a way to keep an eye on my battery.
I picked up a Blue Sea marine panel and swapped out the 12v plug with my ARB one. Then it was a matter of finding a place to put it. If you’ve ever had the panel off, you know there isn’t much room.
I discovered that there is a nice little pocket just below the inverter that had enough depth to accommodate the back of the Blue sea unit.
My multi-tool with a round blade made quick work of the plastic and left a clean look.
raincityrider
Go'n Fast and Take'n Chances Since the 70's
I like the idea of wood!I've fallen deep down the rabbit hole and decided to build my own drawer system-despite having zero wood working/carpentry experience. My initial plan was to wait for Dave, but he's a very busy man and there isn't currently a timeline for 200-specific KISS drawers.
Step 0: Research
I'm a product designer in my professional life, so I approached this like any other problem and started by trying to educate myself.

These three resources really helped me:
Aside: Deconstructing Dave's KISS drawers made me really appreciate the amount of care he put into designing them. So many little details in his design.
- The "post up your drawer" thread on ExPo that's been going for nearly 10 years
- "Thrifta" style drawers for GX470-big take away here was using HDPE "runners" instead of slides.
- Cruzer Dave's KISS thread
Step 1: Constraints
First, I need to understand the footprint I had to work with. I took some measurements and scaled a trunk mat to get the approximate layout. The only critical measurement is the 41.5" between the wheel wells. I decided to make my drawers 40" long to leave plenty of room for the power second row (my kids constantly fidget with it).

Next is to establish drawer height. My wife and I are short (I'm 5'6") so anything too tall would mean we couldn't reach our ARB 50L fridge. We got a good bit of perspective checking out the Adventure Ready 80 series. It has a ~3" lift and ARB drawers (which are about 12" high):

Even with the drop slide (which is crazy expensive!), the fridge was a touch reach for us. So I went home and started making some physical mockups. I wanted to visualize a 10" drawer height—this tub was closest thing I had (~11" high):

The killer AHC feature is comfort access, which drops the rig to her bump stops on exit. This will be very helpful for two shorties like us. If my calculations are correct, the fridge opening should be between 26-28" off the tailgate on level ground. We can work with that.

Next, I had to convince my wife that our s*** would fit into 2 drawers. More physical mockups:


We still have tents and bags and chairs, but those will go on the roof. Success.
Version 1: Copy what Dave did
I didn't get very far hereI got a mostly complete list of 8020 parts my shopping cart was nearing $300. Not including birch and hardware. I aborted. Plus, as a product designer, it felt wrong to try to copy Dave. Maybe that's just my hangup.
Version 2: Just a box
This time around, I was determined to learn Sketchup to help my visualize my plans. My initial though was to not do wings and just build a big ass box with HPDE "runners" under each drawer instead of slides:

This version was really just practice-I made a bunch of mistakes here including making my drawers the same size as the opening. No bueno.
Version 2
I decided that I really want the wings. I plan on storing my tool bag and compressor outside of the drawer, so having them covered is desirable. I also found a model of my fridge—really helped me visualize scale
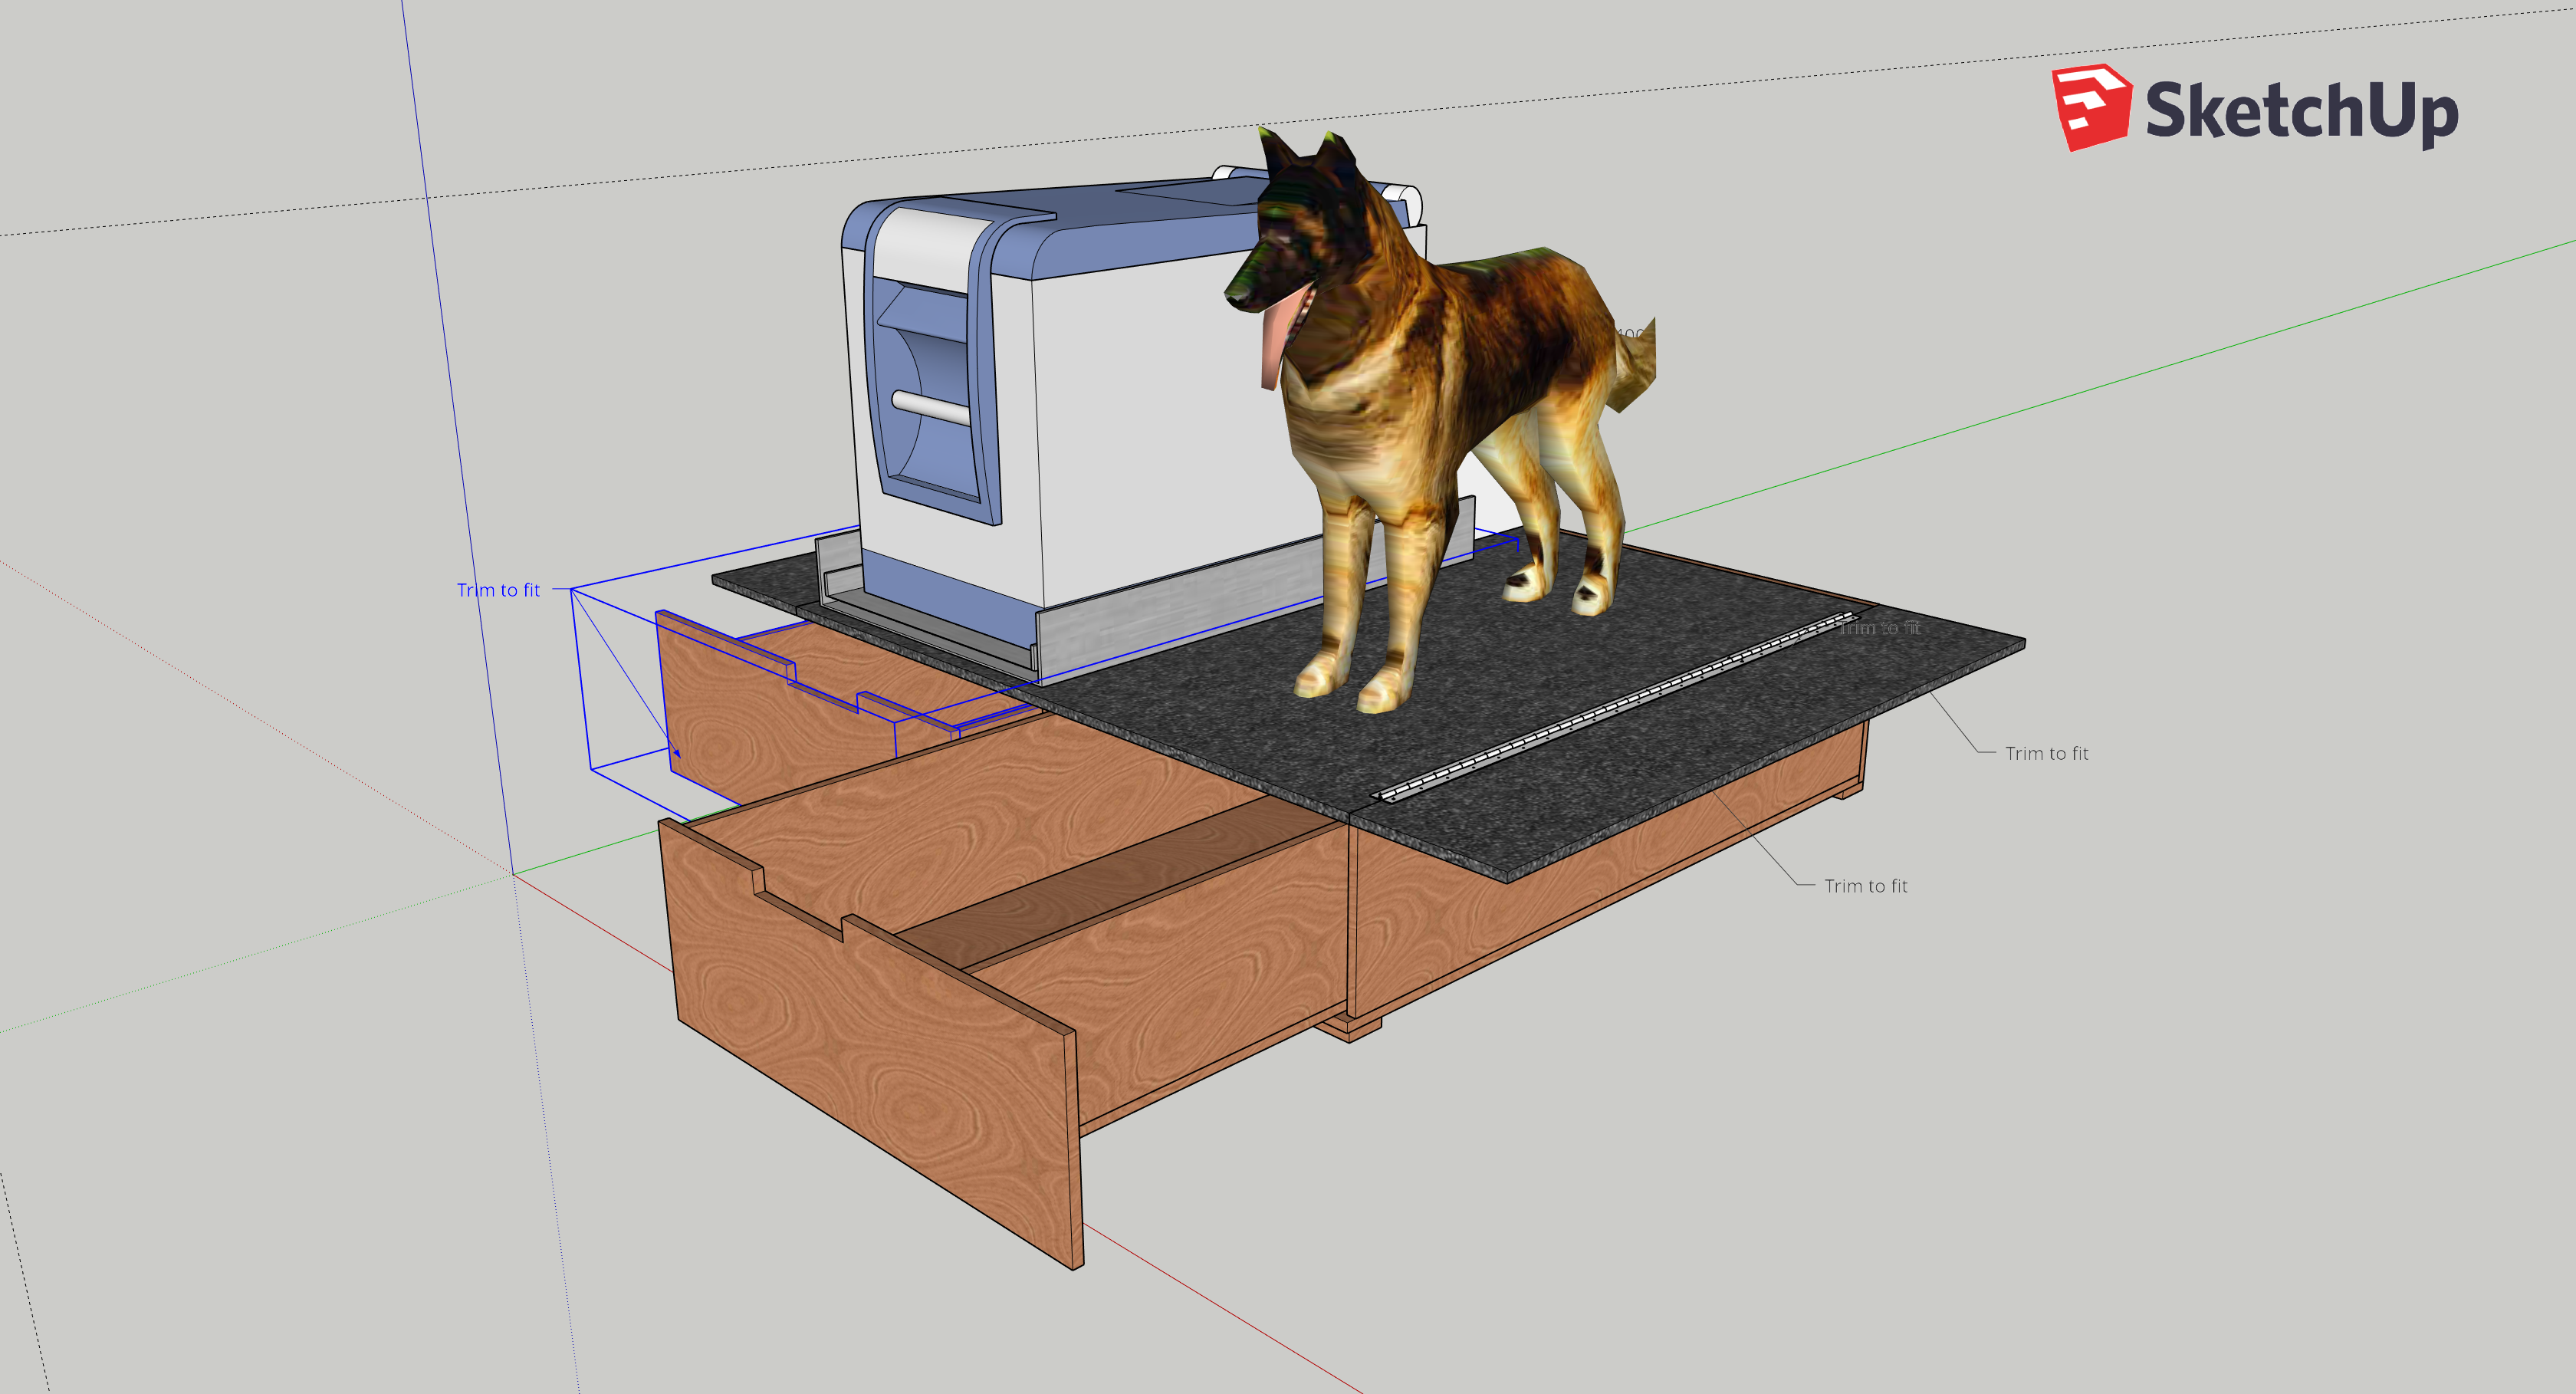
Triangular "brackets" would support the wings:

Version 3:
After looking at plywood, I decided that I wanted to use 3/4" for the top instead of 1/2". I also hacked up cardboard to make a template for my wings:

Not sure what I'll do about the inverter yet...Having this mocked up was helpful because it showed me how much space my "brackets" would eat up in the void between the wheel wells and the drawers. This time around I decided that a 1"x1" stock could support the wings. I also figured out the radius of the hatch opening and incorporated them into my design:


I'm still undecided how I'll finish the drawers—stain, carpet, rubber, paint, etc. First step will be to get box built over next few weekends.
Stay tuned, and wish me luck!
raincityrider
Go'n Fast and Take'n Chances Since the 70's
LOL never mind you are done....
Hey Travis, some questions about how you did your AHC sensor lift:
1. How much did you lift the front? (Think I saw you mention 1.5" in another thread?)
2. How much did you lift the rear?
3. Did you use spacers on the rear? If so, can you share the part number?
1. How much did you lift the front? (Think I saw you mention 1.5" in another thread?)
2. How much did you lift the rear?
3. Did you use spacers on the rear? If so, can you share the part number?
- Thread starter
- #106
Hey Travis, some questions about how you did your AHC sensor lift:
1. How much did you lift the front? (Think I saw you mention 1.5" in another thread?)
2. How much did you lift the rear?
3. Did you use spacers on the rear? If so, can you share the part number?
Here is what I did in this thread: LX570 AHC height modifications (lift it!)
I only did the front, didn't want to mess with rear. My wife and I are small humans so raising the reach in height across the tailgate doesn't work for us.
Here is what I did in this thread: LX570 AHC height modifications (lift it!)
I only did the front, didn't want to mess with rear. My wife and I are small humans so raising the reach in height across the tailgate doesn't work for us.
Gotcha, thank you.
I definitely want to do the rear too, and want to do everything at once so as to only do alignment once; thus the search for correct spacers in the rear.
That’s interesting. I guess I better decide on if I sensor lift the front, and how much before I align for the 35s.
- Thread starter
- #109
That’s interesting. I guess I better decide on if I sensor lift the front, and how much before I align for the 35s.
I just adjusted the fronts to max. Front and rear were withing 1/4" of each other. Alignment shop added more toe-in but caster was within spec.
raincityrider
Go'n Fast and Take'n Chances Since the 70's
Is there a reason to not adjust both F&R? Besides aforementioned vertical challenge?I just adjusted the fronts to max. Front and rear were withing 1/4" of each other. Alignment shop added more toe-in but caster was within spec.
- Thread starter
- #111
I just wanted a level stance. The rear is a little more fiddly (technical term) as the passenger side sensor is adjusted to different position to account for the fuel tank. If you want to adjust it you would need to maintain the same offset or else you’d have a lean.Is there a reason to not adjust both F&R? Besides aforementioned vertical challenge?
raincityrider
Go'n Fast and Take'n Chances Since the 70's
Ooooo, Gangsta!I just wanted a level stance. The rear is a little more fiddly (technical term) as the passenger side sensor is adjusted to different position to account for the fuel tank. If you want to adjust it you would need to maintain the same offset or else you’d have a lean.
First paint correction
- Thread starter
- #113
This weekend I decided to tackle the swirl marks and many many pin stripes I’ve accumulated on the trail.


I’ve never done any kind of machine polishing before-but don’t worry, I’m YouTube certified.
I started with a Chemical Guys starter kit that includes a porter-cable DA, a bunch of pads, and super plush microfiber. I also ordered their full line of cutting compounds and polishes.

I started with a two bucket wash, Adams APC, Iron remover then clay bar.
I thought I could get away with the middle-of-the-road compound but my paint had far too many defects so I ended up using the most aggressive compound. I then finished with polish and wax.

Results are great. Paint is super smooth but not totally defect free. It’s nicer than most trucks this age but not too nice that I’ll feel bad about hitting the trails again.


I’ve never done any kind of machine polishing before-but don’t worry, I’m YouTube certified.
I started with a Chemical Guys starter kit that includes a porter-cable DA, a bunch of pads, and super plush microfiber. I also ordered their full line of cutting compounds and polishes.
I started with a two bucket wash, Adams APC, Iron remover then clay bar.
I thought I could get away with the middle-of-the-road compound but my paint had far too many defects so I ended up using the most aggressive compound. I then finished with polish and wax.
Results are great. Paint is super smooth but not totally defect free. It’s nicer than most trucks this age but not too nice that I’ll feel bad about hitting the trails again.
Wow, that looks incredible!
- Thread starter
- #115
Wow, that looks incredible!
Thanks!
Still have a couple of good ones that are beyond my skill level to correct:

raincityrider
Go'n Fast and Take'n Chances Since the 70's
Great job, Shiny!
Awesome job!
That is truly insane. Having owned many GM's never again. No quality, low expectations.From the sound of your use case it sounds like you could be better suited with one of the long base SUVs from GM. Or Ford...comes down to preference/religion there. m toying with the idea of a Yukon or the Caddy.

- Status
- Not open for further replies.