Builds Red Dawn (60 converted 62 Build Thread w/ R2.8)

This site may earn a commission from merchant affiliate
links, including eBay, Amazon, Skimlinks, and others.

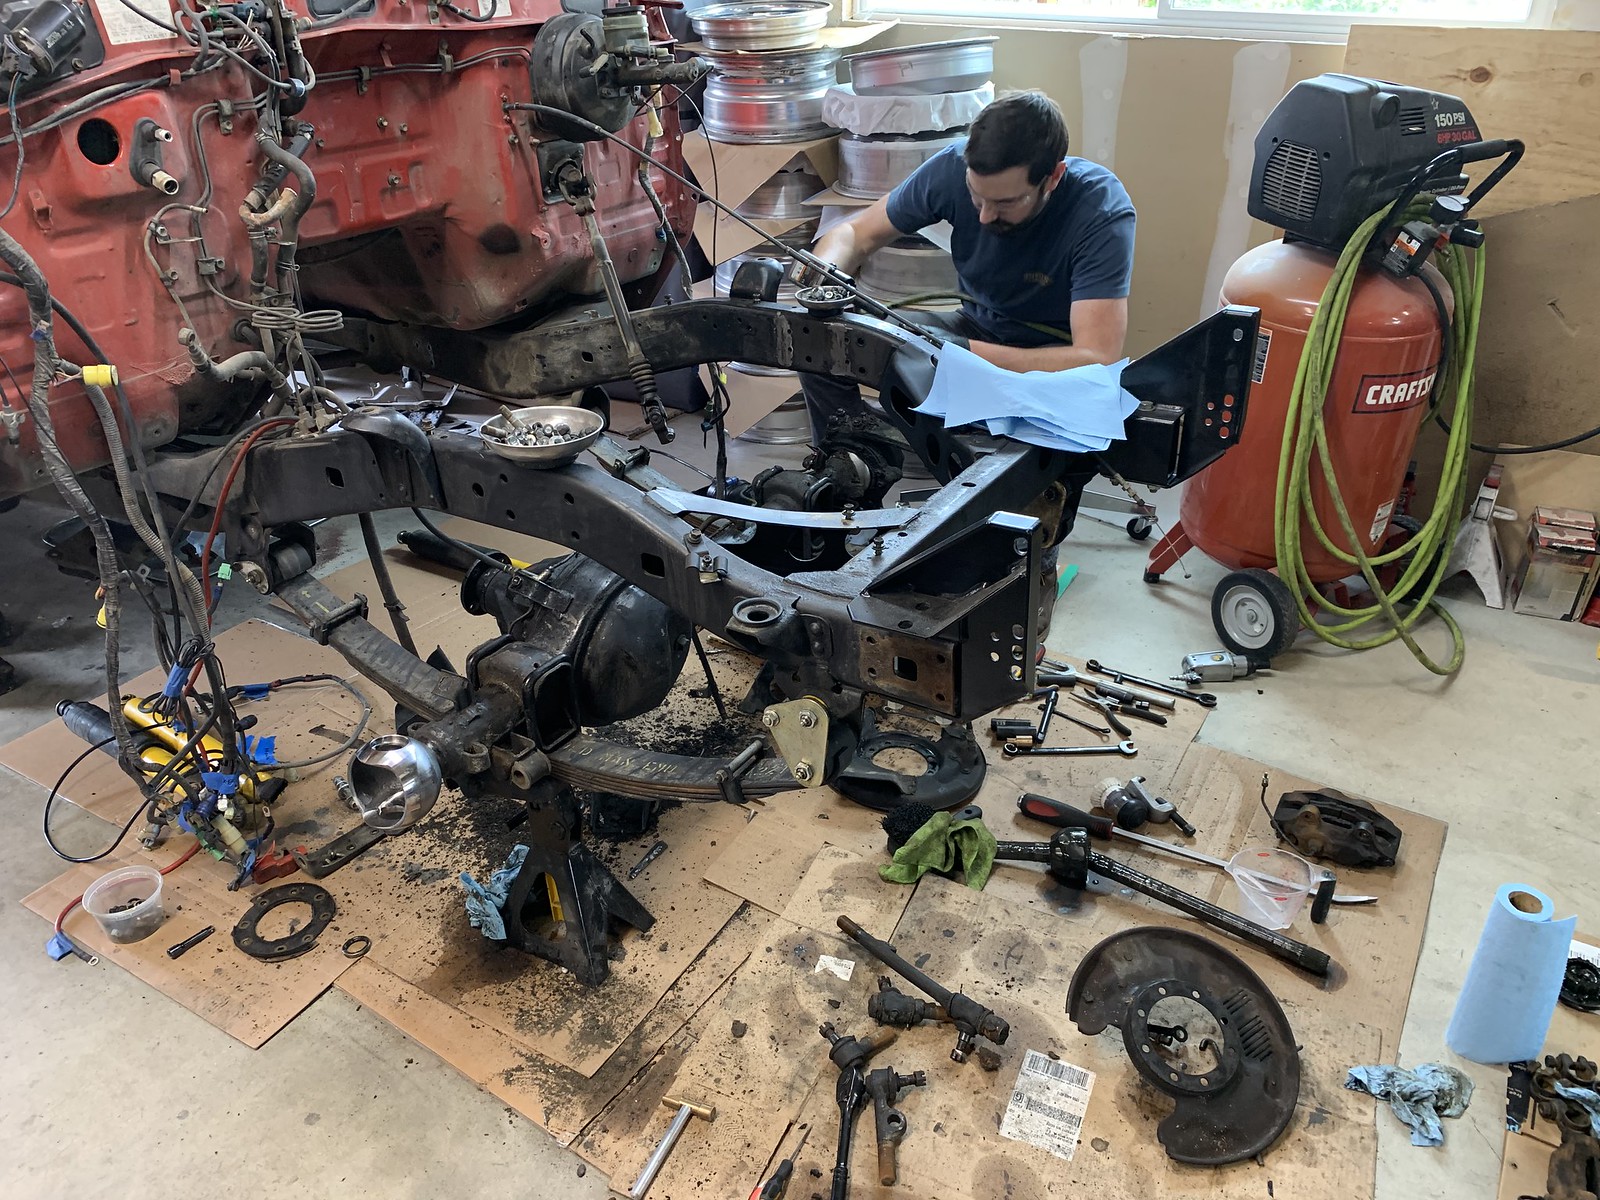
Knuckle rebuild and steering update started this weekend. Nothing spectacular to report. Things are slow. I just keep pressing along. Popped all the steering arms off and got the ends all off. Pressure washed the arms and will prepare them for a fresh coat of paint. Similarly, I tore down the passenger knuckle and started cleaning all the parts for a fresh coat. I also put on my Indiana Jones Fedora and started unearthing the axle. I felt like I was at an archaeological dig uncovering a T-Rex bone from the Jurassic period. Trying to devise a way to pressure wash it in my garage without making a mess. I have a fairly slopped driveway so I can't really push it out into the street as I wouldn't be able to get it in. Not a big deal though. Here's a few pictures, as is my status quo.

50007270771_7d107bb5b9_h.jpg


Need to do some caliper painting as well.

50007270761_f66e5d0f96_h.jpg


I'll take both sides apart so I only have to paint parts once.

50007529287_5ff7e009c7_h.jpg


I'll prod my way through the knuckles and steering stuff. I need to drop off my steering box at @torfab for a rebuild.

I absolutely recommend removing the engine, transmission, transfer case, radiator, hood, fenders, inner fenders and core support to do the knuckles. Makes things so much easier. :)
 
Last edited:
I think I got the dirty part of this job done. Both sides of the front axle are apart. All of the parts are clean and are ready for paint. It was raining all weekend so hopefully I'll get to hang all the parts today and spray them with a POR-15 Chassis Top Coat. Going to give the axle housing a quick scrub as well and put new sway bar hardware on, probably time for extend links and new bushings.

50029230616_f608f77d7a_h.jpg


I'm a masking dork

50029491462_d382e1592c_h.jpg


50029491382_aed121d2e8_h.jpg


50028691383_7a72b63b48_h.jpg


50029230611_feecc51d37_h.jpg


50028691388_88b1760950_h.jpg


50029230641_c1bfce7049_h.jpg


I think we have reached maximum mess in the garage

50028691473_d0c81c8e76_h.jpg
 
Last edited:
I know how exciting painting suspension parts is for you guys :rolleyes: So here is the finished product. I'm pretty happy with the POR 15 Chassis Black Top Coat. It covers pretty well and seemed pretty forgiving enough even though I tried to do as much prep as I could. It's not the cheapest stuff on the planet, but the finish is good. We'll have to see how durable it is. I will be using this same stuff on the frame and engine mounts when it is all welded together.

50040450608_0512475303_h.jpg


And now the pretty parts that will never see the light of day:

50041266007_a6da2176d3_h.jpg


50041266002_1a77871f3a_h.jpg


50041266022_ed66d9582f_h.jpg


The hubs were surface rusted pretty bad before so I figured I'd try this. All the same, I'm not looking forward to slipping the wheels over these:

50041003436_139f706b20_h.jpg


Hit the backing plates with some BBQ paint.

50041003466_f19f80b86e_h.jpg


Got some odds and ends to take care of before it all goes back together. I want to paint the calipers and get the steering rod brackets a fresh coating as well. Hope it's all ready for this weekend so the truck can be back on it's own wheels again.
 
Last edited:
Great work! I wish I had a 1/10th of your masking patience.
 
Got a few more things panted during the week.

50058532162_3400489efb_h.jpg


50058290386_9f97be3beb_h.jpg


Then the whole thing went back together. Wasn't terrible. Getting the axles in was a workout, wiggling, turning the input shaft, wiggling some more. Eventually I got it.

50058290626_f9105f0e64_h.jpg


50058532297_fd141782c3_h.jpg


50058290406_05ba1ab292_h.jpg


Then I swept up the floor, picked up the cardboard and got ready for more work. It doesn't look like much, but there is a ton of time in this front end.

50058290606_4502d70186_h.jpg


50057720393_5de10d2bad_h.jpg


I got the stock flywheel off the R2.8 and started putting the Axis Industries adapter kit on. More to come this week as this won't be nearly as messy a job (should be able to do a little each day).

Stock:
50058290416_e2c7bd2979_h.jpg


Starter ring form Axis:
50058532142_f7d3383ea8_h.jpg


50058532257_8055a5eb96_h.jpg


I need to pull the starter to get the crank bolts torqued. I can turn the engine over while trying to torque them. I ordered some brake lines and swaybar links from Man A Fre along with some new caliper hardware. The eagle eye'd of the bunch will realize my driver's side caliper doesn't have the spring clip between the pads. It was broken when I went to remove the calipers. I'll get the brake lines all sealed up and bled and get this engine and tranny all stuffed together.
 
I got my work bench back this weekend. Got the rest of the Axis Industries kit installed and bolted up which means the engine and transmission are mated and sitting in the garage. Kevin is a solid business owner by the way. I reached out on instagram, and he was very helpful about some of the R2.8 questions I had. He really designs some amazing stuff. I'm sure you can see the quality in the machined parts, but wanted to point it out.

I also got my steering box rebuilt in a day. TorFab got it fresh and new in 24 hours. I almost don't want to put it in the truck it's so nice:

50083652497_e363da58c0_h.jpg


Adapter from the Axis starter ring to the 6L80E flexplate:
50082812148_2f27fe6f08_h.jpg


Kevin includes some very nice fasteners for this kit. Had to pull the starter and use the prybar to set the torque on these guys.

50083393171_ef20f587c6_h.jpg


Now, I haven't worked on many Chevy's before. These M11 flexplate to crank bolts are the strangest thing. They are so close to 7/16ths and I've never seen another M11 bolt in my entire life:

50082812153_9ebd9e6821_h.jpg


Dang things are like 5 bucks a piece too at the dealership. Come in their own sandwich bag :rofl: No lie. The parts guy put them in a sandwich bag.

50082812068_aa0e3d9167_h.jpg


Here is the adapter:
50082811728_d3e1b9a809_h.jpg


50082811778_38feb6ac6f_h.jpg


Then like SpaceX docking with ISS, I slipped the two chunks of money together. I put a quart in the torque converter and attached the converter to the flexplate.

50083631307_ca19c2e3af_h.jpg


Slipped a jackstand under the transmission and took a few pictures:

50082811793_8dca116c2a_h.jpg


50083393606_a041f744bb_h.jpg


50083729702_de70721e0d_h.jpg


50082910938_26ffc285d2_h.jpg


50083491946_adcb07e3b4_h.jpg


I spent the rest of Sunday poking around the truck, removing the gas pedal, and starting to thin down the wiring harness. What I can of worms that is. My plan is to only pull the Cummins back out once to finish weld my mounts. Once it goes in for the second time, that's it. So I'm trying to figure out what needs to be done to firewall now so that I don't forget anything the second opportunity I have. I'll keep working on the wiring stuff this week and cleaning up the fire wall. Probably 3D print some mock-ups for some things. Feels really good to have the big pieces together.
 
I hate to dissapoint, but the engine and transmission are still on the garage floor. I kept going on some of the firewall things, and well, got side tracked. I spent most of Saturday and Sunday working on the new pedal location which isn't a waste of time as you'll see. The R2.8 comes with a fly-by-wire gas pedal. It seems like a decent unit, but the bracket it comes with made the pedal location fairly proud, not to mention the amount of fabrication necessary to attach it to the firewall. The feeling of going from brake to gas would require you to move your foot in, then over and then start pressing on the gas. Not that typical recessed gas pedal feel (which is actually a safety thing as well).

Stock Bracket:
50107623753_f086872483_h.jpg


50107623758_7ceee2cb3e_h.jpg


I started to model the old pedal and new pedal in CAD. The new pedal is shown below highlighted in blue. I could move and rotate the pedal assembly until it lined up with the old pedal face. It's not an exact science because I'm using calipers and photos as reference to model, but it gets me in the ball park and helps me formulate a solution.

50108414267_3423ed9c07_h.jpg


Once the new pedal is positioned, I just made a quick adapter to allow me to use the stock pedal mounting point with the new fly-by-wire pedal. The geometry worked out really well. I was happy with how close I could get to the original pedal location while keeping the adapter fairly simple.

50108414377_8749a016fe_h.jpg


I printed up one and did a test fit.

50107603603_486f2aa6b4_h.jpg


For a first draft I'm very happy with it.

50107603643_40a90cba83_h.jpg


50108172841_921a42e16b_h.jpg


I could sit in the truck and try out the ergonomics. The wife could give me an approval as well. We both thought it could come closer to the driver a hair, which is easy to modify and try again. The finished part won't be printed. I don't trust the material for my old 3D printer that much. I'll probably print a jig and then bend a small bracket. Pretty happy with how it all turned out.

Added bonus is that the stock pedal stop is right below the new pedal. I should be able to thread a longer bolt in there and make it usable for this new pedal as well. The new pedal doesn't have as much travel as the old.
 
Last edited:
Awesome! Name your price and currency/commodity. Cash, beer, smoked salmon, 2-ply toilet paper... :grinpimp:
A couple bucks, a beer and poking around your swap would probably do the trick. You'll see when I get these things made.
 
FYI, this is what I came up with for a pedal stop. I used the jam nut (12mm) from the factory stop bolt on the backside of the widget and tightened it down. Seems to be the perfect length Screwed all the way down. Need to see if I can get a throttle position sensor reading off the OBD port and Torque app just to make sure that I'm getting full throttle but I think it's just right.

1596504115939.png


IMG_20200803_180130.jpg
 

Users who are viewing this thread

Back
Top Bottom