
Navigation
Install the app
How to install the app on iOS
Follow along with the video below to see how to install our site as a web app on your home screen.
Note: This feature may not be available in some browsers.
More options
Style variation
You are using an out of date browser. It may not display this or other websites correctly.
You should upgrade or use an alternative browser.
You should upgrade or use an alternative browser.
Build Red Dawn (60 converted 62 Build Thread w/ R2.8)
Member Builds and Stories
This site may earn a commission from merchant affiliate
links, including eBay, Amazon, Skimlinks, and others.
Looks amazing, can't wait to convert my '84 over to the 2.8 in the distant future, my money tree is not producing much fruit lately
- Thread starter
- #303
I put the transmission plate in the truck with the cross member and mount as well as the two plates that bolt up to the Advance Adapter. I tacked some sacrificial material between all three so I could un-mount it and start fabricating something to connect them together. Just a tip from me, I left the plate and everything bolted to the bushing mount and then bolted that to my welding table to keep it as much in an 'installed' configuration as possible. The plate isn't a perfect fit on the bushing so it bends a bit when installed. If I unbolted it, that slight bending would come out and then be permanent as I put the pipe between it making it not go together properly at the end. Better to tack everything together while it's all tight and bolted up, then remove it and finish weld.
Might add some more pipe before I paint it. I don't have a tube notcher so I coped all this pipe with a flap wheel and angle grinder. Still getting comfortable TIG welding in tight places too, but this is a servicable part that should do the trick. Here is a photo dump so you can "follow along" as I put it together.

I realized afterwords that the plates I made to go to the transmission should have been circular to start, they're just ugly sitting there like that as squares that aren't all that aligned.


First pipe


I cut this second pipe, fit it to the first one and then fully welded it on the bench before tacking both in as one piece. Was easier to fully weld that joint while it was loose rather than try to get in there with the TIG. Still wasn't pretty, but I think I'm getting better.

Here is an early picture I took, edited and sent to @NookShneer & @red66toy in a group chat. Thinking about adding those two outer pipes still. Would certainly beef it up. Belt and suspenders.

Third pipe. I say third because I fell like it needs more support. Not a huge fan of the angles you see here. Feels like a bunch of bending stress on those overhanging pieces of pipe.

All tacked up and the support pieces cut off. I Rounded the plates off a bit after this photo to make them presentable.

And there it is. Warts and all. I'll cut some more pipe today and see if I can get those two other pipes in there and welded easily. Or I might just cut some plate for gussets.
Might add some more pipe before I paint it. I don't have a tube notcher so I coped all this pipe with a flap wheel and angle grinder. Still getting comfortable TIG welding in tight places too, but this is a servicable part that should do the trick. Here is a photo dump so you can "follow along" as I put it together.
I realized afterwords that the plates I made to go to the transmission should have been circular to start, they're just ugly sitting there like that as squares that aren't all that aligned.
First pipe
I cut this second pipe, fit it to the first one and then fully welded it on the bench before tacking both in as one piece. Was easier to fully weld that joint while it was loose rather than try to get in there with the TIG. Still wasn't pretty, but I think I'm getting better.
Here is an early picture I took, edited and sent to @NookShneer & @red66toy in a group chat. Thinking about adding those two outer pipes still. Would certainly beef it up. Belt and suspenders.
Third pipe. I say third because I fell like it needs more support. Not a huge fan of the angles you see here. Feels like a bunch of bending stress on those overhanging pieces of pipe.
All tacked up and the support pieces cut off. I Rounded the plates off a bit after this photo to make them presentable.
And there it is. Warts and all. I'll cut some more pipe today and see if I can get those two other pipes in there and welded easily. Or I might just cut some plate for gussets.
Last edited:
- Thread starter
- #304
Added some gussets and some much needed paint.


- Thread starter
- #305
One last photo before I hopefully never see it again.

Mounted to the adapter.


Then the transmission mount.


Lastly, the crossmember

Everything went together rather well. Pretty pleased with it. I started clearancing the transmission pan for the front driveline.
Marked with sharpie.


Trimmed. It's hard to get a good photo of it. Might do some more when I have more time to play with it.


If you click the photo above this it should take you to the video that plays.
Mounted to the adapter.
Then the transmission mount.
Lastly, the crossmember
Everything went together rather well. Pretty pleased with it. I started clearancing the transmission pan for the front driveline.
Marked with sharpie.
Trimmed. It's hard to get a good photo of it. Might do some more when I have more time to play with it.
If you click the photo above this it should take you to the video that plays.
- Thread starter
- #306
Made a plate for the x-fer case shifter pivot. Put an arm that reaches up on top of the transmission to pin the transmission harness to. Keep it from rubbing on the body of the transmission.
Some weird ankle thing:


In aluminum:

Dimple died on one side to give the panel some extra stiffness. Probably do another on the other side of the pivot when I get that finished. Need to order an M16x1.5 nut for that shifter pivot. Also need to get my wife in the truck to hold the shifter at 'neutral' position, but it's football time now.

Some weird ankle thing:
In aluminum:
Dimple died on one side to give the panel some extra stiffness. Probably do another on the other side of the pivot when I get that finished. Need to order an M16x1.5 nut for that shifter pivot. Also need to get my wife in the truck to hold the shifter at 'neutral' position, but it's football time now.
Made a plate for the x-fer case shifter pivot. Put an arm that reaches up on top of the transmission to pin the transmission harness to. Keep it from rubbing on the body of the transmission.
Some weird ankle thing:
In aluminum:
Dimple died on one side to give the panel some extra stiffness. Probably do another on the other side of the pivot when I get that finished. Need to order an M16x1.5 nut for that shifter pivot. Also need to get my wife in the truck to hold the shifter at 'neutral' position, but it's football time now.
nice hole you got there

mattressking
10 digits to freedom
Need way more dimples. This needs to be a Land Cruiser Lightweight edition.
- Thread starter
- #310
I have been working on an aluminum RTT rack for my ford pickup lately so haven't put in much time on the 62. Of course I caught my thumb with an angle grinder while working on it so I've been waiting for that to heal a little before moving forward. I did however do some snooping around for alternatives to this gigantic catalyst / Holset turbo exit for the R2.8. Putting this here for others who might want to tighten things up and improve performance a little.
This is what I'm talking about.

It's a fairly large catalyst and makes things get fairly tight to the brake lines. You can see here the flange for the turbo outlet and it's proximity to the brake lines.

Many of you know by now, and if you're still reading might actually have an R2.8 of your own, that these little engines are used in different trims overseas. So there are a bunch of parts out there that fit the R2.8 that weren't a part of the original package. The AC mega bracket change I did earlier is another example of this. So I searched around and found a standard replacement. It is Cummins part number 525941. It has a standard 2.5" v-band connection on the outlet side and looks to maybe flow a little better than the cobra neck cast piece originally on the engine.

You can see that "cobra" shape a little here at the cast interface with the catalyst.

The two parts side by side:

Replacement:

I had been worried about the proximity of the catalyst to the brake lines for quite a while. Catalysts get hot, even hotter than normal exhaust. This really helps me clearance away from all that stuff so I don't feel the pressing need to relocate brake lines. Anyway, short update, hope to be back on the truck with a bunch of new parts soon.
This is what I'm talking about.
It's a fairly large catalyst and makes things get fairly tight to the brake lines. You can see here the flange for the turbo outlet and it's proximity to the brake lines.
Many of you know by now, and if you're still reading might actually have an R2.8 of your own, that these little engines are used in different trims overseas. So there are a bunch of parts out there that fit the R2.8 that weren't a part of the original package. The AC mega bracket change I did earlier is another example of this. So I searched around and found a standard replacement. It is Cummins part number 525941. It has a standard 2.5" v-band connection on the outlet side and looks to maybe flow a little better than the cobra neck cast piece originally on the engine.
You can see that "cobra" shape a little here at the cast interface with the catalyst.
The two parts side by side:
Replacement:
I had been worried about the proximity of the catalyst to the brake lines for quite a while. Catalysts get hot, even hotter than normal exhaust. This really helps me clearance away from all that stuff so I don't feel the pressing need to relocate brake lines. Anyway, short update, hope to be back on the truck with a bunch of new parts soon.
Last edited:
- Thread starter
- #311
I got the xfer shifter plate done with a revision. More holes as requested by @mattressking . I still might weld some angle onto the top and bottom edges to make the panel even more rigid. It shifts ok, but I can feel some bendy-ness to it. The long span from mounting holes really makes it flexible. The dimple died holes help, but a little angle on the edges would be great. I might just remake the plate so I can brake the edges rather than weld on this piece.
I also came to the difficult conclusion to lift the motor a little. After careful measurement (using my hand as a ruler) it appears that the front differential housing would hit the oil pan before the axle hits the bump stop. I could lift the engine by cutting apart the axis industries engine mounts and sliding it up, then rewelding. Not a giant issue, but I think it's worth while, I've got space in the transmission tunnel.


I don't know if I can lift the front of the motor to absolutely prevent an oil pan issue, but I can make it better. Not sure if the rubber mounts compressed or if I just goofed it. Just a few hours work though to lift it up before I start fabricating all the plumbing and intake stuff.


Sometimes you eat the bear, and well, sometimes the bear eats you.
I also came to the difficult conclusion to lift the motor a little. After careful measurement (using my hand as a ruler) it appears that the front differential housing would hit the oil pan before the axle hits the bump stop. I could lift the engine by cutting apart the axis industries engine mounts and sliding it up, then rewelding. Not a giant issue, but I think it's worth while, I've got space in the transmission tunnel.
I don't know if I can lift the front of the motor to absolutely prevent an oil pan issue, but I can make it better. Not sure if the rubber mounts compressed or if I just goofed it. Just a few hours work though to lift it up before I start fabricating all the plumbing and intake stuff.
Sometimes you eat the bear, and well, sometimes the bear eats you.
Beautiful build. Curious on suspension and tire size. Cheers.
Depending on how much you plan to raise the engine, make sure to take into account bump stop compression. Even just making some small spacers for the bump stops to lower them. This comes from experience before I was in to 60s. After a wheeling trip in my old CJ5 with a chevy small block I noticed a paint mark on the top of my front diff and paint missing from the balancer on the engine. I had bumped up a ledge and didn't see the second ledge that slammed my front suspension to over full compression (Actually bent the bump stops) . My engine wasn't damaged but it could have been much worse.
- Thread starter
- #315
Beautiful build. Curious on suspension and tire size. Cheers.
285/75/16 and run of the mill OME stuff.

Depending on how much you plan to raise the engine, make sure to take into account bump stop compression. Even just making some small spacers for the bump stops to lower them. This comes from experience before I was in to 60s. After a wheeling trip in my old CJ5 with a chevy small block I noticed a paint mark on the top of my front diff and paint missing from the balancer on the engine. I had bumped up a ledge and didn't see the second ledge that slammed my front suspension to over full compression (Actually bent the bump stops) . My engine wasn't damaged but it could have been much worse.
Good point. There really isn't room to provide additional space, the transmission tunnel isn't quite large enough. I did lift the engine a good inch, maybe more. Bumpstop spacers sure do feel like a good idea. I'm still not 100% sure how I got this off to begin with, the hoist must of sagged overnight while I was doing the original mounts. I cut the mounts apart, lifted the motor, re-welded (sorry no pictures). Now I have "this much" hand clearance.
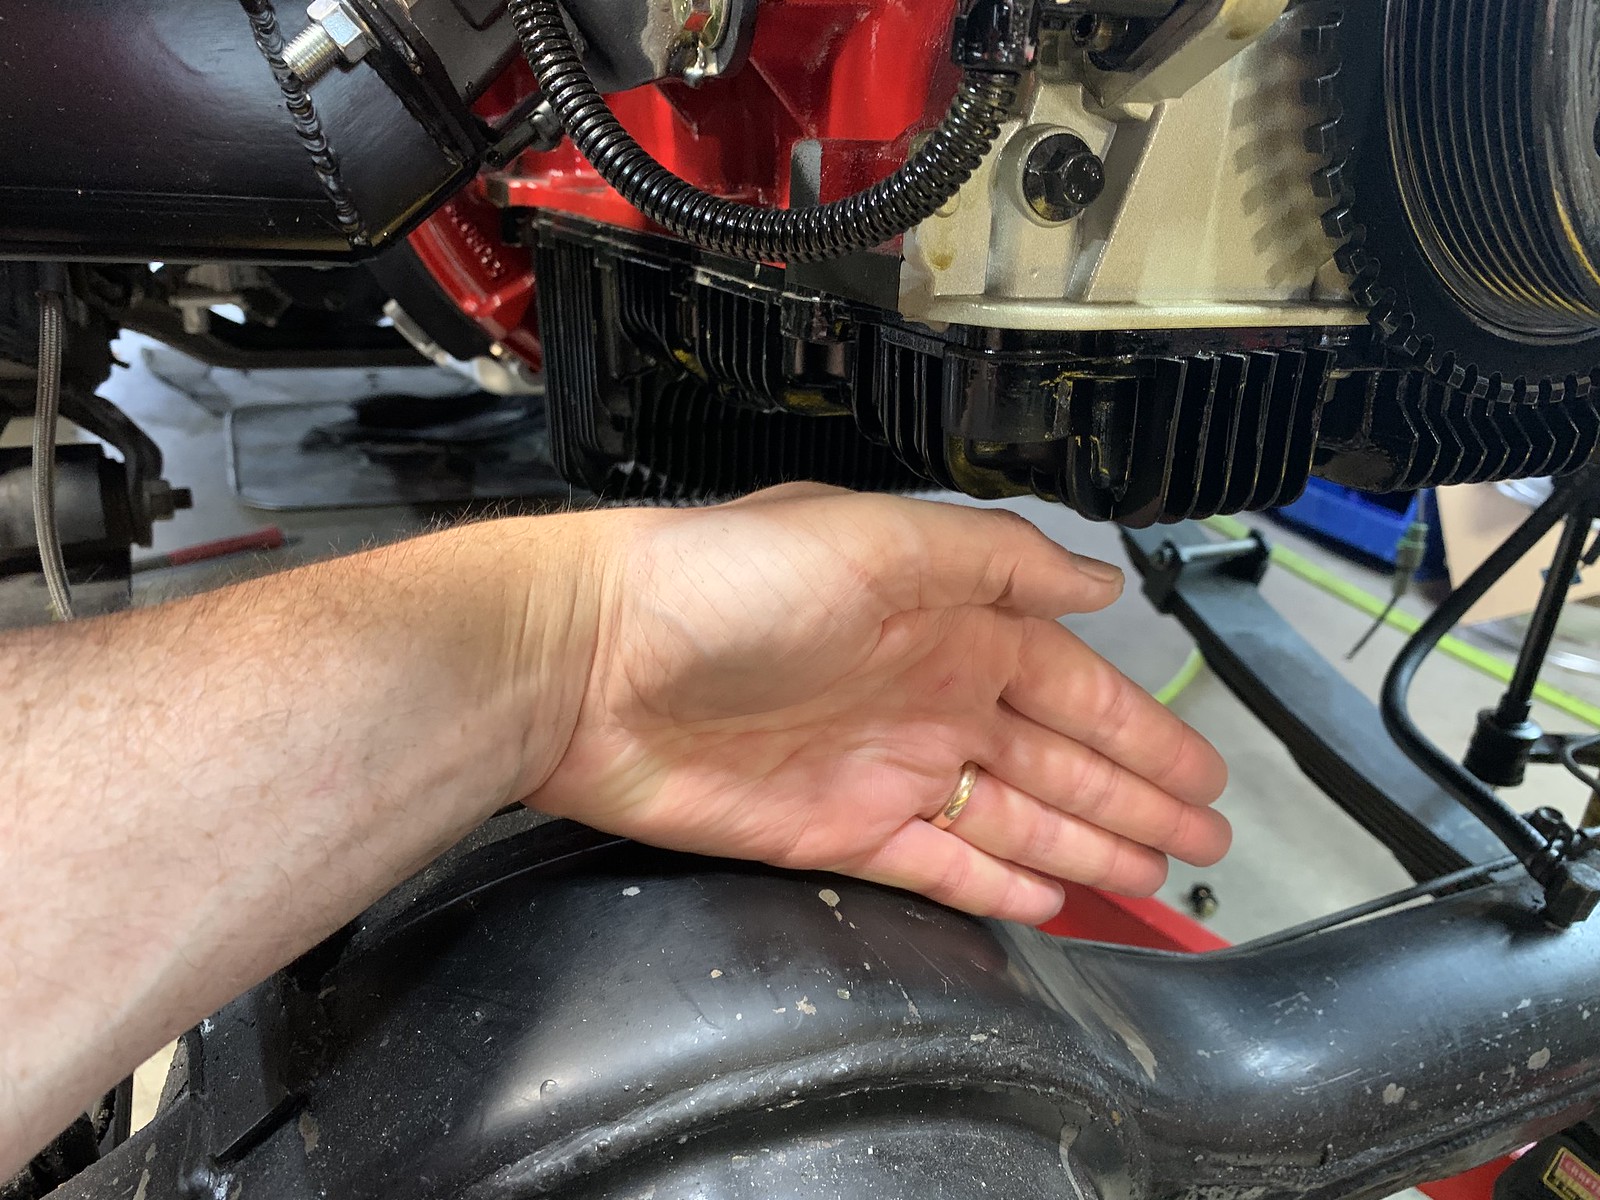
Much more comfortable with this. I'll pull them off and get them painted. I got some exhaust stuff in over the weekend so I think I'll re-enforce the xfer case shifter and do the exhaust next. Still ordering bits. This is definitely the slow part of the swap, even for me the slow-poke.
- Thread starter
- #316
Oh and part of the recent delay was learning to TIG weld aluminum. I decided to make an aluminum roof top tent rack for our powerstroke ford F250 as a "figure it out" project. It turned out ok and I learned a ton.


- Thread starter
- #317
The transfer case shifter pivot plate got some much needed additional reinforcement. The shfiter is much better now. I contemplated remaking it so I could just brake the edges, but the corner on top would be impossible to do without welding anyway. I also need all the aluminum welding practice I can get (as you can see).

I bought a "turbo" HJ61 tachometer from @red66toy quite a while ago. Started goofing with it over the weekend, to try and figure out the green and amber light functions.

Long story short, the function is interesting. I'm pretty sure I can get the amber light to be a "wait to start" light as well as a "stop the truck, something is bad" light while it's running. The green light will be an "all systems go" kind of thing and when it's off while the engine is running means that the engine is throwing a code but doesn't require immediate attention. There is additional circuitry in the sheetmetal box on the back of the tach that is doing some type of logical operation. The green light basically stays on the whole time the truck is running unless you ground a particular pin, the amber light works more normally and can be turned on and off by grounding the other pins (ground turns it on, removing the ground turns it off). I will make a diagram of what I do (if it works) for posterity. Below you can see the additional circuit box and harness for the lights.

I also made myself a pedal bracket and will put it in today, paint was drying overnight.

I bought a "turbo" HJ61 tachometer from @red66toy quite a while ago. Started goofing with it over the weekend, to try and figure out the green and amber light functions.
Long story short, the function is interesting. I'm pretty sure I can get the amber light to be a "wait to start" light as well as a "stop the truck, something is bad" light while it's running. The green light will be an "all systems go" kind of thing and when it's off while the engine is running means that the engine is throwing a code but doesn't require immediate attention. There is additional circuitry in the sheetmetal box on the back of the tach that is doing some type of logical operation. The green light basically stays on the whole time the truck is running unless you ground a particular pin, the amber light works more normally and can be turned on and off by grounding the other pins (ground turns it on, removing the ground turns it off). I will make a diagram of what I do (if it works) for posterity. Below you can see the additional circuit box and harness for the lights.
I also made myself a pedal bracket and will put it in today, paint was drying overnight.
You doing great work. Love the pictures. I'm guessing the 62's have room for a double din stereo and you didn't have to modify the dash.
mattressking
10 digits to freedom
I'm curious to see how you route the exhaust. I recently discovered that BJ60s had the exhaust route on the passenger side of motor under frame rail in front of spring hanger and along the passenger footwell then back under the frame to mate up to the usual muffler/exhaust routing. A picture speaks a thousand words....but I can't find a good one.
- Thread starter
- #320
You doing great work. Love the pictures. I'm guessing the 62's have room for a double din stereo and you didn't have to modify the dash.
The previous owner had cut the cubby out, we just massaged the edges a bit and fit the double din in there. Nothing that hasn't been done before.
I can picture what you're saying and I think the plan is to do a similar routing to what you describe. The exhaust will come down the passenger frame rail, then cross over in front of the transmission cross member before it meets up with the recently replaced exhaust (it was rusted out when we bought the truck). I've seen this routing done before and it seems common the R2.8 swaps I've seen.I'm curious to see how you route the exhaust. I recently discovered that BJ60s had the exhaust route on the passenger side of motor under frame rail in front of spring hanger and along the passenger footwell then back under the frame to mate up to the usual muffler/exhaust routing. A picture speaks a thousand words....but I can't find a good one.