
Navigation
Install the app
How to install the app on iOS
Follow along with the video below to see how to install our site as a web app on your home screen.
Note: This feature may not be available in some browsers.
More options
Style variation
You are using an out of date browser. It may not display this or other websites correctly.
You should upgrade or use an alternative browser.
You should upgrade or use an alternative browser.
Build Red Dawn (60 converted 62 Build Thread w/ R2.8)
Member Builds and Stories
This site may earn a commission from merchant affiliate
links, including eBay, Amazon, Skimlinks, and others.
")
Really good work! Can totally agree about the adapter kit being a "build your own" kit, just a bag of bolts with no clear direction on where theyre to go and really bad instructions!
- Thread starter
- #243
I cut the factory motor mounts off today. Still need to sand up the rails and get things cleaned up. One of the welds was hardly even on there. I got my motor side mounts from Axis and I started doing a CAD mockup of what the frame side will be. I'll have to modify it once I get the engine and trans hanging in the truck.

I started cleaning the transfer case parts. Since most of them are aluminum, I decided not to go to a machine shop. Sometimes they use caustic chemicals that can eat away at aluminum parts. I just don't know anyone enough locally to trust with these parts. So I took a bucket heater which is used in home brewing and farming and decided to make my own hot tank. Just some water and degreaser. I should probably make the mixture more strong in the future. The heat really breaks up the deep grim and dirt. It softens it quite a bit and all I needed to do is pull the part out a little and brush or scrap it then dunk it back in for another hour or so. It just wipes away. The water does get very hot though so I needed to be careful. It's steaming hard and bordering on boiling. A few rounds like that and things get pretty clean.

Dirty parts:


Cleaned:


Not sure what kind of accumulation is on the main shaft cover. Didn’t go after it too hard, rather just paint it. This degreaser is the best stuff I can get without having to recycle it. It's biodegradable and really works well. I used the same dirty water to do the first try on the split case (under the bottle). It didn't turn out great, going to start a second batch of water tomorrow and do both halves while I grind on the frame to clean it up.

Anyone have recommendations for frame paint? I really don't want to do undercoating, just something that mimics the same finish that the frame had from the factory?
I started cleaning the transfer case parts. Since most of them are aluminum, I decided not to go to a machine shop. Sometimes they use caustic chemicals that can eat away at aluminum parts. I just don't know anyone enough locally to trust with these parts. So I took a bucket heater which is used in home brewing and farming and decided to make my own hot tank. Just some water and degreaser. I should probably make the mixture more strong in the future. The heat really breaks up the deep grim and dirt. It softens it quite a bit and all I needed to do is pull the part out a little and brush or scrap it then dunk it back in for another hour or so. It just wipes away. The water does get very hot though so I needed to be careful. It's steaming hard and bordering on boiling. A few rounds like that and things get pretty clean.
Dirty parts:
Cleaned:
Not sure what kind of accumulation is on the main shaft cover. Didn’t go after it too hard, rather just paint it. This degreaser is the best stuff I can get without having to recycle it. It's biodegradable and really works well. I used the same dirty water to do the first try on the split case (under the bottle). It didn't turn out great, going to start a second batch of water tomorrow and do both halves while I grind on the frame to clean it up.
Anyone have recommendations for frame paint? I really don't want to do undercoating, just something that mimics the same finish that the frame had from the factory?
Last edited:
- Thread starter
- #245
BasicallySo you basically sous vide a t-case. Lol
- Thread starter
- #246
Got all the old gaskets off and the two case halves cleaned. My hot tank sous vide didn't quite work as well on the case halves as it did on the smaller parts. I used a flatter plastic tub to soak them. Probably pushing the bucket heater more than it can handle. Block sanded the gasket surfaces and should be starting to rebuild it tomorrow. I need to get an internal bearing puller for the snout bearing on the output shaft. Anyone have any suggestions?
All the clean parts:

Closer pics of two case halves. The hot soaking really loosened things again, but I had to do some degreaser and brush work by hand in the garage sink to get them this clean. Not terrible, but more effort than I was hoping for. Still happy with the results.


I also painted the output flanges black. I think they are both good, the one that goes to the rear is somewhat worn from the seal. Can I swap them?


All the clean parts:
Closer pics of two case halves. The hot soaking really loosened things again, but I had to do some degreaser and brush work by hand in the garage sink to get them this clean. Not terrible, but more effort than I was hoping for. Still happy with the results.
I also painted the output flanges black. I think they are both good, the one that goes to the rear is somewhat worn from the seal. Can I swap them?
Amazing quality here, keep it up!
Got all the old gaskets off and the two case halves cleaned. My hot tank sous vide didn't quite work as well on the case halves as it did on the smaller parts. I used a flatter plastic tub to soak them. Probably pushing the bucket heater more than it can handle. Block sanded the gasket surfaces and should be starting to rebuild it tomorrow. I need to get an internal bearing puller for the snout bearing on the output shaft. Anyone have any suggestions?
All the clean parts:
Closer pics of two case halves. The hot soaking really loosened things again, but I had to do some degreaser and brush work by hand in the garage sink to get them this clean. Not terrible, but more effort than I was hoping for. Still happy with the results.
I also painted the output flanges black. I think they are both good, the one that goes to the rear is somewhat worn from the seal. Can I swap them?
Everyone I have talked to about removing the needle bearing has cut the inside of the cage with a die grinder and then use pliers to tweak it until it can be pulled out.
I assume the wire is a tap off of the reverse light power wire? That would turn on power for the a rear view camera and display?UPDATE: THIS JENSEN HEAD UNIT IS JUNK! It stopped working after 16 months and wouldn't even boot up. I found other such experiences on the internet. Do not purchase it for your project. I recently replaced it with a Pioneer unit.
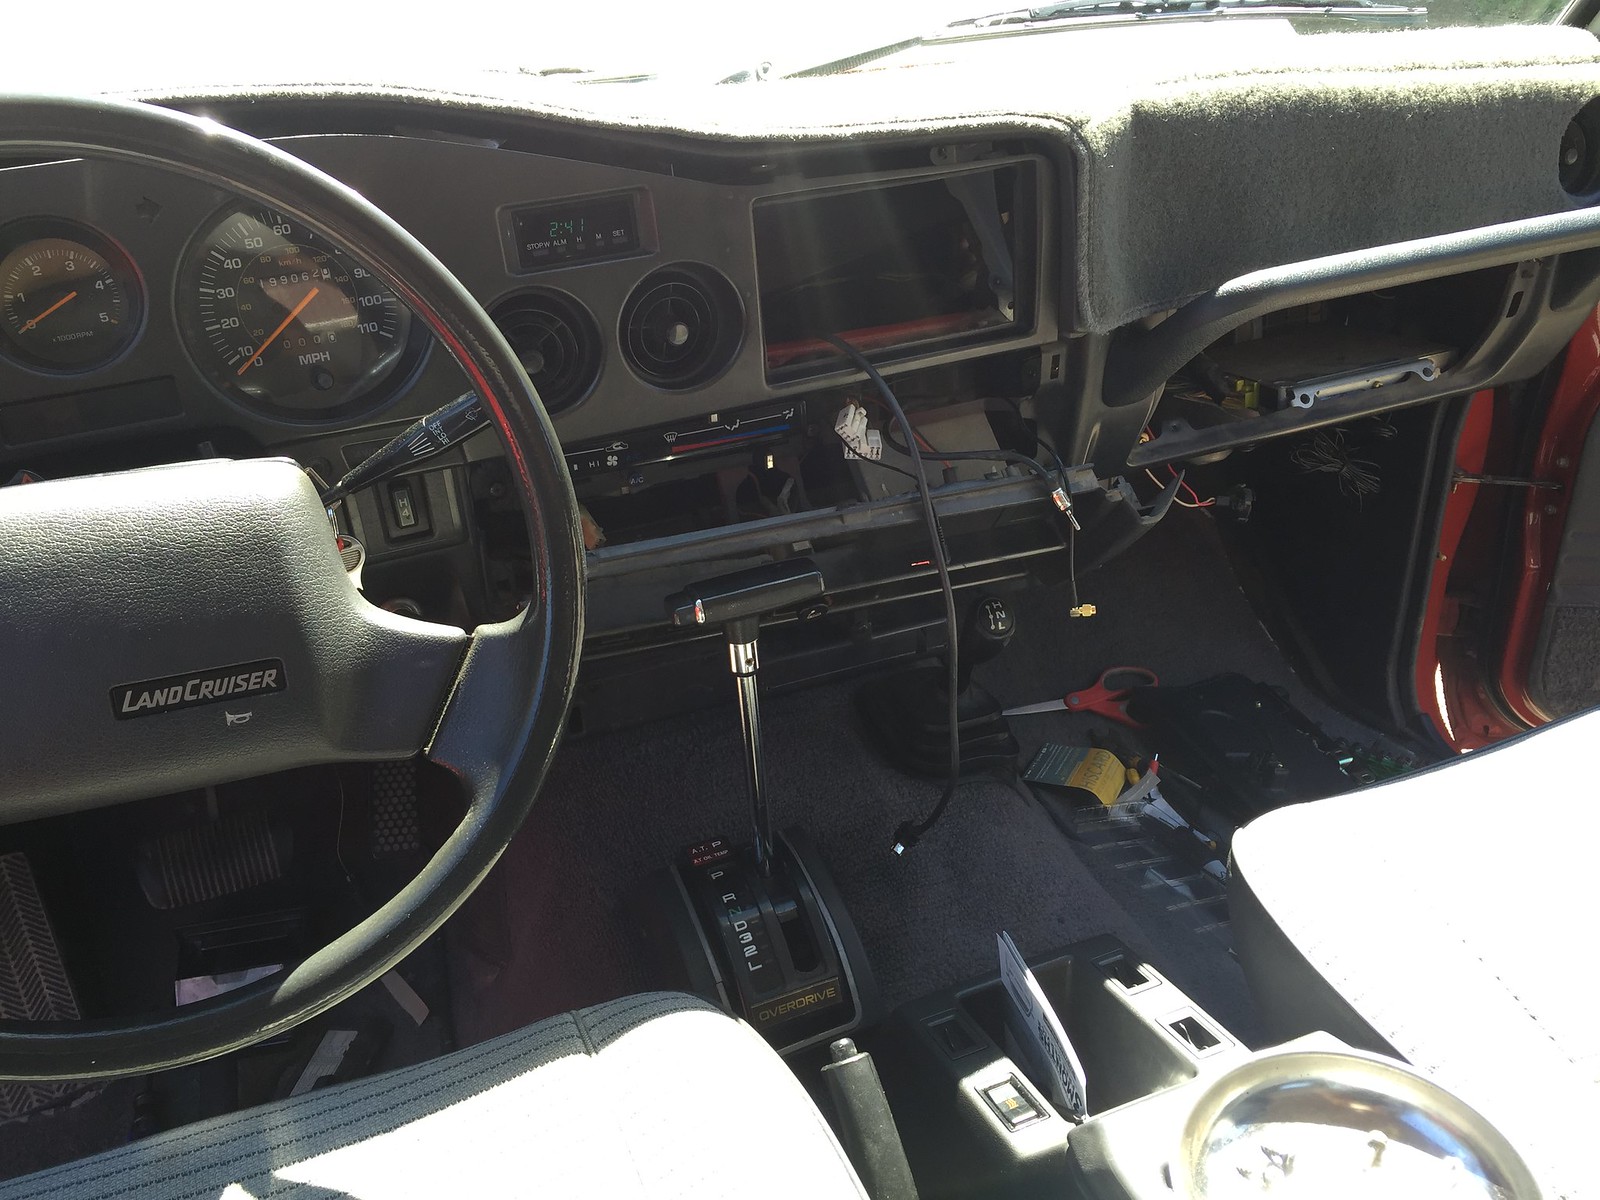
Sure. So here is the pile of stuff that my wife picked out. She did some serious research, even on this forum, to try and find the head unit that did what we wanted. It's a Jenson VX7022. It has nav, DVD player, XM satelite ready, mp3 stuff, the usual suspects. It's a nice unit. We bought the sirius antenna along with a little device which tricks the stereo into thinking that the DVD can always play (usually it wants the truck in park). This way we can watch a DVD at a camp site, or whatever. We got an Esky back up camera plate surround. It's pretty nice. The IR looks pretty good at night. Esky also sells these UHF transmitters and receivers so you don't have to wire the camera all the way through the truck. They work OK. Sometimes there is interference, like if you have a ton of stuff in the back or just randomly it'll get pissed. The picture gets static, like an over-air TV signal, but its still usable. I don't even notice when it does it anymore because it rarely gives us issue. We did have to tweak the location of the items a bit to try and get as clear a line of sight as possible. Position the transmitter so it's at the middle of the tailgate, and the receiver as close to the center of the dash and high as possible so it doesn't have to get a signal through the front seats and might be able to get over the rear bench. It sounds complicated but it's really not. Since we are painting the truck, I'm going to run the included RCA cable from front to back so that the picture is crystal clear. I'd skip the trasnmitter / receiver setup if you were willing to run the cable.

The toughest part about the back up camera was finding the reverse lights at a nice spot to splice into. The head unit will switch to the camera and duck the volume on the radio when you put the truck in reverse. It does this by feeding it 12v from the reverse lights. I found the lights in a harness near the drivers kick panel here (I'm pointing at it with the mulitmeter):

I pushed out the contact with a jewelers screw driver unclasping the locking mechanism for the contact and the stripped back some of the insulation.

Some shrink sleeving and we're ready to go.


Before:
After:
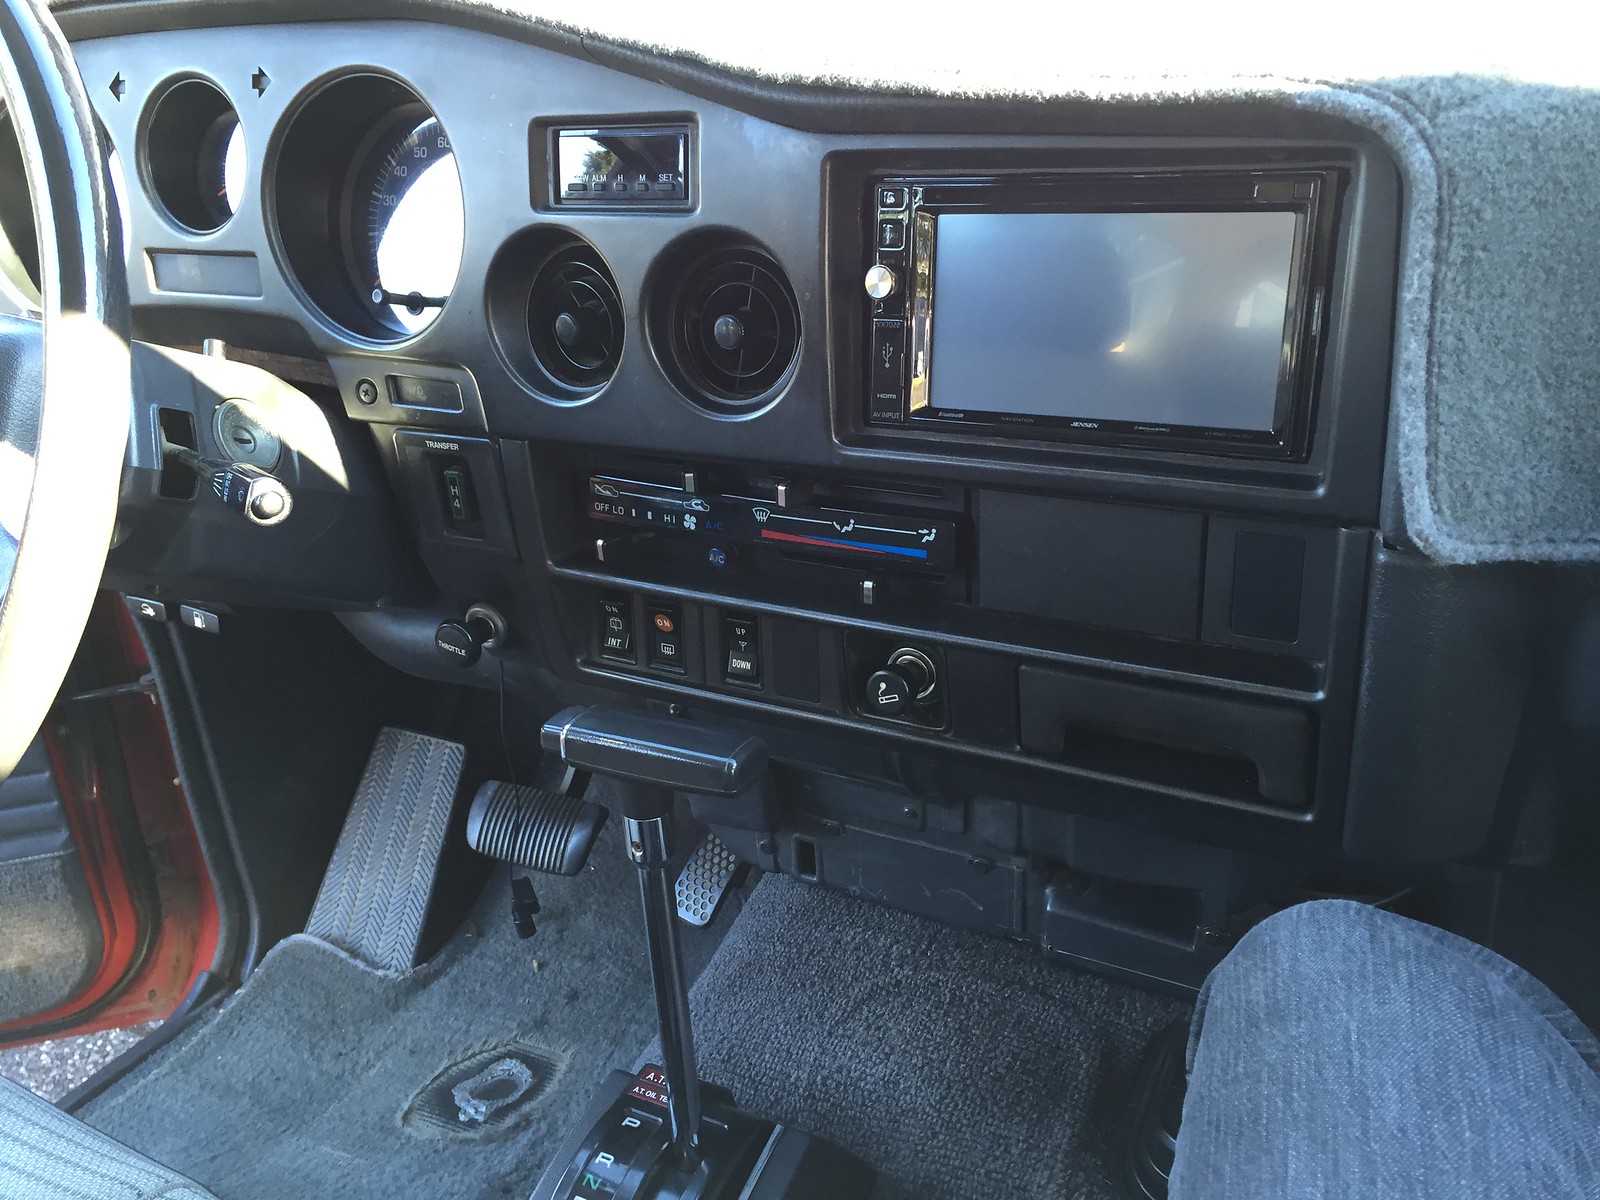
The thing hanging is the bluetooth mic for the hands free phone. We stuck that to the steering column. It works pretty well. The back up camera itself also needs twelve volts to start working, so did the trasnmitter. I cut into the harness that runs under the truck from the drivers to passenger side. The passenger tail light wiring is in that bundle and I just snagged it from there. No tricky harness things, just good old soldering. I didn't take any pictures of it, but everything is hidden in the tailgate. You can see the plate frame in the last photo of my first post. It's pretty small and you can adjust the angle of the camera dependant upon your lift or preference of view. Hope that helps.
Nice work as always. I'm always impressed of the room you have and the other projects in your garage.
I see you cleaned your parts with great results using an aqueous alkaline degreaser. Just a heads up if you didn't already know they are generally not recommended and have a tendency to etch and discolor aluminum.
BTW, if you need a new place to store your front bumper out of the house. I have some room on the front of my 60")
I see you cleaned your parts with great results using an aqueous alkaline degreaser. Just a heads up if you didn't already know they are generally not recommended and have a tendency to etch and discolor aluminum.
BTW, if you need a new place to store your front bumper out of the house. I have some room on the front of my 60
- Thread starter
- #251
I assume the wire is a tap off of the reverse light power wire? That would turn on power for the a rear view camera and display?
Correct. It triggers the head unit to automatically switch to the rear view camera. The camera is powered off a similar line closer to the back of the truck.
Nice work as always. I'm always impressed of the room you have and the other projects in your garage.
I see you cleaned your parts with great results using an aqueous alkaline degreaser. Just a heads up if you didn't already know they are generally not recommended and have a tendency to etch and discolor aluminum.
BTW, if you need a new place to store your front bumper out of the house. I have some room on the front of my 60
Thanks for the kind words. The bottle says it’s safe for aluminum

I have a front and rear bumper taking up space in my garage.
mattressking
10 digits to freedom
Unfortunately you can't swap output flanges but a new replacement for the front is only available aftermarket...rear is still available from Toyota. $65-100 roughly.
Also for aluminum, look into vapor blasting, its the best finish and really brightened up my t-case halves when I did it. From what I gather the slurry mix also sorta anneals the surface so its not as porous...but that is hearsay so far.
Also for aluminum, look into vapor blasting, its the best finish and really brightened up my t-case halves when I did it. From what I gather the slurry mix also sorta anneals the surface so its not as porous...but that is hearsay so far.
- Thread starter
- #253
Unfortunately you can't swap output flanges but a new replacement for the front is only available aftermarket...rear is still available from Toyota. $65-100 roughly.
Also for aluminum, look into vapor blasting, its the best finish and really brightened up my t-case halves when I did it. From what I gather the slurry mix also sorta anneals the surface so its not as porous...but that is hearsay so far.
Next time I’ll get things professionally cleaned. It’s entirely possible that I’ll need to adjust the gearing in the future. Hopefully not.
Great work! Curious on the 6L80E. What made you go with the auto vs manual? I've read a lot of R2.8 to H55 or NV4500 builds, but not as many auto tranny builds. My initial thought behind this was with the small displacement you'd get more "pep" with the manual so it was a more popular choice. I could be completely wrong, and totally understand "to each their own" plus the ease of an auto on long journeys. Just curious is all.
Cheers!
Cheers!
- Thread starter
- #255
Great work! Curious on the 6L80E. What made you go with the auto vs manual? I've read a lot of R2.8 to H55 or NV4500 builds, but not as many auto tranny builds. My initial thought behind this was with the small displacement you'd get more "pep" with the manual so it was a more popular choice. I could be completely wrong, and totally understand "to each their own" plus the ease of an auto on long journeys. Just curious is all.
Cheers!
There are a few things that lead me to the 6L80E. All of these have counterpoints and I'm sure there are some folks who will chime in. These were just the things that pushed us towards the auto.
1) I think wheeling is a bit easier with an automatic. My wife (who can and does drive a manual) also agreed that not having to feather the clutch or rely on the parking break when going uphill in a group would be nice.
2) The president of the R2.8 crate engine program built a range rover with an R2.8 and 6L80E. I didn't reach out and speak with him directly, but I assume he was being guided by folks in the industry who know more than I do.
3) The gear ratios worked out pretty well. The sixth gear is pretty short so it makes the diesel fit well with the gearing native to the cruiser. The 4.10 in the 62 isn't perfect for it, I think 60 gearing would be a bit better, but even the 4.10s will put me at a nice cruising RPM. For the most part the 6th gear really made it attractive for highway driving.
4) The R2.8 has a CAN-bus network which speaks directly to the 6L80E. This will make integration fairly easy and the transmission will learn and react to engine load, throttle position etc, without anything particularly fancy needed (just a patch cable).
5) The truck was already an auto. To be honest I didn't really research how easy it was to convert to a manual (drill for a master cylinder, add a pedal, etc etc.), but given the above it seemed like more of a hassle then it's worth.
6) Lastly, there were adapters and such all ready for it, and Zero Gravity makes a 6L80E ready for the swap.
<edit>
7) 6L80E, along with other modern automatics, has a lockup torque converter. This means lower temps usually. It also negates most loses you would feel at higher speeds. Doesn't address your "pep" statement though.
</edit>
Last edited:
We went with the R2.8/6L80E for all the same reasons plus consideration for towing an offroad teardrop. You can certainly tow 3000lbs with the 5sp manual but we would prefer not to.
Also the 6L80E will work with the stock gear selector. You don't get a tap-to-shift option though, so still considering a Lokar sport shifter.
Also the 6L80E will work with the stock gear selector. You don't get a tap-to-shift option though, so still considering a Lokar sport shifter.
- Thread starter
- #257
Got the t-case all together. Front output with the yoke on is dangerously close to the transmission oilpan. I might have to trim the pan. I'll add a pic later. Tough to tell without knowing the angle of the front drive shaft.
The adapter kit is short one bolt. It's one of the three longer 3 1/4 that go through both split case halves and into the adapter plate.
Just a warning. Advanced Adapters uses 3/8-16 and M10x1.5 for threaded holes. They are dangerously close to each other. Get more than 4 easy turns of a bolt into the hole before you decide to use a bolt. I was thhhiiiisss close to chasing some threads on the adapter when I remembered M10x1.5. The threaded holes for the transmission mounts are M10x1.5


Next step is to get the Axis Industries adapter on the R2.8. Deal with the torque converter and flex plate, then mate these two.
The adapter kit is short one bolt. It's one of the three longer 3 1/4 that go through both split case halves and into the adapter plate.
Just a warning. Advanced Adapters uses 3/8-16 and M10x1.5 for threaded holes. They are dangerously close to each other. Get more than 4 easy turns of a bolt into the hole before you decide to use a bolt. I was thhhiiiisss close to chasing some threads on the adapter when I remembered M10x1.5. The threaded holes for the transmission mounts are M10x1.5
Next step is to get the Axis Industries adapter on the R2.8. Deal with the torque converter and flex plate, then mate these two.
Last edited:
- Thread starter
- #258
Pulled the engine out of the corner yesterday. Finished up the AC compressor install. Started planning out the Axis Industries adapter installation. A couple photos of where I am right now.


The lay of the land:

Factory flywheel:

The Axis Industries pieces. That factory flywheel gets replaced with this starter ring:

This beautiful adapter goes in. It's a work of art. The only bummer is that the engine is crated in such a way that I can't attach this adapter ring without lifting the motor off the crate. I might pick it up, trim the wood the block it sits on and set it back down (you can see the problem in the photo two up from here). I really don't like doing this kind of stuff without the engine being stable.

Then this intermediate hub:

Which bolts to the 6L80E flexplate and torque converter:

Seems easy enough. Then the plan, in a broad scope. Do the knuckles and steering on the truck. I assume its much easier to do that kind of stuff without the engine and transmission installed. Mate the engine and trans. Install the engine side of the Axis Industries motor mounts. Slip the whole kit and kaboodle into the LC. Start fabbing up the frame supports and tranny mount. Pull it all back out. Finish weld and paint the frame. Then charge forward with putting the truck back together. Getting close to the "turn-around" point and I'm excited.
The lay of the land:
Factory flywheel:
The Axis Industries pieces. That factory flywheel gets replaced with this starter ring:
This beautiful adapter goes in. It's a work of art. The only bummer is that the engine is crated in such a way that I can't attach this adapter ring without lifting the motor off the crate. I might pick it up, trim the wood the block it sits on and set it back down (you can see the problem in the photo two up from here). I really don't like doing this kind of stuff without the engine being stable.
Then this intermediate hub:
Which bolts to the 6L80E flexplate and torque converter:
Seems easy enough. Then the plan, in a broad scope. Do the knuckles and steering on the truck. I assume its much easier to do that kind of stuff without the engine and transmission installed. Mate the engine and trans. Install the engine side of the Axis Industries motor mounts. Slip the whole kit and kaboodle into the LC. Start fabbing up the frame supports and tranny mount. Pull it all back out. Finish weld and paint the frame. Then charge forward with putting the truck back together. Getting close to the "turn-around" point and I'm excited.
Last edited:
This is such an awesome family build! I'm excited to see how the R2.8 works out for you. I'm thinking about putting one in my 72 Bronco.