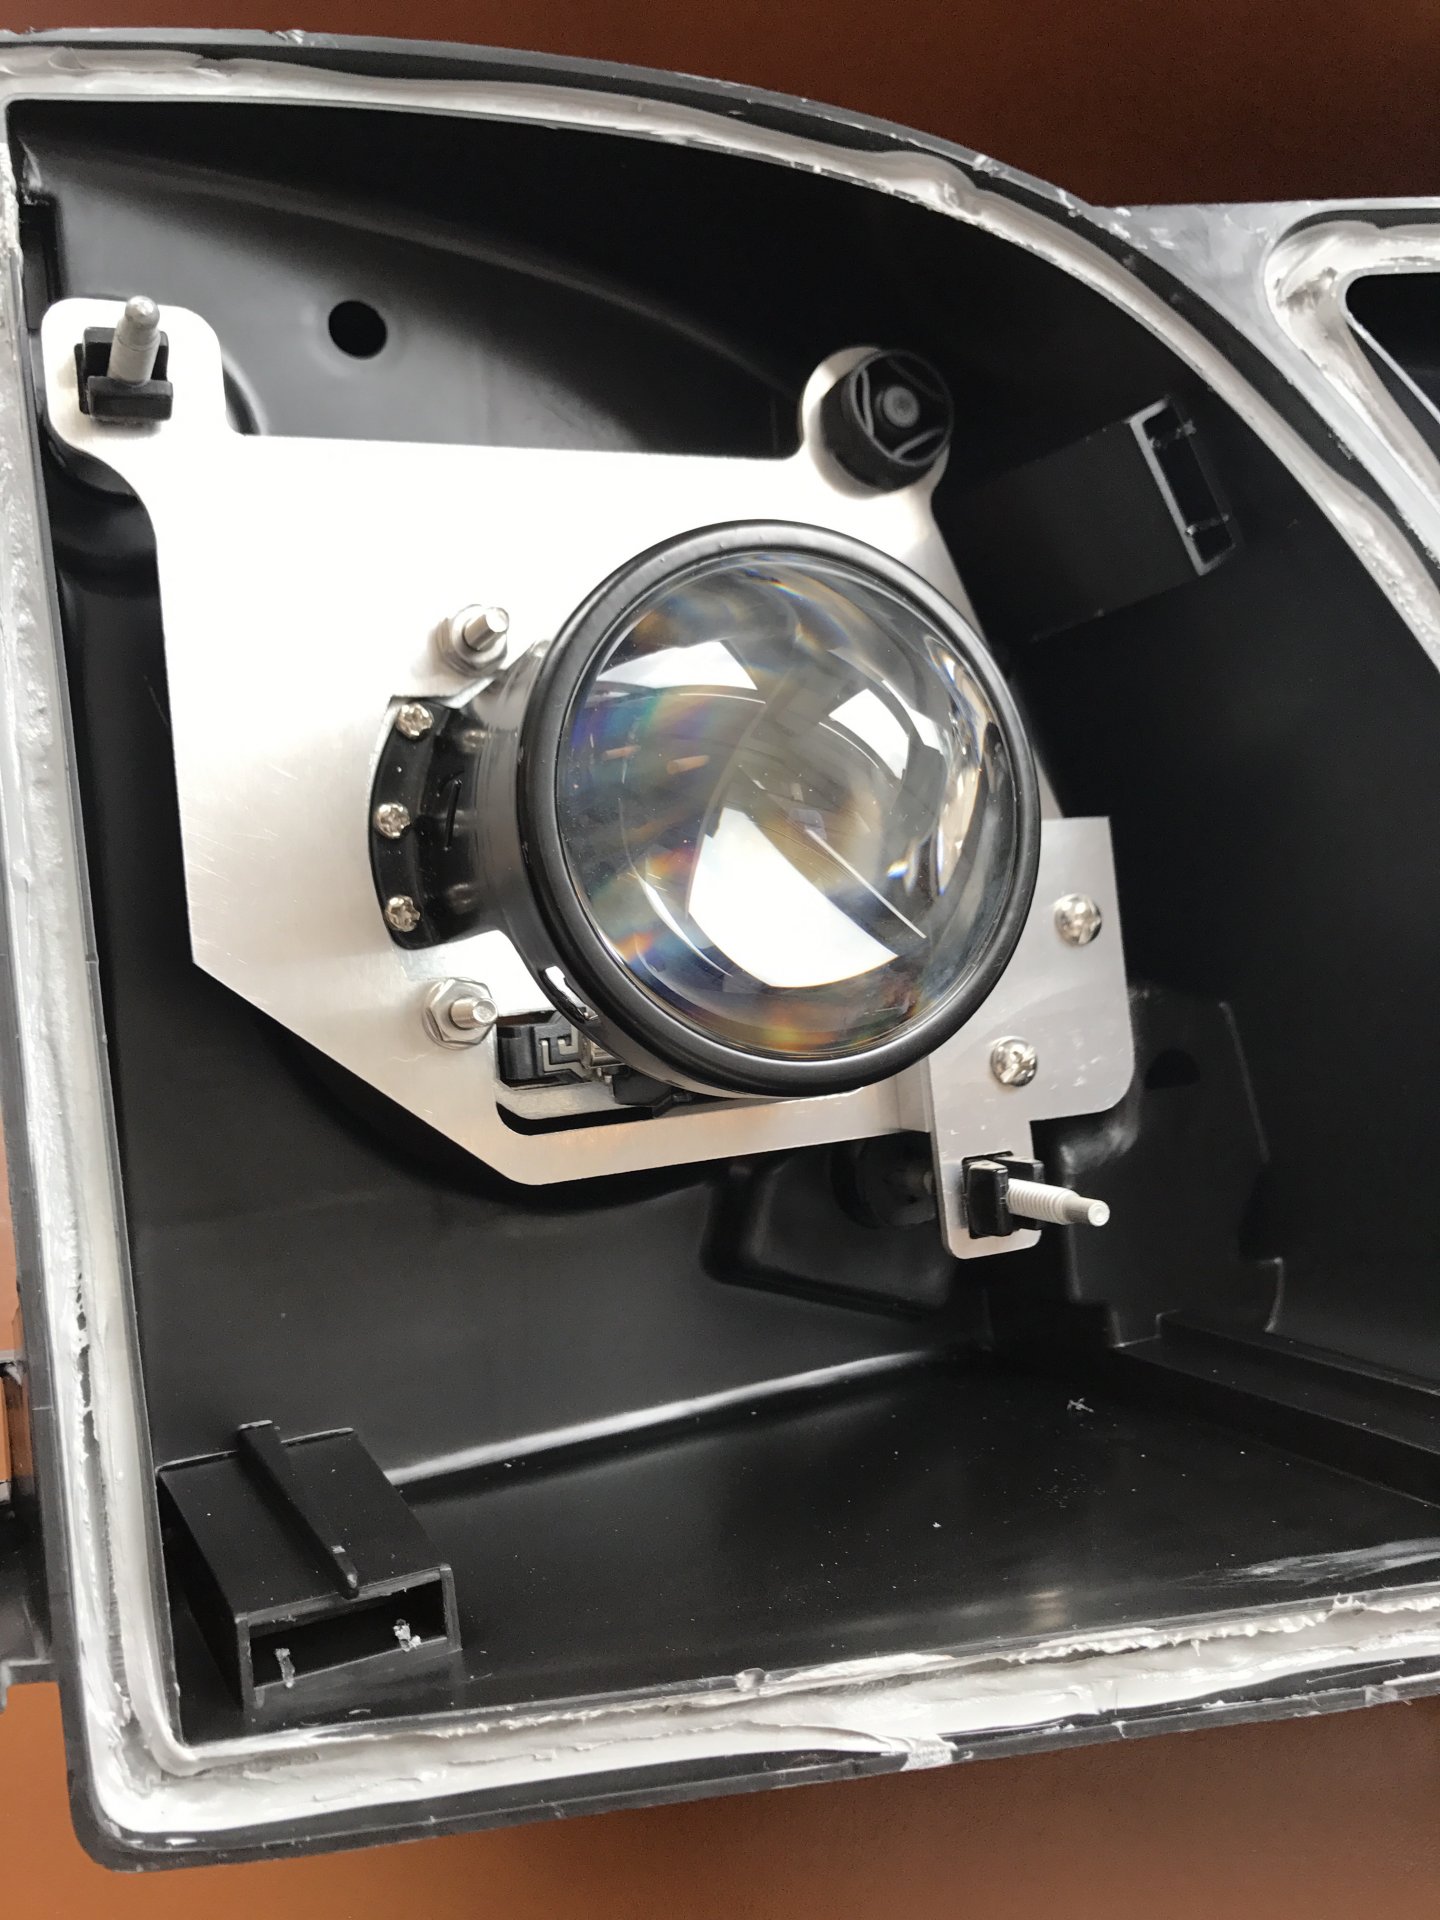
some more pics. clearance to the winshield washer fluid filler tube is good. driver's side ballasts mounted behind the fuse box. i haven't sorted the passenger side yet.


Navigation
Install the app
How to install the app on iOS
Follow along with the video below to see how to install our site as a web app on your home screen.
Note: This feature may not be available in some browsers.
More options
Style variation
You are using an out of date browser. It may not display this or other websites correctly.
You should upgrade or use an alternative browser.
You should upgrade or use an alternative browser.
LX470 HID RETROFIT PROJECTOR BRACKET
This site may earn a commission from merchant affiliate
links, including eBay, Amazon, Skimlinks, and others.
More options
Who Replied?Luke111
Supporting Vendor
- Thread starter
- #864
Both polycarbonate and glass are still available through Lexus. If your lights are in good condition stick with polycarbonate. I don't see any advantage to buying glass unless you are trying to source used housing but one hit from a stone and your buying new housing. All the lights I build are poly
I’m tempted to order a set of glass lens and wrapping them in some kind of paint-protection film to prevent rock chipsBoth polycarbonate and glass are still available through Lexus. If your lights are in good condition stick with polycarbonate. I don't see any advantage to buying glass unless you are trying to source used housing but one hit from a stone and your buying new housing. All the lights I build are poly

Just wanted to chime in and say the bracket made it absolutely easy to retrofit. Easy to aim and they are dead even afterwards.
I did not use any sealant when I resealed them headlights, I just heated up whatever was used in the stock housing and pressed them lens and housing together and haven’t had any moisture issue in 3 years. I also hooked the HID connector directly to the oem harness. No issues there either, I had flickering issues when I used a relay so I ditched that and connected directly to the stock connector.
I did not use any sealant when I resealed them headlights, I just heated up whatever was used in the stock housing and pressed them lens and housing together and haven’t had any moisture issue in 3 years. I also hooked the HID connector directly to the oem harness. No issues there either, I had flickering issues when I used a relay so I ditched that and connected directly to the stock connector.
I'm still sitting on some MLED 2.0's that I bought years ago... Has anyone come up with a good solution for weatherproof caps at the back?
I'm also seeing a new Micro D2S - has anyone tried retrofitting these instead of the Mini D2S? Seems like similar output in a much smaller package.
I'm also seeing a new Micro D2S - has anyone tried retrofitting these instead of the Mini D2S? Seems like similar output in a much smaller package.
Luke111
Supporting Vendor
- Thread starter
- #869
Page 26 post 510 is the cap I use but I also added extra vents into the housing. I also cutout a protion and fiberglassed in a minor extension for clearance, This was a total PITA. Now the Micro D2s is really nice and it mounts using the same bolt pattern as the H1 7.0, so my H1 bracket should work. I'll bench test it over the next few weeks.
 forum.ih8mud.com
LX470 HID RETROFIT PROJECTOR BRACKET
Luke, Do you plan to sell a plug and play option with glass housing and HID ready to go? Yes, the setup above is the glass option.... give me a call if you're interested 703-371-8494
forum.ih8mud.com
marshcat
SILVER Star
Last year I bought a retrofit kit but decided not to do the project. Selling the kit + a spare set of headlights
What are you asking for everything? Are they OEM Headlights?Last year I bought a retrofit kit but decided not to do the project. Selling the kit + a spare set of headlights
Jack90210
SILVER Star
marshcat
SILVER Star
$450 for everything. Yes, OEM Lexus headlights. Headlights are in decent used condition.What are you asking for everything? Are they OEM Headlights?
Luke111
Supporting Vendor
- Thread starter
- #874
I'm working on 2 kits that will be 90% finished using either the Morimoto H1 7.0 or the Morimoto Mirco D2S. Using new OEM housing which will have the new projectors installed. You simply install, align the cut off. remove and seal. Since I don't have a shop, building finished lights required me to remove the lights in my truck, make all the adjustments, then have to install my lights again. Offering a kit will cut the cost and allow me to build lights as I'm considering selling my truck. Pricing will be coming soon but I'm shooting for $300-$350 savings from $1950.00.@Luke111 are you selling a plug-and-play version these days? Or are you doing installs at your shop?
Last edited:
Just wrapped up this project with glass headlights. I used the newly recommended headlight back cover.
I mounted the relays on passenger side using the coolant overflow bottle mounting bolt. Just had to open up the relay bracket some.


I mounted the relays on passenger side using the coolant overflow bottle mounting bolt. Just had to open up the relay bracket some.
Here is a video of how I pressed in the nut sert for mounting the ballast to bottom of headlight. 4-5 seconds on heat then press it in. Too much heat will cause it to melt too much and not set straight.
If you have a garage I would recommend setting up a fixture that mounts to an unchanging location (wall mount?), put your headlight asm in there and then align to a predefined (unchanging) mark across the garage. Could save you a lot of time installing/removing from your truck.I'm working on 2 kits that will be 90% finished using either the Morimoto H1 7.0 or the Morimoto Mirco D2S. Using new OEM housing which will have the new projectors installed. You simply install, align the cut off. remove and seal. Since I don't have a shop, building finished lights required me to remove the lights in my truck, make all the adjustments, then have to install my lights again. Offering a kit will cut the cost and allow me to build lights as I'm considering selling my truck. Pricing will be coming soon but I'm shooting for $300-$350 savings from $1950.00.
Luke111
Supporting Vendor
- Thread starter
- #878
We'll I don't have a garage and if I did it would have to be more then 30 feet deep. if i remove the adjustment step and sealing I can lower the price. Trust me I've considered that option but mounting them in the truck is the most accurate way to adjust the rotation to insure the cut offs are level.If you have a garage I would recommend setting up a fixture that mounts to an unchanging location (wall mount?), put your headlight asm in there and then align to a predefined (unchanging) mark cross the garage. Could save you a lot of time installing/removing from your truck.
Bummer, appreciate your product so was hoping to save you some time!We'll I don't have a garage and if I did it would have to be more then 30 feet deep. if i remove the adjustment step and sealing I can lower the price. Trust me I've considered that option but mounting them in the truck is the most accurate way to adjust the rotation to insure the cut offs are level.
I've been meaning to do this mod for nearly five years, probably about time I get around to it.
I'll be buying some brackets from @Luke111, and it looks like rather than get the Morimoto Mini H1 Stage III kit, I could instead get the new Micro D2S Stage III kit which is currently on sale, plus takes the D2S bulbs: https://www.theretrofitsource.com/bixenon-morimoto-micro-d2s-stage-3
It looks like since I'm ordering directly from TRS instead of Lou, I need to order the kit, plus the high-beam-splitter and the extension cords.
There's a bunch of options on the ordering pages, are these correct for what I need?
The kit:

The splitters - is the top one the correct splitter?

The extension cords:

Looks like I'll also need a housing cap, but the one mentioned previously isn't available through Amazon anymore... @777300er any suggestions for replacements? When I search Amazon for "Headlight covers 80mm" there's a ton of options in all different shapes!:
I'll be buying some brackets from @Luke111, and it looks like rather than get the Morimoto Mini H1 Stage III kit, I could instead get the new Micro D2S Stage III kit which is currently on sale, plus takes the D2S bulbs: https://www.theretrofitsource.com/bixenon-morimoto-micro-d2s-stage-3
It looks like since I'm ordering directly from TRS instead of Lou, I need to order the kit, plus the high-beam-splitter and the extension cords.
There's a bunch of options on the ordering pages, are these correct for what I need?
The kit:
The splitters - is the top one the correct splitter?
The extension cords:
Looks like I'll also need a housing cap, but the one mentioned previously isn't available through Amazon anymore... @777300er any suggestions for replacements? When I search Amazon for "Headlight covers 80mm" there's a ton of options in all different shapes!:
Also, for D2S users I found a good sealing cap that also has a hole in it specifically for the bulb connection. Again, only for D2S users. Mini H1 need not apply. You have to cut the center hole in the cover shorter, then put the grommet over the D2S connector and plug the bulb in.
Headlight Covers 80mm

Last edited:
Similar threads
Users who are viewing this thread
Total: 1 (members: 0, guests: 1)