Joe’s '77 FJ40 Dream Build (1 Viewer)

This site may earn a commission from merchant affiliate
links, including eBay, Amazon, Skimlinks, and others.

Truck still wont start because of an ignition issue, but at least we got this done. Now the rest of the interior and hard top can go on.

I am a big fan of colour matched bedliner type material, been using it on my vehicle builds for over ten years:beer::beer:

Rob
 
Wow Snoozer,

looking great! now I need to get to mine. Your fiance/future in-laws helping is a great way to a relationship. Good luck with the clutch woes.

Luis
 
I still am not driving it yet due to a few more things i need to get it inspected.

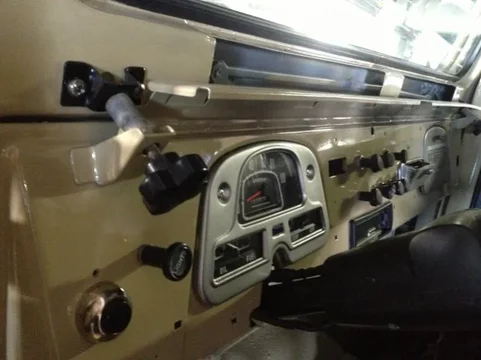
This weekend I had time to route and fabricate the exhaust and hook up the horn. I have not had time to get the steering wheel buttons to work, so here is a quick fix. I wanted the install somewhat clean, so i used the factory defrost hole as a temporary mounting point.


image-3425271660.webp


As you can see, the defrost covers are next on the list.

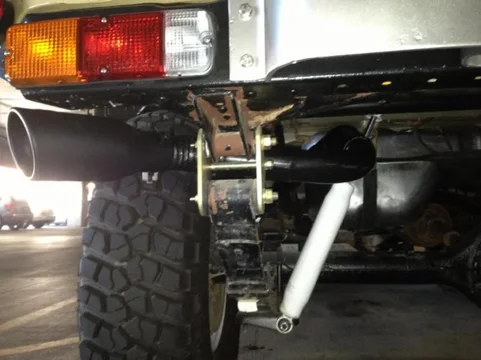
My concept for the exhaust was a TRD FJC look. I might change the angle at the end and have it go straight out the side. I got good feedback from people on its current position. You don't even notice the exhaust until you look for it. The paint is 350 degree crinkle to match the tip.


image-3463280233.webp


image-2429169296.webp


image-2817400680.webp


And of course Christmas was good to me.
My new smitybilt console...


image-934412829.webp
image-3425271660.webp
image-3463280233.webp
image-2429169296.webp
image-2817400680.webp
 
Wow, just wow. Awesome work on this cruiser.
 
It's so nice having the truck at my house. I am able to get the small projects done in my spare time. Last weekend I installed my rear door lock thatI finally picked up from Toyota, the heater, and started my carb tuning. I then washed it for the first time since paint and made a quick drive on the free way to dry off. My secondary is not opening. I am assuming that the diaphragm is bad, but I will find out soon. For now, it idles well and has enough power to get me around.


Here are some higher quality pics as promised. There are a lot of South Americans in my building, so I always get couples that come chat for 20 minutes or so when I am working on things. It's nice seeing their face as it brings back child hood memories for them as much as it does for me.


photomar02150317.jpg


photomar02150156.jpg


photomar02150207.jpg
 
......And of course Christmas was good to me.
My new smitybilt console...


View attachment 719147

Your build looks great! I know I have seen it before and I thought I had commented before now but I guess I haven't. Man you put in some serious hours on this truck.

Can you elaborate on the install of this console? Did you go with the model # 31815? That is the one that is black and has the radio section. How does the width work in your 77 FJ40 between the factory seats? How did you install it? Did you have to fabricate any special brackets to make it ride level on the factory seat frame? Any trouble with the trans shifter contacting?

I have read about the quality and I understand I am not buying a Tuffy. There are lots of threads on the comparison but seems like most of the installs are in 60 series trucks. Since mine and yours are both 77's with original seats, your install would most closely resemble mine. Any help would be greatly appreciated.

*****edit***** Ok. I see those are not OEM seats. They are Procar. Damn those look close to OEM! Nice job. I may have to own a pair if my originals ever wear out. Not sure what I would need you to answer now. Your setup is different than mine. Are you pleased with the Smittybilt console?
 
Last edited:
I am absolutely pleased with the smittybuilt. It was a great surprise gift at christmas from my in-laws. The foam provided was dried out, so i bought some strips from pepboys.

To mount it, you can use the provided mount, or the spacer for the tuffy (depending on model) which is about 20 bucks.

I highly recommend these pro cars for a more comfortable factory look. The fit is tight. But it works.
 
How about an update?


Well there was a wedding...


image-3235214802.webp


image-1708913548.webp


image-841614799.webp


Since we have been back from our honeymoon, Ive been tinkering with small things in the evenings.

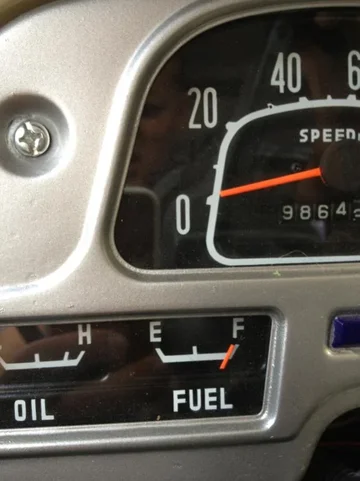
I now have a working fuel gauge. The 79 sender works with the 77 gauge. It isn't perfect, but I at least have a clue where I stand. I ran it about an 1/8th below empty and filled up with 20 gallons. I was pleased to see the gauge climb to here after my fill up.


image-793851426.webp

I also am working on some drivetrain noise and vibration to make it better for a long trip. It turns out my driveshaft was out of phase by one notch. I fixed that. Now I just have the classic gear whine with load applied. I figure this is from the fact that my pinion angle is off (which it is), or my ring and pinion are worn. I will correct the pinion angle as soon as I can decide whether i am removing a leaf.

This week, I Plasti Dipped my tire carrier as an experiment. I was happy with the result, as it goes with the black trimmed theme in the rear. Im also happy to get the 33 and tire carrier out of my storage!


image-3867184976.webp


image-1934411285.webp


image-3830684042.webp
image-3235214802.webp
image-1708913548.webp
image-841614799.webp
image-793851426.webp
image-3867184976.webp
image-1934411285.webp
image-3830684042.webp
 
Last edited:
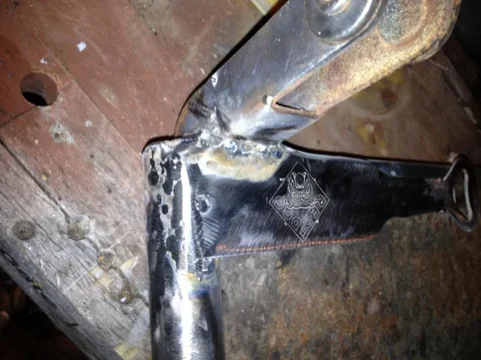
Its time for some passengers. I decided to finish a project I've been dreading. My jumpseats needed some serious TlC. The pipe at the hinges was really cracking and i was afraid i would have to scrap the frames. I looked around and found some nice pieces of "scrap" metal in my dads things. Anyone remember this brand?


image-212947348.webp


image-4083143203.webp


image-1185465781.webp


After some late night painting, my wife ordered me some new black seat covers from CCOT.
The product is great, however, you will need your own screw and Mechanics wire (im not sure why they don't include the mechanics wire.) i had
to buy a roll of 16 gauge wire for 10 bucks from oreilys along with the screws.

I started installing the covers this morning and hope to finish up later.


image-2732174320.webp


image-1896767604.webp


image-1718493245.webp
image-2732174320.webp
image-1896767604.webp
image-1718493245.webp
image-1312111015.webp
image-4083143203.webp
image-1185465781.webp
image-212947348.webp
 
Last edited:
I havent updated in a while, but I have been very busy with a new job and other activities. However, I have gotten a lot done on the Truck.

The rear seats are in and look great. I have been able to take small groups to lunch in the truck, which is always fun.

I got my Trollhole Carb installed just in time, since I had to Daily drive my truck for a few weeks while my other car was in the body shop. Since then, I have gotten a functioning vacuum advance distributor from Marshall and All I can say is wow. I tuned it by ear and feel for now and it is already great. In the past I had to pick between Bad smell, mid throttle power, Tip in power, full throttle accelleration. In the past I had to choose two of 4 and could never have all. This must be what it was like to drive one of these off the show room floor.

De-SMELLIFICATION
My current project is to make the truck as smog and fume free as possible. Before I had nothing on the calve cover vent, so fume would come through there and teh carb and come into the cab. two Christmases ago, I bought an FJ60 Air cleaner and was unable to install due to my Valve cover. I was able to modify this to work by putting a golf ball sized dimple where it comes in contact with the Oil cap and. It fits great, and I have greatly reduced any fumes that came into the Cabin. A big part of why I could not do this, was the rigged up fuel line that a past mechanic had put on the truck. There are about 6 adapters that converted the BPST fitting in the carb to whatever fuel barb the 5/16 rubber hose connected to. I temporarily fixed this situation by running part of a return fuel line(left over form the trollhole install) off the carb and running rubber hose from there to the carb using the correct 13mm barb that used to be on the fuel pump.

Last night I bought a tube bender and steel line to create a more factory looking fuel line. I felt like a Kid with an erector set bending all those turns up and around the Valve cover and Air cleaner. I'll post pics when done. All this is going to lead me to something I didnt want to do. A minimalization of the engine bay and complete cleanup. For those that have read the thread, You will see that My engine is by no means pretty. I think some fresh paint and wire wheeling is due.

Next on the list is:
-New Radiator
-Spring pack leaf removal
-Shim and rear alignment
-Build a tailgate solution
-Speaker solution (looking at MTX wakeboard speakers)
-Maybe 3.70 gears

In my opinion, this is all that is needed to make this a spectacular summer truck, which has been almost 3 years in the making.

I am also looking at installing a catalytic converter right after my Long tube header. Unless anyone has a negative comment about this, I think It will help it to be that much more suitable for commuting around town and not smelling like smog when I go to work.
 
If he ain't interested in the 3.73's PM me a price
 
Goat:
I am not sure if it is, but when you search triple D on yelp, it comes up in the top three with several other spots I have been to when they hosted car shows. All good eats.

Skydog:

This is a single stage

I used PPG epoxy primer, PPG highbuild, and crossfire single stage enamel which has no clear coat. I had very little orange peel despite painting in the dark with falling temperatures. i did not need to sand and was PLEASANTLY surprised when I came back the next day to look at the cured paint.
 

Users who are viewing this thread

Back
Top Bottom