Joe’s '77 FJ40 Dream Build (1 Viewer)

This site may earn a commission from merchant affiliate
links, including eBay, Amazon, Skimlinks, and others.

It's been a while since I've gotten to touch the cruiser, but wheels are in motion. My new ambulance doors just Arrived along with my fuel panel cover and transmission inspection window. I also just ordered my rough country 4 inch lift.
Paint will most likely happen in january now due to all of the projects around the property I inherited from my father. I am seriously considering the tintable MONSTALINER. I really like the results I have seen and would like factory color interior with the ruggedness of the liner. After blasting, there are parts of the body that have a little more pitting than I would like visible.

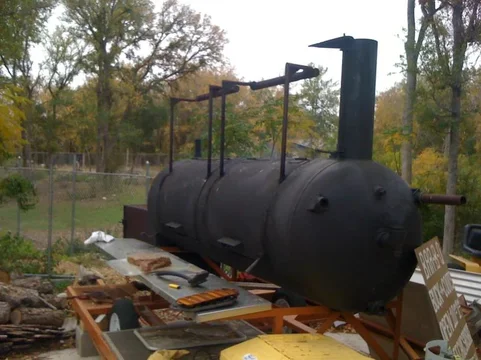
Here are some non cruiser pics from my dads celebration of life. He was an award winning brisket cooker. I hope I did him proud with the 60 pounds of meat I smoked for his shindig. This is how we do it in Texas. Meat so good you don't need sauce. Also his smoker; another thing that will never be sold. :cheers:


image-1132549767.jpg


image-470935714.jpg


The day after, a buddy and I organized the carport and cleaned a lot up so we could have a real workshop. we also found a cart stashed in some weeds that had some giant casters. We modified it slightly and put the new body on it so we could get it out of the elements.
That's all for now...
image-1132549767.jpg
image-470935714.jpg
image-2541298133.jpg
image-3377182016.jpg
 
Last edited:
You know, by posting that pic of the smoker, you are volunteering to cook for a Austin get together, right? Okay, just checking...
 
Sorry for your loss!! Fortunately you were able to spend some quality time with him.
 
FJsnoozer said:
Its a marketing technique to get extra help from local cruiserheads. :cheers:

Let me know if you need help with anything. I have most of the changes/fixes done on mine for now, so have time.
 
I am back! I couldn't wait to get back to the enormous task at hand. My :princess: and I headed down with the sole intention of installing the lift. My cousin just moved back from Pitt and now lives 5 min from where my project is stored, so he came over to lend a helping hand.

All went very smoothly; cotter pins all came out, all nuts came off easily ( I manhandled the I bolts off with my breaker bar) even the stock shackles weren't too difficult. Then came the obstacle. Spring pins would not budge more than a half a cm. After searching mud with no luck or answer I watched a YouTube video from the SPEED channel where they installed a lift on a cj7. You know how they always make if seem sooo quick and everything comes off easily? Well tho was the case, but the guy admitted: "you see we didn't show us removing the bolts, that's because they were seized and we had to cut them off." Thanks for the honesty! Well I just don't happen to have a spare set of spring pins. Or do I ...

We decided to pound on it with a hammer for another 30 min before we settled on a miter box saw with a metal blade. Lucky me, the blade was just deep enough to just cut through the bolts and nothing else.

This is the part of the story where my GF walks into the house. Something about me on my back cutting upwards with a circular saw didn't sit right. :hmm: I began cleaning up parts with the wire wheel and coating them with chassis saver. Then I remembered seeing a ziplock bag labeled spring center pins in my box o stuff I got with the Tub. So we'd we're able to quickly finish off the back as we ran out of daylight.

Here are some before and after shots of the shackle angles. Mind you, there is not much weight in the truck, only a tub and driveline at this point. So considering I had decent shackle angles before with full weight' I hope these should be good. I have also attached a pic of the new parts on old parts. I can't wait until everything like like this lift. After seeing this, I am definitely going to treat the whole frame.
image-2106540761.jpg
image-1238842814.jpg
image-497309442.jpg
 
I notice the truck now leans. The stock leaves had the factory spring spacers to correct it but I did not swap them on. I will add them back in before the final tighten down.

Plan is to take the body off of the frame this weekend.
image-891139397.jpg
 
Last edited:
Davis,

Glad to see you are back at it. Keep posting pictures so that I can continue to get inspired to work on mine.

ML
 
Yes, Sully that is the body I had Sand Blasted by Stan. I still have a little bit of work to do while it is sitting in the garage on the stand. Ill have to workout a few little dents as well as some pinholes in the floorboard.

Meatloaf, thanks I'll keep taking pictures hopefully a lot better now that I've got the iPhone 4s. It has a much better camera than the old iPhone that I was taking shots from. This thing is about to start looking like a real frame off instead of a boring project.

Good luck with your build.
 
Last edited:
The body on the frame? No, that's the old pos body that I sprayed with a 1 can of rattlecan rust oleum.

The new body is in grey primer and is parked in the car port!

Current body looks like this inside :)

Let me know if any one has a day this weekend to help me yank the body off!
image-3747759542.jpg
 
FJsnoozer said:
Free BBQ AND BEER or iced tea!

Sully, are you in town? I know you know the way.

What day do you want to do it? Do you already have the bolts removed/cut that are holding the current tub on? I can definitely come up and help. Sunday would be much better for me if possible. It should only take about 2 minutes to remove the tub once the bolts are removed. Are you going to be there Friday? Anyways let me know. I'm pretty wrapped up this weekend in chores/plans but I can come up and help get that job done.
 
I can bring my engine hoist so that if it is just the two of us, it will make it much easier!
 
I didn't get a lot done today but I did make some progress. The rain and several things that need to be done around my mothers house definitely tied me up for most of the day. It was the saws-all that saved the day. I made one trip to Lowe's to get a metal blade and then all the body mounts came off very easily. I gutted the dash and brought the steering column and gauge bezel home so I can refurbish them. Our high-rise has a storage area where I can get miniature projects such as this done. I still need to remove the master cylinders. As soon as I have help from a few friends I will take the body off and start working on the frame and the paint.
image-3762738270.jpg
 
Last edited:

Users who are viewing this thread

Back
Top Bottom