What Did You Do with Your 80 This Weekend? (44 Viewers)

This site may earn a commission from merchant affiliate
links, including eBay, Amazon, Skimlinks, and others.

tore apart the front end, cleaned up all the parts real good, new bearings all packed and took out stock diff to put new diff with 4.88s and arb in only to find it doesn't fit! :mad: bought it from low range since i didn't want to buy from trailmart and marlin was backordered on bearings, only find low range farms everything out to trailmart. trailmarts excuse is they use a thicker bearing adjuster and that the housing needs to be modified, but neither website nor the paperwork mention anything about a thicker bearing adjuster or housing modifications required, which now has be a bit apprehensive in addtion to seriously pissed.

but i did finally get the front end abs free (anyone need front harness and sensors) and the front end is completely rebuilt minus the diff View attachment 1042688 View attachment 1042689

Well that puts a damper on your project. I am pretty sure I remember reading threads where ppl have to clearance the housing to fit the ARB locker in. It wasn't much but it has to be done.
 
Here are some night shots
ImageUploadedByIH8MUD Forum1425900358.063206.webp
ImageUploadedByIH8MUD Forum1425900370.365236.webp
ImageUploadedByIH8MUD Forum1425900379.548810.webp
ImageUploadedByIH8MUD Forum1425900394.300347.webp
 
Finally woke up after forcing myself to stay up so that jet lag wouldn't kick my ass all week. Tried to get breakfast but truck wouldn't start. Not even turn over. Just "click". Well 2ish weeks is all it takes to kill the main battery it seems. Well brought out my handy dandy jumper cables and jumped myself using my six battery. No worries and all is good with the world again.

I see some draw chasing in your future - make sure you start a long thread about it :p and avoid listening to advice :flipoff2:
 
Last edited:
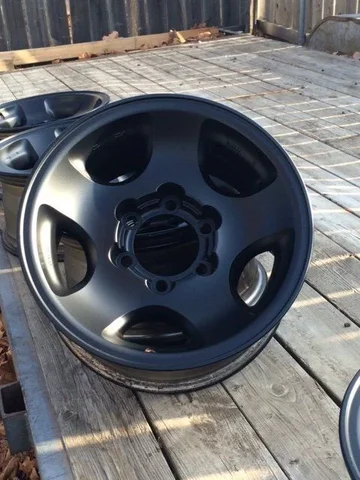
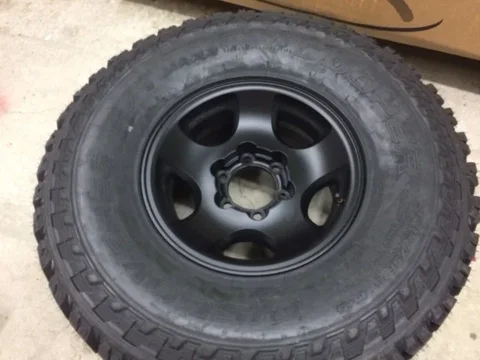
Powdercoated my wheels Black Jack Flat Black and got them mounted on some Cooper ST Maxx 35's, Got my Ironman bumper back from the powdercoater, couldn't fit it in my oven but had it coated Kingsport grey to match the rest of the color scheme. Also finished installing my OME 2.5" lift and started in on my DEPO HID retrofit. Waiting on the weather now so I can monstaline the whole exterior and finish up wiring the roof for the light bars.
IMG_0124.webp IMG_0125.webp IMG_0127.webp
 
Powdercoated my wheels Black Jack Flat Black and got them mounted on some Cooper ST Maxx 35's, Got my Ironman bumper back from the powdercoater, couldn't fit it in my oven but had it coated Kingsport grey to match the rest of the color scheme. Also finished installing my OME 2.5" lift and started in on my DEPO HID retrofit. Waiting on the weather now so I can monstaline the whole exterior and finish up wiring the roof for the light bars.
View attachment 1042880 View attachment 1042881 View attachment 1042882

Rims look nice how costly was the PC?
 
Used it to pull the river boat to check on my floating camp/getaway. Been a few months since anyone has checked on it. She's just fine! Gonna need a coat if paint this summer.
ImageUploadedByIH8MUD Forum1425917445.209336.jpg

ImageUploadedByIH8MUD Forum1425917579.759280.jpg
 
Last edited:
Fixed my rattling steering column cover (re-built the broken columns with epoxy putty), finally did the 7-pin mod, and added a blank ABS cover plate next to my CB to fill in a gap.

I can't believe how happy the steering column fix has made me. The turn signals seem to work better, no rattling. Something this small shouldn't make me smile this big! :)
 
Rims look nice how costly was the PC?
The wheels just cost me materials since I have all the powdercoating equipment, so about 35 bucks in powder and the electricity to run the oven.. FYI factory wheels have some sort of anodizing on them that is an absolute bear to get off unless you have a high power blaster or some good chemical powder remover. I ended up just etching the anodizing with my cabinet blaster and coating over it.

The bumper I had him just spray over the original ironman black powdercoating as it was still in good shape. I supplied the powder and clear for it and he charged me $155 to finish the prep, shoot the first coat, and then shoot the clear. I'll post some pics of that as soon as I get it out of the back of my truck.
 
I see some draw chasing in your future - make sure you start a long thread about it :p and avoid listening to advice :flipoff2:

First off: :flipoff2:

Secondly: I think it's the light on the window switch for the LCP keyless windows mod.

Thirdly: I could absolutely start a thread detailing how I track it down which would be profoundly useless save for all of (4) people.

Lastly: I only listen to good advice :flipoff2: and at my pace and interest level. If I can over think and over engineer it with something that over complicated it...well then it's priority just got moved up. :D
 
Last edited:
First off: :flipoff2:

Secondly: I think it's the light on the window switch for the LCP keyless windows mod.

I would like someone to donate a master switch to determine how to discount the switch light that causes the draw

Anyone with an extra switch?
 
Last edited:
I would like someone to donate a master switch to determine how to discount the switch light that causes the draw

Anyone with an extra switch?

Unfortunately I don't but I think I will just remove the bulb in that particular switch. It's not like I use or even notice it. Also, I'm making a pretty big assumption on it being the cause but I do have my entire electrical system well planned out so unless I have a gremlin elsewhere ...
 
Unfortunately I don't but I think I will just remove the bulb in that particular switch. It's not like I use or even notice it. Also, I'm making a pretty big assumption on it being the cause but I do have my entire electrical system well planned out so unless I have a gremlin elsewhere ...

You cant get to it like one would think. The are two wires on the switch that made some sense (to me) they would be for the lamp so I cut them and reinstalled the switch and nothing:doh: I believe the lamp is a inline LED otr the likes so one needs to dig into the assemble. I not willing to risk destroying mine.

I started asking the parting out guys for a donation for research:rolleyes:we will see if someone kind sole comes through

I actually read a write up about this here on MUD. It's not impossible. When I get in front of a computer I will find it. Was it in the mod thread for giving constant power to the window switch? Or maybe it was in an LED thread. It showed exactly what to do to replace the bulb in the switch to LED so you could take from that how to just eliminate the bulb.
 
I actually read a write up about this here on MUD. It's not impossible. When I get in front of a computer I will find it. Was it in the mod thread for giving constant power to the window switch? Or maybe it was in an LED thread. It showed exactly what to do to replace the bulb in the switch to LED so you could take from that how to just eliminate the bulb.

That would be most excellent I will look forward to it
 

Users who are viewing this thread

Back
Top Bottom