Builds 1st FJ40, '76 - SMOKEY - Puttin’ her Back Together (3 Viewers)

This site may earn a commission from merchant affiliate
links, including eBay, Amazon, Skimlinks, and others.

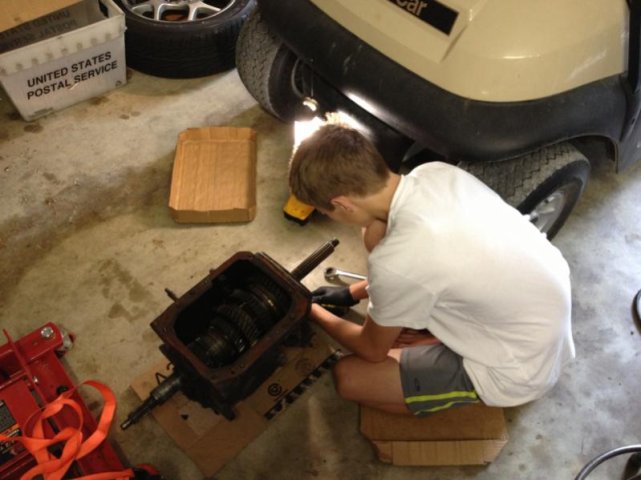
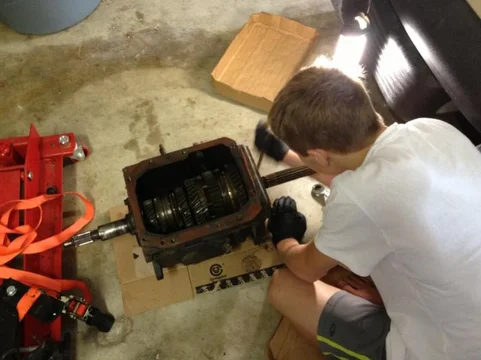
Started the tranny rebuild today. Got my son to help (actually he came to me for the first time and said, "Let's work on the truck, what can I do?")

Going to try to make a decent How To thread since I cannot find a complete one for an H42 version. Will need everyone's help to ensure it is correct since I have no idea what I'm doing :cheers:

Here is a link to the thread: https://forum.ih8mud.com/40-55-series-tech/758634-h42-transmission-rebuild-76-fj40.html

And photos of the boy at work. Wish I had learned what a tranny looked like at 13.
image-124120693.jpg

image-2402266289.jpg
image-124120693.jpg
image-2402266289.jpg
 
Last edited:
That's a memory maker for sure! Good job dad. Mine is 13, not quite ready for the Quetico trip.

I went to the BWCA and Quetico Forest the first time when I was 12. At thirteen took a 21 day trip that exited through a forest fire on Saganaga and Saganagons. By sixteen my buddies and I were up there with no adult supervision and a canoe mounted gravity bong. :meh:

Probably to late to bring him now but think about it for next year. Great place to learn some valuable life lessons......

Enjoy the trip man. That place is the :censor: bees knees.

It is another world up there. One of the few places in the world where you can drink the water right out if the lake with no filter - which we do regularly. It is a strange feeling that first time every year, but it tastes so good you get over it.

The son is going next year if we can get the timing right.
 
Got quite a bit done tonight - for me anyway.


Finished the ujoints on my drive shafts except for the one needle bearing that I've got to find somehow. Got my second pair from Kurt and Bryce at CruiserCorp. Matsuba.

image-3682896671.jpg
image-1048843072.jpg
Ujoints


Started marking wires on my wiring harness with a label maker. Getting ready to pull things off to get the engine out, and for body and frame refurbish.


image-1044705240.jpg
Labels

Then, had an idea to grind down the claws on a bearing puller to fit into the transmission case for the counter shaft bearings and darn if it didn't work! Pulled both PITA bearings right out. I won't be returning that puller to Autozone who loaned it to me though. Guess I bought it.

image-1256902626.jpg
OEM Brand Puller model 27011

image-1570616563.jpg
Ground 2 of the claws

image-1601488797.jpg
Viola!

Pretty stoked about all that. Weather was so nice today I didn't break a sweat at 4pm. WTH?
image-3682896671.jpg
image-1048843072.jpg
image-1044705240.jpg
image-1256902626.jpg
image-1570616563.jpg
image-1601488797.jpg
 
That puller is a fantastic idea. Once my power steering debacle is over, the next thing on my list is the transmission/bellhousing/clutch/rear main seal. I also don't think I'm going to "outsource" this to a mechanic, as my friend has offered up his little brother and his garage :hillbilly:

I doubt I'm going to go as far as to replace the bearings in the transmission, but if I do - I am stealing this idea!

Thanks RWB. Thus far, transmission has been easier than the transfer case, but I'm still tearing it down. :hillbilly: Main problem is lack of clear guidance.
 
Back from my fishing trip, and back working on the tranny. It's good to be back - ha ha, not really.

Synchros and Gears and Bushings, oh my!

As a good friend of mine says - "that is some serious "Dr. Seuss" sh*t right there..." Good luck!

I was wondering why I hadn't seen an update from you in a while. Without losing site of the tech - hope fishing was lucrative! I was fishing trout in the north-central PA wilderness as well!
 
As a good friend of mine says - "that is some serious "Dr. Seuss" sh*t right there..." Good luck!

I was wondering why I hadn't seen an update from you in a while. Without losing site of the tech - hope fishing was lucrative! I was fishing trout in the north-central PA wilderness as well!

Nice! I was in Boundary Waters in Northern MN and Quetico. 6th trip. Best yet. 30's at night, 60-70 during the day. Huge walleye, smallmouth, Northern Pike.
 
nice work sounds like the two of you are making some good memories. Let me know if you need a fsm with that trans in it i think i have one that covers it i can mail or bring up to you to borrow. Im headed up to hendersonville saturday

Wow, that may be very helpful. Thanks Roma.

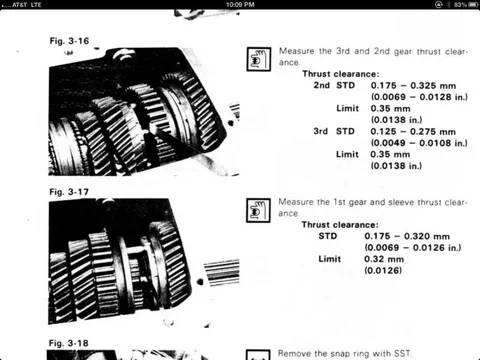
Does that FSM have a better description of where to place the gap tool between the synchros and gears? The FSM I have is a scan in a PDF that is kind of dark. See below for a screen clip of it.

image-4272614791.jpg

The Haynes manual talks about doing the gap measurement AFTER you take the gears off the output shaft. FSM says do it before you remove the Output shaft from the case but just isn't clear where to measure.

If I could just see what to measure I could figure it out.
image-4272614791.jpg
 
While I'm figuring out how I'm going to pull that bearing from the tranny, I decided to kick the body and frame blasting/painting into high gear. I want to get this thing into blasting by 10/1, which will be hard, since my time is constrained by family and work.

I moved the vehicle with the aid of the Gator by the garage so that when I pull the engine, it won't have to move far.


image-1757565953.jpg
New Location


image-1592505544.jpg
Got smart and put up the tent.

Then I started pulling body panels. Pretty easy. These things are such simple vehicles.


image-2756750547.jpg
Hood First

Screws came out fairly easily. Used some In-Force to get them started. This stuff seems to work very well.


image-1547969892.jpg
In-Force

image-2901817171.jpg
Hood, bib, left fender and that... other... panel (forget the name) is off.

Fenders are fiberglass. They are for sale. In great shape (no rust - LOL). I'm hoping for some steel ones.
image-1757565953.jpg
image-1592505544.jpg
image-2756750547.jpg
image-2901817171.jpg
image-1547969892.jpg
 
Last edited:
Welcome back. Is that the new garage?
 
Go check out Vessel tool's impact driver kit - steel case and that thing will blow screws/bolts loose easily - no oil needed .
Welders/machinist trick - heat the bolt good n hot with a propane or jet torch , hit it with some paraffin canning wax and allow it to cool a bit -they come right out .
Sarge

I remember you saying that about the wax. I'll try it. I think I purchased the impact tool a while back - the one in the red steel box, right? I also got the simple screwdriver that is an impact driver.
 
Welcome back. Is that the new garage?

Hi Craig! Not good to be back ;)

No, that's the hole in the ground we are throwing money into (pool) and the pool house. Workshop is next but it'll be on the other side of the house. Likely next year before we get on that.
 
No work today but had my 9 YO daughter out again last night helping pull the fenders off. I know removing these large pieces will be a great memory for her.


image-273752322.jpg
image-580933918.jpg
She's learning the names of the tools, how the car is built, and begging to help me again! Great memories.


image-2354754479.jpg

image-4125710430.jpg

image-2744671607.jpg
Got a couple of these I'm selling. In great shape. Fiberglass.


image-2989581798.jpg
Looking like an old hot rod.
image-273752322.jpg
image-580933918.jpg
image-2354754479.jpg
image-4125710430.jpg
image-2744671607.jpg
image-2989581798.jpg
 
Still removing stuff on the inside to remove the body. Labeling the wiring harness as I go so I can remember how to undo what I did.


image-3227687844.jpg
Labels

image-910773677.jpg
Instruments

image-3510801059.jpg
Knobs

image-778171886.jpg
Steering Column

image-3267731600.jpg
Top is loose

image-3135302463.jpg
And rust free (x fingers)
image-3227687844.jpg
image-3510801059.jpg
image-778171886.jpg
image-910773677.jpg
image-3267731600.jpg
image-3135302463.jpg
 
So it's been 8 days. Travelled for work, then to St Louis to see the Cards whoop Pittsburg Friday and Saturday to regain the lead in the division! First time there. Great stadium.

image-3955005393.jpg
Love the Arch on the field

Got back to it today. Removed the front wiring harness. Gotta admit I was a little freaked out to do it, but it was a piece of cake. Everything was labeled, and already loose, so I just slid both sides out and it came right out of the dash.


image-3613542386.jpg


image-4167732223.jpg


image-831470004.jpg


image-964918213.jpg
.


image-2269854282.jpg
Even got the munchkin to help remove the clips on the hard lines.

She's a cute one. She said "When I learn to drive, if it still runs, I claim it."

I need to get back to the tranny, and I need to pull the engine.

QUESTION: Should I pull the engine, then remove the flywheel, bell housing and such, or do all that first, and then pull just the engine? I guess I need to pull the alternator and the header and manifold before I can pull the engine, so that will be next.

Ah, frame off, here we come.
image-3955005393.jpg
image-3613542386.jpg
image-4167732223.jpg
image-831470004.jpg
image-964918213.jpg
image-2269854282.jpg
 
Last edited:

Users who are viewing this thread

Back
Top Bottom