Builds 1973 Build - Putting the puzzle together (1 Viewer)

This site may earn a commission from merchant affiliate
links, including eBay, Amazon, Skimlinks, and others.

Yep, if you do that , you have to put the right hanger on the left and left on the right

Interesting, though, I'll probably just leave it for now. This isn't really going to be a hardcore offroad rig.
 
You have alot of work to do on those frame horns, its the best time to flip the hangers or go back to factory set up, shackles in the front

So you're proposing that if I flipped the brackets backward that the springs would maintain axle location if I flipped them as well? That seems too convenient. I see the newer SR kits work that way...I guess I'll have the measure it up.
 
It's not to hard to end up with the axle at the same place , measure and weld

Ya I was just about to go back and edit my last post...I can just put the front hangers wherever I want and the shorter half of the spring would help the battle....we're on the same page now. I may very well go that route.
 
So I managed to sell the ghetto 20" wheels and 35" tires for $700 earlier in the week, and I also sold the TPI350 for $200 yesterday. So I'm only in this thing for $400 as of right now, I'm going to keep track of the budget to see how cheaply I can throw this together.

So I got the steering box situation sorted out this weekend. I had to hack the thing all apart just to get the box off the old bracket, but I eventually got it off reasonably cleanly.
D6WIDUO.jpg


Next I started slowly trimming away the rad support crossmember until I had the box near where I wanted it.
k6wjCY2.jpg


Then I cut out a piece of 5/16" steel plate and plotted out the box mounts and drilled it out on my mill, which makes getting the bolt pattern right very easy.
TxuYb9i.jpg

ZPQ7LXv.jpg


The plate ended up being a bit long which held the box too far forward...back to the mill to remove .200" off the end.
d0bQKJQ.jpg


Bolted to the box and mocked up to measure for the spacers. I put the impact socket on the front bolt to make sure I could get a normal socket on it easily to get at the bolt later. I also rough cut the contours on the corners of the plate, just for the aesthetics.
K7dnXyO.jpg


I rough cut the spacers on the bandsaw, then cut them down to size on the mill...they're made of bushing stock.
9Dip52X.jpg


Cleaned everything up and coated it in weld-thru primer, then a coat of POR15 on the stuff that'll never see the light of day again.
aRVF76I.jpg

CEOwbdV.jpg


Mocking up the plate with the spacers in place.
4ZErmvL.jpg


Tacked the spacers in place with the whole assembly bolted together, then took it apart and TIG welded them.
yMlJeQ9.jpg

bCpHlka.jpg


Welded in and the top mounts installed.
hduYzxM.jpg

o4j77yZ.jpg


I spent $52 at the hardware store on hardened bolts, bushing stock, stainless washers, and weld thru primer today....so I'm in $452 thus far.

I still need to install supports through the frame for the bottom bolts to go in from the other side of the frame. I also need to finish welding in the shackle reversal mounts that the PO never finished, and when I do that I'll clean up all the welds attaching the plate to the frame with the TIG...just for looks ;).

Not bad for probably 5 or 6 hours of work, I would have finished everything today but I had to take a break to watch the Packers - Vikings game...

Also, I'm leaving the shackle reversal brackets as they are. I just don't see what problem I'd be solving by changing them, this truck will not be a serious off road rig.

Hopefully this week I'll pick up a 4.8 or 5.3 and get it in the frame. That way I can fabricate a new trans mount and also motor mounts if needed next weekend and I can then yank the body off and sandblast and POR15 the whole chassis.
 
You will cut those frame extension , right. ?

Haha, YES! the frame extensions are going...I just didn't get a chance to hack them off today.
 
And you will box-in the front crossmember where you removed half of it, right ??? And you will abort that power steering spud shaft and attach a lower steering u-joint directly to the gear box (that's has a built-in slip yoke), right???
 
And you will box-in the front crossmember where you removed half of it, right ??? And you will abort that power steering spud shaft and attach a lower steering u-joint directly to the gear box (that's has a built-in slip yoke), right???

Yes, I'll support the crossmember once I've decided exactly what the steering shaft is going to look like, i have a few options for that.

Obviously I'm going to use a slipyoke, this isn't my first trip to the rodeo...
 
10-4, and hope you didn't take my previous post as condescending.
 
10-4, and hope you didn't take my previous post as condescending.

I did a bit, that's okay though, no harm done.

Do you happen to know what the shaft/spline is on the saginaw box? I got the the extension shaft off the box tonight but it was getting late so I didn't measure up the splines on the box itself. I've got a few OEM steering shafts around left over from another project, but none seam to have the right spline.
 
Update time.

So I think I mentioned before that I sold the TBI 350 that came in the '72. Well earlier this week I tracked down an LM4 4.8L locally so I went and snagged that.
enopCxS.jpg

quaDide.jpg


And I bought some Billet LSx - SBC motor mount conversion plates. I had planned on milling these from 6061 plate myself, but I found them for $24.99 on amazon...didn't think it was worth my time + materials at that price so I just bought them.
Ozigtfv.jpg


And they mount something like this...
j7F3Ue4.jpg


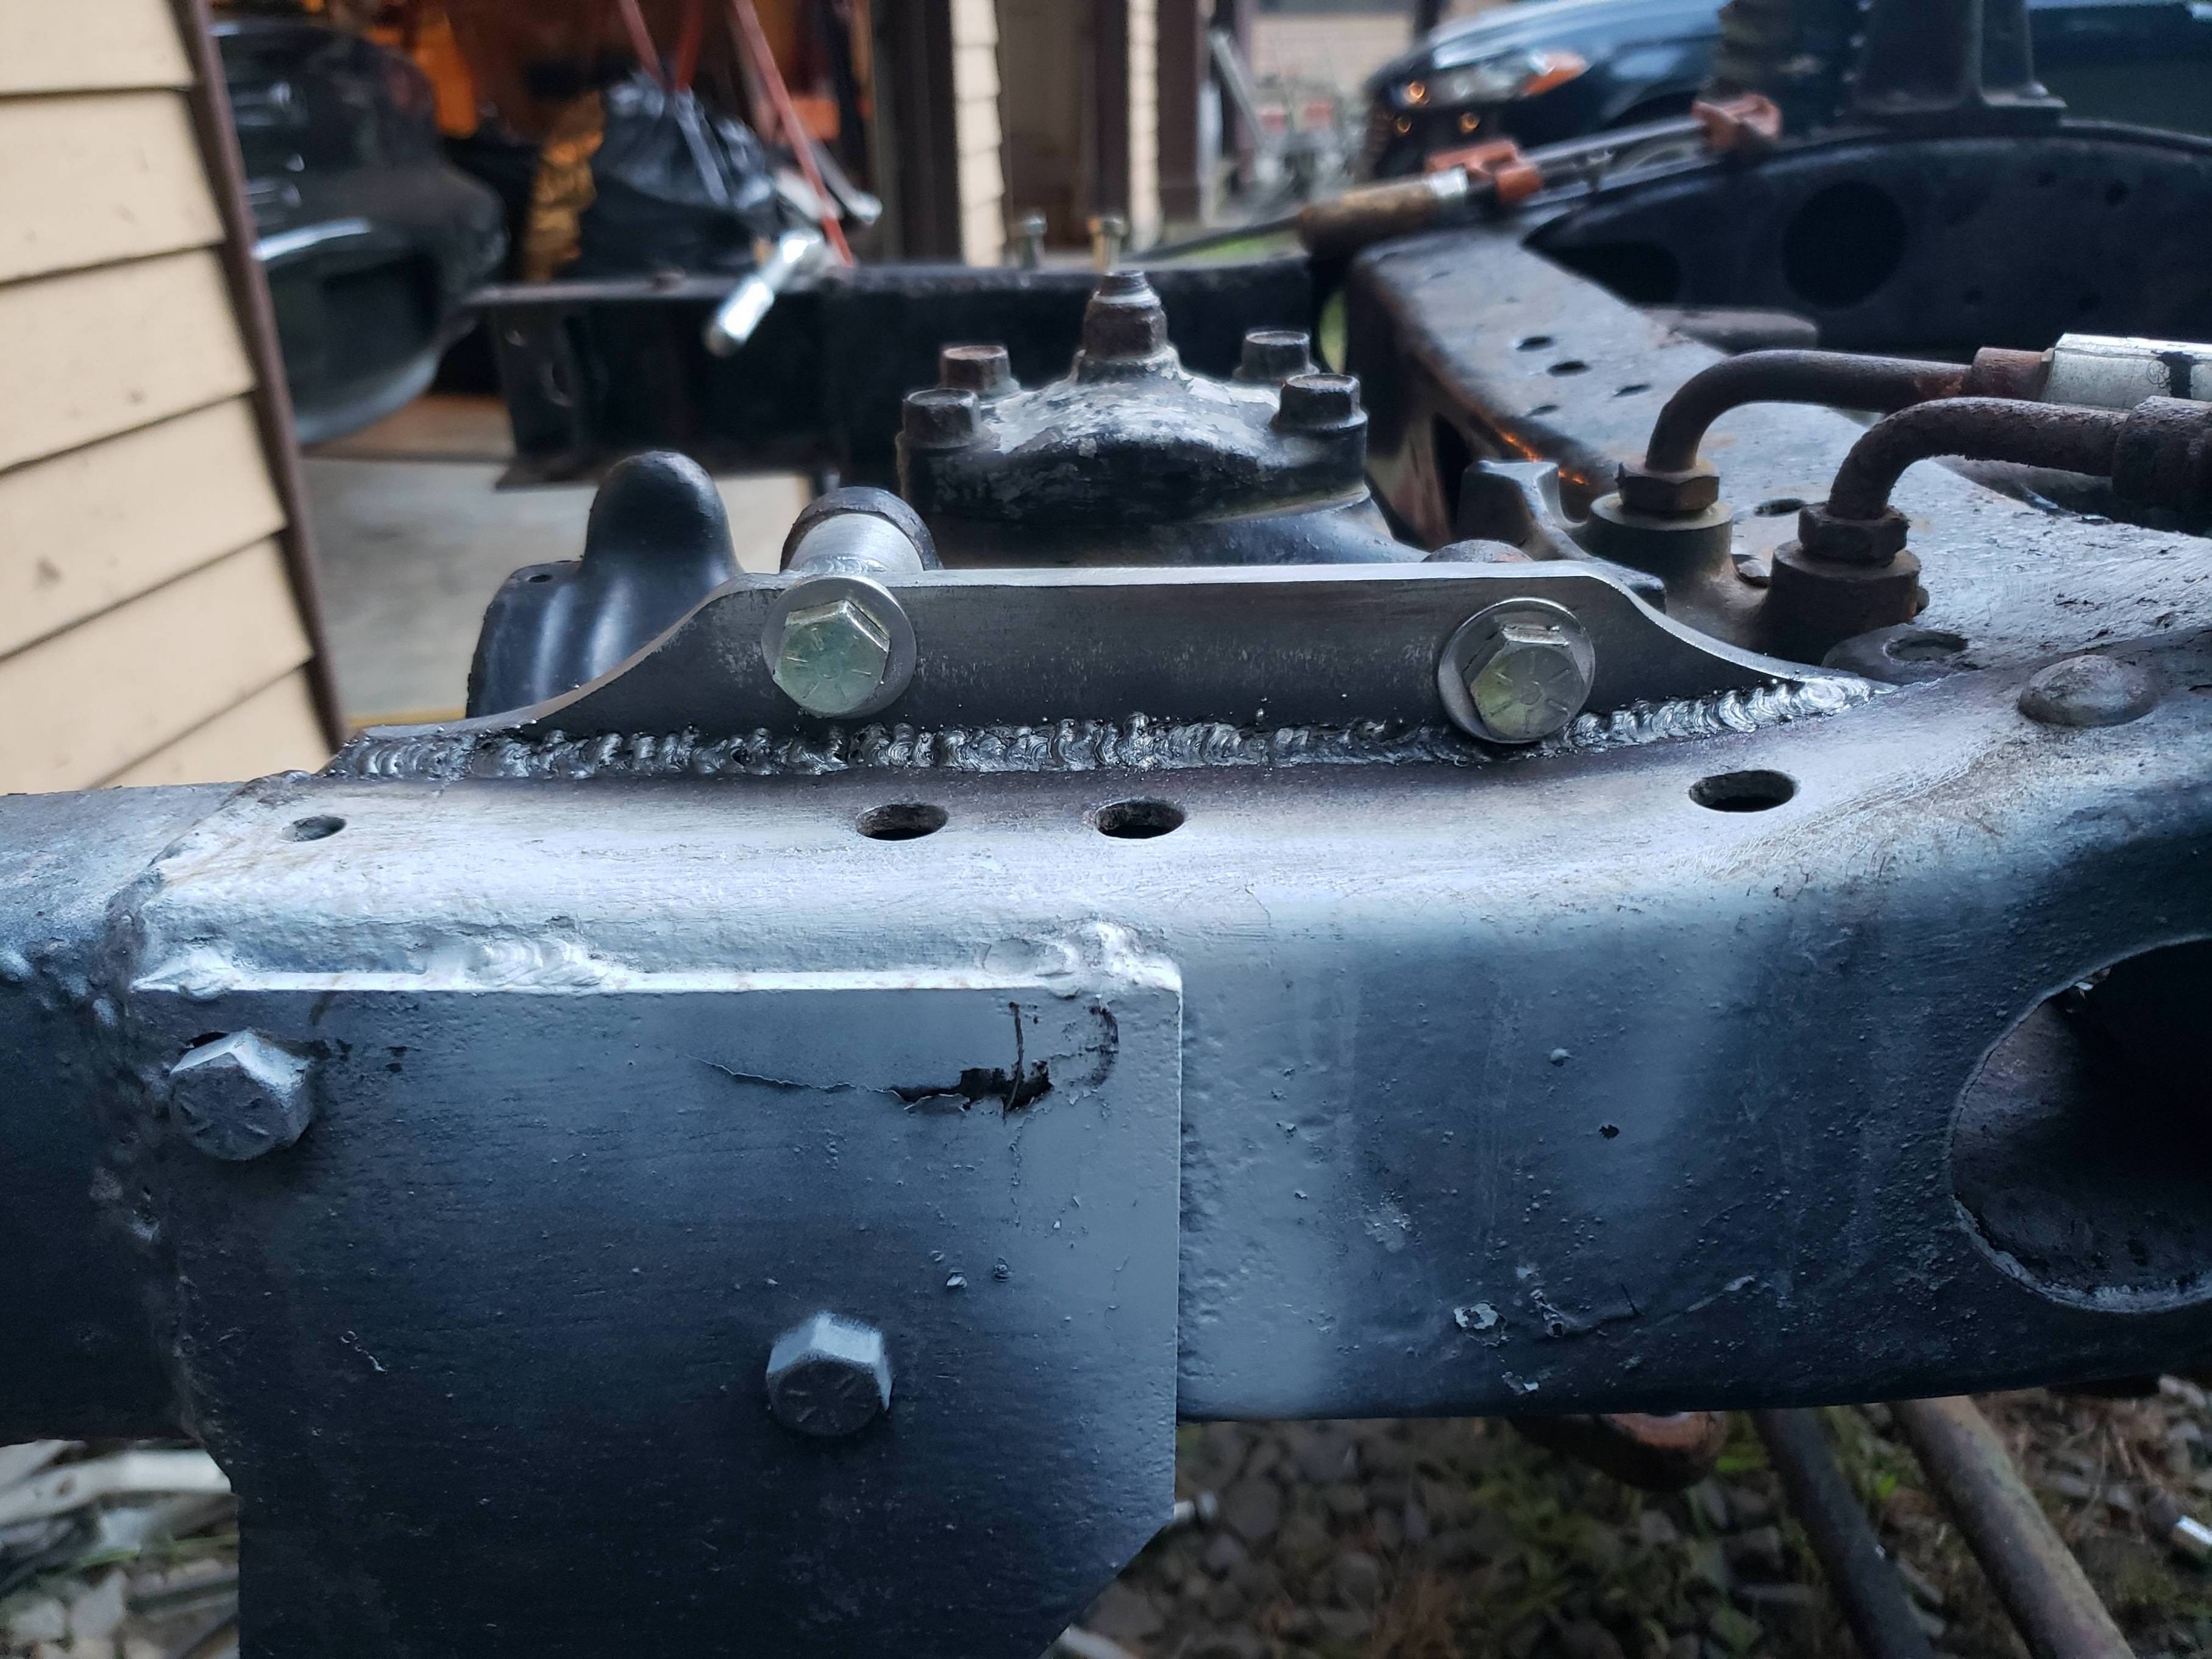
The channel mounts that bolt to those plates came with a brand new SBC mount kit that the PO of the '72 gave me, it also came with rubber isolators/hardware/and weld-in frame mounts

And in she goes.
wzMVN2B.jpg


For whatever reason the mounts didn't line up with the old SBC tabs on the frame so I cut them off and tacked on the new ones that came with the kit from the PO.
wzMVN2B.jpg


I also removed the horrible old trans crossmember, I'll be fabricating a new one out of 1x2 rectangular tubing.
MUpxvP5.jpg


Cleaned up the valley and reinstalled the intake with new gaskets I had laying around.
bOuzxyT.jpg


And cut off the frame rail extension things...just for @Downey and @jim land
U5VsUWD.jpg


Lastly I pulled the manifolds off (unfortunately broke 3 bolts even after soaking in PB blaster for the last 4 days). The stock cast manifolds ran right in the frame rail, fortunately I had a set of edelbrock shorty headers laying around from when my RX7 was NA. They fit perfect!
copF63D.jpg


Now that the engine is in its final resting place I can step back and look at the steering shaft situation. It's going to be.....tight.
htZdzTq.jpg


Any input @Downey ? will your steering shaft setup sneak around that you think?

Unfortunately for me my day was cut short by an errant piece of red hot steel that snuck around my safety glasses and lodged itself directly in my left cornea while I was cutting off the trans crossmember! Direct quote from the doctor at the emergency clinic "It's not just a scratch, its a blanket of scratches right in front of your pupil. It's the worst i've seen, I wish I had students here to show this to." So needless to say I wont be getting much progress in this week, considering I can barely focus enough to write this update.

Anyway, the next steps as I see it are as follows:

- Fabricate new trans cross-member
- Yank out motor/trans/tcase
- Wash tub thoroughly and take off frame
- Remove Con-ferr fuel tank and decide whether its salvageable or not
- Finish welding in motor mounts and steering box mounts / Box in radiator support cross-member
- Sandblast and POR15 chassis
- Put tub back on with new body mounts (no body lift)
- Degrease and paint Engine/Trans/tcase all together and reinstall.


EDIT: I forgot the cost update...The 4.8L was $300 complete with harness and everything, the billet engine mount plates were $30 shipped, the rectangle tube for the trans cross-member was $60 shipped, and I spent $50 at the hardware store on stainless hardware and consumables...Total = $892
 
Update: I fabricated the new trans cross-member...

I decided to cut the old plates of the original crossmember since they already resembled what I wanted to start with. So I chopped them off, ground them flat where I cut and then Flattened them out with a facemill since I'm a bit OCD :hmm:.
yGBuh7S.jpg


Then drilled two of the holes out for clearance with a 1/2-13 bolt
A4xRO0V.jpg


Next I rough-cut a section of 1x2 steel tubing to cover a straight stretch from the drivers side frame rail to under the trans mount, drilled a hole in it and inserted a section of .375" ID pipe for the trans mount bolt, and welded it in.
7wfTcnt.jpg


And ground down flat...
T1vdWcA.jpg

jqsvmQ0.jpg


Next I measured up and trimmed the mounting plates to fit, and tacked one on the corresponding end of the straight section.
GggGGZB.jpg


I set the optimal height for the trans, bolted the mocked up section to the new trans mount, and drilled and tapped two 1/2-13 holes in the frame for stainless bolts, and bolted the straight section in.
GXvBWQx.jpg


I didn't think to take pictures of the rest of the mock-up but I basically just built off the straight section since I had already hit the trans mount the rest wasn't too important geometry wise. Just needed to make it look good, be low profile, and not hit the T-case. Here's the whole member tacked together.
zM3lovs.jpg


Then I removed it, ground out the fluxcore I used to tack it together under the truck, and TIG welded the whole thing...
frVo2Ms.jpg

8XdZS0i.jpg

CKZ46GJ.jpg


I also yanked out the Con-ferr tank and had a look at the damage.
JoZtTGf.jpg


That's the worst of it, however, it didn't take much cutting to find good metal...
EVFhBYF.jpg


So I went ahead and filled it with water to located any other damage and also clean it out...maybe one more pinhole lol :)
E32ypmI.jpg


I may try to fix the tank and use it, I could see inside pretty easy once I cut the opening in it and its really not in bad shape at all inside.


Last but not least I was removing the manifolds on the 4.8L and broke a couple bolts (like every other LS variant I've built). Anyway one of them broke way out from the head surface so I figured I'd try to weld a nut to it and spin it out. Now I've tried this trick atleast a dozen times before and the bolt always breaks further down...BUT IT WORKED! not only did it work once, I got one out on the other side with that method also...I am now a believer. :clap:
34JMF9D.jpg
 
Wow, glad you have the skills to undertake this project (I do not)--so much work but I sense you enjoy the challenge:)
 
Wow, glad you have the skills to undertake this project (I do not)--so much work but I sense you enjoy the challenge:)

I do enjoy the fab work quite a bit! Historically speaking I've spent a whole lot more time building these things then I do driving :steer:.

By the way, I don't know if anyone on here uses instagram but if you like the fabrication work I do a lot of other projects and post pics of everything on IG, follow s.matschke if you like this stuff.
 

Users who are viewing this thread

Back
Top Bottom