Navigation
Install the app
How to install the app on iOS
Follow along with the video below to see how to install our site as a web app on your home screen.
Note: This feature may not be available in some browsers.
More options
Style variation
You are using an out of date browser. It may not display this or other websites correctly.
You should upgrade or use an alternative browser.
You should upgrade or use an alternative browser.
What have you done to your Land Cruiser this week? (20 Viewers)
- Thread starter IH8MUD
- Start date
This site may earn a commission from merchant affiliate
links, including eBay, Amazon, Skimlinks, and others.
More options
Who Replied?Been putting off a valve adjustment so I finally pulled the trigger today. Every one was PERFECT! I've owned this '75 40 since 1996 and check the valves once/year. Only once did I have an exaust valve that was slightly tight, and an intake that was slightly loose. Oh well, I have a new gasket and peace of mind. Just curious about how often you guys adjust the valves on your rig? Also , had a hard time keeping the valve cover gasket in place this time while installing the valve cover. Is there some secret I'm missing? Cleaned spark plugs, checked the points and checked timing all was OK.
Test fit my new chains for next weekends drive. The test fit is on 235/85 16 which I know will not clear the front steering linkage without spacers. The actual tires are 7.50 r16's. hardened square links 5.5mm.
I just realized that they are on inside out after I took the pics.
There is a yearly snow drive- 3 day event- very unofficial. Just show up if your in the know kind of a thing. I couldn't go last year so this will be my first time. Off to Nagano next weekend to climb the mountains.
Pete


I just realized that they are on inside out after I took the pics.
There is a yearly snow drive- 3 day event- very unofficial. Just show up if your in the know kind of a thing. I couldn't go last year so this will be my first time. Off to Nagano next weekend to climb the mountains.
Pete
Off to Nagano next weekend to climb the mountains.
So jealous.

Matsumoto-jo is one of the coolest things I've ever seen. Stop by there if you've never been.
My oldest daughter and I have been tossing around the idea of Ozzfest in Tokyo in May.

Wish me luck all, I'm going out to weld these up:
EDDY
O.K. Lets see the morning after photos
O.K. Lets see the morning after photos
BDSeff1fitty
1987 Toyota 4Runner
Redneck Ram'd my PS pump and swapped in a belt 1" shorter to get the pump standing up vertically instead of the bad angle it has been at.
paint
Got some paint on the air cleaner this morning.

Got some paint on the air cleaner this morning.
Broke an Easy-Out trying to remove a rusty bolt in my exhaust manifold!!!
Any suggestions?
Get a stick welder. Build up the weld in the block so you can weld a bolt onto it. Back it out - the heat will also loosen the broken stud/bolt. Just did the same with mine, but without the EasyOut!
EDDY, O.K. Lets see the morning after photos
The dude with the welder didn't show.
 I wanted to do the sill with adhesives anyway, so I got my wish. Pics in a few.
I wanted to do the sill with adhesives anyway, so I got my wish.
This is a lot more like how a new car body would be put together and the adhesives will keep water from between the metal layers. I repaired my bib this way on my '78 too.
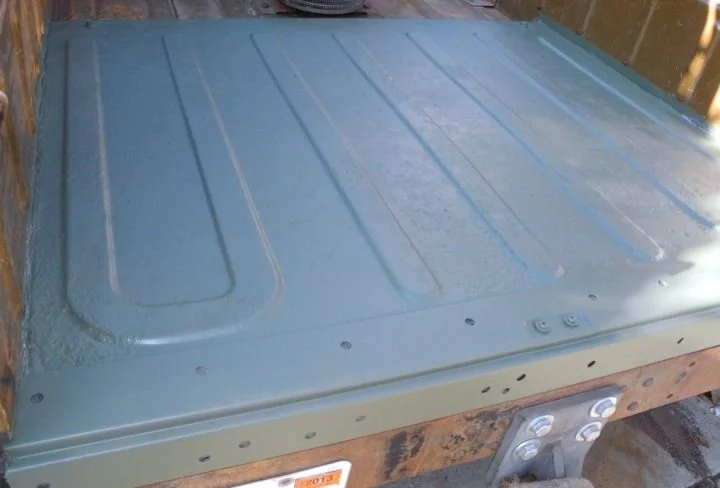
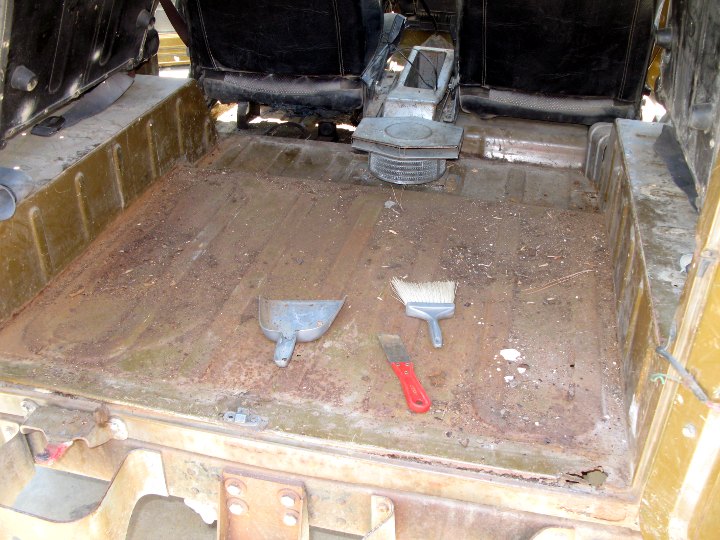
The rusty floor is pretty solid other than just a couple little spots, so I'm repairing those and I'm going to coat it with something, maybe color-matched Monstaliner.
I added a 1.5"x1/8" steel 'shelf' to hold up the floor. JB Weld and rivets on this side.
I didn't get a picture with that piece attached but not yet installed. I rushed through painting it so I could get it installed before dark. Here it is with just the sill brace installed. You can see the rivets where the other piece was attached underneath. There is FIPG between the floor and the added steel to keep any noise or water out. I decided I didn't need rivets on this side.
Then I stuck on the sill with FIPG. It will still get tacked at the holes and welded to the sides of the tub where they intersect and the body panels when they get welded up. I'm ordering my welder today. Tired of counting on others for welding.
Last edited:
spotcruiser
Geezer
Are you really sure you want that hi-lift jack aimed at the windhshield that way? It looks like it could be deadly for a passenger during an accident. 

Tool brackets.
spotcruiser said:Are you really sure you want that hi-lift jack aimed at the windhshield that way? It looks like it could be deadly for a passenger during an accident.
Maybe that's the idea? Cheaper than a divorce!
")
ElHefe
SILVER Star
Maybe that's the idea? Cheaper than a divorce!
LOL.
The other mounts look nice. Post some close up pics.
Dropped the body and all the parts off at the body shop for some fresh paint.
My wife drove it to work today. We're pretty sure her car (Civic) blew a head gasket. It's got 210K and although I can't see any oil in the coolant, the coolant overflow is got this nasty black sludge all over it, and her heater core started leaking really bad (pressurized coolant?)
She's going to be driving her truck until we can afford a new car. We've been thinking about buying an FJ80 or 100 sooooo... maybe it's sooner then later.
She's going to be driving her truck until we can afford a new car. We've been thinking about buying an FJ80 or 100 sooooo... maybe it's sooner then later.
Self-etching primer. More pics in my 'after' thread. ")
Here's a pic from when I got it two and a half years ago.
Here's a pic from when I got it two and a half years ago.
Last edited:
Installed my 40 series tacho yesterday. Cutting the huge hole in my baby's dash was pretty nerve racking. All I could think of was sorry, sorry, sorry, while hacking into her with my 4" grinder
Even though this is an FJ40 the five pin plug for the diesel tacho wiring was sitting there looking at me after I cut the hole. The only wiring I had to do was a single wire from the sensor in the side of the 12HT bellhousing to the spare wiring loom connector in the engine bay. Works great . Don't you just love Mr Toyota sometimes.
Even though this is an FJ40 the five pin plug for the diesel tacho wiring was sitting there looking at me after I cut the hole. The only wiring I had to do was a single wire from the sensor in the side of the 12HT bellhousing to the spare wiring loom connector in the engine bay. Works great
. Don't you just love Mr Toyota sometimes.Restored all the heater components and fixed parking brake. Set on stands and took wheels off for brake restore.


I got my new frame to a point were I needed to set the body on to finish the fab work.
 [/IMG]
I then built a roll around table for the frame and body to sit on. I can now fab the body mounts, mock up the rest of the tubing and supports.
 [/IMG]
Pulled everything off the firewall so I can clean it up.
 [/IMG]
I cut the welds off the dash, and pulled the dash out. I am gonna hide tubing behind the dash so need access for now.
 [/IMG]
Set the hood on to do some measuring and a little planning.
 [/IMG]
I then built a roll around table for the frame and body to sit on. I can now fab the body mounts, mock up the rest of the tubing and supports.
Pulled everything off the firewall so I can clean it up.
I cut the welds off the dash, and pulled the dash out. I am gonna hide tubing behind the dash so need access for now.
Set the hood on to do some measuring and a little planning.
Similar threads
Users who are viewing this thread
Total: 21 (members: 6, guests: 15)