HJ60 driveway resto/build (2 Viewers)

This site may earn a commission from merchant affiliate
links, including eBay, Amazon, Skimlinks, and others.

Joined
Aug 1, 2019
Threads
12
Messages
104
Location
Alberta, Canada
HJ60 build

1986 HJ60 G Auto
OME heavy duty
33 10.5 on FJ55 rims
Restored (ish)

Precursor,
First build thread, we were working on a strict budget as I’m a student.

We posted a wanted ad for an HJ60 on Kijiji in Alberta, and someone ended up replying after being referred to us by someone else we met via the world of Landcruisers. Long story short, we bought it and this is the story of getting it back on the road!

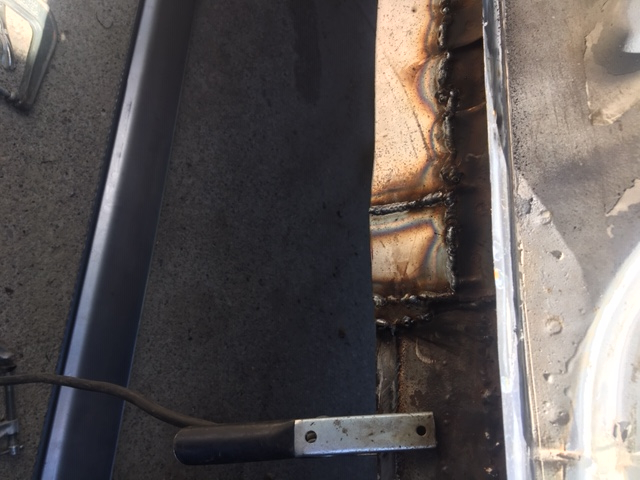
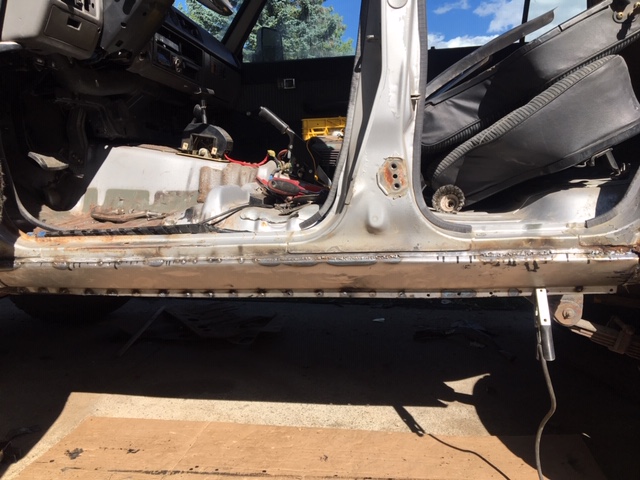
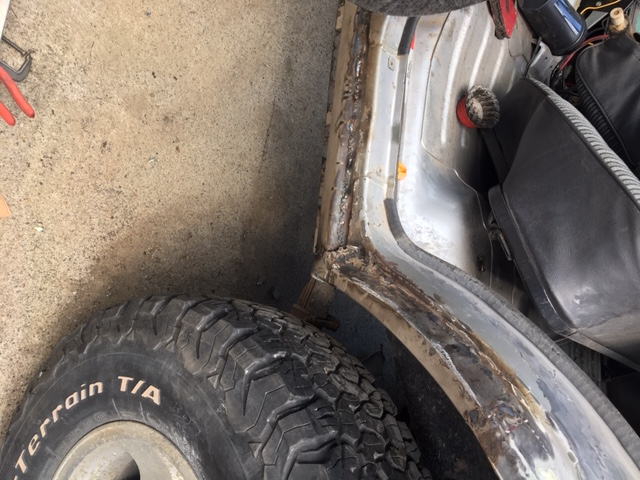
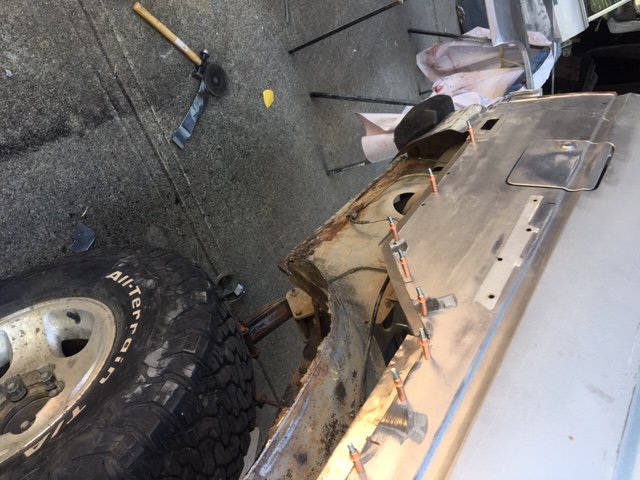
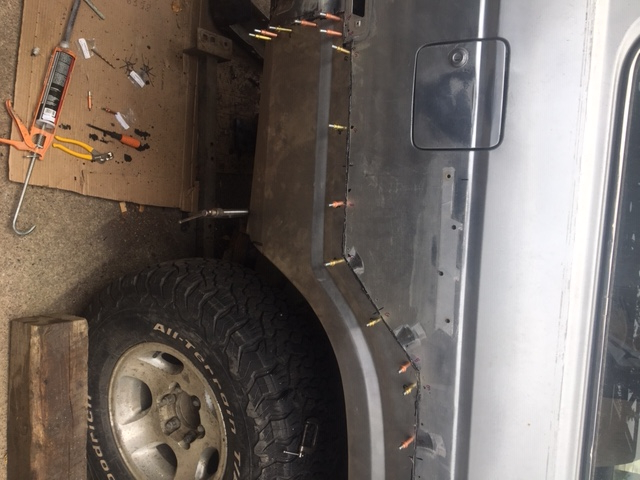
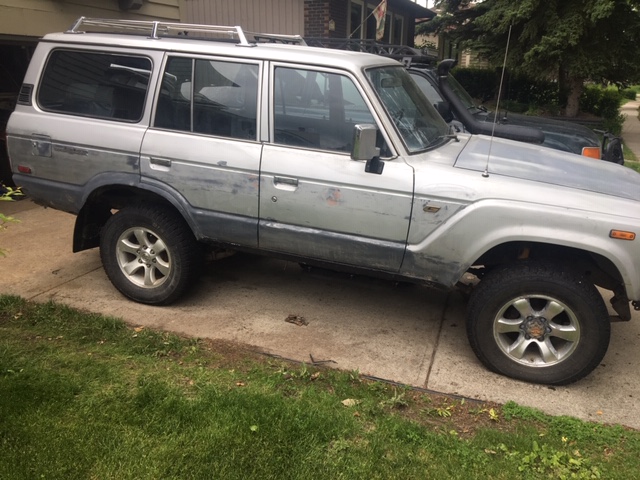
Upon initial glance, we knew it was kind of a POS. The rockers were both shot, definitely needed a passenger quarter panel and the dog legs were in rough shape. The annoying part was a previous owner had attempted to fix these issues with 30 pounds of bondo and fiberglass (to the point where I found a shoe sole in the quarter panel which was used to hold all the fiberglass together). In addition to the obvious bodywork that needed to be done, there were some significant holes in the floorpan (unless we wanted to run the truck Fred Flinstone style, haha).

Despite the state of the project, we bought the truck. After all, it had 180000 KM on it and a 2h (I think the 2h is pretty rad)...

Before I get into how we actually made it look pretty and drivable again, here are pictures of the before and after.

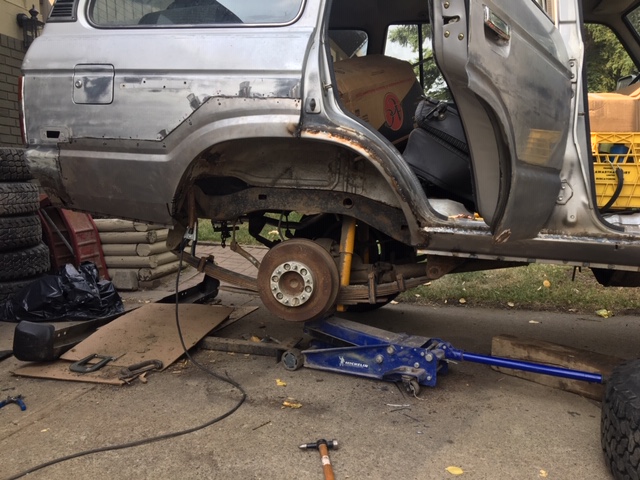
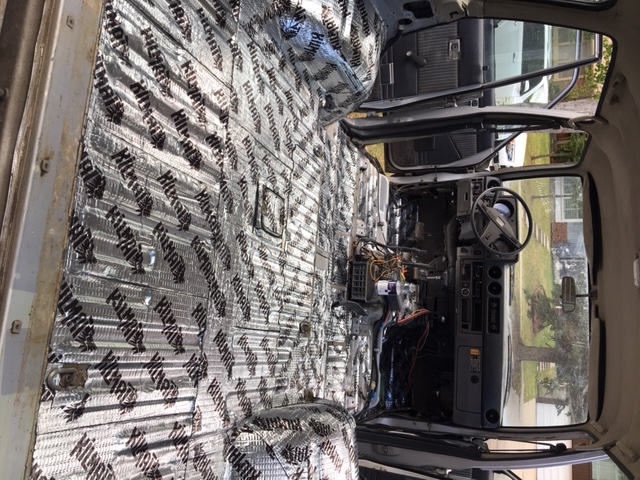
Given that my girlfriend and I are both students, we had a limited budget and all the work was done in a driveway. But we are very proud of how rad the truck looks now!
C5g7hlNQap4-UPbHiBs6lufpT7OM7k6UlzfeiuETVFLm4ZceGsbXQfzK5E4DSpvf-e40M-rLrdKi9LK9ngijicZH-nV9fxa-SHgMrNHjQ-kSOlwzlCPN5ULswUgnMmLIZ4m_0sVb

HsWMplQWDKy8oonzQuBH_9JRvz-UoyKsdO5_MUgCYDwnjFfbVcyn9-QjlviKxAcjuxoPy2ynP34bch9CxgO5eAIg2s_EjEyK5lYlLEu81yopRf-jzzV3tcrisTMjOLYY39cvrgaf

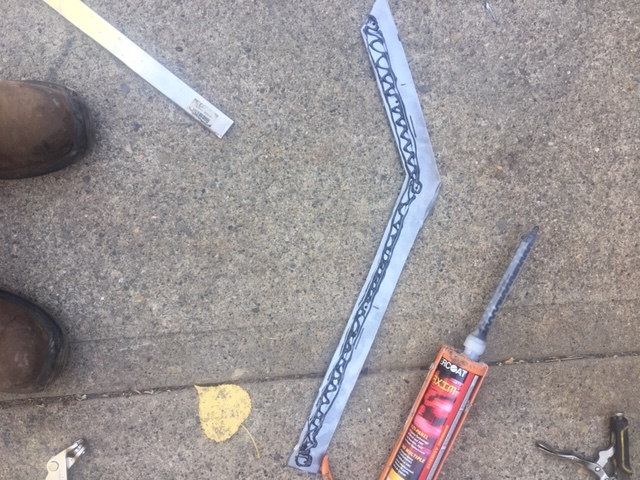
I'll break this up into three parts; first will be body work, second the mechanical work and finally some highlights of the ups and downs along the way.
 
Last edited:
Body work

Never having purchased body panels before, I went for the Wolf/Alfa panels from Quebec (Canada), as they were the cheapest and we were keen to support anything made in Canada. Reflecting on this purchase after the fact, I would recommend their rockers, but not anything else. Spend the money on better quality stuff and you won’t have to spend as much time perfecting bondo and sanding.

The rockers were not that hard and pretty straight forward. Basically I cut them in half (pic below). Welded those puppies on and I’m pretty happy with the finished result, the wolf rockers actually tuck up more than stock (so when wheeling without sliders you have a lower chance of ripping them off, which I like). Also had to make a new inner rocker, not hard to do just a lot of hammering.
IqP7Ig9YKbTOrsP6Hlgt5RtCPZSRLXx-RiQZPgNPbJ_OtU9HmsvvfEz3xKHu0TmwqH_3mh4ybrUPfShS68f7mOxKXtWBTPy4QPRYgrQUExHk5qJhHIhmfM4prr_VzPIceaaLKn3h

g1oaPGk50B6ffDniZ3M9w33UIt0_QwwdEdj-v7doHMoYuX5acDhn00pfWRRhEaDcyX4td5-Izd0So680UXzoTZwYLIF1Xhcs9P2Rpbx23vju_RSsE9LSC52fbmvoUKdw3_XVsj2N

UpC4QszvjO0j_bOABpONr4a-_6bBZHQn_REpwj82r1cYwqUQU5P5p9ndxkwIPLkjgpalYsh1gy03iBMZPcoT6AoY3A-N1TQywM6Wb8tK0ScZ1I8rlebDyJolPdK4mOp9huUNhDY4
 
Dog legs… my advice would be don't make your own. It is well worth the money to save yourself time. That being said I used the the wolf auto ones and it took a still took a stupid amount of clamping, hammering and fab to make them work.
3cPUHV3SKKoDOtViwesx90Vd-hUaLZNck7vJ-KZygZ5XAzty66yhN5LyUVHqijdeBDTQ7kWkKVlv_h7C_7EywncA0PdEc0L_9FFNSJnxBtaEW3jK-q9BT9XqyqmKrwQLL4_R9ez6

EQxSN5vtR_9Z5xqYe3EnDWhYMNO3oEwFpAOHUUFmAc9e7eGftAe8wi0pjrRdnoTVuL9RTIVbJF15JlQufhjEKDyNpVkKCFvJbGtqEQNA-kcyuq9IFlfnMAoLNmT-P8pW9V1xxgEs

You may have to zoom in to see what I’m talking about but if you have any questions just let me know.
 
Now this is where it gets interesting, I used nascar stuff for the quarter panel. Which basically means my truck is now a race car… right?

What am I talking about ?

Body panel adhesive! Yes, I glued the rocker on, yes it is strong and yes you should use it too. Warping panels isn’t fun and as my boilermaker friend says, if you can ever avoid welding, avoid welding!

This is something I'm happy to answer questions about because as far as I know I'm the first person on mud to use it on a 60.

This stuff works great but you must have a flat surface to glue along. You need to make a surface to glue to so first glue a strip of metal to the inside of the truck, clamp and leave for 24 hours. The next day, glue the panel to strip of metal you that glued on the day before. Finally, clamp it with lots of clecos (which you can get on amazon, they are removable rivets). Leave it to set for 24 hours and fill gaps with fiberglass (short strand).

Tips for success:
-Bar metal is the key! Wire wheel the crap out of it to get all the tar off.
-Buy clecos. You may think you can do it without them... but trust me, just buy clecos.

I also tack welded the bottom. In terms of the product, the 3m one is the industry standard but I used the knock off one and it was pretty good. The name of the product is Evercoat.
pVH-V0Up2V3R9OZJsPoQT3Qd3yp73z2c5D9fF-GVPhTT1ZJmLtQbjx7k0jnQ6Rek5AM6pV8xrAcSkUKXOL9qe9849aKpvSQZ9h5Fgn5g8utdquaOyAxMLcQizWCZZb-MeEi1E2rt

GiyCfTt9THJh-j-yc_J9zvsB13MIvBIB38NFRXIa_aPAj70de7nPKXSUy_tNRjDlpqg1vj7LhS1cYbsqMjDfH0LPnJqgxAUxkZFidrFHFssBxnNXr2m2w4jZP_WgBcfJuEFo4URZ

zhHu4Pjg0Q2pwWC97TaAqi8ELoIJLFJ95lVsshQ8wy0yzYpbhvCZhz8K7c-W-amZsH38cbGp2c6w4FIGOpRp-Kugd7upcTHdcTfzOM0itAR9E-o34JMmneajVsomiL2_2D3dONjO

After a week of perfecting the bondo and many rounds of sanding, the truck was ready for priming. We were able to tape and prime in the driveway before trailering for painting. We chose the two-tone look but with the top colour as the stock colour from this truck (rather than the stock two-tone colour. The top colour code (for anyone wondering) is 147 and the bottom is 155. Using the stock colour meant that the interior didn’t need to be resprayed (saving us a little bit of cash). A few things we did to beef up the appearance included repainting the grill (a PO had painted it and the paint was peeling), as well as spraying the inside of the wheel wells and a new driver's mirror. Unfortunately, a PO had sprayed the stock bumpers (front and rear) so we do not have the stock chrome look. As mentioned at the top, we have FJ55 rims and hubcaps with new 33 10.5 KO2s.
 
Mechanical

I did the usual; new fluids and filters all around, but don’t need to bore you with that.

The exhaust was rusted out, so cut it off halfway and straight piped it… Okay so maybe that’s what I wanted to do, but there is no real benefit on a 2h and the engine is loud as hell anyway (my girlfriend also said no…). In the end I dropped off the segment that was rusted and had it rebuilt (which was surprisingly cheap).

I had the common HJ60 problem where my dash warning lights and filter lights were all on. After some hunting on mud I decided I just needed to do a charge relay… But when that didn’t work I realized I needed a new alternator (because it was only charging at 12 volts). Thanks to a buddy, I was able to take his and then had mine rebuilt for him!

Unfortunately I also had to get the rad re-cored (which is not cheap and not fun) but now she’s cool in both senses of the word.

Speaking of cool, I also plumbed in a trans cooler as the A440f overheated and our commute to University is through several mountain passes. Ended up having to do the rear brake soft line. Basically just a bunch of stuff to make the truck happy on the highway!

Interior

Yes, I lied...the thread is longer than three sections.
The interior needed attention, and due to the PO smoking and using the truck to transport stuff to the dumb, we pulled everything out. I used Kilmat for sound deadening (off of Amazon).Seems to be pretty good, that combined with the new carpet makes road noise minimal. Went with the Rockauto Carpet kit (the cheap one) and it was relatively straightforward to instal. The seats were in pretty good shape for the age of the truck (aside from the inevitable tear in the drivers seat), just required some deep cleaning and stitching in the drivers.

Vv0jtSgVbXTtSONTTq0QUsxoQ2F8zA3jwPOqpDb52HF7cq10JOi-7OvO3Dm8VhtYsrVivIuQa2EdJD8uYVs6t5NX-j5Em9qgTHGC_uHlL0-XM48kkyWbzB5GcQGa_A6oyimM8bsy

The bed required about 50 sq/ft of Kilmat, but more would be required if you were wanting to do more than just the floor.
 
Last edited:
Ups, downs and extras

Finally we have arrived at the section where I tell you to not only double check, but triple check that the VIN the owner texted you so you could CARFAX matches up with the VIN on the truck.

As hinted above the VIN’s were different, and the real vin indicated the odometer had been rolled back and the vehicle required an out of province inspection.

Unfortunately these lies from the PO required some additional work, but all that aside, we got the truck built and safe within a month and a half. All of this was under 5000 CAD. A big shout out to mother nature for not raining for the duration, and to my parents for letting us restore the truck in their driveway.

For anyone wondering, we have the Thule gutter-mount rack with 58” bars and a Maggiolina Autohome RTT. Don’t worry, we will be putting a winch on it (Warn 8200 /8074) accompanied by new front and rear bumpers, just haven’t had time yet!

Feel free to ask any questions!
Cheers and thanks for reading our story.
 
Nice, I am doing something similar but it is dragging on for years not months. What did you do with the stock roof rack holes? I just welded up 32 holes from mine and the rails that were screwed in. I finally painted the roof today with rattle can Dupli-color so now I have a functioning roof ready for winter since it isn't going to be under a tarp all winter. I still have a few more areas of rust to fix on the sides and doors before it's ready for the monsoon.
 
Nice, I am doing something similar but it is dragging on for years not months. What did you do with the stock roof rack holes? I just welded up 32 holes from mine and the rails that were screwed in. I finally painted the roof today with rattle can Dupli-color so now I have a functioning roof ready for winter since it isn't going to be under a tarp all winter. I still have a few more areas of rust to fix on the sides and doors before it's ready for the monsoon.
I ended up filling the holes with short strand fiber glass, ground that down then bondo to make smooth.
I think welding is probably better but I was worried about heat on the headliner
 
On the drive up to school I noticed the truck had a hard time getting into gear and would shake pretty bad if i came off the gas and then went back on. this happend mainly when descending hills..

My theory on this is torque converter issues but i'm not sure,

And ill just get ahead of some questions, yes I've done a flush in fact twice.

So here are my questions,
one does anyone have a good thread about this that i may have missed when searching
two where do I get an A440F torque converter as i understand they are different for the 2h/12ht

Cheers and thanks !
 
Thanks for the write-up. I've been wondering about that glue/adhesive, wondering if anyone here had tried it. Nice work, I love it when people do this stuff in their driveway and turn a truck around. Awesome.
 
Check your rear pinion bearing, grab it and if you can move the diveshaft up down/ side to sidethere, that's you issue
 
Check your rear pinion bearing, grab it and if you can move the diveshaft up down/ side to sidethere, that's you issue
Are we talking play at the t case or at the diff?
I think there is actually a little on the t case end...
 
Also does anyone know of any cruiser heads in Prince George BC?
 
Are we talking play at the t case or at the diff?
I think there is actually a little on the t case end...
In my case it was the diff end, don't know if tcase can do it too..
 
In my case it was the diff end, don't know if tcase can do it too..
And you were experiencing that shaking at higher rpm when you take off the gas and go back on it eh ?
 
Any time I engine braked, aka took the foot off the gas to slow down.
 
Any time I engine braked, aka took the foot off the gas to slow down.
Mine is when I get back on the gas it’s shakes bad, unless I rev match or floor it.
Which is why I think it’s a torque converter issue
 
You might check all your drive flanges. I just had this happen on an '82 minitruck, and it was the xfer case output flange that was loose.
 
You might check all your drive flanges. I just had this happen on an '82 minitruck, and it was the xfer case output flange that was loose.
I’ll check it when I have a chance here,
But to clarify your issue was when coming back on the gas eh ?
 

Users who are viewing this thread

Back
Top Bottom