Builds Here we go (FJ-40 getting a 3B/Turbo/H55f)... (1 Viewer)

This site may earn a commission from merchant affiliate
links, including eBay, Amazon, Skimlinks, and others.

The other bit of fab work I did was to make an "overhead" panel for lights. There is a big dome light, and two little spot/map lights. All of them are LED, and all powered with the ACC position of the key, so that you could conceivably leave the lights on for quite some time (days and days) without worrying about the ability to start.

The lights all came from Aircraft Spruce and Specialty.

The dome light is just a 12 LED white unit. It's very, very bright at night. Very easily lights up the whole inside of the truck.
LED CABIN LIGHTS from Aircraft Spruce

The spot/map lights are really cool. They have both red and white lights (which are switched separately in our case). Amazingly bright little spot lights.
754 SERIES LED COCKPIT LIGHTS from Aircraft Spruce

But enough about the lights, here are pictures...

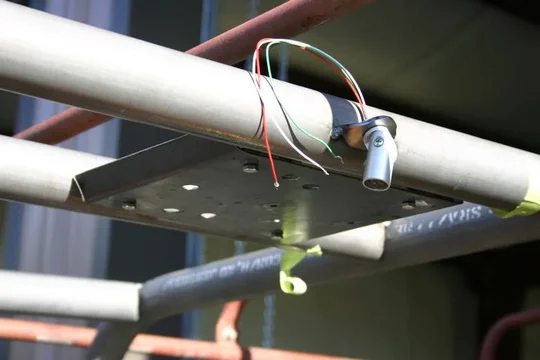
Here's the panel. I'll talk about the "switchology" in a second... It is removable, I just welded tabs onto the cabe spreader bars that it bolts into, for ease of maintenance.
overhead 1.jpg

And here's two pictures of the lights and switches installed in the panel. The center button is square, and turns the dome light on and off. The round switches are used to control the spot lights. I painted the buttons on two of the switches white, so to turn on the white spot light you press the white button, and to turn on the red spot you press the red button. You can have both on at the same time if you choose (don't know why, the white overpowers the red, but it's easier to wire this way anyway).
overhead 2.jpg
overhead 3.jpg

On the rear of the panel there are two threaded screw holes for the external speaker (for either the CB or HAM radio).

That's it for the pictures I've got on the computer.

Here's what's left before the 40 gets painted and put back together:
  • Cut out rust in the bed floor (I'm going to fabricate a tool box in the floor)
  • Finish the tailgate door
  • Attach the soft top windshield channel (we ordered one from Shane/AATLAS1X)
  • Add the footman loops and twist locks for the soft top
  • Attach the alternator permanently. I'm having a problem with the '79 alternator plug coming part. All I need to do is remove the spades from the plug and insert them into the other plug
  • I've got to figure out why the ammeter doesn't work, what's shorting out in the rear diff lock wiring, and why the fuse for the panel lighting blows (I think I touched a part to the frame and blew the 5A fuse, but I want to be sure)

After that the body comes off and everything gets painted for the final time and put back together. Sounds simple with that list, doesn't it? :bounce:

Dan
overhead 1.jpg
overhead 2.jpg
overhead 3.jpg
 
Well, I've got a few days off to get dirty again. So dirty I am getting.

I fabbed up most of the tailgate door today. Pretty slick really.

I had to cut up the gate I made earlier and make it just a little skinnier, and then I cut out a piece of 18GA to skin the gate. Then I got to making some hinges for the thing. Here's a few pics of that process...
tailgate 1.jpg
tailgate 2.jpg

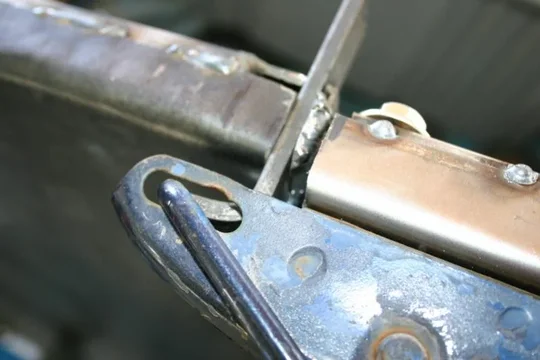
And a closeup of the hinge I made. I made it out of 1/8" steel, so they should be PLENTY strong.
tailgate 3.jpg
tailgate 1.jpg
tailgate 2.jpg
tailgate 3.jpg
 
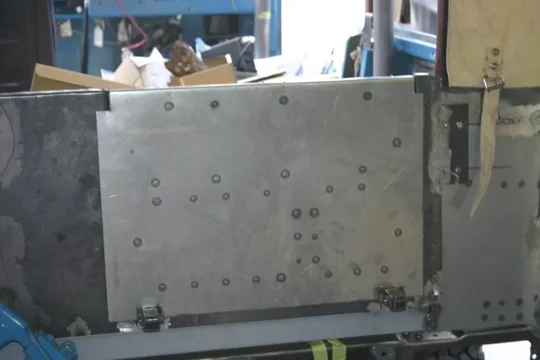
With the hinges done, I bolted the latches back onto the gate, and bent up some strip steel for the catches. I then cut slots in the fixed portion of the tailgate, and welded the catches into those slots for the latches to catch. (I think that makes sense). But the pictures should explain it pretty well...
tailgate 4.jpg
tailgate 5.jpg

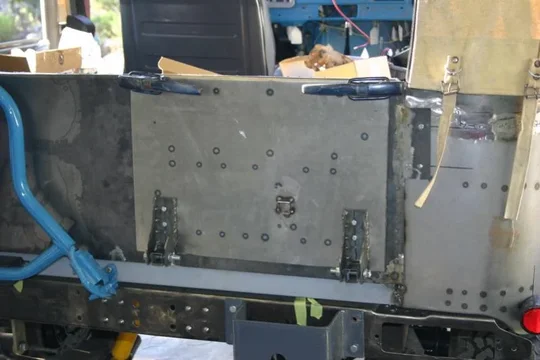
With all that done, here's an overview of the tailgate. I still need to mount the license plate on this, but it's pretty much done.
tailgate 6.jpg

You can see in the center of the gate is a small bit of steel, that's a fancy little piece that rests on the bumperette to support the gate if you put weight on it (instead of just letting it rest on the sheet metal. I will weld a cap on that notch, just so it's not two edges resting on the bumperette and scratching it up, but overall: I'm pretty happy with the tailgate. I'm kind of impressing myself with how tight it closes. It'll get a little weatherstripping when it's all said and done, but mostly to make sure it doesn't rattle than to keep water out.

More tomorrow...

Dan
tailgate 4.jpg
tailgate 5.jpg
tailgate 6.jpg
 
Like it alot! I'm going to copy that when I get to that stage.
 
Who has been busy? I have been. And so has Dad...

So, aside from making an "emergency" trip up to Montana to drive back an '84 FJ-60 for my sister (and getting to visit with my brother and 3_puppies), and acquiring more goodies for my 45, I FINALLY got some time to work on the 40...

I have three full days off in a row here, so I'm trying like heck to get the bodywork done, disassembled and off to get blasted so that it can get painted and driving sooner rather than later.

So, first things first:

I decided to mount the CB and HAM antennas directly to the body, but of course with a possible softtop there's just not much body to use. So I fabricated a couple brackets and welded them to the body. Kind of like the simple brackets that bolt on between the hood and the apron, but welded on (so it'll have a GREAT ground).

The CB Antenna. The AM/FM stereo antenna also sits on this side on Dad's truck, but it's pretty unobtrusive.
cb ant.jpg

The HAM antenna. I like NMO mounts, as it's what everyone I know seems to use, and it's what the faux-lux has, so it's a no-brainer to me...
ham ant.jpg

And here's an overview of the truck with the antennas both sticking up. You'll notice that they are both well clear of the windshield hinges. Which means that Dad can mount a hi-lift there someday if he wants. Also, he can still fold down the windshield with the antennas like this.
ant overview.jpg
ham ant.jpg
cb ant.jpg
ant overview.jpg
 
I mounted the windshield channel using sheet metal screws (the channel came from Shane--and it's beautiful). I actually mounted it a little too close to the windshield frame (only a 1/8" gap) and the only way to get it on there is to leave the first few screws off the end and get the top started in the slot before screwing the end down. But in the end, I think it'll give a nice taught top--and since it works--it'll stay.

Here's the channel with the top slid into it, but not yet flipped over onto the rest of the bows...
soft top channel.jpg

And here's a front view.
soft top channel 2.jpg

Dad wanted to see how it looked with a door, so I showed him. Looks good, no?
soft top 3.jpg
soft top channel.jpg
soft top channel 2.jpg
soft top 3.jpg
 
So, the last of the real bodywork it needed is the bed floor is rusty. I'm talking about pitted, cancerous rust that a PO apparently cleaned up, and then sprayed a TON of paint and bedliner on it, and sort of kept the water out--sort of.

Either way, I cut it up today.

Here's the before picture: the worst of the rust is on the left.
bed 1.jpg

Oh look, a huge gaping hole.
bed 2.jpg

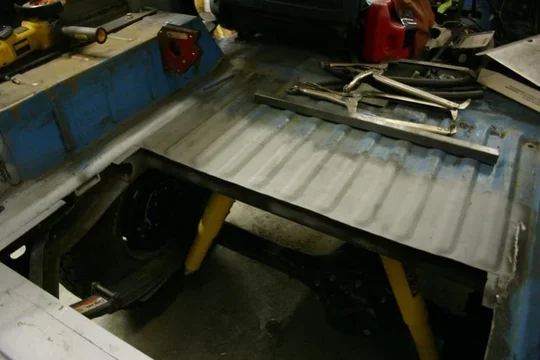
And here you can see a section cut out of a donor 40 (thanks Paul!) that will be used to "terminate" the ribs so it won't look funny when I make a flat floor section for the lid of the tool box that's going to go into that huge hole...
bed 3.jpg
bed 1.jpg
bed 2.jpg
bed 3.jpg
 
The other things that got done today were that Dad pulled the ambi doors apart, and got to work patching the rust in one of them (one was perfect, the other--not so much). Here's a pic where you can see the patches welded in, and some ground down. Still a bit of rust on the inside, but hopefully we can finish those off tomorrow. We figured that while we were blasting and painting body parts, that it only made sense to also do the hard top in case Dad ever puts it back on...
ambi door.jpg

I also found time to get started welding up a rolling axle stand. I noticed that I have 4 cruiser axles alone lying around the shop somehow or another, so it seems like a good idea to build a rack that can hold all of them, move around the shop, and have a good place to work on an axle (on the top).
axle stand.jpg

OK, that's it for today. Tomorrow I'll be boogieing to finish up the bodywork, because if we can do that, then the body can come off and Dad can get busy cleaning and painting the frame...

Dan
ambi door.jpg
axle stand.jpg
 
Thats is coming along nicely
my only concern is the height of the antennas, being blocked to the rear corners. Trees and branches have the potential to take hold of them as well.
 
Thats is coming along nicely
my only concern is the height of the antennas, being blocked to the rear corners. Trees and branches have the potential to take hold of them as well.

That was my concern too. But I think this was the best option, all things considered. Taller antennas could help get "above" the cab, and with a soft top, I don't think there should be all that much blockage by the bows and roll cage.

We'll see. I'm sure that trees and branches can grab these, but at least they are both easily visible when driving, so Dad can stop and remove the antenna if he's so inclined. He doesn't wheel enough to make it an issue. (let's see how long it takes him to read that!)

Dan
 
Sounds like a plan, The tool box location looks like a winner as space is always a premium.
 
Well, yesterday and today were productive. Of course, not in a "pretty pictures for MUD" sort of way though...

First off: most of my axle rack. I only have one other cruiser axle to get off the floor (the late model 40 drum axle that will get the discs off of one of these axles for my 45), but it's behind a BIG White Truck axle (40,000 lb rear end) so it'll have to wait until I'm in the mood to roll it out of the way to set on the stand. MUCH easier to move the axles around, plus it just looks pimping.

Who has an '85 mini truck, an FJ-60, and a 40 series FF rear axle all just lying around? I do. That's who. :grinpimp:
axle rack.jpg
axle rack 2.jpg

Then I welded in the bit of donor floor...
bed 1.jpg
axle rack.jpg
axle rack 2.jpg
bed 1.jpg
 
Next up I ground the welds smooth and gave it a quick coat of primer to make sure it looked okay (it did).
bed 2.jpg

Once that was done, I built a frame around the opening to stiffen it up out of 1"x1"x16GA square tube...
bed 3.jpg
bed 4.jpg
bed 2.jpg
bed 3.jpg
bed 4.jpg
 

Users who are viewing this thread

Back
Top Bottom