
Just saw these headlights and thought of your rig….


Navigation
Install the app
How to install the app on iOS
Follow along with the video below to see how to install our site as a web app on your home screen.
Note: This feature may not be available in some browsers.
More options
Style variation
You are using an out of date browser. It may not display this or other websites correctly.
You should upgrade or use an alternative browser.
You should upgrade or use an alternative browser.
Build Evolution of a Land Cruiser: My 80's build thread
- Thread starter jcardona1
- Start date
Member Builds and Stories
This site may earn a commission from merchant affiliate
links, including eBay, Amazon, Skimlinks, and others.
- Joined
- Jan 6, 2012
- Threads
- 340
- Messages
- 10,935
You may want to check your axle housing to make sure it's not bent while it's apart. A bent housing will cause premature axle seal leak.
What's the procedure for checking for a bent housing ?You may want to check your axle housing to make sure it's not bent while it's apart. A bent housing will cause premature axle seal leak.
Alignment bar, you’d use the saddles in the carrier to line it up usually, not sure how you’d do that without a removable cover. Maybe just try and slide in from the short side. You’d need some sort of puck clamped in the carrier to match the diameter of the bar. You could measure distance from bar to housing on top, bottom, front and rear side where it passes through the seal (seal removed) on the housingWhat's the procedure for checking for a bent housing ?
ThisI’d bet your axle is a little bent or warped
Alignment bar, you’d use the saddles in the carrier to line it up usually, not sure how you’d do that without a removable cover. Maybe just try and slide in from the short side. You’d need some sort of puck clamped in the carrier to match the diameter of the bar. You could measure distance from bar to housing on top, bottom, front and rear side where it passes through the seal (seal removed) on the housing
something Like this ? I used to make sure my housing did not warp when I was welding the truss. there a hollow third and a piece of chromoly pipe.
If there was no index to the third member (machined pucks that clamp in the carrier bearing bore, with a tight tolerance ID to index the alignment bar) that tube through your housing won't really help you with much at all. It won't keep anything straight while welding, and it won't let you know if your housing is bent.View attachment 2721676
something Like this ? I used to make sure my housing did not warp when I was welding the truss. there a hollow third and a piece of chromoly pipe.
Ha ha of course there is, The hole set was made by a engineer friend wheeling buddy of mine just for welding on axle housings. And no that pipe won't stop warping that's what the big a** I-beam is for.If there was no index to the third member (machined pucks that clamp in the carrier bearing bore, with a tight tolerance ID to index the alignment bar) that tube through your housing won't really help you with much at all. It won't keep anything straight while welding, and it won't let you know if your housing is bent.
What I meant my hollow is no ring and pinion in there.
The pipe fits the carrier bearing pucks (as you call them) and both ends of the axle housing with the tight tolerance you mention.
The idea is you weld a little spin the pipe weld a little more spin the pipe again continuing on like that and if at any point you fell resistance you know the housing is starting to warp.
Common sense dictate all of this.

In short it's a sweet set up
")
In my original question I should have been more clear, I was wondering if there a way to check the housing with out complete disassembly.
- Thread starter
- #2,809
Okay back to the front axle rebuild! I don't doubt that my housing is a bit bent from all the welding. I tried to take it slow while welding the truss and armor but I most certainly did not use a jig. Hopefully the Speedi Sleeves buy me a bit more time.
Over the last few weeks I got everything cleaned up and put back together. While I was in there I decided to replace the bronze bushings with new aftermarket pieces from Crusier Outfitters. The spindles may need replacing too, but since I eventually want to run the TG studless hubs which require different spindles, I decided to keep the originals for now. These bronze bushings were a pain in the ass to remove. Had to cut them with a Dremel until they could be removed.
Also replaced the leaky ram with a new unit from PSC.
- Thread starter
- #2,810
SLICK ROCK
With the truck back together, I met up with @Road Apple and hit up Slick Rock for a quick day trip. Ron's has a super nice LX with the first 80 bumpers built by the guys at Dissent Offroad - incredible work on these bumpers. I don't know if I could go crawling with a truck as nice as this. Hey Ron, you need a build thread!
The last time I ran Slick Rock was 2019 and the trail has definitely changed a lot. It's almost unrecognizable from the first time we ran it in 2012. Lots of traffic has really chewed this trail up, but that makes it challenging! I just hope this one stays open for years to come because it's one of my local favorites.


Video of me coming down the 'Gauntlet' which is part of the re-route at the north end of the trail. Steep downhill (or uphill) boulder field. Because it's mostly loose dirt, it's gotten really gnarly with deep holes compared to last time I ran it.
And climbing the Staircase at the south end. Went too far driver side and fell into a huge hole that was too deep to climb out of. This is why I'm glad I don't have a full bumper with swingouts. It would have wedged me here pretty good.
With the truck back together, I met up with @Road Apple and hit up Slick Rock for a quick day trip. Ron's has a super nice LX with the first 80 bumpers built by the guys at Dissent Offroad - incredible work on these bumpers. I don't know if I could go crawling with a truck as nice as this. Hey Ron, you need a build thread!
The last time I ran Slick Rock was 2019 and the trail has definitely changed a lot. It's almost unrecognizable from the first time we ran it in 2012. Lots of traffic has really chewed this trail up, but that makes it challenging! I just hope this one stays open for years to come because it's one of my local favorites.
Video of me coming down the 'Gauntlet' which is part of the re-route at the north end of the trail. Steep downhill (or uphill) boulder field. Because it's mostly loose dirt, it's gotten really gnarly with deep holes compared to last time I ran it.
And climbing the Staircase at the south end. Went too far driver side and fell into a huge hole that was too deep to climb out of. This is why I'm glad I don't have a full bumper with swingouts. It would have wedged me here pretty good.
- Thread starter
- #2,811
And Ron making quick work of the stairs by taking the correct line, not like mine haha
SLICK ROCK
With the truck back together, I met up with @Road Apple and hit up Slick Rock for a quick day trip. Ron's has a super nice LX with the first 80 bumpers built by the guys at Dissent Offroad - incredible work on these bumpers. I don't know if I could go crawling with a truck as nice as this. Hey Ron, you need a build thread!
The last time I ran Slick Rock was 2019 and the trail has definitely changed a lot. It's almost unrecognizable from the first time we ran it in 2012. Lots of traffic has really chewed this trail up, but that makes it challenging! I just hope this one stays open for years to come because it's one of my local favorites.
Video of me coming down the 'Gauntlet' which is part of the re-route at the north end of the trail. Steep downhill (or uphill) boulder field. Because it's mostly loose dirt, it's gotten really gnarly with deep holes compared to last time I ran it.
And climbing the Staircase at the south end. Went too far driver side and fell into a huge hole that was too deep to climb out of. This is why I'm glad I don't have a full bumper with swingouts. It would have wedged me here pretty good.
It's looks like a really fun trail !! And I agree Ron you need a build thread !!
Those tube doors are sweet and on my list. Are you running electric fans? Thought I could hear that distinct sound.
Last edited:
- Thread starter
- #2,814
It's looks like a really fun trail !! And I agree Ron you need a build thread !!
It sure is! Not as epic as Rubicon/Fordyce but perfect for a day trip where you don't have 2-3 days to spare for wheeling.
Those tube doors are sweet and on my list. Are you running electric fans? Thought I could be that distinct sound.
@NCTrey133 tube doors are awesome, welcome addition for wheeling. And nothing like driving the twisty mountain roads with the sunroof open. But let me tell you - it sure is miserable once you get back to the valley floor and it's 110 degrees.
And yeah those are electric fans you're hearing. I added these after installing the hydro assist. There's a steering cooler mounted horizontally in my front bumper with twin-mounted Spal fans. Tiny but they're loud little buggers and move a ton of air.


Sits flat in this area:

- Thread starter
- #2,815
TUBE DOORS
Okay so tube doors! As you guys may have noticed from my last few posts I installed a set of tube doors a few months ago. I wanted to wait until they were fully welded and painted before writing up the details.
First off, big thanks to the guy that builds these, @NCTrey133 I wanted a DIY kit and Trey was kind enough to send me a set that was tacked in place and required just a bit of finish welding. But as usual, I can't leave well alone and had to add some extra tweaks.
There were a few things that I wasn't willing to give up with tube doors: speakers, armrest, and last but not least, cupholders.
One of the things that always bugged me about tube doors was how exposed the hinges and doors sills are. It's kinda distracting which is why I wanted half doors. But I just can't find the time these days to build a set. The area that bothers me the most is at the front where the hinges are. So I made a cardboard cutout and added a filler plate to cover most of the exposed guts. Quick change that made a big difference in aesthetics.

Then armrests. This one was important because the tube doors were so low. Not having a decent armrest for either arm was too uncomfortable so I started looking for ideas. Looked at a few marine options, then came across this random NOS on eBay. The description said Caterpillar/John Deere/Hitachi so I'm guessing they're supposed to be for some farm equipment or a forklift. Whatever, they're stout and they work great.
For speakers I used a set of Krypt 6.5" wakeboard tower speaker cans and loaded them with a pair of Polk DB652. These things sound amazing in the sealed cans!

The cupholder was built out of 4" / 0.125" wall DOM. 3.75" ID which is perfect for a 32oz Hydroflask.
While working on the tube doors I quickly realized just how much it sucks to remove and install the heavy OEM door. So I bought a used set of hinges to make some quick disconnects. I cut out the center pin on my original hinges as well as these. With the hinge separated, the door-side brackets will be attached permanently, one to the tube doors, another set on the original doors. Then, I can either use an M8x60mm bolt or an 8mm (or 5/16") clevis pin to disconnect the hinges. Much easier than undoing the bolts and trying to hold the door up to reattach.

Here you can see the two hinge halves held together with an M8 bolt.

Here's a picture of the latch and the stopper thing I made to keep the door open/closed systems working correctly.

The doors were originally built to use Jeep TJ mirrors but I wasn't happy with how much they stuck out. So instead I made a mount for some UTV/SxS mirrors which are nice and compact.
Anyway, on to the final pics


Okay so tube doors! As you guys may have noticed from my last few posts I installed a set of tube doors a few months ago. I wanted to wait until they were fully welded and painted before writing up the details.
First off, big thanks to the guy that builds these, @NCTrey133 I wanted a DIY kit and Trey was kind enough to send me a set that was tacked in place and required just a bit of finish welding. But as usual, I can't leave well alone and had to add some extra tweaks.
There were a few things that I wasn't willing to give up with tube doors: speakers, armrest, and last but not least, cupholders.
One of the things that always bugged me about tube doors was how exposed the hinges and doors sills are. It's kinda distracting which is why I wanted half doors. But I just can't find the time these days to build a set. The area that bothers me the most is at the front where the hinges are. So I made a cardboard cutout and added a filler plate to cover most of the exposed guts. Quick change that made a big difference in aesthetics.
Then armrests. This one was important because the tube doors were so low. Not having a decent armrest for either arm was too uncomfortable so I started looking for ideas. Looked at a few marine options, then came across this random NOS on eBay. The description said Caterpillar/John Deere/Hitachi so I'm guessing they're supposed to be for some farm equipment or a forklift. Whatever, they're stout and they work great.
For speakers I used a set of Krypt 6.5" wakeboard tower speaker cans and loaded them with a pair of Polk DB652. These things sound amazing in the sealed cans!
The cupholder was built out of 4" / 0.125" wall DOM. 3.75" ID which is perfect for a 32oz Hydroflask.
While working on the tube doors I quickly realized just how much it sucks to remove and install the heavy OEM door. So I bought a used set of hinges to make some quick disconnects. I cut out the center pin on my original hinges as well as these. With the hinge separated, the door-side brackets will be attached permanently, one to the tube doors, another set on the original doors. Then, I can either use an M8x60mm bolt or an 8mm (or 5/16") clevis pin to disconnect the hinges. Much easier than undoing the bolts and trying to hold the door up to reattach.
Here you can see the two hinge halves held together with an M8 bolt.
Here's a picture of the latch and the stopper thing I made to keep the door open/closed systems working correctly.
The doors were originally built to use Jeep TJ mirrors but I wasn't happy with how much they stuck out. So instead I made a mount for some UTV/SxS mirrors which are nice and compact.
Anyway, on to the final pics
Last edited:
- Thread starter
- #2,816
Almost forgot! With tube doors, the master switch is disconnected which means your rear power windows will not work! Your sunroof will also not work. Here is the thread where a few other members helped find the solution by connecting a few pins in the driver's side kick panel when the main door harness is unplugged.

 forum.ih8mud.com
How to make rear windows work with tube doors?
forum.ih8mud.com
FMC80
SILVER Star
Dude, just phenomenal. All of it.
I don't see an answer to your question on is that new HG ok with it not a perfect circle around each piston..is it? I'm about to start a motor rebuild with gaskets and seals and timing chain on their way so I'm "studying" as much as I can before the journey begins. Also, after scraping off the old head gasket, how did you clean out the block with the tiny bit that will get into it?HEAD REASSEMBLY
It's finally time to start the reassembly process! Hopefully it goes a bit quicker this time around. I won't be taking pictures of everything, maybe just a few important items. At this point I'm waiting on a new torque wrench I ordered so I can finish bolting down the head and continuing on with the rest of the parts.
After cleaning the block surface and pistons I set out to clean the head bolt holes. The head bolts are threaded in the M11x1.25 unicorn thread which makes it almost impossible to fine a thread tap at a local store. I purchased it from here: http://www.mscdirect.com/product/04993051
Don't skip this part! My bolt holes were full of crud! Here's an example of what came out of every hole

As mentioned earlier, I chose not to reuse the stock head bolts and because a new set of OEM head bolts would have cost about $180 for a bolt that's basically not reusable, I decided to buy a set of ARP studs for a cheaper price. I went with the Opel V6 kit (item # 209-4702). This comes with 16 studs so you have 2 extra.
The front 2 studs need to be trimmed about 1/4" so they won't interfere with the cam gears. Here's what I trimmed away with a Dremel tool and a cutoff disc. I also slotted the head so I could use a screwdriver to insert/remove. I hope I cut enough. I'll find out when I install the cams!

Wiped the block down with some rubbing alcohol and set the new gasket down. You'll also notice the bit of gray FIPG sealant right behind the timing chain as specified in the FSM.

And here's something that threw me off. The brand new OEM head gasket does not follow the circle shape around the cylinder. My brain can't process why the gasket is "deformed" at the 10 and 2 o'clock positions. This is the same for all cylinders.
This is my first HG job and as a non-engineer, this defies all laws of common sense for me. The Toyota guys obviously know what they're doing but I can't understand why a HG would not seal perfectly around the edge of the cylinder. Wouldn't that just set it up for premature failure? Are all OHC engines setup like this?

And to compare, let's look back at my old HG. Where I thought my old gasket was warped and deformed turns out to look exactly like the new OEM version. Was my gasket even that bad to begin with? Color me confused


They are designed that way.I don't see an answer to your question on is that new HG ok with it not a perfect circle around each piston..is it? I'm about to start a motor rebuild with gaskets and seals and timing chain on their way so I'm "studying" as much as I can before the journey begins. Also, after scraping off the old head gasket, how did you clean out the block with the tiny bit that will get into it?
- Thread starter
- #2,820
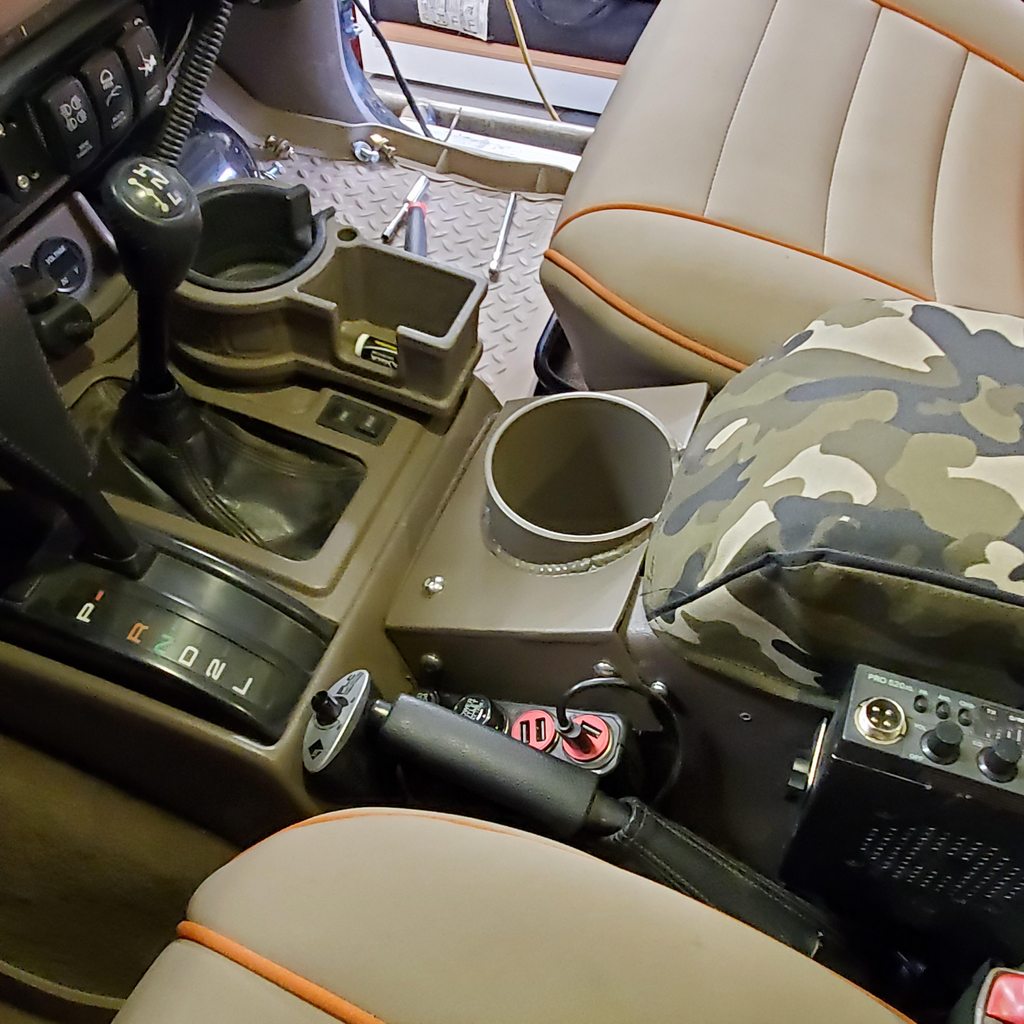
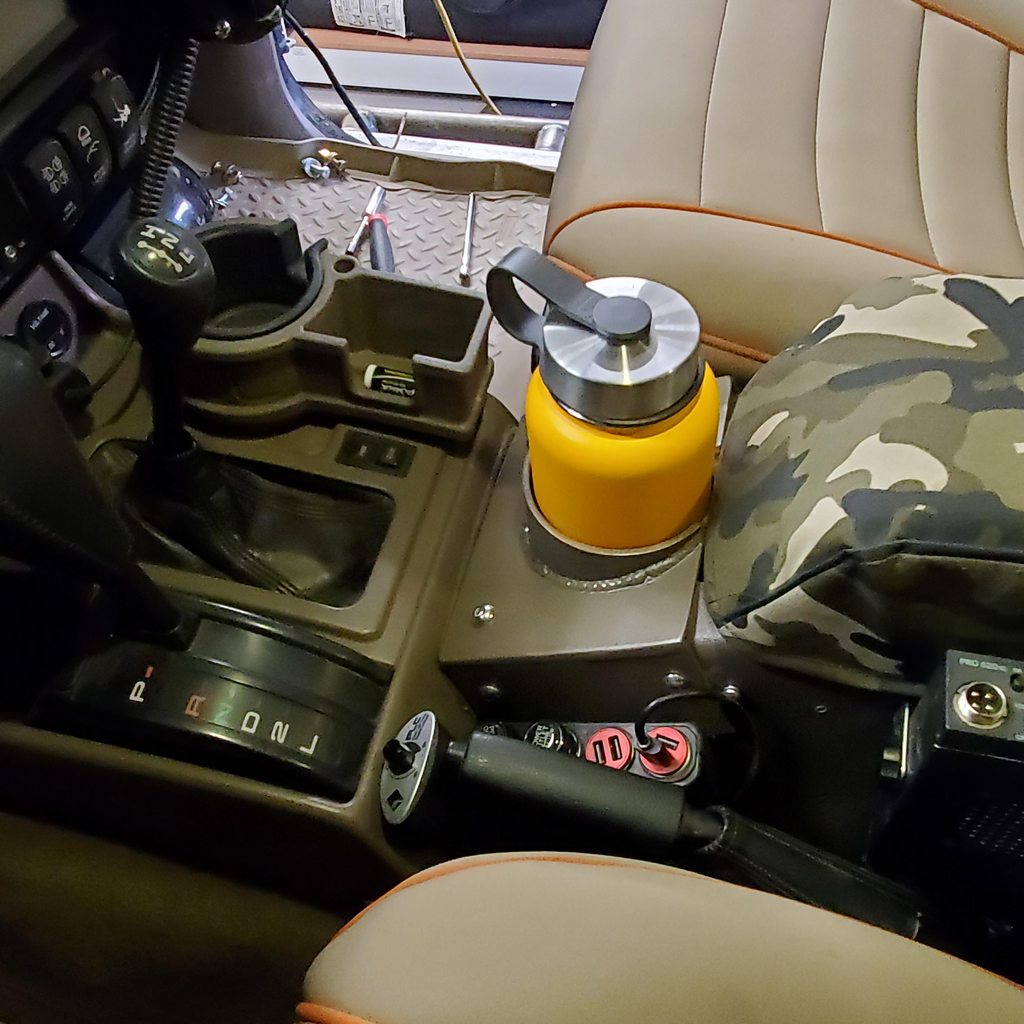
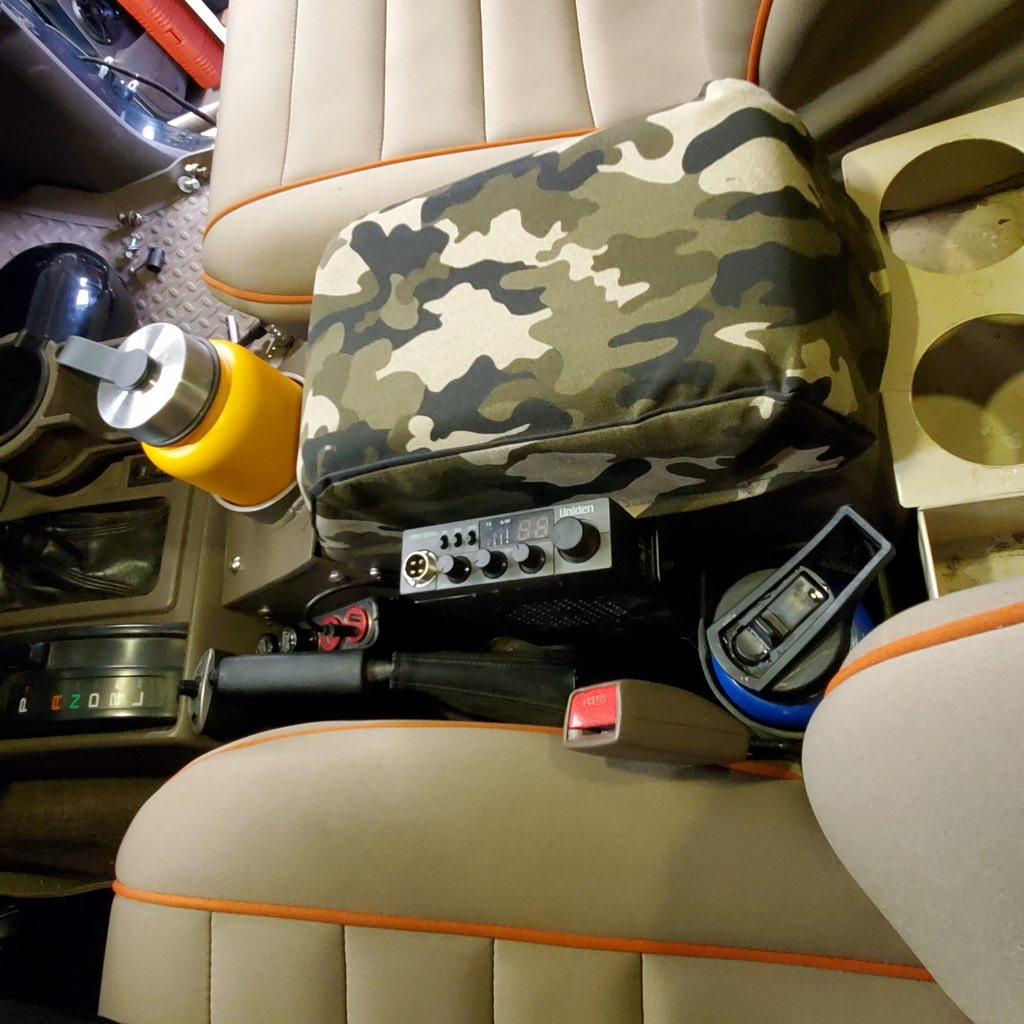
Did this a few months ago, never posted it here:
A little center console project in order to hold 32oz Hydroflask-type bottles. I like to use these water bottles for wheeling trips and it was annoying not having a good spot to put them in.
So I cut out the cubby and made a drop-in insert out of 4" pipe and some scrap steel. The 4" pipe has an ID of 3.75" which is perfect for all these generic 32oz vacuum insulated bottles that are about 3.6" in diameter.
I also removed the tiny cupholder on the side of the console and attached a waxed canvas chalk bag, also the perfect size for a 32oz water bottle. Now I can carry two!
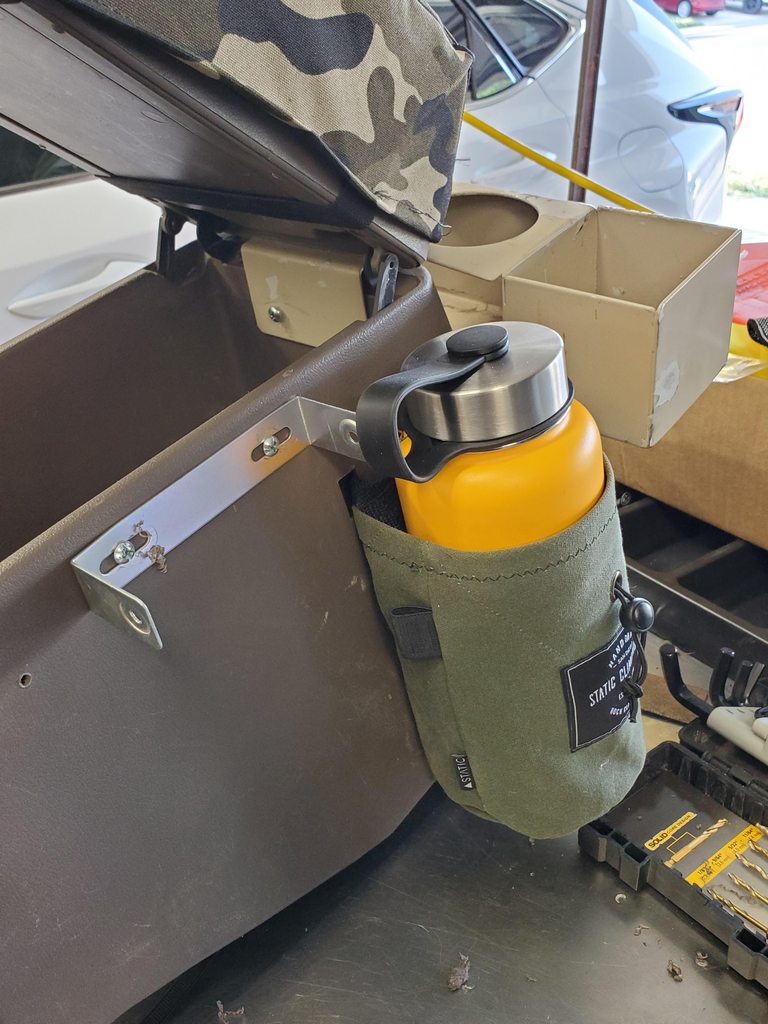