
Still you have a 30% stiffer rate with only a 10% additional wheel ratioYours are pretty much vertical right? Mine are angled back about 25° which affects the effective spring rate.
Navigation
Install the app
How to install the app on iOS
Follow along with the video below to see how to install our site as a web app on your home screen.
Note: This feature may not be available in some browsers.
More options
Style variation
You are using an out of date browser. It may not display this or other websites correctly.
You should upgrade or use an alternative browser.
You should upgrade or use an alternative browser.
Build Evolution of a Land Cruiser: My 80's build thread
- Thread starter jcardona1
- Start date
Member Builds and Stories
This site may earn a commission from merchant affiliate
links, including eBay, Amazon, Skimlinks, and others.
- Thread starter
- #2,743
5TH GEN 4RUNNER BRAKE CONVERSION & OVERHAUL
Copypasta from my other thread for those following along:
I'm still finalizing the last few pieces of this upgrade but wanted to share the details with folks. I've seen a few other brake upgrades that involve different rotors and a bit of machining but in my opinion this is the easiest way to get bigger brakes without the extra work. I've seen a few guys running this hub/rotor/caliper setup now for quite some time and haven't seen any reported issues. I've yet to see a detailed write-up using this configuration so that's where I come in!
Let's start by buying some stuff. You'll want to make sure you get the calipers from the earlier 5th gens (2010-2013) with 14WA stamped into the caliper. The later year models switched to a 14mm mounting bolt vs our 12mm mounting bolt. These will have 14WB stamped into the caliper. Caliper specs:
5TH GEN FRONT CALIPER (14WA stamping, For 338mm rotor (All Trims)
Toyota Part #: 47750-60300 - LH, 47730-60300 - RH
Mounting Bolt: 12mm
Piston Size: 48mm
Bleeder Size: M7 x 1.0
Inlet Size: M10 x 1.0
And here are the specs on the rotor:
5TH GEN FRONT ROTOR (For 14WA front caliper (All Trims))
Toyota Part #: 43512-60191
Outer Diameter: 338mm
Thickness: 31.8mm
Hub hole: 108mm
Bolt hole: 14.4mm
I've read of issues with sticking calipers whether new OEM and reman so I just decided to go with aftermarket to take advantage of the long warranties. For the calipers I went with new aftermarket (not reman) Raybestos units. Part numbers are FRC12551N and FRC12552N.
Here's a comparison of the stock 80 calipers and the 4Runner calipers. The 80 Series Caliper Piston OD is 45.3mm or 1.7835". The 4Runner Caliper Piston OD is 48mm or 1.8898". Credit to @Dirty Koala for providing the math and specs on these things.
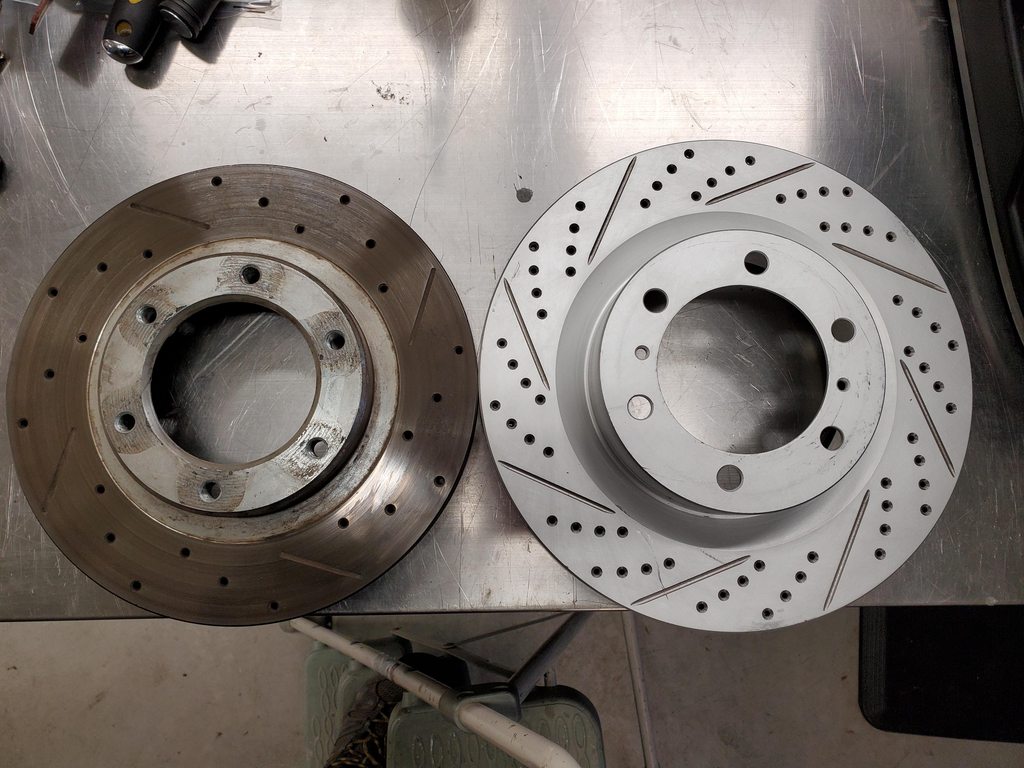
For rotors I also went with aftermarket from R1. I went with their Carbon GeoMet cross drilled and slotted version because I hate money and like flashy parts. 311mm/12.2" vs 338mm/13.3", a whole inch bigger.
First step is figuring out the caliper mounting. Now, the 4Runner caliper will bolt up directly to the 80 knuckles no problem. But because the rotor has a deeper hat and we're not doing any machining of the hub, the rotor will sit DEEPER over the knuckle compared to the 80 rotor. This then means the caliper needs to be spaced BACK. Based on what I heard from other that have done this, the caliper needs to be spaced back about 10mm.
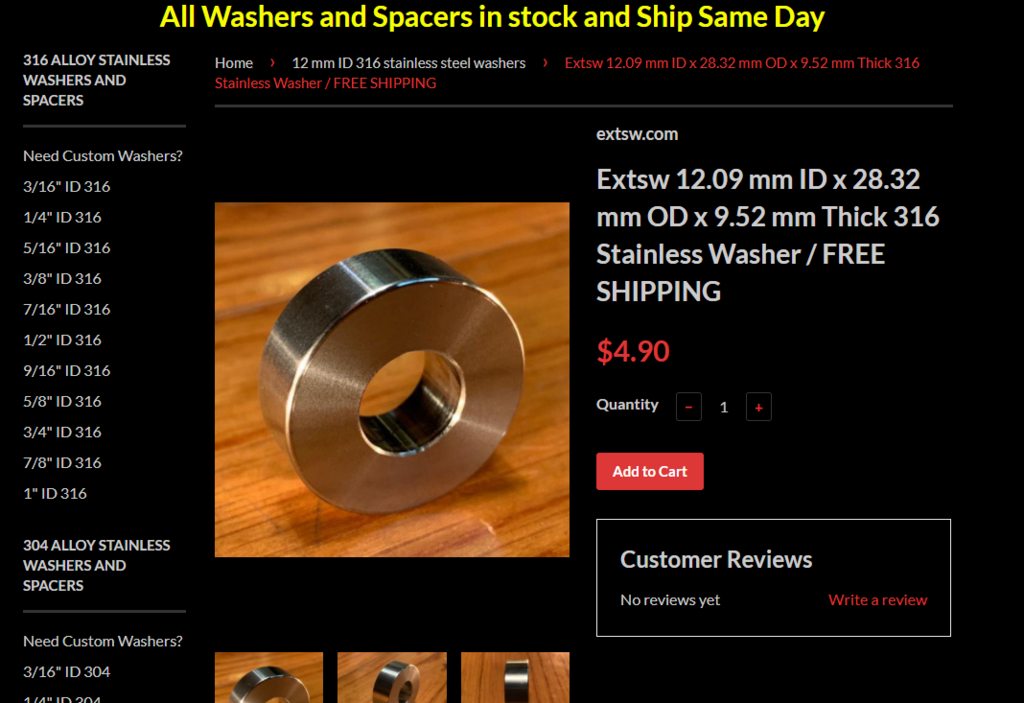
On the FB 80 page someone found these machined spacers that looked to do the trick. They have an ID of 12.09mm (perfect for the mounting bolt) and are 9.52mm thick.
Here's the link: 12 mm ID 316 stainless washers spacers - https://www.extsw.com/collections/12mm-id-316 Be sure to order a few extras as you will always need these to mount your caliper.
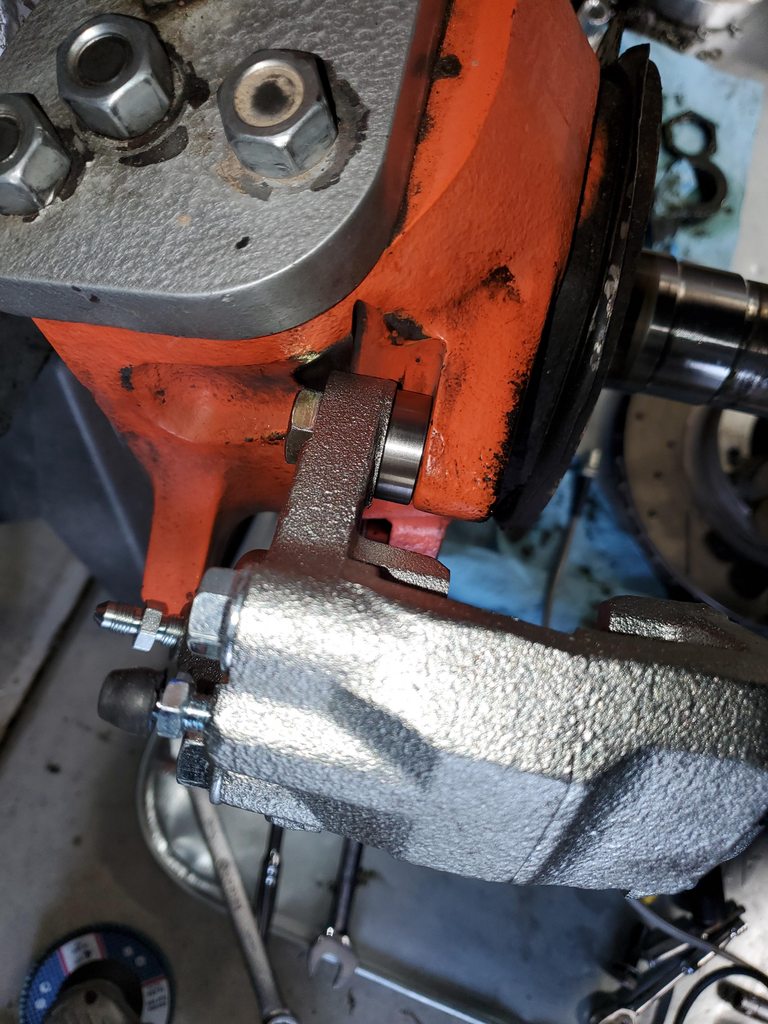
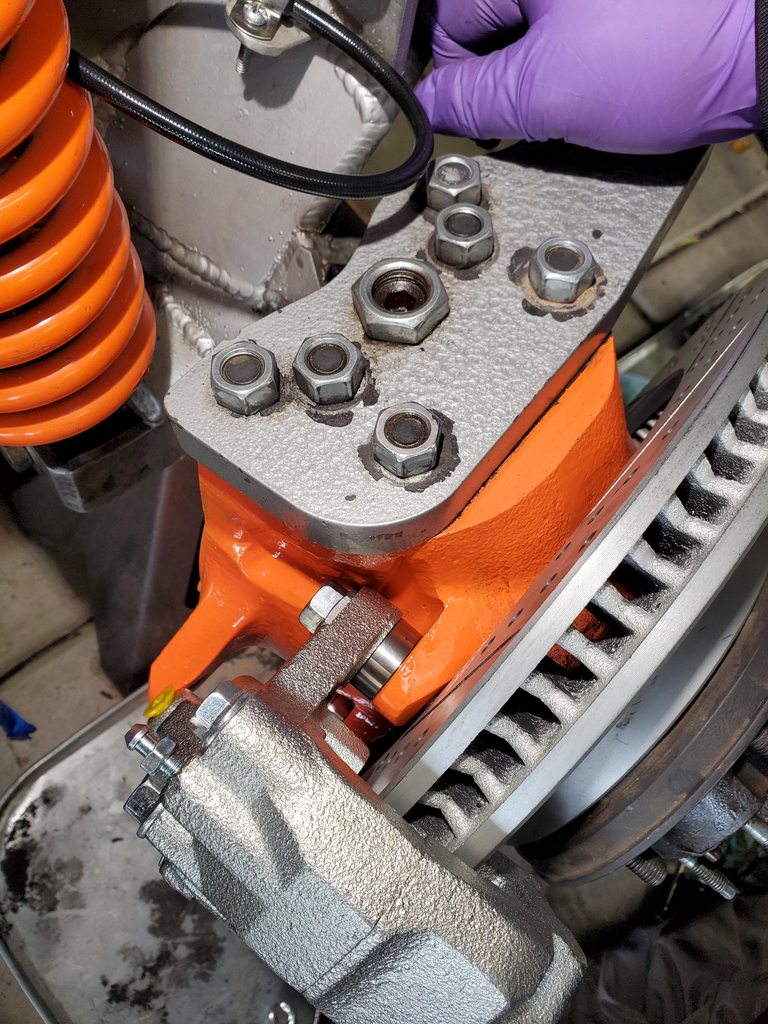
You will also need longer bolts. I used M12-1.25 x 45mm 10.9 bolts. Here is the caliper bolted up to the knuckle with the machined spacers and longer bolts.
The next step is figuring out how to mount the rotor to the hub. The stock 80 rotor has threaded holes and bolts up behind the hub. The 5th gen 4Runner rotors are slip-fit in stock configuration. Our hubs will not work for slip-fit unless you do a lot of machine work to the hubs, something I didn't want to do. So we're gonna bolt them up in a lugcentric configuration.
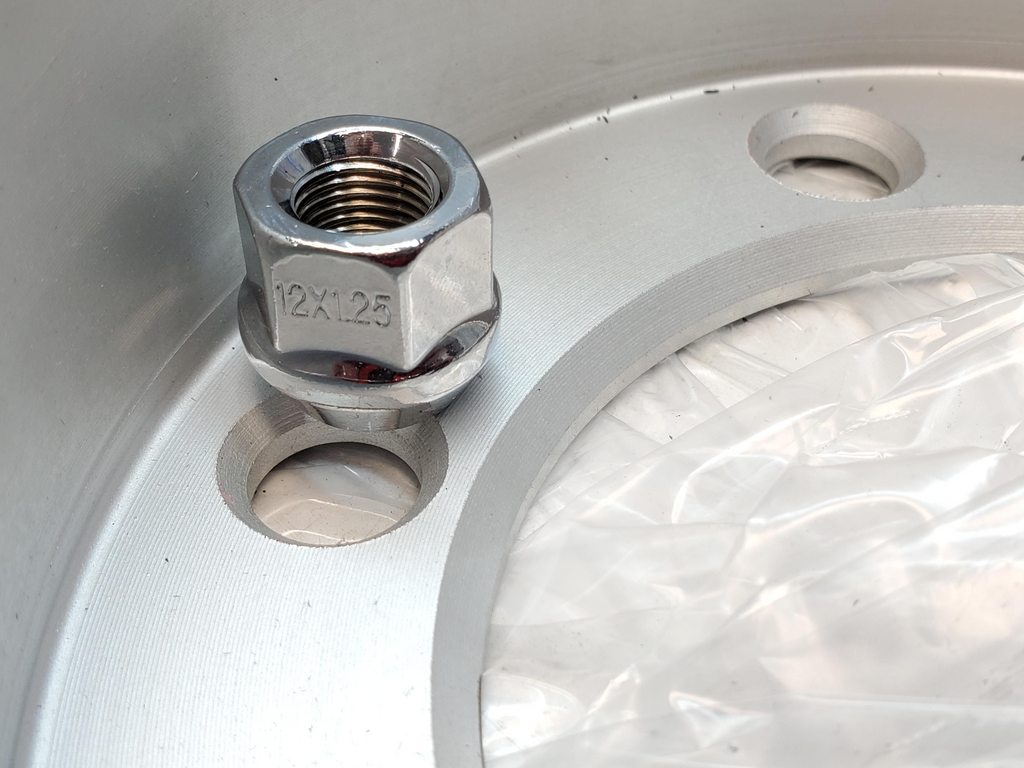
For this I used longer M12-1.25 x 40mm bolts and M12-1.25 open-ended acorn bulge lug nuts. Here's the hub taken apart with longer bolts.
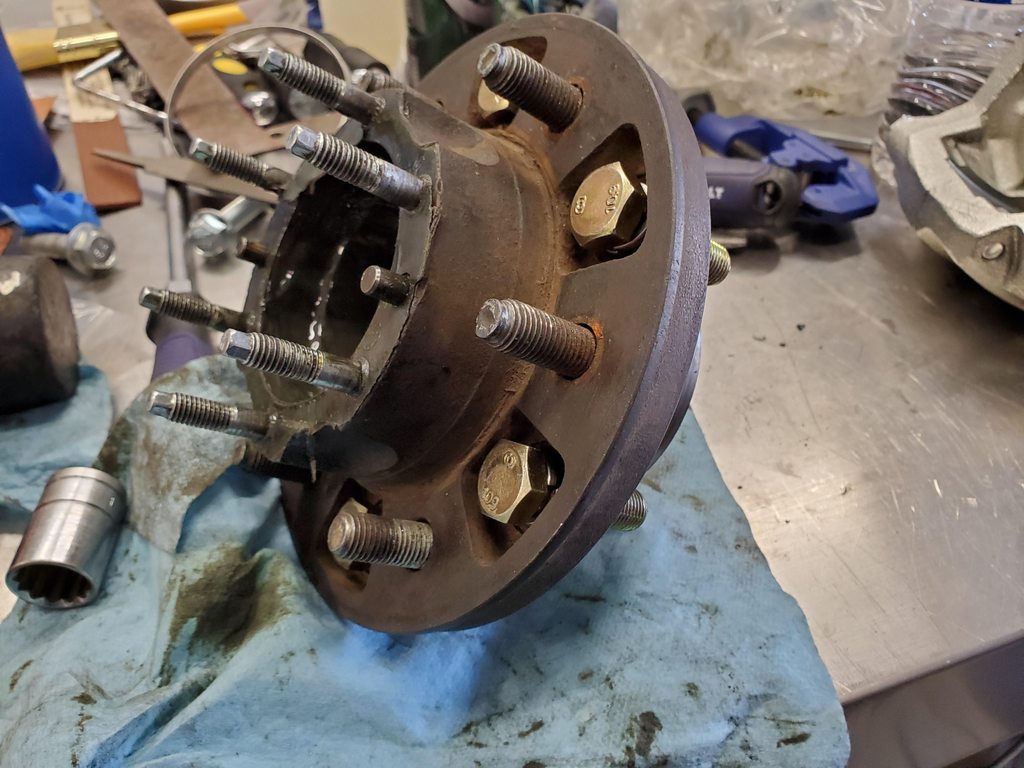
Back side of the hub. You'll notice I had a hub centering ring here. Based on what I read from others, they recommended 108mm to 106mm rings to help center the hub over the rotor. However I feel this isn't needed because of the lug centric nuts we're using.
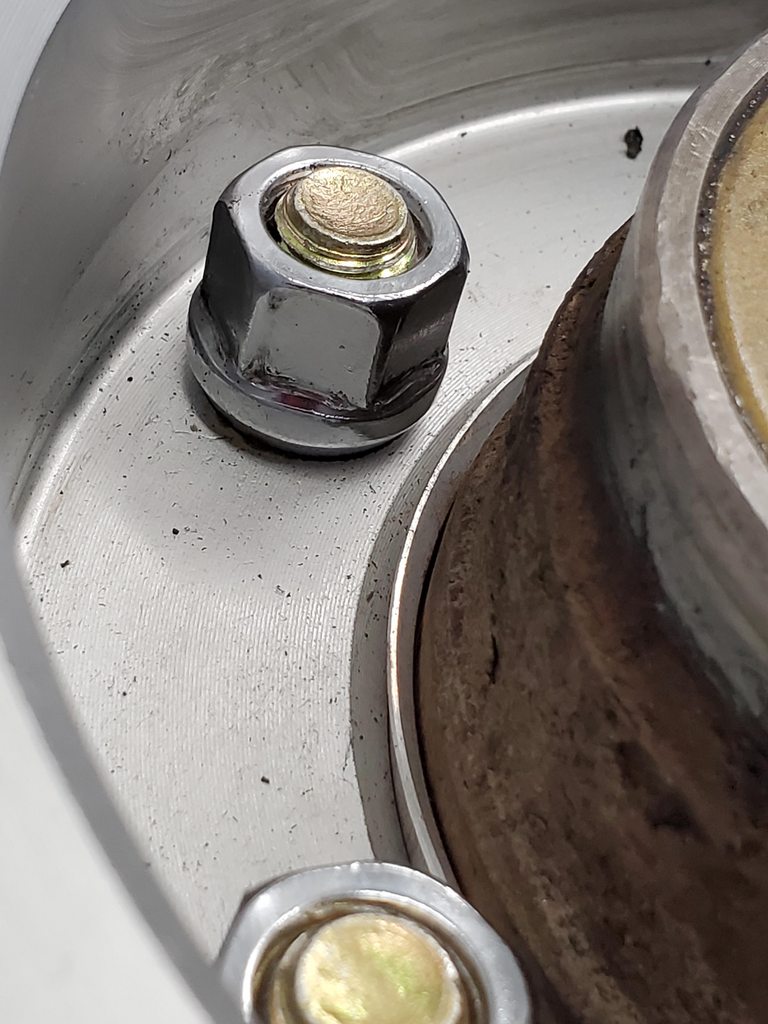
The back side of the rotor showing the beveled hole which matches nicely with the acorn bulge lugnuts.
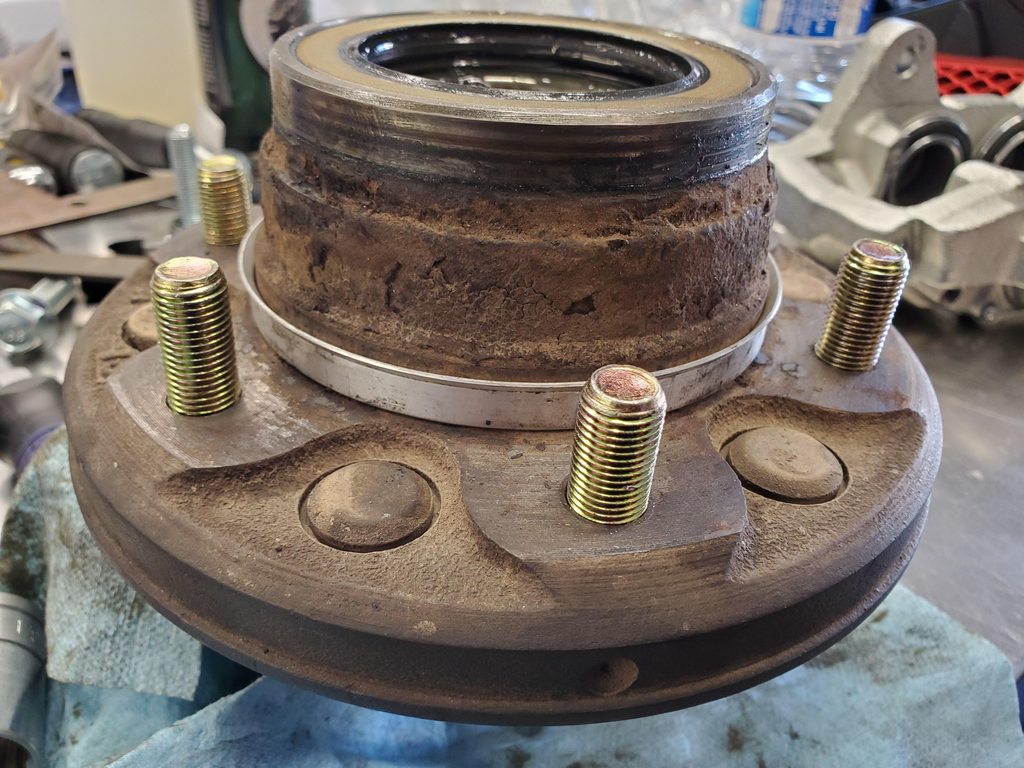
I used orange Loctite and cranked them down to about 14 3/4 Ugga Duggas. Here you can see the hub centering ring still installed.
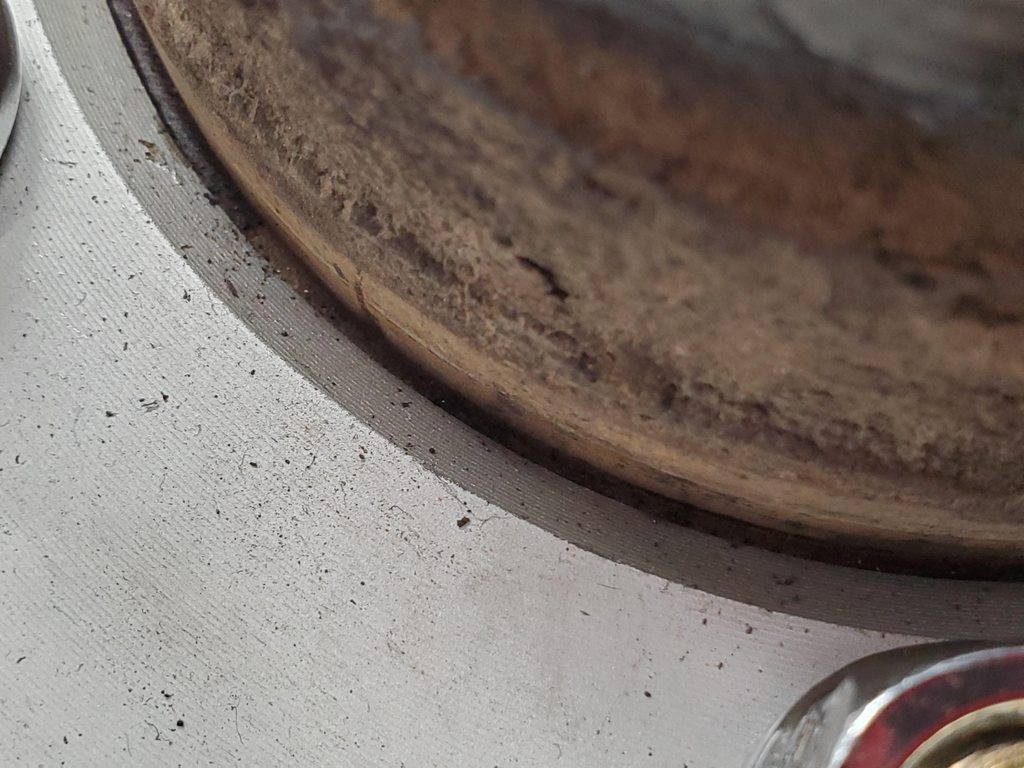
Here's the approx 2mm difference between the hub and the rotor with the ring removed after you tighten everything down. As I mentioned, several people have been running these for a few years now with no issue. It's really no different than when you install aftermarket wheels in a lugcentric setup vs OEM wheels that are hubcentric.
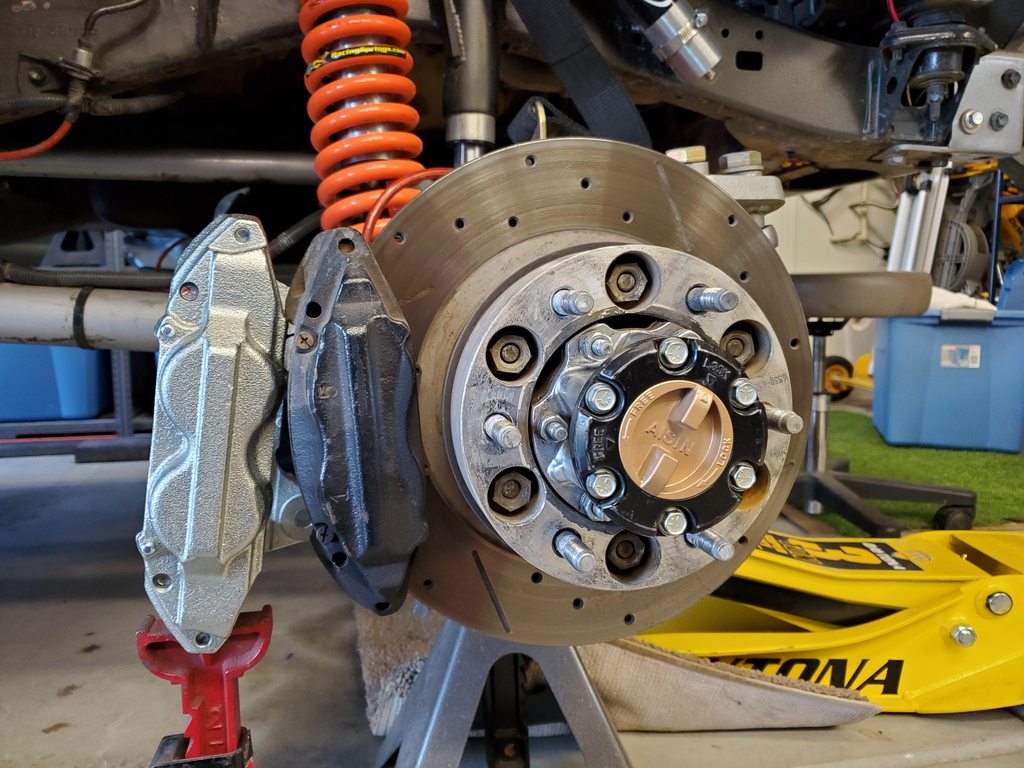
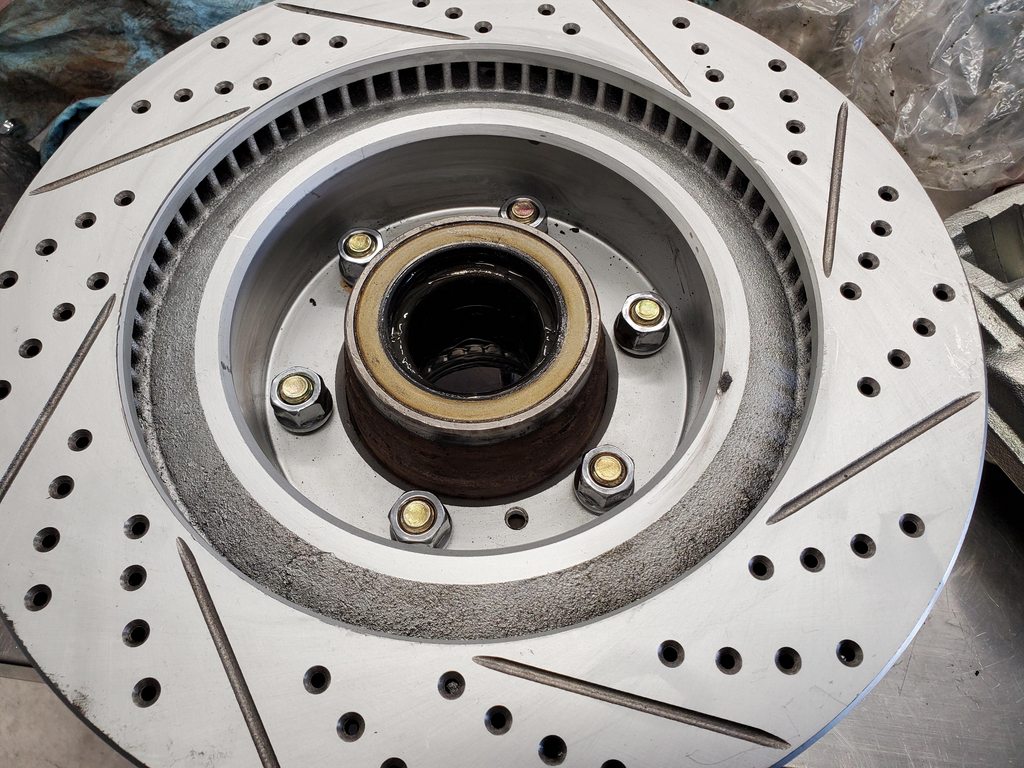
And the final assembly
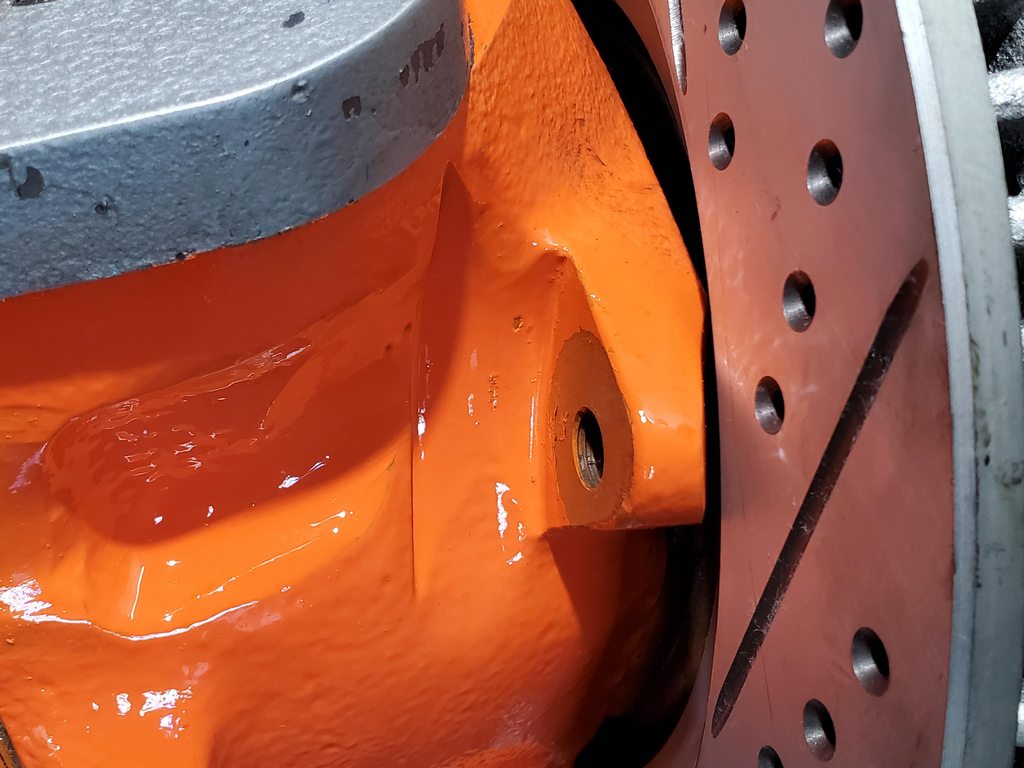
As mentioned above, the 4Runner has a deeper rotor hat and since we simply bolted it to the back of the 80 hub, it will sit deeper over the knuckles. This means you need to do a little bit of grinding to clear the rotor. Here you will see the spots that required grinding on my knuckle. The grinding on the back steering stop is to clear the caliper. Because I'm running Hellfire knuckles with more material up top, I had to do a bit more grinding to clear the nut and a socket due to the caliper being spaced back by about 10mm. All in all this is quickly taken care of with a flap wheel.
NOTE: since I'm running high-steer and don't have lower steering arms, I had nothing to grind here. But your lower steering arms will also require a bit of grinding to clear the rotor.
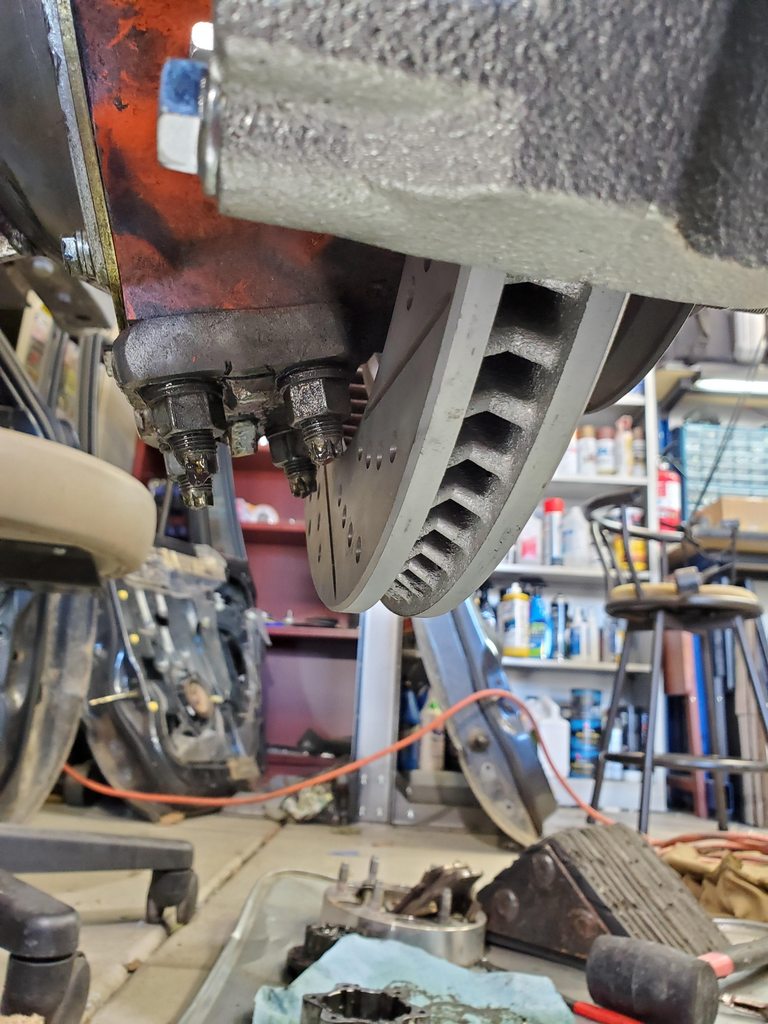
With that out of the way we can mount the rotor/hub assembly back on the spindle. Here's the final clearance after grinding.
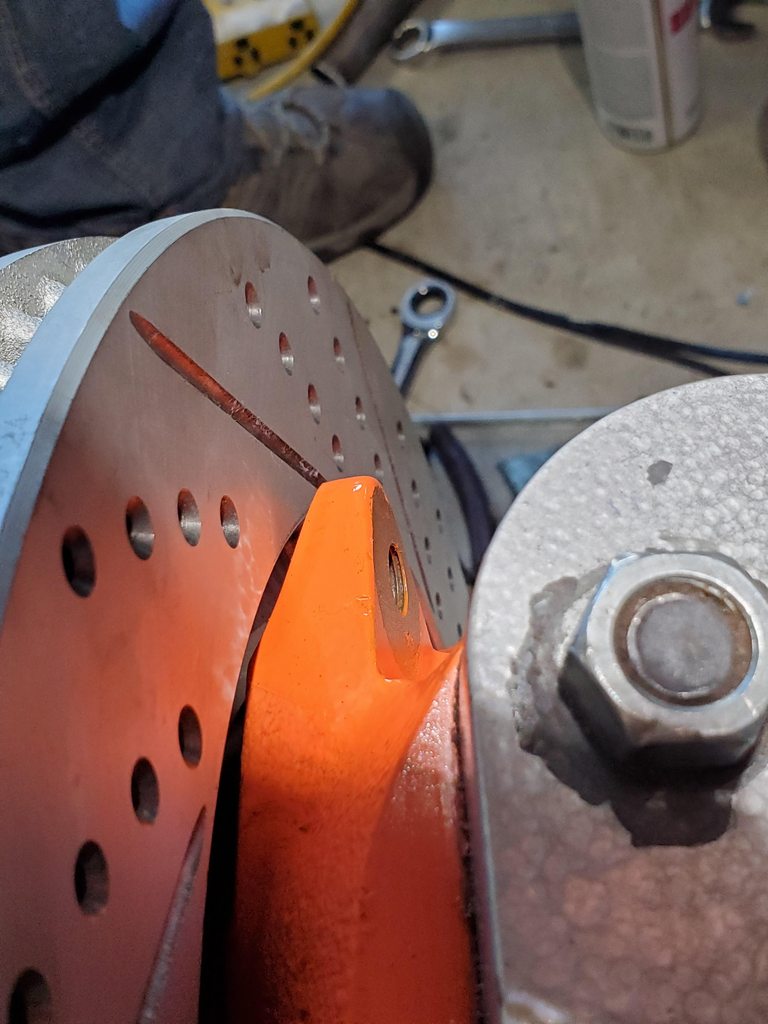
Lower caliper mount.
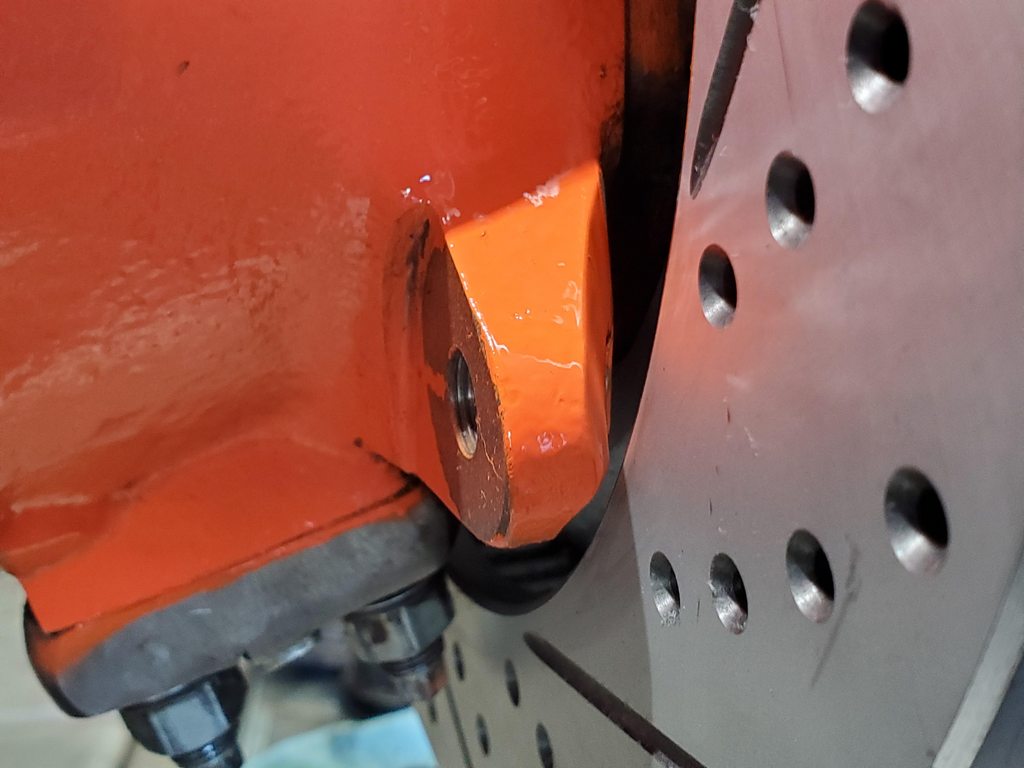
And we can finally put the caliper over the rotor!
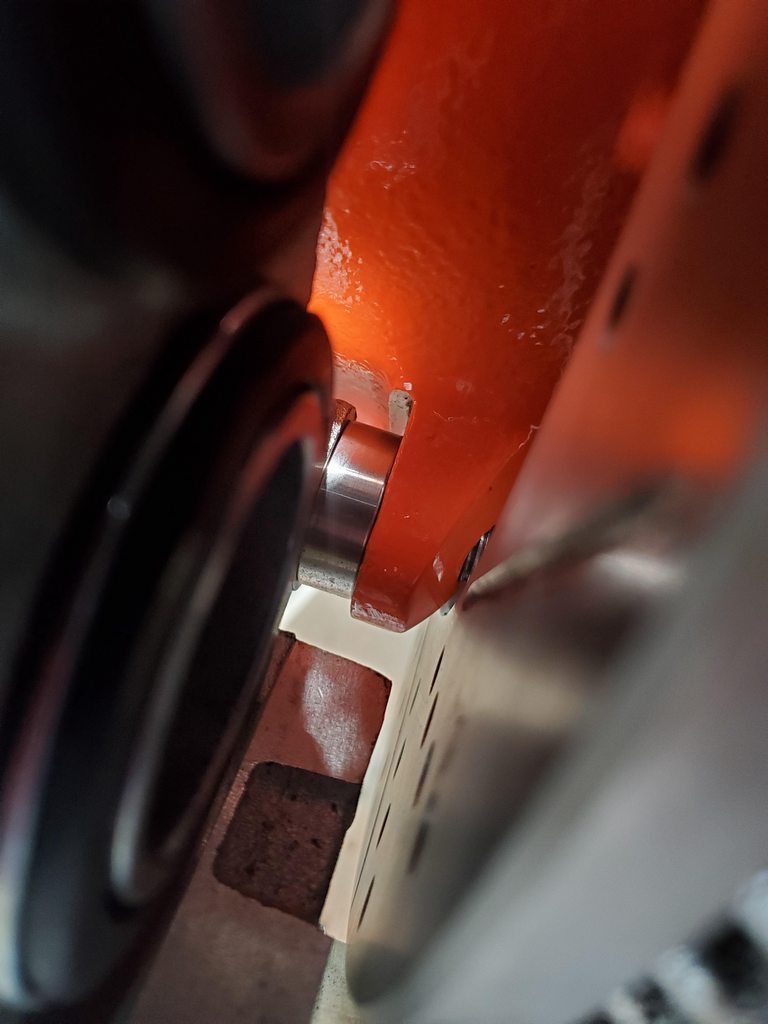
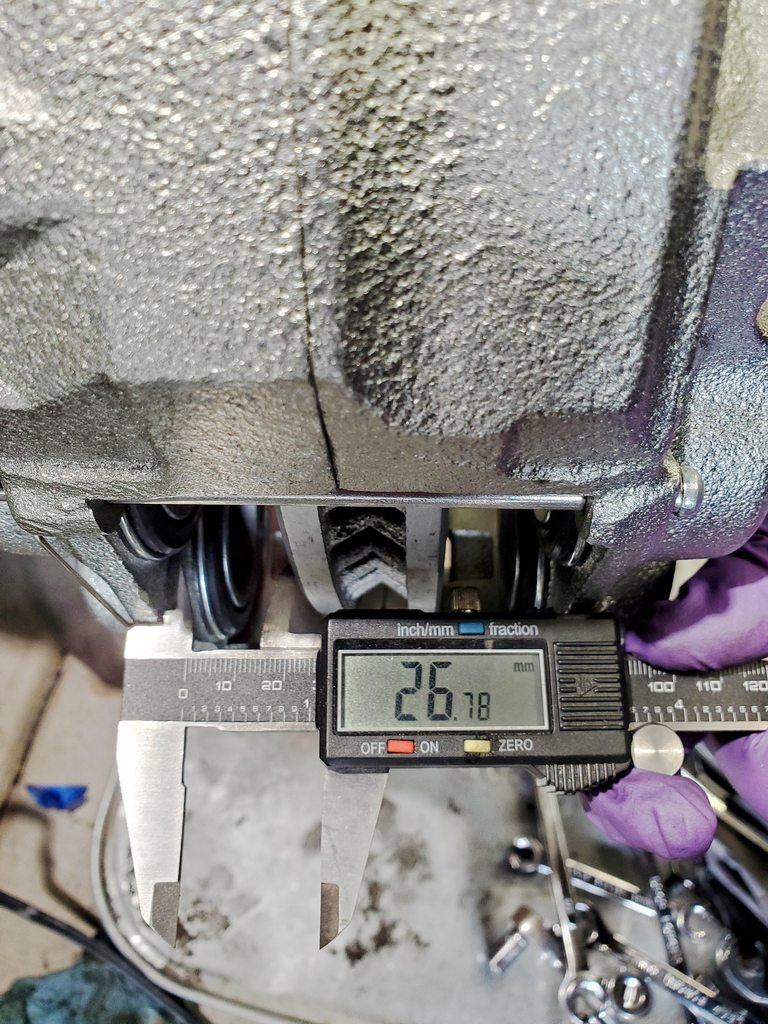
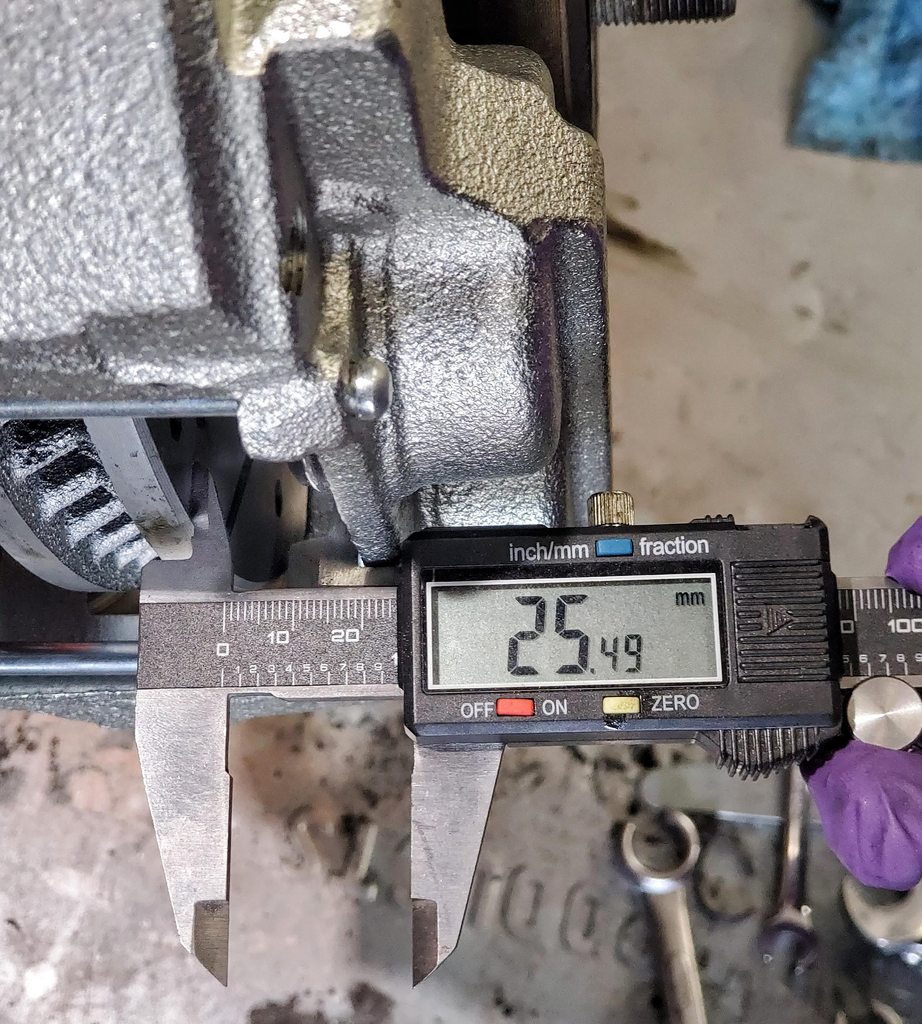
The 9.52mm machined spacers are just about perfect. With everything mounted up, I measured the distance between the surface of the rotor and the inside of the caliper housing. Not sure if this is the best place to measure but it's where I could get a consistent flat surface. With this setup I'm at about a 1.3mm difference between each side which is 0.05", basically nothing. I really don't see this causing an issue but if you really needed it to be perfect, it seems like an 8mm wide spacer would be just right.
Copypasta from my other thread for those following along:
I'm still finalizing the last few pieces of this upgrade but wanted to share the details with folks. I've seen a few other brake upgrades that involve different rotors and a bit of machining but in my opinion this is the easiest way to get bigger brakes without the extra work. I've seen a few guys running this hub/rotor/caliper setup now for quite some time and haven't seen any reported issues. I've yet to see a detailed write-up using this configuration so that's where I come in!
Let's start by buying some stuff. You'll want to make sure you get the calipers from the earlier 5th gens (2010-2013) with 14WA stamped into the caliper. The later year models switched to a 14mm mounting bolt vs our 12mm mounting bolt. These will have 14WB stamped into the caliper. Caliper specs:
5TH GEN FRONT CALIPER (14WA stamping, For 338mm rotor (All Trims)
Toyota Part #: 47750-60300 - LH, 47730-60300 - RH
Mounting Bolt: 12mm
Piston Size: 48mm
Bleeder Size: M7 x 1.0
Inlet Size: M10 x 1.0
And here are the specs on the rotor:
5TH GEN FRONT ROTOR (For 14WA front caliper (All Trims))
Toyota Part #: 43512-60191
Outer Diameter: 338mm
Thickness: 31.8mm
Hub hole: 108mm
Bolt hole: 14.4mm
I've read of issues with sticking calipers whether new OEM and reman so I just decided to go with aftermarket to take advantage of the long warranties. For the calipers I went with new aftermarket (not reman) Raybestos units. Part numbers are FRC12551N and FRC12552N.
Here's a comparison of the stock 80 calipers and the 4Runner calipers. The 80 Series Caliper Piston OD is 45.3mm or 1.7835". The 4Runner Caliper Piston OD is 48mm or 1.8898". Credit to @Dirty Koala for providing the math and specs on these things.
For rotors I also went with aftermarket from R1. I went with their Carbon GeoMet cross drilled and slotted version because I hate money and like flashy parts. 311mm/12.2" vs 338mm/13.3", a whole inch bigger.
First step is figuring out the caliper mounting. Now, the 4Runner caliper will bolt up directly to the 80 knuckles no problem. But because the rotor has a deeper hat and we're not doing any machining of the hub, the rotor will sit DEEPER over the knuckle compared to the 80 rotor. This then means the caliper needs to be spaced BACK. Based on what I heard from other that have done this, the caliper needs to be spaced back about 10mm.
On the FB 80 page someone found these machined spacers that looked to do the trick. They have an ID of 12.09mm (perfect for the mounting bolt) and are 9.52mm thick.
Here's the link: 12 mm ID 316 stainless washers spacers - https://www.extsw.com/collections/12mm-id-316 Be sure to order a few extras as you will always need these to mount your caliper.
You will also need longer bolts. I used M12-1.25 x 45mm 10.9 bolts. Here is the caliper bolted up to the knuckle with the machined spacers and longer bolts.
The next step is figuring out how to mount the rotor to the hub. The stock 80 rotor has threaded holes and bolts up behind the hub. The 5th gen 4Runner rotors are slip-fit in stock configuration. Our hubs will not work for slip-fit unless you do a lot of machine work to the hubs, something I didn't want to do. So we're gonna bolt them up in a lugcentric configuration.
For this I used longer M12-1.25 x 40mm bolts and M12-1.25 open-ended acorn bulge lug nuts. Here's the hub taken apart with longer bolts.
Back side of the hub. You'll notice I had a hub centering ring here. Based on what I read from others, they recommended 108mm to 106mm rings to help center the hub over the rotor. However I feel this isn't needed because of the lug centric nuts we're using.
The back side of the rotor showing the beveled hole which matches nicely with the acorn bulge lugnuts.
I used orange Loctite and cranked them down to about 14 3/4 Ugga Duggas. Here you can see the hub centering ring still installed.
Here's the approx 2mm difference between the hub and the rotor with the ring removed after you tighten everything down. As I mentioned, several people have been running these for a few years now with no issue. It's really no different than when you install aftermarket wheels in a lugcentric setup vs OEM wheels that are hubcentric.
And the final assembly
As mentioned above, the 4Runner has a deeper rotor hat and since we simply bolted it to the back of the 80 hub, it will sit deeper over the knuckles. This means you need to do a little bit of grinding to clear the rotor. Here you will see the spots that required grinding on my knuckle. The grinding on the back steering stop is to clear the caliper. Because I'm running Hellfire knuckles with more material up top, I had to do a bit more grinding to clear the nut and a socket due to the caliper being spaced back by about 10mm. All in all this is quickly taken care of with a flap wheel.
NOTE: since I'm running high-steer and don't have lower steering arms, I had nothing to grind here. But your lower steering arms will also require a bit of grinding to clear the rotor.
With that out of the way we can mount the rotor/hub assembly back on the spindle. Here's the final clearance after grinding.
Lower caliper mount.
And we can finally put the caliper over the rotor!
The 9.52mm machined spacers are just about perfect. With everything mounted up, I measured the distance between the surface of the rotor and the inside of the caliper housing. Not sure if this is the best place to measure but it's where I could get a consistent flat surface. With this setup I'm at about a 1.3mm difference between each side which is 0.05", basically nothing. I really don't see this causing an issue but if you really needed it to be perfect, it seems like an 8mm wide spacer would be just right.
- Thread starter
- #2,744
Brake pads look nicely aligned with the rotor
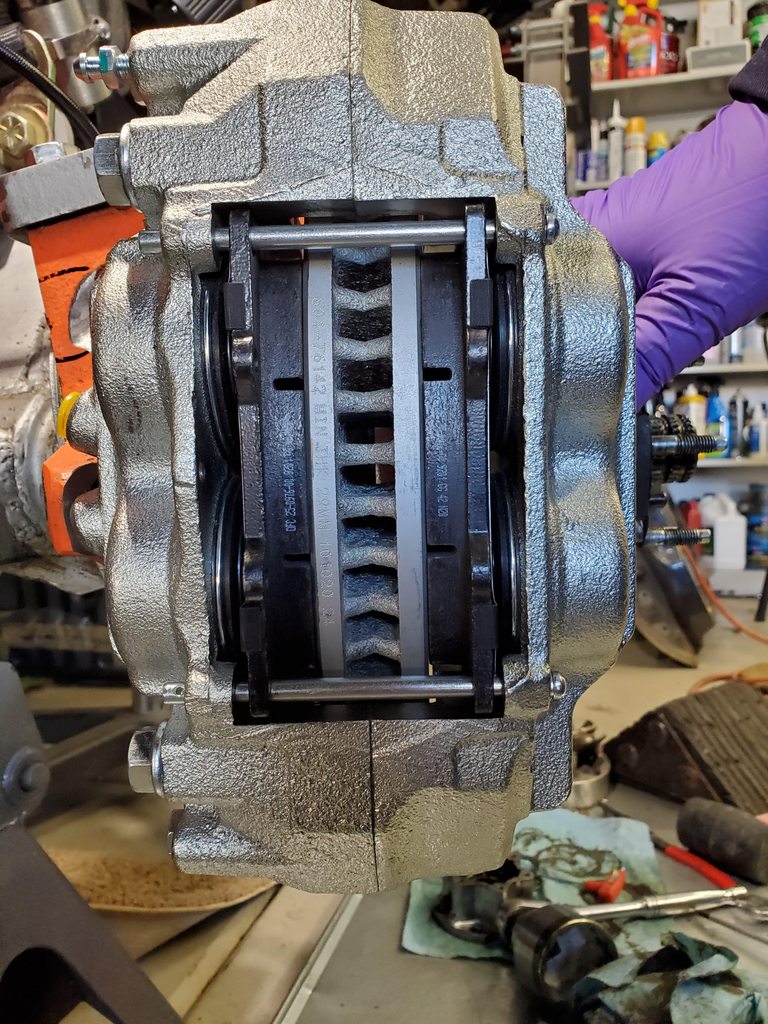
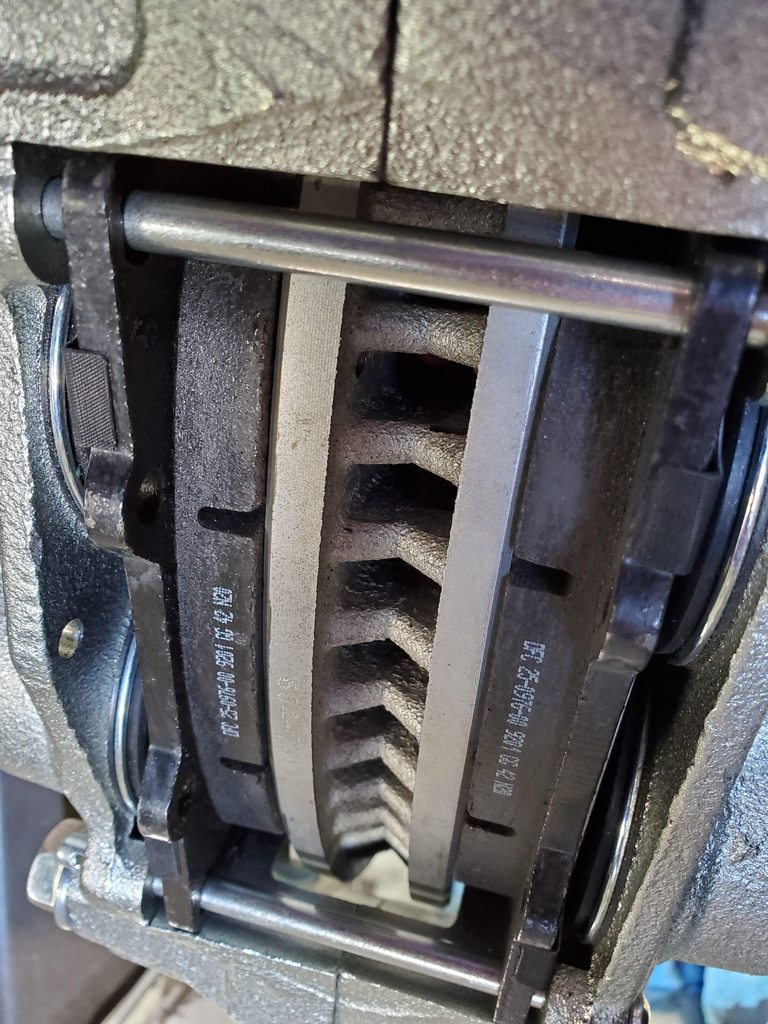
And that's pretty much how you mount up 5th gen 4Runner rotors and calipers without any machining! There are still a few odds and ends I'm working on while I complete my brake overhaul. I'll share these below as some might be relevant, but are mostly unique to my setup.

Okay so brake lines. The 4Runner caliper uses a standard hardline fitting with the same Toyota M10-1.0 inverted flare found throughout our trucks. However our trucks use a 10mm banjo fitting on the caliper. From what I read you can run the standard OEM banjo fitting on these calipers, but the banjo bolt might be too long. You can either cut the bolt down a tiny bit or run extra copper washers. Or you can swap out to different lines and eliminate the banjo fitting all together.
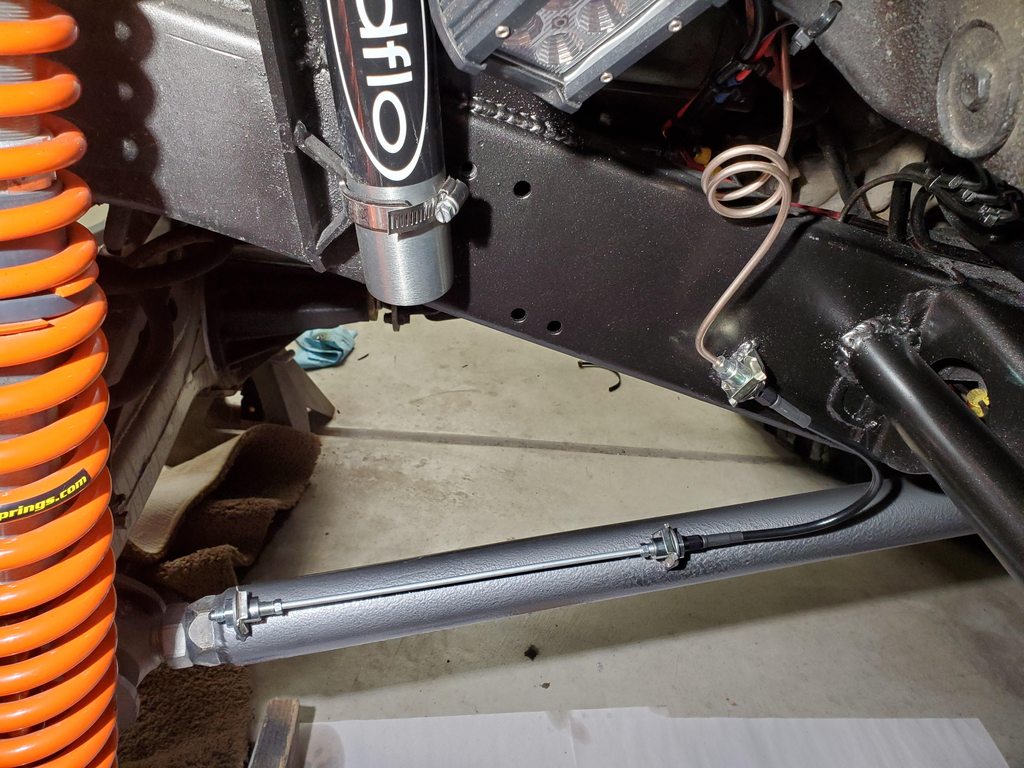
My setup has all custom brake lines due to the 3 link so I converted to SAE/AN fittings all below the frame. This makes it much easier and cheaper to find the right fittings and hoses you need in any size/length.
For the caliper I chose a 35 degree angled 10mm banjo fitting that convers to -3AN and uses the factory bolt.
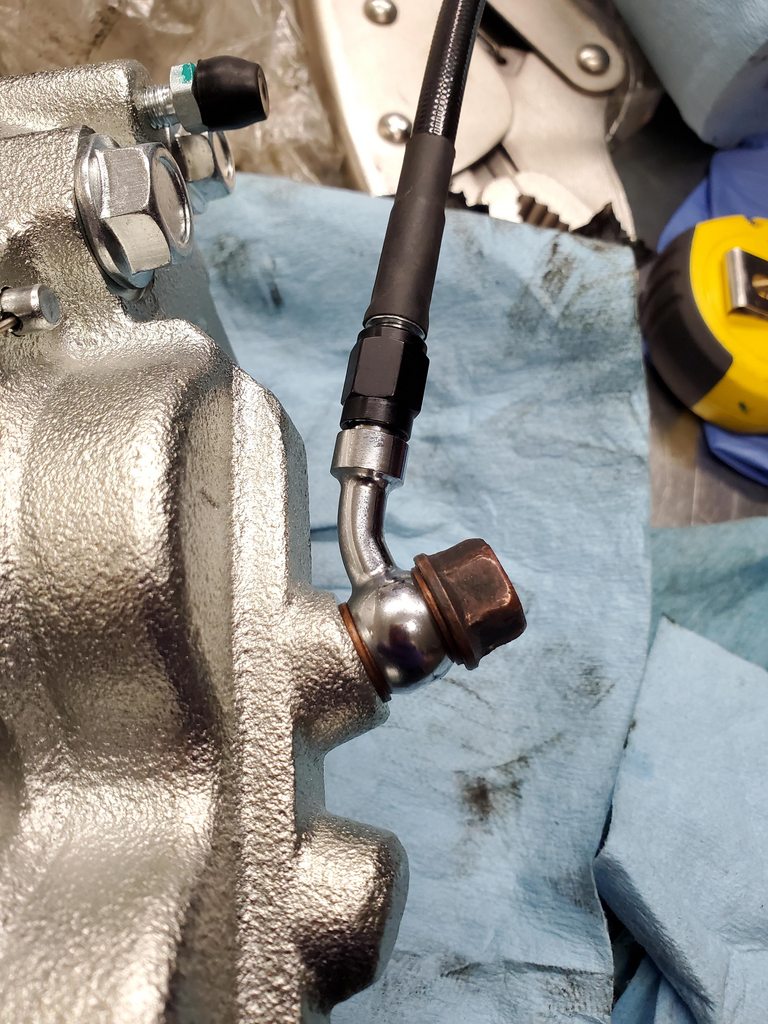
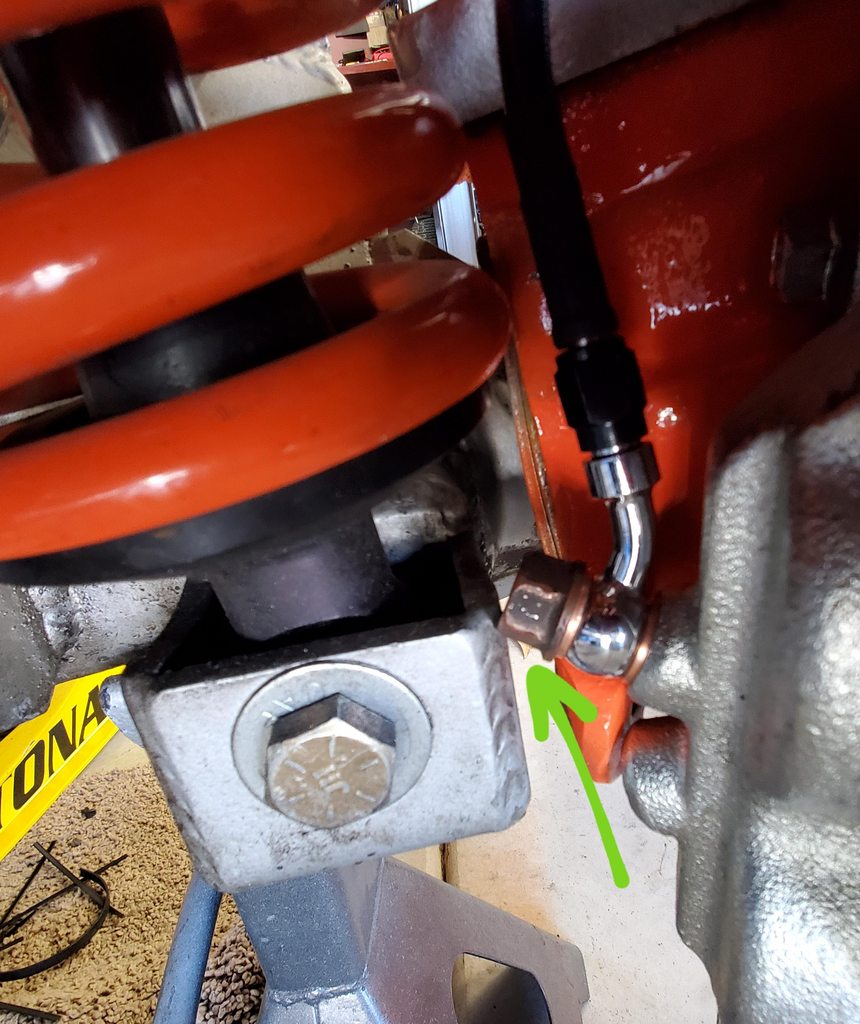
However this resulted in a minor issue I'm still trying to sort through. Because I have coilovers, the banjo bolt will hit my coilover mount at full turn. I don't want to lose any turn radius and don't want to grind my coilover mount so I'm in the process of looking for lower profile banjo bolts and trying to find a slimmer banjo fitting. Most of you won't have this issue I think.
As part of my brake overhaul, I'm running all new lines as mentioned. Here is the passenger side being converted from metric to standard.
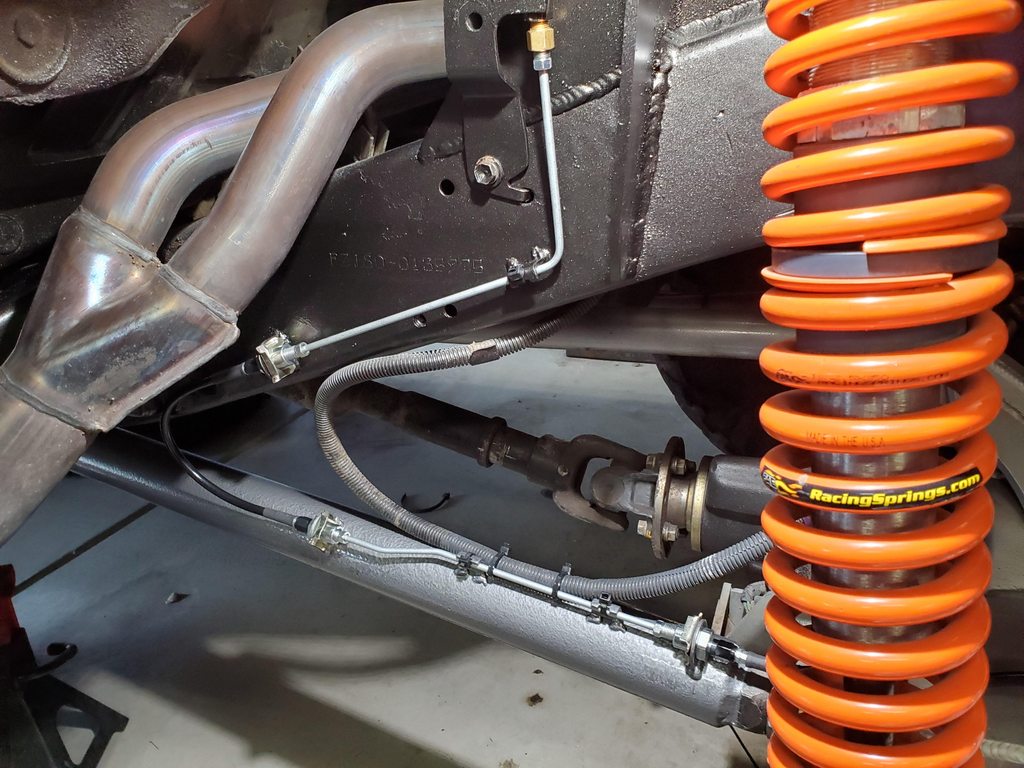
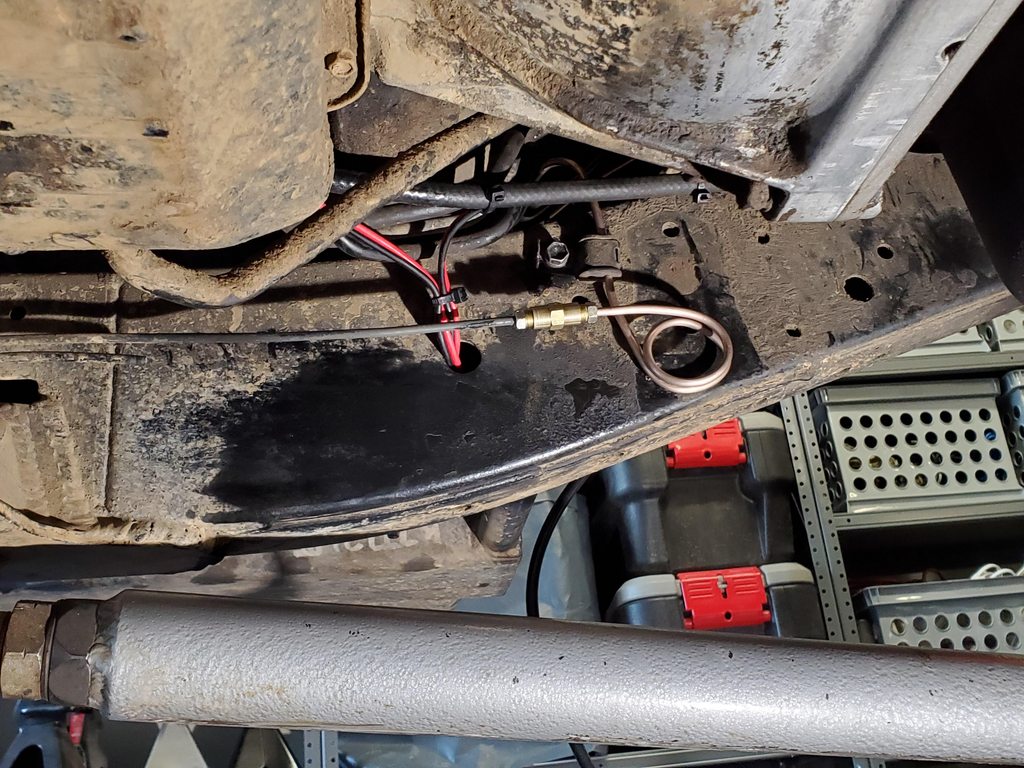
Driver's side. I also re-routed this one.
Re-routed and re-ran the rear brake line as well (deleted LSPV years ago).
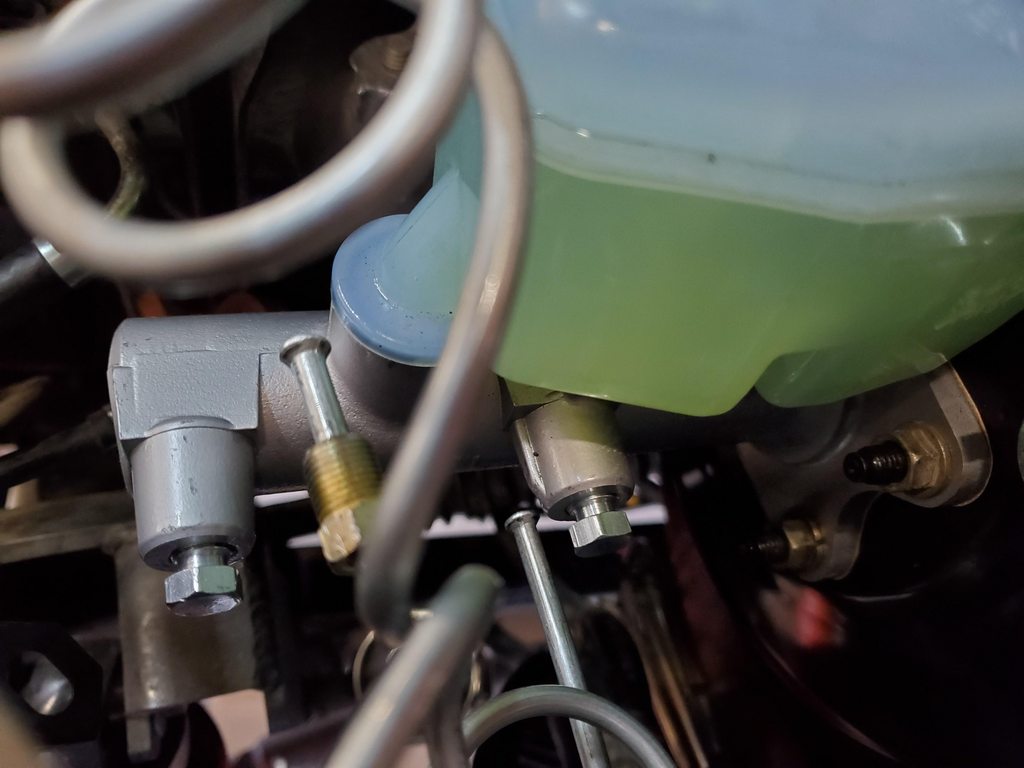
New Seiken booster and master cylinder from the one-ton T100 trucks (Advics/Aisin BMT-139, non-ABS).
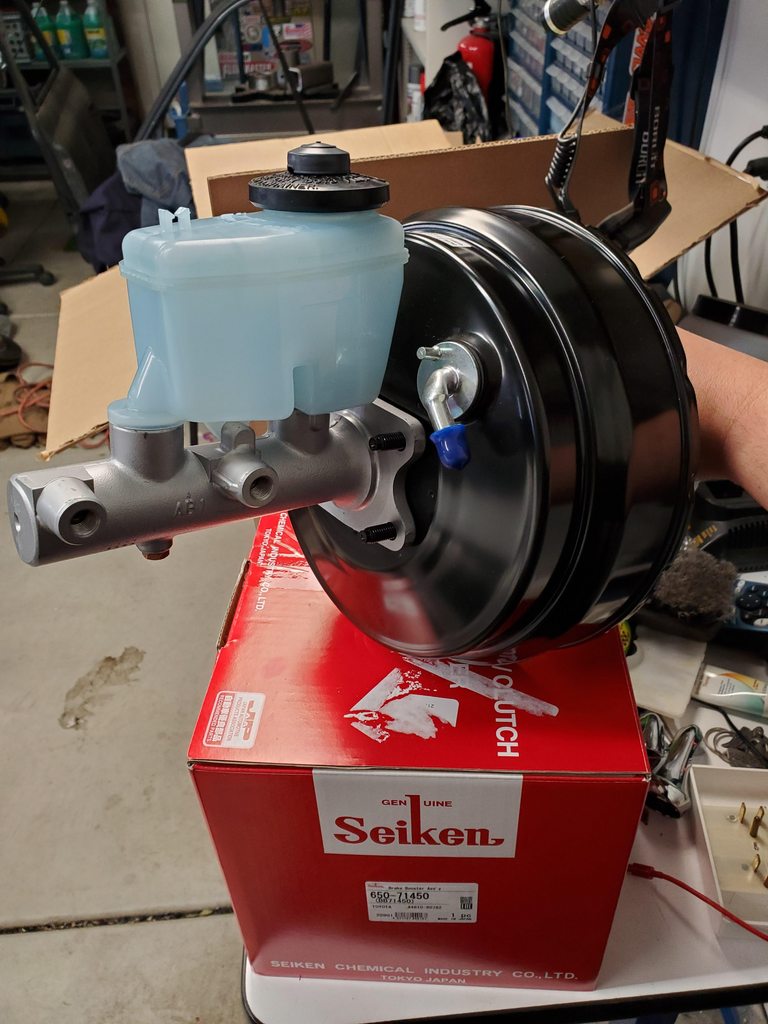
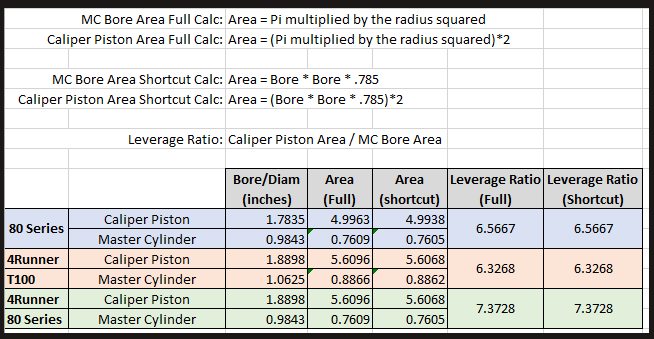
With the bigger 4Runner calipers you want an MC with a bigger bore to keep the same pedal throw. Thanks again to Dirty Koala for the math. The stock 80 MC has a 1" bore. The T100 has a 1-1/16" bore which when combined with the 4Runner brakes, maintains almost the exact same leverage ratio as stock. If you upgraded the brakes but didn't upsize the MC, you'd increase your leverage ratio/pedal throw by about 12% (6.5667 to 7.3728).
On the firewall I also cut out all the factory lines and re-did everything. I removed the entire section that goes under the battery box as well.
Here I was staring to run the lines for the front brakes with a new tee.
The rear port had a proportioning valve from when I deleted ABS/LSPV years ago. For this setup I relocated the valve and mounted it on a homemade bracket. You can also see here where I re-routed the rear and front-driver brake lines to drop down under the booster, running along the fuel lines.
I should be close to wrapping everything up here soon so I'll report back and see how it goes. If this don't fix my mushy brakes I'm burning down the truck
And that's pretty much how you mount up 5th gen 4Runner rotors and calipers without any machining! There are still a few odds and ends I'm working on while I complete my brake overhaul. I'll share these below as some might be relevant, but are mostly unique to my setup.
Okay so brake lines. The 4Runner caliper uses a standard hardline fitting with the same Toyota M10-1.0 inverted flare found throughout our trucks. However our trucks use a 10mm banjo fitting on the caliper. From what I read you can run the standard OEM banjo fitting on these calipers, but the banjo bolt might be too long. You can either cut the bolt down a tiny bit or run extra copper washers. Or you can swap out to different lines and eliminate the banjo fitting all together.
My setup has all custom brake lines due to the 3 link so I converted to SAE/AN fittings all below the frame. This makes it much easier and cheaper to find the right fittings and hoses you need in any size/length.
For the caliper I chose a 35 degree angled 10mm banjo fitting that convers to -3AN and uses the factory bolt.
However this resulted in a minor issue I'm still trying to sort through. Because I have coilovers, the banjo bolt will hit my coilover mount at full turn. I don't want to lose any turn radius and don't want to grind my coilover mount so I'm in the process of looking for lower profile banjo bolts and trying to find a slimmer banjo fitting. Most of you won't have this issue I think.
As part of my brake overhaul, I'm running all new lines as mentioned. Here is the passenger side being converted from metric to standard.
Driver's side. I also re-routed this one.
Re-routed and re-ran the rear brake line as well (deleted LSPV years ago).
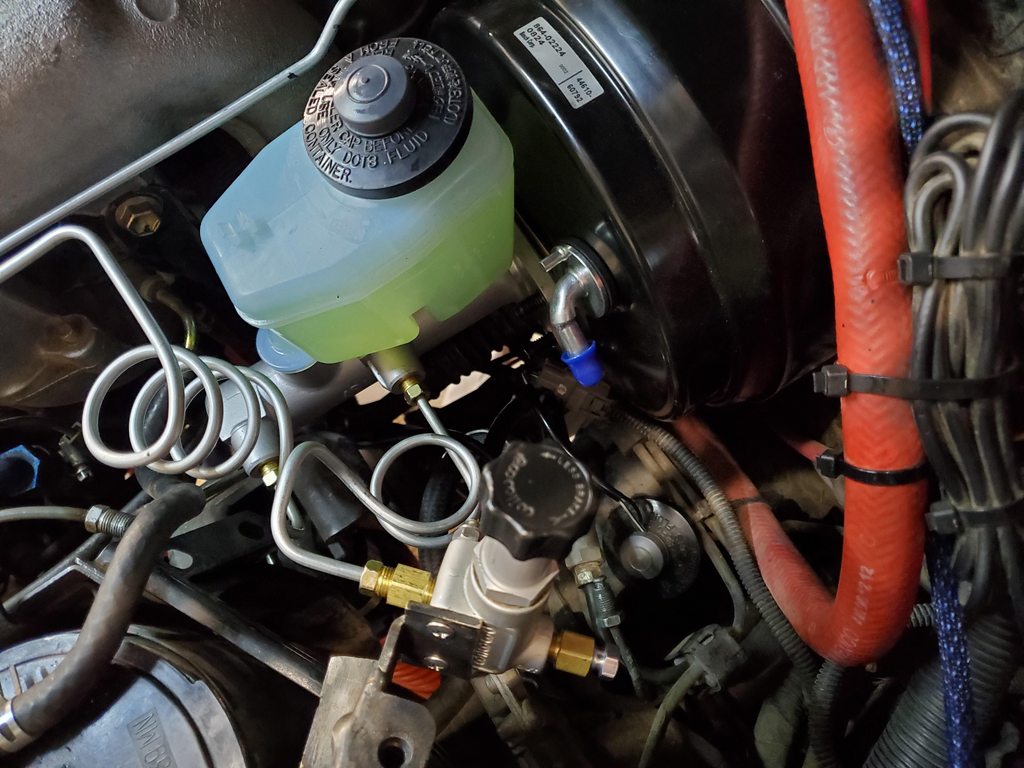
New Seiken booster and master cylinder from the one-ton T100 trucks (Advics/Aisin BMT-139, non-ABS).
With the bigger 4Runner calipers you want an MC with a bigger bore to keep the same pedal throw. Thanks again to Dirty Koala for the math. The stock 80 MC has a 1" bore. The T100 has a 1-1/16" bore which when combined with the 4Runner brakes, maintains almost the exact same leverage ratio as stock. If you upgraded the brakes but didn't upsize the MC, you'd increase your leverage ratio/pedal throw by about 12% (6.5667 to 7.3728).
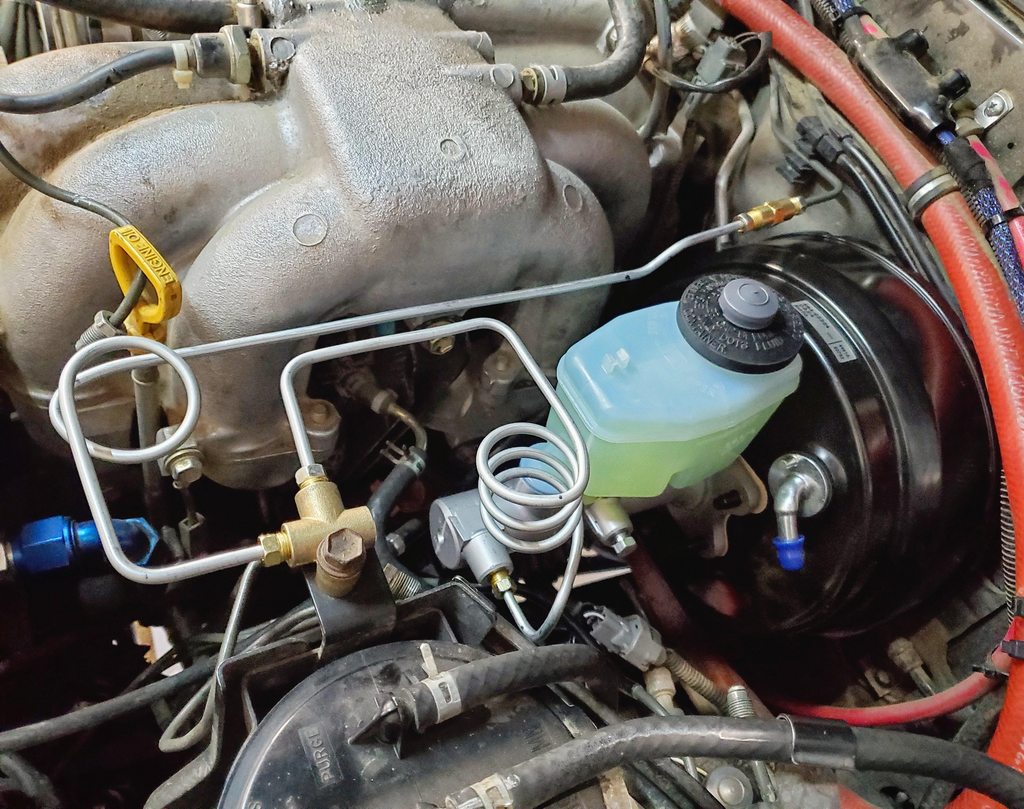
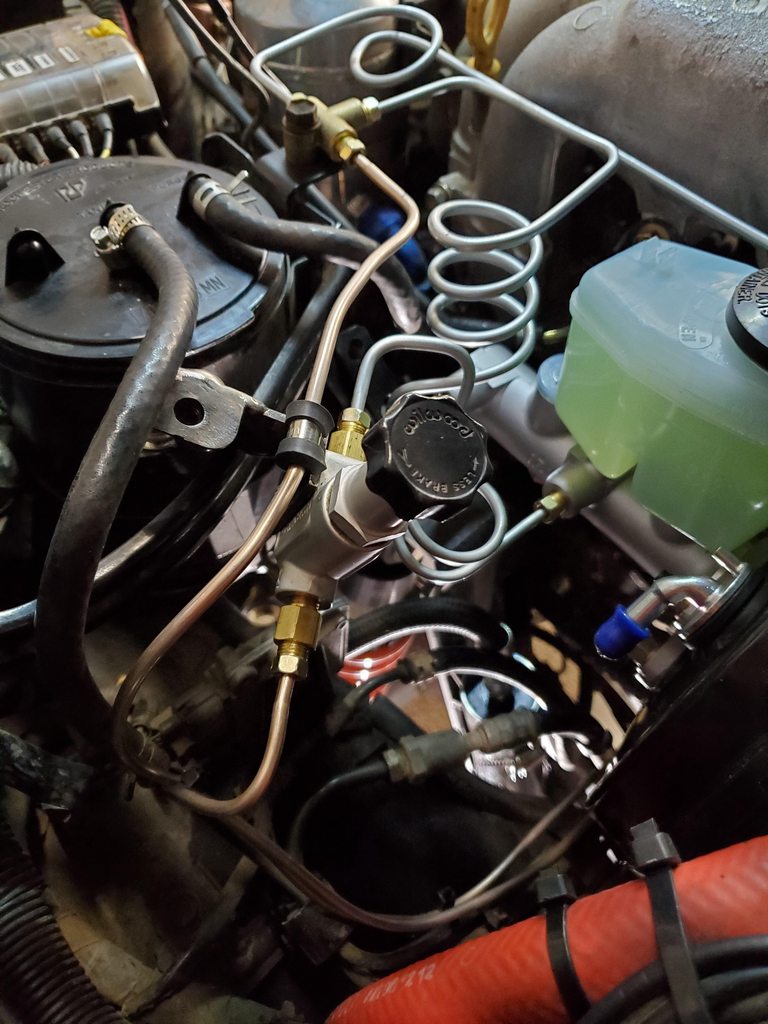
On the firewall I also cut out all the factory lines and re-did everything. I removed the entire section that goes under the battery box as well.
Here I was staring to run the lines for the front brakes with a new tee.
The rear port had a proportioning valve from when I deleted ABS/LSPV years ago. For this setup I relocated the valve and mounted it on a homemade bracket. You can also see here where I re-routed the rear and front-driver brake lines to drop down under the booster, running along the fuel lines.
I should be close to wrapping everything up here soon so I'll report back and see how it goes. If this don't fix my mushy brakes I'm burning down the truck
- Thread starter
- #2,745
UPDATE TIME!
Got everything wrapped up, bolted together and bled. First road test...AWFUL. Brakes were terrible, worse than before. Something was up. Did several rounds of the traditional 2-person bleed and still nothing. Went through almost a gallon of brake fluid, super mushy brakes.
I was convinced I had a bad MC even though it was a brand new Aisin unit. So I started diagnosing. No leaks anywhere. Wasn't losing any fluid after several road tests. To test the master cylinder, I used a pair of 10mm x 1.0 inverted flare steel plugs purchased from BelMetric. These are great to have on hand for testing or in case you need to plug a line on the trail. BLP10X1.0DF - Metric Brake Line Plug [BLP10X1.0DF] - $3.63 : Bel-Metric, Metric Hardware, Metric Fasteners, Metric Bolts, Metric Nuts & Time-Sert Thread Repair - https://www.belmetric.com/double-flare-c-17_564_1107_1109/blp10x10df-metric-brake-line-plug-p-13727.html?zenid=1cpo4ko183dkj4vjcdss8bqd20
I plugged both ports on the MC as shown below. Started the truck, pressed on the brake pedal. It wouldn't budget, rock solid. This told me the MC was fine. If the MC was bad, I would expect the pedal to move a bit as fluid blew past the seals and circulated back into the reservoir.
Next step, I left the front capped off and connected the rear line only then proceeded to bleed. After a few bleeds I got a NASTY stream of bubbles with the flaky residue that came out. Who knows where this rogue air pocket was and it's strange that no matter what I did, I could not purge it out doing a standard bleed with all circuits connected, even after going through almost a gallon of fluid.
Started the truck with only the rear line connected, brake pedal felt great! Super firm. Rolled it a few feet in the driveway, great pedal feel. But brakes obviously sucked because it was just the rear.
Then connected the front + rear. MUSHY. Bled again, still mushy. Disconnected the rear and did the front only. Bled bled bled, few tiny bubbles, nothing major. Started the truck, pedal was firm. Okay that's good right? Rolled it a few feet, pedal still firm.
Connected the rear again (all ports connected), bled bled bled. Mushy again. Ready to light the truck on fire. If I ask the wife to help me bleed again I'm afraid she's taking the kid and moving out.
What now? The rear and front brakes feel great when connected individually, but when I connect front and rear it gets soft. Then it occurred to me. PUSHROD! I adjusted the pushrod on the new booster, or so I thought. Apparently wasn't enough I guess? That explains why I was getting a soft pedal with both front and rear connected; the plunger in the MC wasn't being pushed in far enough to generate enough pressure, but it worked fine for one circuit. After adjusting the pushrod out a few turns, SUCCESS!
It was a nightmare but in the end it was a rogue air pocket and poorly adjusted pushrod that was giving me grief on the new setup.
I'm now happy to report the brakes are working great. Here's a video doing 2 emergency stops from 45-50mph GPS speed. Proportioning valve is fully open. I haven't driven a stock 80 to compare or not sure how this compares with other people's rigs, but it's the best braking I've had out of this truck for a long long time. Truck is about 6500~6700lbs on chunky 37" Nitto Mud Grapplers
Got everything wrapped up, bolted together and bled. First road test...AWFUL. Brakes were terrible, worse than before. Something was up. Did several rounds of the traditional 2-person bleed and still nothing. Went through almost a gallon of brake fluid, super mushy brakes.
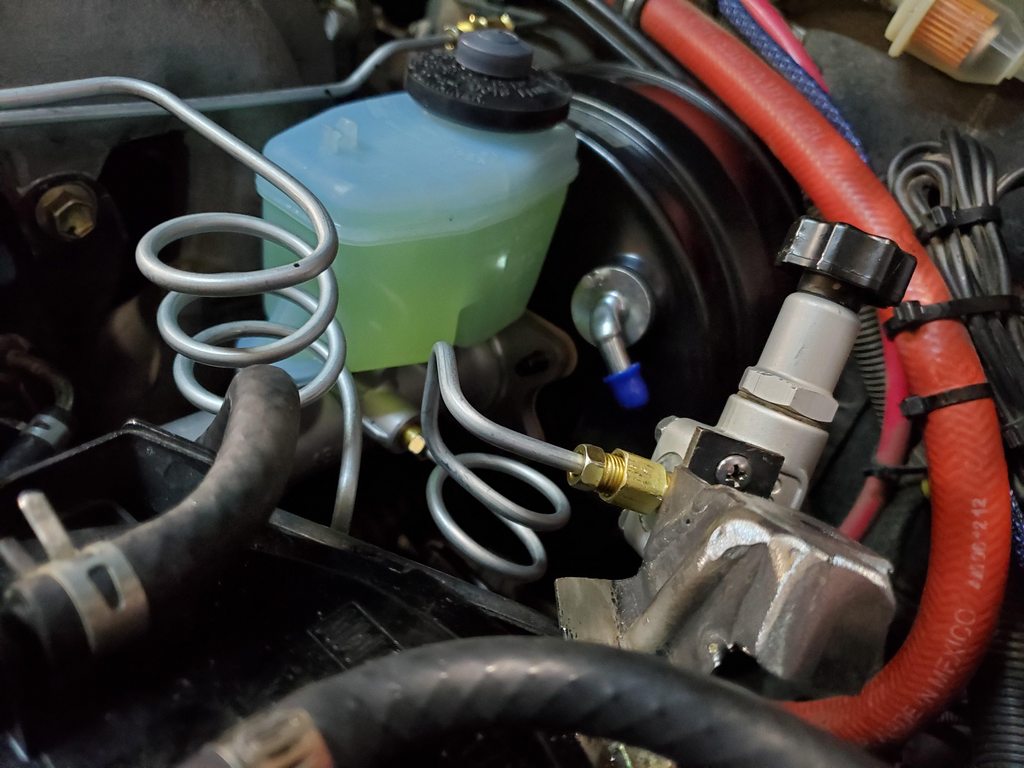
I was convinced I had a bad MC even though it was a brand new Aisin unit. So I started diagnosing. No leaks anywhere. Wasn't losing any fluid after several road tests. To test the master cylinder, I used a pair of 10mm x 1.0 inverted flare steel plugs purchased from BelMetric. These are great to have on hand for testing or in case you need to plug a line on the trail. BLP10X1.0DF - Metric Brake Line Plug [BLP10X1.0DF] - $3.63 : Bel-Metric, Metric Hardware, Metric Fasteners, Metric Bolts, Metric Nuts & Time-Sert Thread Repair - https://www.belmetric.com/double-flare-c-17_564_1107_1109/blp10x10df-metric-brake-line-plug-p-13727.html?zenid=1cpo4ko183dkj4vjcdss8bqd20
I plugged both ports on the MC as shown below. Started the truck, pressed on the brake pedal. It wouldn't budget, rock solid. This told me the MC was fine. If the MC was bad, I would expect the pedal to move a bit as fluid blew past the seals and circulated back into the reservoir.
Next step, I left the front capped off and connected the rear line only then proceeded to bleed. After a few bleeds I got a NASTY stream of bubbles with the flaky residue that came out. Who knows where this rogue air pocket was and it's strange that no matter what I did, I could not purge it out doing a standard bleed with all circuits connected, even after going through almost a gallon of fluid.
Started the truck with only the rear line connected, brake pedal felt great! Super firm. Rolled it a few feet in the driveway, great pedal feel. But brakes obviously sucked because it was just the rear.
Then connected the front + rear. MUSHY. Bled again, still mushy. Disconnected the rear and did the front only. Bled bled bled, few tiny bubbles, nothing major. Started the truck, pedal was firm. Okay that's good right? Rolled it a few feet, pedal still firm.
Connected the rear again (all ports connected), bled bled bled. Mushy again. Ready to light the truck on fire. If I ask the wife to help me bleed again I'm afraid she's taking the kid and moving out.
What now? The rear and front brakes feel great when connected individually, but when I connect front and rear it gets soft. Then it occurred to me. PUSHROD! I adjusted the pushrod on the new booster, or so I thought. Apparently wasn't enough I guess? That explains why I was getting a soft pedal with both front and rear connected; the plunger in the MC wasn't being pushed in far enough to generate enough pressure, but it worked fine for one circuit. After adjusting the pushrod out a few turns, SUCCESS!
It was a nightmare but in the end it was a rogue air pocket and poorly adjusted pushrod that was giving me grief on the new setup.
I'm now happy to report the brakes are working great. Here's a video doing 2 emergency stops from 45-50mph GPS speed. Proportioning valve is fully open. I haven't driven a stock 80 to compare or not sure how this compares with other people's rigs, but it's the best braking I've had out of this truck for a long long time. Truck is about 6500~6700lbs on chunky 37" Nitto Mud Grapplers
always raising the bar...
- Thread starter
- #2,747
always raising the bar...
Thanks! But I can't take credit for this, just the documenting of it. Several other guys have done this mod before me.
Great stuff. You gave me some ideas. I have a bit of mushy pedal still as well.
- Thread starter
- #2,749
NEW GRILL / ROUND HEADLIGHT CONVERSION
Time for some cosmetic upgrades! I've been obsessed with the round headlight conversion for the 80s ever since I started this thread 8yrs ago This is beautiful...somebody make it for me (60 headlights on an 80)! - https://forum.ih8mud.com/threads/this-is-beautiful-somebody-make-it-for-me-60-headlights-on-an-80.760286/
Luckily @kelly saad came to the rescue with his full grill replacement and round headlight conversion. I followed along as he went through various prototype designs. Always wanted to do it but other projects took priority. Now that he's got all the details ironed out, I decided to splurge on the full grill replacement. Headlight conversion 7” round - https://forum.ih8mud.com/threads/headlight-conversion-7-round.1038902/ & land cruiser grilles - https://landcruisergrilles.com/
Another reason I held off for so long was that I knew it would require some modifications to my setup. I have the very early 4x4Labs bumper which is super tucked and high clearance. This meant that I had to cut away most of my stock grill to clear my winch. I wasn't about to do that on this new expensive grill so I had to take apart the winch and relocate the guts. Here's the tower removed, you can see I had a big chunk removed from my OEM grill.

Once I saw what I had to work with, I moved the solenoid and controller wiring under the hood. Made a bracket and mounted it to the existing bracket on the air cleaner. Routing four monster 1/0 cables was not fun but luckily I had extra room as the original headlights would be replaced.


And here is the winch solenoid in its new location all wired up.

Then I could start to mock this thing up. This thing is incredibly well made and very stout. The price is a bit up there, but once you see it in person you understand the work that goes into these. Definitely not something easy to fabricate so that everything lines up correctly. Because all the pieces are adjustable, this was a very time consuming install. Once I got it all aligned I bolted everything down and painted it as one piece. Not going through that again!

The color is Rustoleum Universal 'Gunmetal'. The grill uses the Toyota emblem from the older cruisers, 70 series IIRC. Having a 7" round headlight gives you a ton of options at various price points. After seeing lots of comparison videos, it was no contest. The Morimoto Sealed 7 was the clear winner and one of the best looking 7" round headlights on the market.

All bolted in. You'll notice I cut out the pedestals where I had my light bar mounted and swapped to a single pair of 5" round LEDs as I don't wanna cover my pretty new grill.

Even with the solenoid tower removed, I still had to cut away a small portion of the grill to clear the winch. This I can live with though. I also had to cut off the clutch release handle and make a new one with a piece of solid rod.

And done! This thing is so ridiculously obnoxious that I can't stop staring. It fits well with the look of the truck and was the next logical step in bastardizing all things Land Cruiser.

DRLs - these are tapped to the 7.5a CHARGE fuse under the hood (behind the battery) which only gets power when the truck is running.

High and low beams

And turn signals

And a before pic for old time's sake

Time for some cosmetic upgrades! I've been obsessed with the round headlight conversion for the 80s ever since I started this thread 8yrs ago This is beautiful...somebody make it for me (60 headlights on an 80)! - https://forum.ih8mud.com/threads/this-is-beautiful-somebody-make-it-for-me-60-headlights-on-an-80.760286/
Luckily @kelly saad came to the rescue with his full grill replacement and round headlight conversion. I followed along as he went through various prototype designs. Always wanted to do it but other projects took priority. Now that he's got all the details ironed out, I decided to splurge on the full grill replacement. Headlight conversion 7” round - https://forum.ih8mud.com/threads/headlight-conversion-7-round.1038902/ & land cruiser grilles - https://landcruisergrilles.com/
Another reason I held off for so long was that I knew it would require some modifications to my setup. I have the very early 4x4Labs bumper which is super tucked and high clearance. This meant that I had to cut away most of my stock grill to clear my winch. I wasn't about to do that on this new expensive grill so I had to take apart the winch and relocate the guts. Here's the tower removed, you can see I had a big chunk removed from my OEM grill.
Once I saw what I had to work with, I moved the solenoid and controller wiring under the hood. Made a bracket and mounted it to the existing bracket on the air cleaner. Routing four monster 1/0 cables was not fun but luckily I had extra room as the original headlights would be replaced.
And here is the winch solenoid in its new location all wired up.
Then I could start to mock this thing up. This thing is incredibly well made and very stout. The price is a bit up there, but once you see it in person you understand the work that goes into these. Definitely not something easy to fabricate so that everything lines up correctly. Because all the pieces are adjustable, this was a very time consuming install. Once I got it all aligned I bolted everything down and painted it as one piece. Not going through that again!
The color is Rustoleum Universal 'Gunmetal'. The grill uses the Toyota emblem from the older cruisers, 70 series IIRC. Having a 7" round headlight gives you a ton of options at various price points. After seeing lots of comparison videos, it was no contest. The Morimoto Sealed 7 was the clear winner and one of the best looking 7" round headlights on the market.
All bolted in. You'll notice I cut out the pedestals where I had my light bar mounted and swapped to a single pair of 5" round LEDs as I don't wanna cover my pretty new grill.
Even with the solenoid tower removed, I still had to cut away a small portion of the grill to clear the winch. This I can live with though. I also had to cut off the clutch release handle and make a new one with a piece of solid rod.
And done! This thing is so ridiculously obnoxious that I can't stop staring. It fits well with the look of the truck and was the next logical step in bastardizing all things Land Cruiser.
DRLs - these are tapped to the 7.5a CHARGE fuse under the hood (behind the battery) which only gets power when the truck is running.
High and low beams
And turn signals
And a before pic for old time's sake
Last edited:
- Thread starter
- #2,750
Almost forgot - headlight harness. You can use a generic 9005/9006 to H13 but the Toyota headlights do something weird with the Morimotos (not sure if all 7" headlights will have this issue). When you plug everything in, the high beams will be stuck always on. The switch inside does nothing and they won't turn off. So I had to cut the harness and put in a relay to use the high beams as the "switch". With this mod it works as intended.
You can see the plugs marked high and low beam and how there were connected to the relay.

You can see the plugs marked high and low beam and how there were connected to the relay.
That’s something else buddy, SLICK WILLY!
- Thread starter
- #2,752
That’s something else buddy, SLICK WILLY!
Thanks! Definitely one of those love it or hate it mods.
This is the only mod I dont like from your thread. Everything else gets a thumbs up.Thanks! Definitely one of those love it or hate it mods.
- Thread starter
- #2,754
This is the only mod I dont like from your thread. Everything else gets a thumbs up.
Just wait till you see me on the Rubicon with these


Just so you know why it was occurring.. The stock highbeams are ground switched. The “+” is always on.Almost forgot - headlight harness. You can use a generic 9005/9006 to H13 but the Toyota headlights do something weird with the Morimotos (not sure if all 7" headlights will have this issue). When you plug everything in, the high beams will be stuck always on. The switch inside does nothing and they won't turn off. So I had to cut the harness and put in a relay to use the high beams as the "switch". With this mod it works as intended.
You can see the plugs marked high and low beam and how there were connected to the relay.
Maybe OK based of your locale, (Your raw steel never seems to rust
) but that harness makes my skin crawl!*Edited for clarification
Last edited:
- Thread starter
- #2,756
Just so you know why it was occurring.. The stock highbeams are ground switched. The “+” is always on.
Maybe OK based of your locale, (Your raw steel never seems to rust
*Edited for clarification
Yeah I noticed both wires on the high beam plug were always energized even when the high beams weren't switched. Hey it was all wrapped with wiring loom cloth tape afterwards!
Thanks! Definitely one of those love it or hate it mods.
Seems like one of those mods you have to see in person, who cares as long as you like it things. I would consider but just something looks off, maybe the marker lights need something to match better?
I'm not a fan of the OEM, especially the orange marker, and I actually want to remove the headlight and marker and replace with Challenger Hellcat headlights and maybe venting where the markers are lol. Bought a cheap 2021 OEM plastic Hellcat bezel to size and the shape fits the headlight perfect, HID housing may just be too deep overall tho because it needs to set back like yours to look right. Additional pass thru venting on the interior light even.
Nice work as always.
- Thread starter
- #2,758
Seems like one of those mods you have to see in person, who cares as long as you like it things. I would consider but just something looks off, maybe the marker lights need something to match better?
I'm not a fan of the OEM, especially the orange marker, and I actually want to remove the headlight and marker and replace with Challenger Hellcat headlights and maybe venting where the markers are lol. Bought a cheap 2021 OEM plastic Hellcat bezel to size and the shape fits the headlight perfect, HID housing may just be too deep overall tho because it needs to set back like yours to look right. Additional pass thru venting on the interior light even.
Nice work as always.
It definitely looks cool in person but do agree with the corner lights. Would be neat if Kelly also offered a panel to fill in the corner light, but then I'm not sure what sort of aftermarket light would work there.
- Thread starter
- #2,759
RCV 300M REAR AXLES
While working on the brakes and checking my rear bearings (which happened to be completely loose), I noticed my OEM axles (long side) was chewed up and twisted. This was surprising to see because I'm very gentle on the throttle and try not to have lots of wheel spin and hop. This sucked cause I wasn't planning on having to upgrade axles so it was an unexpected expense.
OEM shafts held up well but I knew it was time for an upgrade. The Nitros twist if you so much as look at them funny so that only left the $1k RCV 300M axles. Pricey as hell, but a one-time expense since I know I'll never break these.

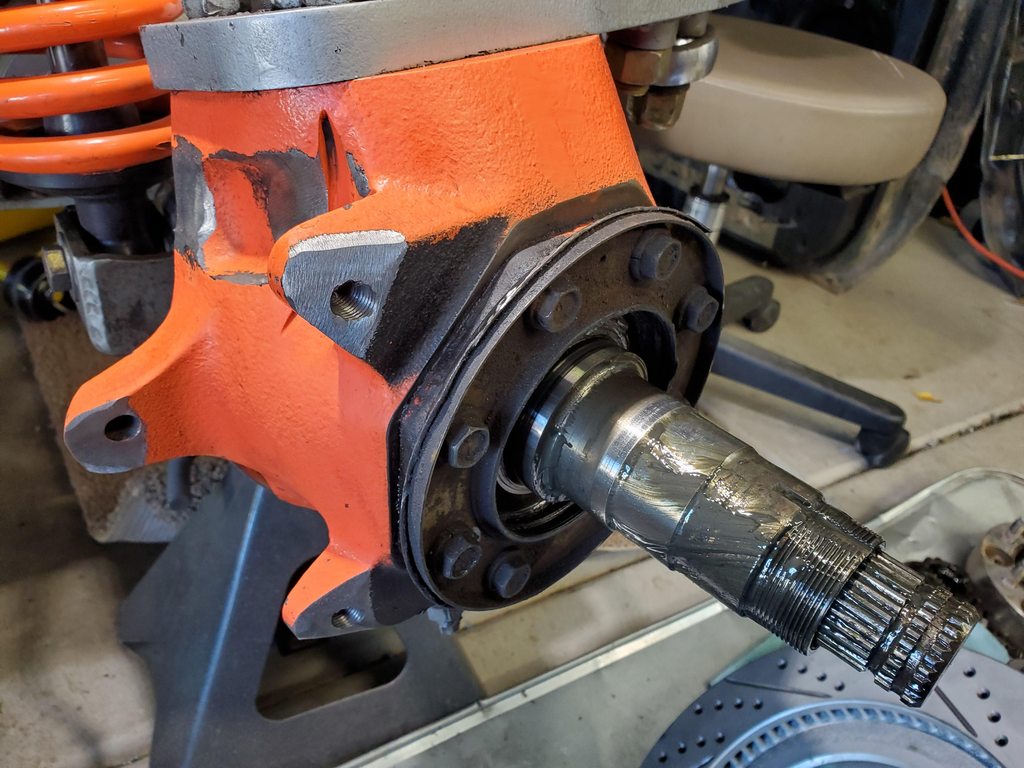
The new RCVs sure are pretty. The flange is drilled for 6 dowel pins vs 2 one the original setup. The shafts are also machined to prevent the infamous stuck twisted axles in the elocker collar. They also use a 2-piece design with a separate drive flange like the front, nice.


Rather than use that OEM studs and cone washers, I decided to get rid of even more fuses and upgraded to 7/16" ARP bolts since I was already getting the hub machined for additional dowel pins. These things are like 3x cheaper then the metric ARP studs for our hubs.

Back from machining. 6 dowel pins, 6 big ass ARP bolts, bye bye third member!

Since I had the hubs apart, I decided to replace all bearings, races, and seals because who knows how long I rode on the loose bearings.


And here it is all back together. I did have to grind down the heads of the ARP bolts in order to clear the wheels as they stuck out past the edge of the hub a tiny bit.

And a picture of what my Cruiser does best lately...sit on the pavement :/

While working on the brakes and checking my rear bearings (which happened to be completely loose), I noticed my OEM axles (long side) was chewed up and twisted. This was surprising to see because I'm very gentle on the throttle and try not to have lots of wheel spin and hop. This sucked cause I wasn't planning on having to upgrade axles so it was an unexpected expense.
OEM shafts held up well but I knew it was time for an upgrade. The Nitros twist if you so much as look at them funny so that only left the $1k RCV 300M axles. Pricey as hell, but a one-time expense since I know I'll never break these.
The new RCVs sure are pretty. The flange is drilled for 6 dowel pins vs 2 one the original setup. The shafts are also machined to prevent the infamous stuck twisted axles in the elocker collar. They also use a 2-piece design with a separate drive flange like the front, nice.
Rather than use that OEM studs and cone washers, I decided to get rid of even more fuses and upgraded to 7/16" ARP bolts since I was already getting the hub machined for additional dowel pins. These things are like 3x cheaper then the metric ARP studs for our hubs.
Back from machining. 6 dowel pins, 6 big ass ARP bolts, bye bye third member!
Since I had the hubs apart, I decided to replace all bearings, races, and seals because who knows how long I rode on the loose bearings.
And here it is all back together. I did have to grind down the heads of the ARP bolts in order to clear the wheels as they stuck out past the edge of the hub a tiny bit.
And a picture of what my Cruiser does best lately...sit on the pavement :/
Last edited:
