- Thread starter
- #101
Navigation
Install the app
How to install the app on iOS
Follow along with the video below to see how to install our site as a web app on your home screen.
Note: This feature may not be available in some browsers.
More options
Style variation
You are using an out of date browser. It may not display this or other websites correctly.
You should upgrade or use an alternative browser.
You should upgrade or use an alternative browser.
Builds 1968 FJ40 Build Page "the rocky road"
- Thread starter huminajumina
- Start date
This site may earn a commission from merchant affiliate
links, including eBay, Amazon, Skimlinks, and others.
More options
Who Replied?- Thread starter
- #102
Well I got them cleaned up a little
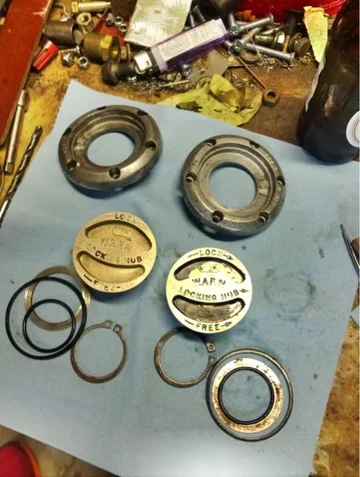
Then I slapped some paint on them, not my best work, but definitely an improvement, I didn't have gloss black enamel in the cabinet and my SOR "Warn hub service kit" gaskets don't fit, so I can just pop them back off, pull the wheels & paint the whole hub the next time it's on the lift....

Good enough for now...
Besides I have other things to do....


Then I slapped some paint on them, not my best work, but definitely an improvement, I didn't have gloss black enamel in the cabinet and my SOR "Warn hub service kit" gaskets don't fit, so I can just pop them back off, pull the wheels & paint the whole hub the next time it's on the lift....

Good enough for now...
Besides I have other things to do....

- Thread starter
- #103
- Thread starter
- #104
Furlough
Well, I went wheeling a few times and shook my shims loose on the front end, so last night I slid them back in tight, and torqued the U-bolts down snug, and I have great steering and handling again. I also went ahead and bolted the bigger stabilizer back on.

The weathers been nice so I pulled the top off again!!

And now I found out that the new 3" exhaust clears the front driveshaft as well....
I have been tinkering with the carb since I got it running, now I think I have some kinda air leak somewhere, because it won't idle as low as it should, and it has a hesitation in light throttle..... I have pulled this thing apart and soaked it, and I am not really sure what the hell is wrong with it.... I kinda want to but a EFI kit, but I don't want to give up on this stack of quadrajets either......


I may grab another one off the shelf and try rebuilding it, maybe this one has a clogged circuit or is warped or something...
Well, I went wheeling a few times and shook my shims loose on the front end, so last night I slid them back in tight, and torqued the U-bolts down snug, and I have great steering and handling again. I also went ahead and bolted the bigger stabilizer back on.

The weathers been nice so I pulled the top off again!!

And now I found out that the new 3" exhaust clears the front driveshaft as well....
I have been tinkering with the carb since I got it running, now I think I have some kinda air leak somewhere, because it won't idle as low as it should, and it has a hesitation in light throttle..... I have pulled this thing apart and soaked it, and I am not really sure what the hell is wrong with it.... I kinda want to but a EFI kit, but I don't want to give up on this stack of quadrajets either......


I may grab another one off the shelf and try rebuilding it, maybe this one has a clogged circuit or is warped or something...
- Thread starter
- #105
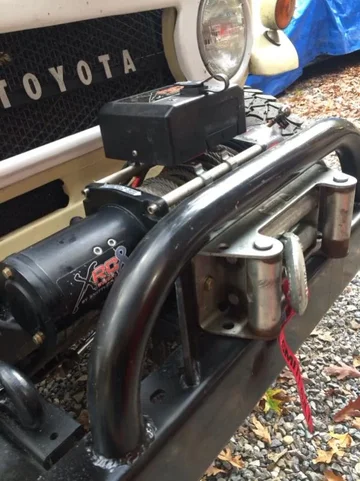
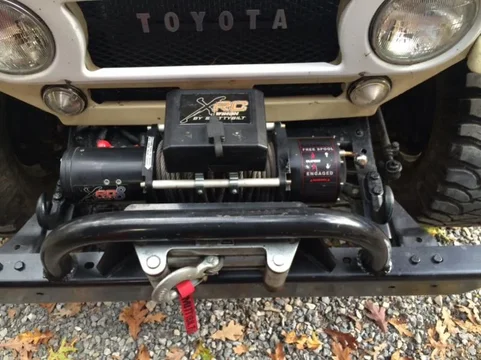
I finally installed my winch, this was on my S10 for 2 years but barely used, I got it from 4wheel parts for $275 free shipping when they first came out!!!!
I also drilled out a broke off screw in my bezel, tapped it & installed the new one & rubber insulator....
Before & after my battery tray installation:

Here's what I scavenged from my dad's house to make the new battery tray/mount:

I also touched up the hubs & calipers with a little paint too...

And here is a fall leaf shot!!

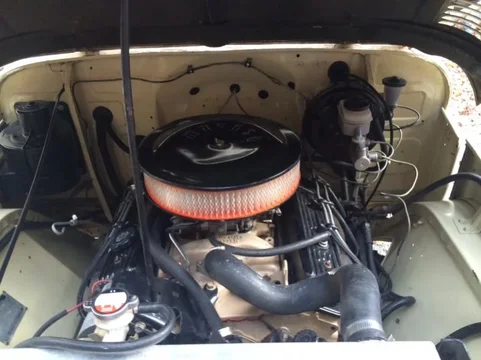
Also since my last post I found the carb base gasket seated but needed to be re-torqued. I did an oil change & installed a new air filter as well.


I also drilled out a broke off screw in my bezel, tapped it & installed the new one & rubber insulator....

Before & after my battery tray installation:


Here's what I scavenged from my dad's house to make the new battery tray/mount:

I also touched up the hubs & calipers with a little paint too...

And here is a fall leaf shot!!

Also since my last post I found the carb base gasket seated but needed to be re-torqued. I did an oil change & installed a new air filter as well.
- Thread starter
- #106
- Thread starter
- #107
My Brake Booster was making an awful creaking sound, so I pulled it apart today & cleaned everything up and Wire brushed the corroded spots at the bottom.

It was pretty clean inside

It was making the RPM's drop a little at idle w/ brake use, and after reassembly it is working like a champ!

Here is a little more corrosion, they diaphragm was in great shape despite the corrosion on the inside.


It was pretty clean inside

It was making the RPM's drop a little at idle w/ brake use, and after reassembly it is working like a champ!

Here is a little more corrosion, they diaphragm was in great shape despite the corrosion on the inside.
MScruiser
obsessive-compulsive oppositional-defiant wise-ass
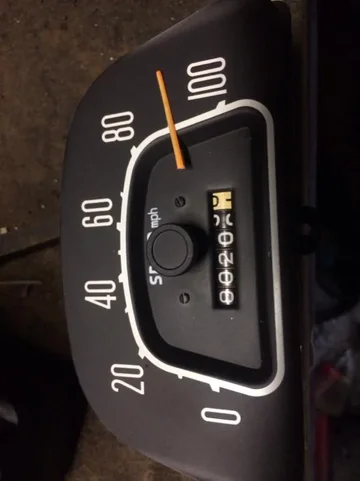
I have been battling my ODO cluster too! GAH! I was finally able to repair my speedo, by ensuring the magnet hub was perfectly aligned with the magnet itself (mine is off a 1968 too). The speedo needs to be re-calibrated (adjust the tension in the spring by removing the small pin that holds the spring in place, thus tightening or loosening it.).
My odometer gear it shot though (the first worm gear that makes contact with the underside of the magnet.
#1: I can not for the life of me figure out how to remove the broken gear. Do you know how?
#2: Do you know of a place I can buy a replacement gear?
Good luck on solving your problem.
My odometer gear it shot though (the first worm gear that makes contact with the underside of the magnet.
#1: I can not for the life of me figure out how to remove the broken gear. Do you know how?
#2: Do you know of a place I can buy a replacement gear?
Good luck on solving your problem.
- Thread starter
- #109
Yea if yours is a 68 then it's a metal cast housing correct? The driveshaft driven from the speedo is held in by a brass washer pressed in the end. I just tapped on it & it came out. Be careful if the driveshaft is plastic though. (I think one is plastic & one is metal)
If your housing is plastic, the driveshaft will be held in by a little metal strip that is cast into the plastic, you can break it off, drill the plastic studs out & use tiny screws to secure the plate back on. This is for the newer 70's style speedos I think.
I can try to post pics if that will help
MScruiser
obsessive-compulsive oppositional-defiant wise-ass
Yea if yours is a 68 then it's a metal cast housing correct? The driveshaft driven from the speedo is held in by a brass washer pressed in the end. I just tapped on it & it came out. Be careful if the driveshaft is plastic though. (I think one is plastic & one is metal)
If your housing is plastic, the driveshaft will be held in by a little metal strip that is cast into the plastic, you can break it off, drill the plastic studs out & use tiny screws to secure the plate back on. This is for the newer 70's style speedos I think.
I can try to post pics if that will help
Yeah, my housing is entirely metal; I didn't see any plastic anywhere on mine. Pics would be extremely helpful too!
If by some miracle I am able to get the worn shaft/worm gear out, do you know of a source for finding a new one?
Thanks.
I just read through your thread, great job! Mostly though I wanted to tell you that's a good looking Chessie you have, I have two myself, 13 1/2 years old, brother and sister. My boy looks incredibly like yours. Don't often see many of them around, small world. Great build and nice pooch. Good luck!
- Thread starter
- #112
Rusty the Chesapeake Bay Retriever and the FJ40
Thank you!! I have grown up around Chessie's my whole life. I love them! When I was a kid and my parents couldn't find me, the first place to look was wherever the dog was.

Soon after Clint passed away (in the picture with my brother and I) we realized we needed to get another Chessie and got two (Brother and Sister). They were with me all the way up to college. The male had a litter of pups before he passed and I told mom I wanted the biggest one, not realizing how much of a monster he was going to become!!! Rusty is his name, and I have enjoyed every moment with him.

We found this sign this past summer at the Outer Banks in NC and had to stop and get a picture. When I pulled over and forced my friends to snap a few shots of Rusty and I we got several cruiser compliments, looks, and one woman even asked "Is his name Rusty?", it was quite comical. Rusty loved every minute of that trip, the water, the camping, riding in the cruiser (7ish hours down and back).


These pictures are all from the same beach trip, Rusty kept us all entertained as he retrieved anything we threw into the ocean no matter how far it went or how intense the waves.


None of these pictures show the dog slobber that the three of us had to endure, while packed into the topless cruiser amongst all of our beach gear!
And here are a few from a trip Rusty and I made the the near by lake. We managed to get a little mud on the cruiser and Rusty obviously got lake water all over the interior!


Being a that he is a Chessie, it is quiet difficult to keep him out of the water and to get him out once he gets in. There is never a dull moment with Rusty.
Attached are some more pictures of Rusty being awesome and/or lazy!!!!


I just read through your thread, great job! Mostly though I wanted to tell you that's a good looking Chessie you have, I have two myself, 13 1/2 years old, brother and sister. My boy looks incredibly like yours. Don't often see many of them around, small world. Great build and nice pooch. Good luck!
Thank you!! I have grown up around Chessie's my whole life. I love them! When I was a kid and my parents couldn't find me, the first place to look was wherever the dog was.

Soon after Clint passed away (in the picture with my brother and I) we realized we needed to get another Chessie and got two (Brother and Sister). They were with me all the way up to college. The male had a litter of pups before he passed and I told mom I wanted the biggest one, not realizing how much of a monster he was going to become!!! Rusty is his name, and I have enjoyed every moment with him.

We found this sign this past summer at the Outer Banks in NC and had to stop and get a picture. When I pulled over and forced my friends to snap a few shots of Rusty and I we got several cruiser compliments, looks, and one woman even asked "Is his name Rusty?", it was quite comical. Rusty loved every minute of that trip, the water, the camping, riding in the cruiser (7ish hours down and back).


These pictures are all from the same beach trip, Rusty kept us all entertained as he retrieved anything we threw into the ocean no matter how far it went or how intense the waves.


None of these pictures show the dog slobber that the three of us had to endure, while packed into the topless cruiser amongst all of our beach gear!
And here are a few from a trip Rusty and I made the the near by lake. We managed to get a little mud on the cruiser and Rusty obviously got lake water all over the interior!


Being a that he is a Chessie, it is quiet difficult to keep him out of the water and to get him out once he gets in. There is never a dull moment with Rusty.
Attached are some more pictures of Rusty being awesome and/or lazy!!!!
- Thread starter
- #113
Winter
Well, over the last two weeks I have had my fair share of Cruiser maintenance problems...
I needed tires so I put two used BFG mud Terrains on from my truck, and purchased 2 more. I put the Faulken Rocky Mountain ATs (31's) on the truck. Lets just say it was an expensive ordeal and ate up all my fun money from my last work trip.

Work

Tires

Rocky Mountains on the Truck
I replaced my water pump with a new AC Delco pump for $38 from Amazon. While doing that I went ahead and installed a new 1-wire 100A alternator (it is chrome but it will do). The original water pump was sitting for years on this engine before I put it in the cruiser, so it began to make noise and I couldn't take it any longer. I also threw on a new Goodyear Gatorback Serpentine belt and it is nice and quite again.
The other day I had a fuel starvation problem that took some time to track down. At first I suspected it was and ignition issue and replaced my ignition chip in the Dizzy. Then I realized it was fuel so I put a new pump on and in the process discovered that the bolts were way to short so I was able to replace them. After the pump and replacing the carb filter and inline filter I still had the same issue. I pulled the Quadrajet apart and found the float hitting the chassis and staying closed. I put a new float and needle in and it seems to have fixed it.
The test drive proved successful:

Finally checked the fit of my chains on 33's and they work

Someone beat me to the trail, but I think they were traveling in the opposite direction

Rusty enjoyed his walk...
He jogged more that he walked actually.
And with all of that being said, I have been more than happy with all the work that I have put into the Cruiser, and it takes me everywhere. This past summer I got 14.7mpgs going 80mph to the beach, and since then I have been getting 11-12mpgs. This carb can probably be tuned alot better, but I started purchasing some GM TBI parts. I have access to plenty of parts at my dads garage, so lets hope I can convert to Fuel Injection and keep it simple and clean looking.
Well, over the last two weeks I have had my fair share of Cruiser maintenance problems...
I needed tires so I put two used BFG mud Terrains on from my truck, and purchased 2 more. I put the Faulken Rocky Mountain ATs (31's) on the truck. Lets just say it was an expensive ordeal and ate up all my fun money from my last work trip.

Work

Tires

Rocky Mountains on the Truck
I replaced my water pump with a new AC Delco pump for $38 from Amazon. While doing that I went ahead and installed a new 1-wire 100A alternator (it is chrome but it will do). The original water pump was sitting for years on this engine before I put it in the cruiser, so it began to make noise and I couldn't take it any longer. I also threw on a new Goodyear Gatorback Serpentine belt and it is nice and quite again.
The other day I had a fuel starvation problem that took some time to track down. At first I suspected it was and ignition issue and replaced my ignition chip in the Dizzy. Then I realized it was fuel so I put a new pump on and in the process discovered that the bolts were way to short so I was able to replace them. After the pump and replacing the carb filter and inline filter I still had the same issue. I pulled the Quadrajet apart and found the float hitting the chassis and staying closed. I put a new float and needle in and it seems to have fixed it.
The test drive proved successful:

Finally checked the fit of my chains on 33's and they work

Someone beat me to the trail, but I think they were traveling in the opposite direction

Rusty enjoyed his walk...
He jogged more that he walked actually.
And with all of that being said, I have been more than happy with all the work that I have put into the Cruiser, and it takes me everywhere. This past summer I got 14.7mpgs going 80mph to the beach, and since then I have been getting 11-12mpgs. This carb can probably be tuned alot better, but I started purchasing some GM TBI parts. I have access to plenty of parts at my dads garage, so lets hope I can convert to Fuel Injection and keep it simple and clean looking.
- Thread starter
- #114
Troubles of TBI Conversion
Sometimes I go really fast in reverse....haha, just kidding, its broken again....
A co-worker gave me one of these, I am very lucky to have such generous people around me

I also found a way to get an early style factor temp sender in the V8 block

Spoiler alert: this is a 350 TBI intake manifold with the now cleaned up thermostat neck on it (TBI temp sender to ECM as well as TEQ gauge Sender)

Here are most of the supplies I gathered over the past few weeks:

First snag (of many) The Transdapt 2208 adapter bolts up to a GM Quadrajet manifold, but it is restricting...

No big deal, I just had to go get a factory TBI manifold from my father(pictured above) then I noticed that one of the T-stat bolts was broke off, drilled, but never tapped, so I did all that to get it bolted on.

and I broke the factory oil pressure switch off after I installed the new manifold, but the guys at War Performance (where I got the harness) had already removed the switch from the fuel pump circuit, so I just put the TEQ oil press sender there....


Parts Run, for the millionth time:


So after taking a little longer to swap everything over than I thought.... I was able to turn the key, and boy was I disappointed... it did nothing, no fuel while cranking, I reversed the Airtex fuel pump that came with crappy directions and no Directional Arrow stamped or painted on it, and then it happened! Fuel shot all over the engine bay, on all the freshly painted surfaces...
So I had to re-re-rebuild the throttle body unit, actually I had to rebuild another housing because Kevin=hulk when very mad. Kevin Torque Screws...Kevin Smash...
So I fixed in, no leaks, injectors spraying...no spark. My timing light didn't work ( I tried it on the truck at idle and it had no flash) I pulled a plug on the cruiser to confirm and as I figured no spark. After about an hour of ringing out circuits with a test light and multimeter I retired for the night and gave it a fresh start in the morning. This is what I found.

Normal EST from that direction...but....

I may or may not have pushed a connector on with too much force...
after I straightened that out it started right up, the idle was rough and it pulsed, but I moved the Dizzy around by hand and tried to set base timing without a light, and tried to set base idle speed following this:http://www.gmcmidwestclassics.org/Web%20pages/Tuning%20the%20TBI.pdf
But being that the timing wasn't really right I had to wait until i figured other things out.
I got it moving and realized that my MAP Sensor was counting in the wrong direction, reading 4-5VDC at idle and moving down with less vacuum... so I had to make another parts run, and after I relpaced it everything ran really well.
I set base timing with a light and went over all the other sensor/senders and it runs really well now.


Sometimes I go really fast in reverse....haha, just kidding, its broken again....
A co-worker gave me one of these, I am very lucky to have such generous people around me

I also found a way to get an early style factor temp sender in the V8 block

Spoiler alert: this is a 350 TBI intake manifold with the now cleaned up thermostat neck on it (TBI temp sender to ECM as well as TEQ gauge Sender)

Here are most of the supplies I gathered over the past few weeks:

First snag (of many) The Transdapt 2208 adapter bolts up to a GM Quadrajet manifold, but it is restricting...

No big deal, I just had to go get a factory TBI manifold from my father(pictured above) then I noticed that one of the T-stat bolts was broke off, drilled, but never tapped, so I did all that to get it bolted on.

and I broke the factory oil pressure switch off after I installed the new manifold, but the guys at War Performance (where I got the harness) had already removed the switch from the fuel pump circuit, so I just put the TEQ oil press sender there....


Parts Run, for the millionth time:


So after taking a little longer to swap everything over than I thought.... I was able to turn the key, and boy was I disappointed... it did nothing, no fuel while cranking, I reversed the Airtex fuel pump that came with crappy directions and no Directional Arrow stamped or painted on it, and then it happened! Fuel shot all over the engine bay, on all the freshly painted surfaces...

So I had to re-re-rebuild the throttle body unit, actually I had to rebuild another housing because Kevin=hulk when very mad. Kevin Torque Screws...Kevin Smash...
So I fixed in, no leaks, injectors spraying...no spark. My timing light didn't work ( I tried it on the truck at idle and it had no flash) I pulled a plug on the cruiser to confirm and as I figured no spark. After about an hour of ringing out circuits with a test light and multimeter I retired for the night and gave it a fresh start in the morning. This is what I found.

Normal EST from that direction...but....

I may or may not have pushed a connector on with too much force...
after I straightened that out it started right up, the idle was rough and it pulsed, but I moved the Dizzy around by hand and tried to set base timing without a light, and tried to set base idle speed following this:http://www.gmcmidwestclassics.org/Web%20pages/Tuning%20the%20TBI.pdf
But being that the timing wasn't really right I had to wait until i figured other things out.
I got it moving and realized that my MAP Sensor was counting in the wrong direction, reading 4-5VDC at idle and moving down with less vacuum... so I had to make another parts run, and after I relpaced it everything ran really well.
I set base timing with a light and went over all the other sensor/senders and it runs really well now.


- Thread starter
- #115
A little more Winter Action..
Then this showed up in the mail box!!!!! So excited, I can finally say I own it, although we all know I probably dumped an equal amount of money in upgrades and repairs as I did in the initial purchase cost.

I always drive by this old mill and I always snap a quick shot. I love snow.

Obligatory Polar Vortex picture...


Low Fuel test, Complied With.....

So it has been a long week(+work weekend) but I think I have been driving the TBI FJ40 for about a week now and I have to say I am impressed, it is very nice, I am working on hooking up the VSS to the early 70's FJ40 emissions speed sensor in the cluster, it is a 6-pulse sensor, where-as a GM305 TBI motor should have a 2-count sender, but I am going to hook it up just to see how it reacts. Also I am going to hook the EGR valve up, it is installed, but was also deleted from the harness by War Performance. It has only set a CEL code for no VSS signal so far, and runs very well. I want to see if a EGR gives me any MPG's since I have all of the parts to install it and it is of $0 cost to me. I am also going to reconnect my low-speed wiper wire that pulled out of the spade connector on the switch, since the cluster is currently out of the way.
I am going to connect a shift light to the ECM to see if it gets me any MPG's, I am driving conservatively right now but may be shifting too low (I highly doubt it) but we'll see.
Then this showed up in the mail box!!!!! So excited, I can finally say I own it, although we all know I probably dumped an equal amount of money in upgrades and repairs as I did in the initial purchase cost.

I always drive by this old mill and I always snap a quick shot. I love snow.

Obligatory Polar Vortex picture...


Low Fuel test, Complied With.....

So it has been a long week(+work weekend) but I think I have been driving the TBI FJ40 for about a week now and I have to say I am impressed, it is very nice, I am working on hooking up the VSS to the early 70's FJ40 emissions speed sensor in the cluster, it is a 6-pulse sensor, where-as a GM305 TBI motor should have a 2-count sender, but I am going to hook it up just to see how it reacts. Also I am going to hook the EGR valve up, it is installed, but was also deleted from the harness by War Performance. It has only set a CEL code for no VSS signal so far, and runs very well. I want to see if a EGR gives me any MPG's since I have all of the parts to install it and it is of $0 cost to me. I am also going to reconnect my low-speed wiper wire that pulled out of the spade connector on the switch, since the cluster is currently out of the way.
I am going to connect a shift light to the ECM to see if it gets me any MPG's, I am driving conservatively right now but may be shifting too low (I highly doubt it) but we'll see.
- Thread starter
- #116
Initial TBI driving
So I have been driving around trying to stay out of the accelerator pedal hoping for big fuel economy improvements, but I have only gained 1 MPG so far, from 11.8ish to 12.8. Not nearly the high 14's I was getting with my first carb. So today I hooked up the VSS and EGR Solenoid to see if they increase the efficiency any. I have heard a lot of Pro's and Con's when advancing base timing above 0 Deg so I am not sure if that will help or hinder.
During the initial TBI rebuild I installed the "Power up kit" spacer and 14PSI fuel regulator spring, I am sure this is probably not helping things...

The TBI system is running well, idling high until it detects any temp sender input then it kicks it down and it also drives very smoothly.
The VSS is hooked up to the 6-count emissions VSS off the back of my 70's cluster. So with the Scan-Tool hooked up you can just divide by 3 and you know how fast you are traveling...
This snow is fun, and I really enjoy the winter, but I am ready to drive around topless...

Also, 1 year ago today I took this picture....a lot has changes since then

So I have been driving around trying to stay out of the accelerator pedal hoping for big fuel economy improvements, but I have only gained 1 MPG so far, from 11.8ish to 12.8. Not nearly the high 14's I was getting with my first carb. So today I hooked up the VSS and EGR Solenoid to see if they increase the efficiency any. I have heard a lot of Pro's and Con's when advancing base timing above 0 Deg so I am not sure if that will help or hinder.
During the initial TBI rebuild I installed the "Power up kit" spacer and 14PSI fuel regulator spring, I am sure this is probably not helping things...

The TBI system is running well, idling high until it detects any temp sender input then it kicks it down and it also drives very smoothly.
The VSS is hooked up to the 6-count emissions VSS off the back of my 70's cluster. So with the Scan-Tool hooked up you can just divide by 3 and you know how fast you are traveling...
This snow is fun, and I really enjoy the winter, but I am ready to drive around topless...

Also, 1 year ago today I took this picture....a lot has changes since then

- Thread starter
- #117
- Thread starter
- #118
Roof Rack Pics
Today I went for a cruise and took some shots along the way, somehow this gorgeous sunlight decided to join me....I hope I get time and money to paint this summer...


Today I went for a cruise and took some shots along the way, somehow this gorgeous sunlight decided to join me....I hope I get time and money to paint this summer...


Last edited:
rkymtnflyfisher
Trout Bum
Nice skills with that camera also! Great pics man
- Thread starter
- #120
Thank you sir! You'll have to bring yours out & I can get a few nice shots of your cruiser as well!! And we need to do some fishing!Nice skills with that camera also! Great pics man
Similar threads
Users who are viewing this thread
Total: 1 (members: 0, guests: 1)


