Builds 1984 Root Beer in Vermont - Build (1 Viewer)

This site may earn a commission from merchant affiliate
links, including eBay, Amazon, Skimlinks, and others.

Replaced my Alternator with the one from rockauto for $55 and aside from having to swap over the pulley from the old unit to the new it was an easy install. Now I've got a steady 14v at idle and barely a dip in the needle when I turn the lights on.

I also reached out to @ToyotaMatt to start a dialog about getting all the parts together to fix my intake/exhaust manifolds. We had a thorough and long conversation last night and I gleamed a lot of good info from him and happy to have the help with amassing parts. At his suggestion I also finally donated the $20 to become a silver member on here and give a little back to the site hosts for such an awesome service.

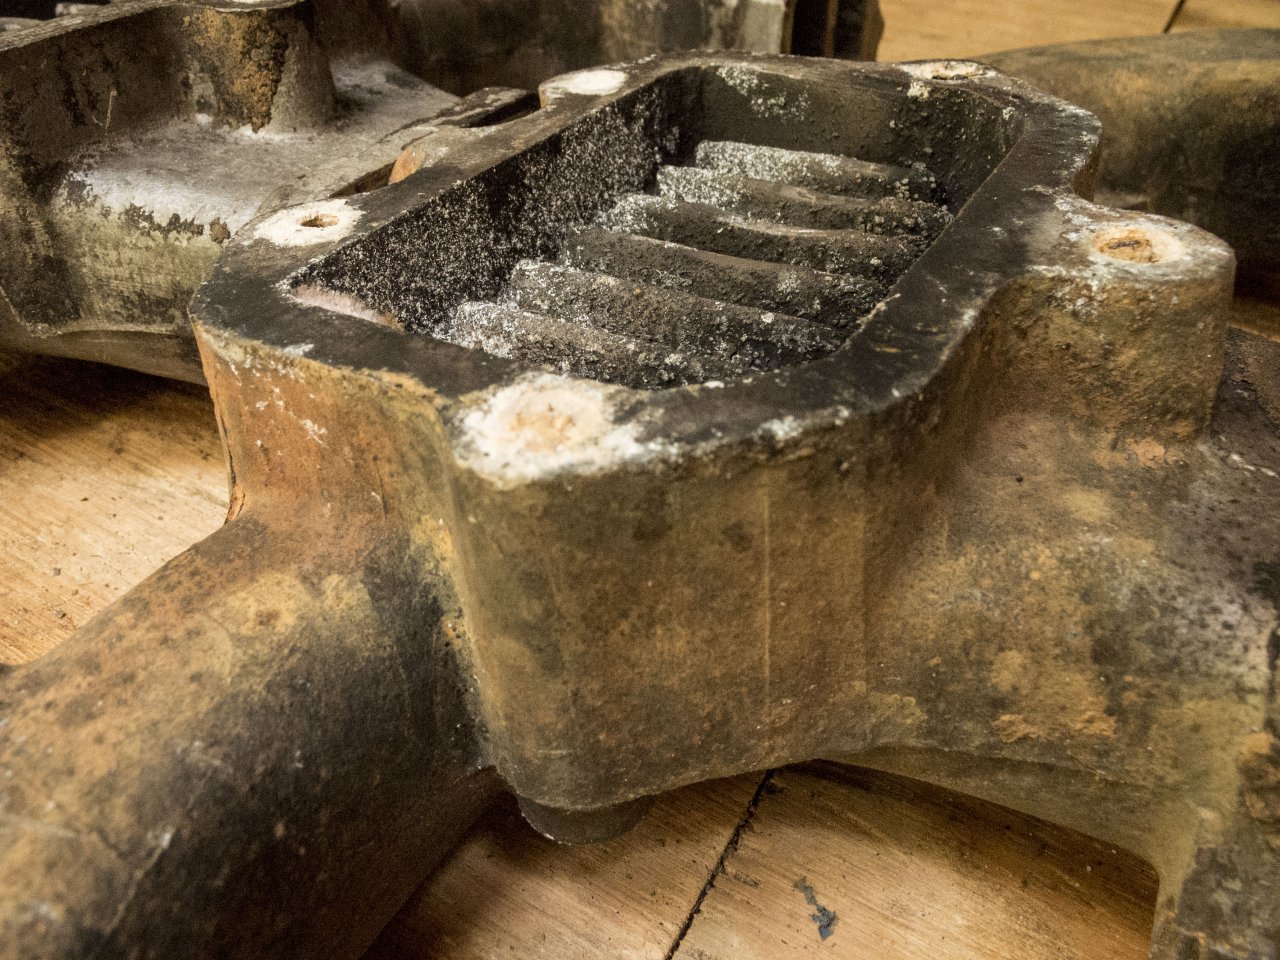
I had picked up a match machined set of intake/exhaust from the Mud classifieds a few months ago and I was inspecting everything today. I found that the exhaust manifold looked good and no issues to speak of. However I found that the intake manifold was in need of some serious attention. Unfortunately just about all of the threaded holes on it need to be fixed as they are either stripped, or have damaged threads that a tap alone won't fix or in some cases there are heli-coils that were put in and they were coming out. Either way I decided that the intake I currently have on my truck is cleaner, all the threaded holes are good, and it would be better to use that instead.

And....figured if I am going to end up using my current intake then I might as well just put my 3FE exhaust manifolds on and finish that project. I've been researching others who have done the mod and really the only thing I'll get help with besides a little machine shop work is the new down pipe


Pulled my carburetor off Wednesday afternoon and separated the isolator block/heat shield. Still working on getting all the baked on crud off the heat shield and old gasket material off the isolator block. So far the block looks reusable and while the heat shield is cracked I don't think its going to be a problem for now. Now that the carb is off and I can see how truly dirty it is I should probably just buy a kit and rebuild it. I like things to be clean but I hate the traditional spray and wipe to get clean method...it just burns through paper towels and wash at an alarming rate. I was looking at ultrasonic tanks and saw a good youtube vid with one from Amazon....I found a 6 Liter version I migtht give a try as the price decent.

1586539047356.png


I'll be pulling my intake/exhaust manifold off soon too. I'm going to run the 3Fe exhaust manifolds and I want to get the mating surfaces cleaned up for them. They don't have quite the same criticality of the 2F in the need to machine the intake and exhaust together as they are not bolted together.....however there is still the issue of matching the heights of the intake/exhaust where the nut and washer sit on the stud. I've read one thread where someone built up the surface of the intake with half washers and seen a second thread where someone machined the cast iron on the exhaust manifold down to match the intake. I'm in the mindset that bringing the aluminum intake surface up to match is better....keep that cast iron as thick as possible....SO...either weld up and machine the intake surfaces flat or mayb make some stepped spacers.
 
It was a long spring. I like everyone else have been dealing with the Covid mess and my company laid off 25% of its workforce in two rounds of layoffs. Thankfully I've survived and can count on a regular paycheck for a little while longer.

My 60 exhaust and vacuum leaks had been getting worse and worse so I reached out to @ToyotaMatt and had a conversation about rebuilding the intake/exhaust side of the engine. I got ambitious one afternoon and took everything apart....of course then the job risk went sky high and I throttled back to build savings and wait in case things went bad. So my truck is down now waiting for the next step.

I have a set of 3FE exhaust manifolds I was going to run but I've decided to get the truck back together so I can drive it again and that will make it a lot easier to get over to my friend shop where we can fab up a new down pipe to be used to mate the 3FE manifolds to the stock 6 Cat and rear exhaust.

Per Matt's advice I did order a set of Remflex gaskets and I got a heat riser block off plate from Cruiser outfitters. I owe a call back to Matt so I can review the order and get this machine back together.

and in a bit of dark humor my daily driver (1999 Saab 9-5 287K miles) decided to eat its serpentine belt a couple weeks ago....that means no water pump, alternator, or power steering. Luckily I was able to limp the car home without it getting too hot and I've already gotten the new belt installed. My radiator has had a pin hole leak for years...its no longer a pin hole after this...so I have a new rad to throw in as well. In the mean time I pulled my 09 Husaberg FE450 out of storage and was riding that when I had to go somewhere....but its fuel pump died on my way home the other night. And just to cap it all off...My dad offered me his 2003 Jetta TDI one afternoon so I could do some things...I made it half way up the driveway before I realized something was wrong. I did some tracing and research and figured out that its got a bad alternator pulley. These cars have a pulley with a one way clutch built in and over time they seize up. So I'll be fixing that too. Luckily I own a mtn bike and a pair of shoes or else I'd really be stuck :rofl:


Does any of yoots have a dimensioned diagram showing the bolt hole location for the intake/exhaust mounting holes on the head?
 
It was a long spring. I like everyone else have been dealing with the Covid mess and my company laid off 25% of its workforce in two rounds of layoffs. Thankfully I've survived and can count on a regular paycheck for a little while longer.

My 60 exhaust and vacuum leaks had been getting worse and worse so I reached out to @ToyotaMatt and had a conversation about rebuilding the intake/exhaust side of the engine. I got ambitious one afternoon and took everything apart....of course then the job risk went sky high and I throttled back to build savings and wait in case things went bad. So my truck is down now waiting for the next step.

I have a set of 3FE exhaust manifolds I was going to run but I've decided to get the truck back together so I can drive it again and that will make it a lot easier to get over to my friend shop where we can fab up a new down pipe to be used to mate the 3FE manifolds to the stock 6 Cat and rear exhaust.

Per Matt's advice I did order a set of Remflex gaskets and I got a heat riser block off plate from Cruiser outfitters. I owe a call back to Matt so I can review the order and get this machine back together.

and in a bit of dark humor my daily driver (1999 Saab 9-5 287K miles) decided to eat its serpentine belt a couple weeks ago....that means no water pump, alternator, or power steering. Luckily I was able to limp the car home without it getting too hot and I've already gotten the new belt installed. My radiator has had a pin hole leak for years...its no longer a pin hole after this...so I have a new rad to throw in as well. In the mean time I pulled my 09 Husaberg FE450 out of storage and was riding that when I had to go somewhere....but its fuel pump died on my way home the other night. And just to cap it all off...My dad offered me his 2003 Jetta TDI one afternoon so I could do some things...I made it half way up the driveway before I realized something was wrong. I did some tracing and research and figured out that its got a bad alternator pulley. These cars have a pulley with a one way clutch built in and over time they seize up. So I'll be fixing that too. Luckily I own a mtn bike and a pair of shoes or else I'd really be stuck :rofl:


Does any of yoots have a dimension diagram showing the bolt hole location for the intake/exhaust mounting holes on the head?


you simply need the bare cylinder head for your FJ60 2F female fasteners/ threads in the head itself mounting locations and layouts ?
 
It was a long spring. I like everyone else have been dealing with the Covid mess and my company laid off 25% of its workforce in two rounds of layoffs. Thankfully I've survived and can count on a regular paycheck for a little while longer.

My 60 exhaust and vacuum leaks had been getting worse and worse so I reached out to @ToyotaMatt and had a conversation about rebuilding the intake/exhaust side of the engine. I got ambitious one afternoon and took everything apart....of course then the job risk went sky high and I throttled back to build savings and wait in case things went bad. So my truck is down now waiting for the next step.

I have a set of 3FE exhaust manifolds I was going to run but I've decided to get the truck back together so I can drive it again and that will make it a lot easier to get over to my friend shop where we can fab up a new down pipe to be used to mate the 3FE manifolds to the stock 6 Cat and rear exhaust.

Per Matt's advice I did order a set of Remflex gaskets and I got a heat riser block off plate from Cruiser outfitters. I owe a call back to Matt so I can review the order and get this machine back together.

and in a bit of dark humor my daily driver (1999 Saab 9-5 287K miles) decided to eat its serpentine belt a couple weeks ago....that means no water pump, alternator, or power steering. Luckily I was able to limp the car home without it getting too hot and I've already gotten the new belt installed. My radiator has had a pin hole leak for years...its no longer a pin hole after this...so I have a new rad to throw in as well. In the mean time I pulled my 09 Husaberg FE450 out of storage and was riding that when I had to go somewhere....but its fuel pump died on my way home the other night. And just to cap it all off...My dad offered me his 2003 Jetta TDI one afternoon so I could do some things...I made it half way up the driveway before I realized something was wrong. I did some tracing and research and figured out that its got a bad alternator pulley. These cars have a pulley with a one way clutch built in and over time they seize up. So I'll be fixing that too. Luckily I own a mtn bike and a pair of shoes or else I'd really be stuck :rofl:


Does any of yoots have a dimensioned diagram showing the bolt hole location for the intake/exhaust mounting holes on the head?


is this what you need as far as the " bolt hole locations intake/exhaust mounting holes on the head? "


1593135916903.png
 
you simply need the bare cylinder head for your FJ60 2F female fasteners/ threads in the head itself mounting locations and layouts ?

I want to draw an exhaust flange with the holes in the correct location. It’s just something to play with for now. I have some ideas and I just want to model them up and see how they look. I can measure the exhaust gasket but I wondered if drawings already existed.
 
im not aware of a Engineers type cad drawing of a 2f head like that ?

the gasket is your best possible pattern or JIG i would think
 
@ToyotaMatt :cheers: . Thanks. I’ll measure up the gasket and create a file that can be shared.
 
Spent some time at my friends shop yesterday replacing all the brakes...rotors, pads, hardware, and calipers on my Saab daily driver. Also did some work on my new to me exhaust manifold and intake. Picked them up from the mud classifieds a while ago in prep for redoing the intake/exhaust on my truck which was suffering from a lot of leaks on both fronts. The manifolds I got were match machines but the intake has a lot of stripped holes and I am doing a bunch of cleanup on the exhaust.

Of the 3 studs in the down pipe flange 1 had been removed. I was able to heat up the house and remove a second one but the 3rd on broke off. So we through the manifold in the bridge port and milled the remaining piece flat, then center drilled, then drilled it for an easy out. But the easy out didn’t work. So we upped the left hand drill to the size for drilling as if to tap and about halfway in the stuck piece wound out. Then I ran a tap through the 3 holes for good measure.

also bead blasted the intake and cut some steel bar stock to use to block off the old pivot hole for the thermostat flap.
4FA3806C-5192-4200-B2C3-E6EA964233D6.jpeg
DD948FDB-F4A5-4F83-B281-0F85F50BA4AC.jpeg
3BBFE9B0-8BAE-46D8-B913-399211391207.jpeg
7E2D8790-4A62-4FC5-A96F-B0E822440084.jpeg
 
Spent some time with my new pressure washer to clean up the side of the block. Was careful with the spray and risky areas were shielded or blocked to prevent water getting where it shouldn’t. I’ll prime and paint this side of the block before I put things back together. At least make it a little nicer in here until the day I can pull the whole driveline and do a full renovation.

1594669573453.png


E1C926EC-EF3A-4396-ACEA-0ADC5C649C07.jpeg
 
Last edited:
Spent some time working on the intake manifold tonight. This is the one that came matched to an exhaust manifold already machined from the classifieds on mud. Unfortunately most of the 8x1.25 holes were stripped or had failing helicoils. @ToyotaMatt suggested Time-Serts and I got a set of tools and time serts to try. I can say its a nice setup and worked well. I ended up fixing 9 of the threaded holes:

Red circles are holes that I did Time-Serts and blue circles were ones where there was enough material left to chase with a tap.

1596072034253.png


1596072056095.png


1596072073046.png


1596072087605.png


1596072100531.png
 
Here is a photo showing part of the process. 1) drill out the hole with the provided drill, 2) use the counter sink tool, 3) tap the new hole with the provided drill, 4) put some oil on the insert tool then use the tool to thread in the insert. The tool itself threads into the insert and when the insert seats the tool expands it slightly locking it in and then the tool unthreads out.

1596072251436.png
 
Looks like a cool tool ! Any pic's ?

My kit is out in the truck but here is a screen grab from the google:

1596073211846.png


The numbers I put on the photo show the order of operations. I had one hole that I pulled the old helicoil out of like unwinding a spring. I was able to countersink and retap the hole and the insert went right in without issue. I did some more research and it looks like Wurth also offers a version and I'm sure there are some other brands. I might see how the Wurth ones look.


this is the website I went to but when you order it takes you to their amazon account. The tool kit comes with 5 or 6 inserts and I bought 10 more. All were 8x1.25. If you need another size then you need another kit of tools. Luckily the 8mm bolts are the most prevalent on the intake.

 
Last edited:
My truck hasn't had any use this summer as I currently have the entire intake and exhaust off the truck. I have all my parts to put it back together and will start soon.

On a whim I did some calling around to find out about costs of getting a chassis galvanized. Two places contacted me within 20 minutes of my online form submission and two different prices.

Duncan located in MA says:
Min charge $450, $185/hr to sand blast.
no heavy grease.

The other place that returned my call was in Taunton MA: V S Taunton Galvanizing
They said $1300 to dip and 5-7 day turn around time. We spoke over the phone and he said any boxed or closed sections had to have at least 1/2" drain holes on each end and the frame should be sand blasted before its delivered to them. He mentioned that some frames do distort and require some straightening and that they do a lot of work for the various Land Rover places in the area.

I'm not ready to paint or treat the chassis but galvanizing has always been appealing to me and I wanted to get an idea for the cost.
 
You might reach out to the Vermont Rover guys. 1/2" drain holes shouldn't be an issue, I think the ends are open.

Distortion sounds odd. Is that from heat? I wouldn't think that would be an issue on our frames.

Galvanization is a nasty process that is heavily regulated, I doubt there is much difference between whoever is doing it. I'd go with who ever is closer and can fit your timeline. Sand blast and galvanizing in the same location sounds like the ticket.
 

Users who are viewing this thread

Back
Top Bottom