What have you done to your Land Cruiser this week? (9 Viewers)

This site may earn a commission from merchant affiliate
links, including eBay, Amazon, Skimlinks, and others.

I wish I could say that I've never done this, but I have! The night before a cross-country trip no less. Discovered it at the first fill-up on the trip, in Vernon, TX. Nice people at the local NAPA found me a domestic part that fit the neck and opening, but the fuel door wouldn't close. That got me to Albuquerque NM and American Toyota, who (back in the Dr. Dan days) had the correct one in stock.
I did it on the first 1300 mile drive out to Katemcy in Ruftoys in 2005. Running a canvas softtop no less, that had enough ‘flap’ in it to act like a reverse bellows and suck all the fumes from the tank into the cruiser. :eek:

Made a cellphone call to @tornadoalleycruiser, who was having dinner in a bar in Kansas City IIRC to have him put the word out for me that I needed a cap.

By the time I got to the Roundup, there were three caps waiting there for me.😊
 
Toyota Turtle.jpg


Toyota "Turtle"

Almost as long lasting as a Landcruiser.
 
Haven't done anything to the LandCruiser this week, except to fill up the gas tank today. In doing so, I discovered that behind my locked gas tank door, the cap was missing! :doh:. I must have left it sitting on the running board the last time I filled up. I asked the attendant if it was in the lost and found, and looked around the parking lot, but it's been a few weeks since I filled up last, it is long gone :frown:
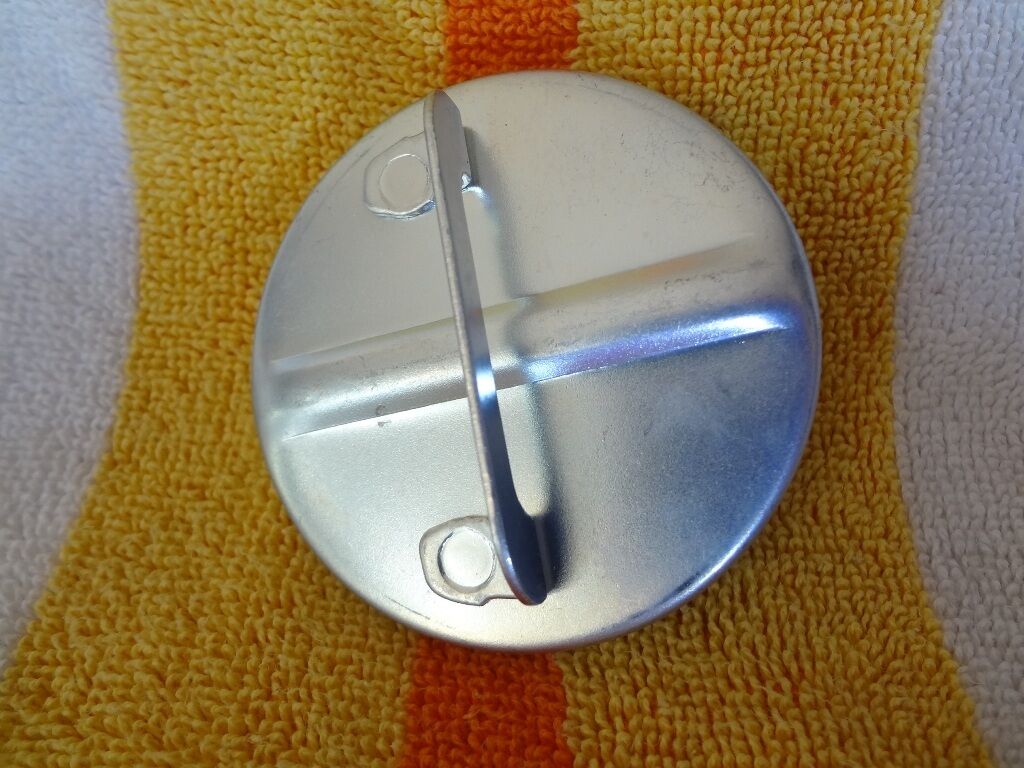
. It was an old vented version of the gas cap, and I was just continuing to use it until I could get the new charcoal and vent system hooked up. Anyway, so I put the factory non-vented cap on that I had in the glove box, and now I guess my new lines for the vent have been moved up on the to-do list. Need to get some of that ni-cop line in the correct diameter first. I just hate losing that thing :(. The non-vented cap with the old rusted vent lines does build up some pressure, so I just have to be careful with that. Well, no pictures of the missing cap. I hope the rest of my 40 friends have a better week! :).


if you have a NON-VENTED gas cap on your 1978 FJ40 621 Rustic Green... then she ain't STREET LEGAL now any more since 2021 ...

- this is the ONLY OEM toyota Gas cap for a 1978 FJ40 , its design feature is ONLE way venting inward ONLY , not OUTWARD ...

- i suspect your little white plastic check valve is your issue greater then a 51% chance it is ....

- or

- i say 49% chance you do not have this oem gas cap below maybe ?


- report back after you review the links and TECH below


thanks
matt


DSCN5751_2048x.jpg


IMG_0521_2048x.jpg


TANK_2048x.jpg


IMG_20201223_131617288_2048x.jpg


1676732607882.png

1676732642272.png
 
Did a little work on the passenger floor pan. The patch panel didn’t fit at all so hand formed panels out of pieces of my old fenders. Coming together pretty well. Stoked on forming the correct curvatures. Still have lots of clean up to do and I’m waiting on that Milwaukee bandfile to show up so I can clean up my welds in the recessed area between the door frame and the passenger seat hump.
9128A1A5-84B4-4348-BCBF-F4777A4BBC62.jpeg
C415997A-137E-49FC-A07A-8071332D194F.jpeg
 
Need to replace the rear wheel bearings. Thought it'd be easy with the horrible freight bearing puller, but it wouldn't open large enough to catch the bearing. So I went to the local auto parts store and asked if they had the rental bearing puller. They did, and I thought I was lucky since it was brand new. Still no luck. I found that the spacers wouldn't fit and I need to hold a nut behind the puller deep in my axle housing.

So I decided to build one:


Used some strap iron and drilled 3/8th inch holes to secure to the caliber mounts. Doubled up couple more strap iron pieces, welded them together and drilled a 3/4 inch hole in the middle. Ran some all thread through the "right size" punch I had and threaded it through the 3/4 in hole. Tighten it down on two 1" tube legs and welded it together. Got the bearings loose, I just don't know if there are races and/or if I can get them out.


I'm hoping to use it to push them back in as well.
 
With my wife’s help to pump the pedal, I finished the first full overhaul of the rear brakes on my LWB in the 29 years that I’ve owned it. Always dodged the full overhaul before by honing the cylinders on the truck.

Made some new brake lines while I was at it. And for that, I give thanks to MUD. I learned about both the Nicopp tubing and the flaring tool from this forum. 😊

175EF9E7-D5F3-4751-8072-2068301F4DC9.jpeg
 
.
i brought 87240-10010 back from the dead ...... :cool:
&
she is HEAVY DUTY tough as nails period correct

- Direct plug and play fit Cylinder Head & First Generation Water Pump threaded port also

- NO adapters or other Related Fittings Necessary ….
.


.

DSCN9974.JPG


.


DSCN9978.JPG


.
DSCN9972.JPG


.


DSCN0021.JPG


.
 
Last edited:
.

Also ..........

- i felt the time was right and the time is now , to bring this to the table , since TOYOTA has Disc. / NLA the basic longer coil wire ignition cord set , they only now offer the shot coil wire version for a cylinder head mounted coil ?

- - - odd choice since the longer one could well achieve both applications , where as the short one cannot ?

- the FENDER mounted Ignition COIL is the best possible location to mount your set up Hands Down ....

- applications
: F , F1.5 , 2F , 3F CARB

- this needed OEM parts solution is needed right away


- because , some circus clown will come along with a
SUMMIT Racing monkey business stand alone Ignition Coil Wire , and claim it's the 2nd coming of TEq .........

-
NO , that's NOT how this will play out , ONLY a true MADE IN JAPAN OEM parts maker NON-USA Substitute made for these application's need will do here ...

- a Genuine OEM SUMITOMO LONG REACH @ 23" is here now , and here to stay

- so here we are and there we go .
.. :cool:


.


DSCN9993.JPG
DSCN9995.JPG
DSCN9998.JPG


sumitomo-electric-industries-logo-displayed-on-a-modern-smartphone-2ARG2M1 - Copy.jpg1.png
 
Last edited:
.
i brought 87240-10010 back from the dead ...... :cool:
&
she is HEAVY DUTY tough as nails period correct
.


.

View attachment 3253250


.


View attachment 3253251


.
View attachment 3253249


.


View attachment 3253252


.


Matt: For completeness sake Vintage TEQ should also bring back from the dead the corresponding union that this valve screws into (I believe it is PN#90404-16164). That way folks could source from you the complete new shiny assembly for a true Plug 'n Play. What do you think?
 

Users who are viewing this thread

Back
Top Bottom