The Lemon Gelato Journey - Build Thread (1 Viewer)

This site may earn a commission from merchant affiliate
links, including eBay, Amazon, Skimlinks, and others.

"Sand and fur" .... sounds familiar. My torsion bar still works from both sides, but something inside behind the post on the driver's side is definitely loose. I'll dig into it and may report back.

I took a photo of my seatback and looks like I was on the right track from what I can see. The whole mechanism seems to be attached to the metal seatback. You might have to replace that assembly.

IMG_1217.JPEG


I'll get into this further probably this weekend. I sanded and primed all of the metal pieces and all that's left is a couple coats of paint, reassembly and installation.
 
I've wanted to update my interior to get a Double Din head unit and I like the slightly more modern dash of the FJ62. The passenger side grab bar will be a welcome addition to friends and family because they all have to hoist themselves into the truck with the way it sits now. Every time they get in I can see the ceiling grab handle flex a little. I've got plans to retromod the interior and this is the starting point for it. I've been looking for a grey interior FJ62 part out since the weekend I brought mine home and finally found one an hour away. Made the drive down to the middle of nowhere and started pulling parts. The owner gave me, what I thought, was a great deal because I offered to pull of all the parts myself. It was in much worse shape than the photos when I got there, but I didn't fully regret my decision until I had gotten home the next day and I could see all the parts in the light. This photo should set the tone nicely. That structural wood support was not helpful if you were wondering.

IMG_1170.JPEG

Rust was the common theme throughout the truck. Every time I sat on the driver seat I sunk a little bit closer to the actual floor and at one point the seat supports completely collapsed and I thought I was going to get stabbed with a rusty peace of metal.

Some photos of the "spoils".
IMG_1185.JPEG


The instrument panel itself is in surprisingly good condition considering the rest of the vehicle. For some reason there's a light mist of grey paint on part of the panel as well as the faces of some of the gauges. I'll be reusing the gauges from my 60 dash, so these aren't needed.


IMG_1187.JPEG


Everything taken apart to get ready for prep and cleaning. I need to make a decision on the clock and the space it occupies. I'm not sure I want the hassle of wiring it into my 60, and I'll already have a clock on the face of my radio.


IMG_1188.JPEG


The theme of rust continues into even some of the gauges themselves. If you look closely you can even see the white indicators on the gauges have rust on them as well. I tried brushing them off but they're there to stay because all of the black faces are also metal.

IMG_1207.JPEG


The underside of the dash pad (which has enough crevices to compete with the grand canyon) is also unsurprisingly rusty. I started sanding all of the loose rust off before I sealed it with Rustoleum Primer. I need to make a decision on the rework for the dash pad. I'll either get a new color matching cap, or I'm going to repair what I can and have an upholstery shop wrap it in black leather. I plan on doing the BMW seat swap using the Torfab brackets, and those will be black.

A keen eye will see the lower dash portion in the grass. Rust has eaten away at some of the underside portions that aren't visible to passengers. I'm going to fix it, but I haven't decided to what degree yet.
 
After some cleanup work for a show our car club was hosting it's looking pretty in the sunset.
IMG_1043.JPEG


I still think this truck is one of the best looking vehicles ever made. You can also see how bad my rear tint is if you didn't believe me in the earlier posts. I'm hoping to address that this weekend with a clothes steamer, a razor blade and copious amounts of patience. The original headlights are also terrifying to use on backroads that have no extra lighting. Any modern oncoming car will outshine my headlight output and I end up driving blind until they pass. They've got to go.


IMG_1099.JPEG


A really nice FJ62 was 10+ hours from his home and decided to park next to me at our event. I got a ton of good ideas and inspiration from his rig and it was nice seeing something that wasn't low and fast for once.

IMG_1163.JPG


A friend from our group was kind enough to ceramic coat my Volks for me. It's hard to tell in photos but they're less gold and more bronze in color now. These will have to sit and wait to be installed sadly. I want to be able to carry all five wheels with me and I've always wanted a bumper with a tire carrier on a swing out. I'm leaning towards the DIY kit that a Mud member made but we shall see.
 
@TheEngineer I did the DIY bumper kit and it turned out great. Let me know if you have questions when you get there.
 
After some cleanup work for a show our car club was hosting it's looking pretty in the sunset.
View attachment 2812897

I still think this truck is one of the best looking vehicles ever made. You can also see how bad my rear tint is if you didn't believe me in the earlier posts. I'm hoping to address that this weekend with a clothes steamer, a razor blade and copious amounts of patience. The original headlights are also terrifying to use on backroads that have no extra lighting. Any modern oncoming car will outshine my headlight output and I end up driving blind until they pass. They've got to go.


View attachment 2812898

A really nice FJ62 was 10+ hours from his home and decided to park next to me at our event. I got a ton of good ideas and inspiration from his rig and it was nice seeing something that wasn't low and fast for once.

View attachment 2812902

A friend from our group was kind enough to ceramic coat my Volks for me. It's hard to tell in photos but they're less gold and more bronze in color now. These will have to sit and wait to be installed sadly. I want to be able to carry all five wheels with me and I've always wanted a bumper with a tire carrier on a swing out. I'm leaning towards the DIY kit that a Mud member made but we shall see.
There’s a pretty good trick for old tint. Get some large black trash bags and some “windex” WITH AMMONIA (that’s the key), then tape the bag over the window all the way to the edges, leave the top edge untaped so you can spray the windex all over the tint, then park it in the direct sun so it hits the window. Let it sit for about an hour or so. The tint will basically just peel off in one full sheet. I did this a couple years ago on my 2003 Camry. Tint came right off, it was nuts. I think there are some YouTube videos on it. I think it has something to do with the sun heating up the windex and causing it to off gas and release the tints adhesive. HTH
 
@TheEngineer I did the DIY bumper kit and it turned out great. Let me know if you have questions when you get there.
I’ve got so many haha. I can’t weld but I have looked at the directions he’s posted, how easy was it to follow along? I’m going to have someone else weld it up for me.

Second, how easily does his design lend itself to modifications? I wanted to have a small portion wrap around the sides similar to some other bumpers I’ve seen. Not a huge fan of not having rear quarter protection if I’m going through all this effort.

Third, is the swingarm height adjustable on the spindles? I wanted to implement a locking system so I could have both arms lock in the outward position. That’s all I can think of for now, I’m sure there will be more later.
 
There’s a pretty good trick for old tint. Get some large black trash bags and some “windex” WITH AMMONIA (that’s the key), then tape the bag over the window all the way to the edges, leave the top edge untaped so you can spray the windex all over the tint, then park it in the direct sun so it hits the window. Let it sit for about an hour or so. The tint will basically just peel off in one full sheet. I did this a couple years ago on my 2003 Camry. Tint came right off, it was nuts. I think there are some YouTube videos on it. I think it has something to do with the sun heating up the windex and causing it to off gas and release the tints adhesive. HTH
That’s going to be the second method I try. I have to remove the top half of the hatch to replace the gasket up there anyways. Without knowing the full scope of that chemical reaction I’m worried about the seal. I rubbed some dirt off the seal and almost stained my shirt because the gasket is breaking down. I’ve ordered a new window seal anyways so I can do some small rust repairs. I’ll report back with how it goes either way.
 
I’ve got so many haha. I can’t weld but I have looked at the directions he’s posted, how easy was it to follow along? I’m going to have someone else weld it up for me.

Second, how easily does his design lend itself to modifications? I wanted to have a small portion wrap around the sides similar to some other bumpers I’ve seen. Not a huge fan of not having rear quarter protection if I’m going through all this effort.

Third, is the swingarm height adjustable on the spindles? I wanted to implement a locking system so I could have both arms lock in the outward position. That’s all I can think of for now, I’m sure there will be more later.
I had never welded before, but I borrowed a MIG machine and was able to do the whole thing easy enough.

If you can template with cardboard or something then cut out a sheet of metal, you can do rear quarter protection. It's welding, so sky's the limit.

Arm & spindle tighten to a certain point into big needles bearings. The entire spindle height is determined by how for up or down you weld it though.

Provided in the kit are stop pins and 3-position catches to lock the swing arms out. Some folks weld the pin onto the side of the arm and others drill a hole through the arm (as close to the spindle as you can get) and weld the pin in there. Where you put the pin determines where you put the catch, but of course that can be goofed with a little bit to make the locked opening positions different.

Awesome, just what I was looking for. I'm between adding material to what comes in the kit or just using it as a starting point for what I want done.

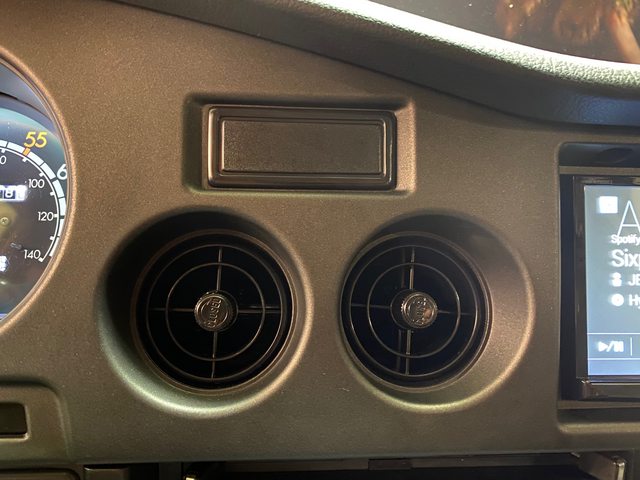
Oem clock cover is the way to go.

55533-90A00

SaNnEpdl.jpg

This is awesome. I was thinking of something like this but with a RAM mount so I had someplace to put my phone that was front and center. I'll looking for one of these though.
 
Gaskets and body seals.

In my pursuit of reducing NVH I ordered every body and panel seal I could think of. These parts were mostly from City Racer with the exception of the body door seals and trunk seal that I got from Trail Tailor. For those ordering these from Trail Tailor, they will not come labeled. Lay them out and take the shortest pieces for the front two doors. The front doors have a much longer door sill, so their pieces won't be as long as the ones needed for the rear.

Once you've removed the old material and you're ready to place the new door seals in, place the end of the new seal underneath where the door sill ends, you want them to obviously overlap. Make sure you get the edges of your B pillar cover and headliner inside the door seal when you're making your way around. If you've done any sound deadening work and have the little roller that some of those kits include, it would be a huge help here. I woke up the next day and wondered why my thumb hurt before I remembered all the pressing I was doing.

For the seals that sit on the doors themselves you'll want a pair of pliers. If your seals are anything like mine, when you remove the rubber the plastic feet will stay behind. You'll most likely need those pliers to take them out and it helped me to rotate them 90 degrees to get a better grip. You'll also have to remove the retaining pin on the black arm(?)/guide to get the seals on and off. I'm not sure of the name, but it's the metal component that prevents your door from swinging too far out, it's on the lower half of the inside of your door.

The best method I found to put the new door seals on was to start in the top outside corner of the door. Press the seal into the channel and work your way down towards the new plastic feet. Mount the first feet on either side to make sure you haven't stretched the seal from the first part. If you have trouble making the feet line up with their respective holes, you've either stretched the seal too far or not enough. Once that's all sorted it's easy sailing. To check that they're fully seated in the upper channel, give them a light tug. There should be no visible gap and they should be firmly inside.

The most difficult body seal to replace will be the top seal of your rear hatch. It's possible to remove it and install a new one without taking off the upper hatch door but I didn't want to suffer and had someone help me remove it. What worked for us was to undo all of the wiring and the water line connections first. On the passenger side you'll have to unscrew the farthest panel to undo the water line for the rear window spray nozzle. Mine had a simple press fitting joining the two lines and yours should be the same. The driver's side has the positive line for your rear defroster as well as the wiring for your rear wiper motor (I also had what looked like a grounding wire attached to my hatch lock, but I'm not sure what it's for at this point). Slide the female end of the defroster power line off and pull all the wiring partially through the grommet, I'd say about 4-6 inches. This slack is so you have some room to move the door around. Next, you'll want to remove the four bolts that hold the hinges to the upper door and then the struts. I'd advise having someone help with this as the hatch door is deceivingly heavy.

IMG_1230.JPEG


Feast your eyes on my WIP progress interior. Once the struts are off the ball mounts, flip the hatch door up onto the roof. You'll see why it's important the have some slack in the lines if you don't feel like removing them. I chose to leave them in because I had no way of fishing them back out. Take a photo to see how your old gasket was oriented before removing it and snap the new one in. I took this time to lube the hinges as well.

Reinstall in the reverse order and you're good to go. If you manage to lose one of the bolts or want to replace them, here's what I used from home depot.
IMG_1231.JPEG


So far, all of these new seals have made a fairly significant difference in squeaks and bumps. For those of you with 60s getting the door seals from Trail Tailor you'll notice the biggest differences. Our 60s didn't come with the bulb that runs along the outside edge and the replacement seals provide a firm seal against all of the doors that wasn't there before. I've noticed that it takes a little more force to close the doors and that they sound more solid as well.
 
Last edited:
Often overlooked but always appreciated, are the surfaces that you interact with on a daily basis. As part of my order from City Racer, I got new pedal covers. The brake and clutch pedals have the same covers if you're going to place an order. Save yourself some trouble and start from the top of the pedal like so.
IMG_1213.JPEG


Get the top portion in and work on the sides afterward. These were soft enough to manipulate with your fingers but a flathead screwdriver would serve you well if you can't get a grip.

IMG_1214.JPEG


Having grip on the pedals was a much needed improvement over metal and old, hard rubber. I was also able to fix the brake light issue I was having. My pedal has some side to side play in it and tightening the nut at the pivot point wasn't helping me. I adjusted the depth of the brake light switch so that it was a little deeper towards the pedal arm and it fixed my issue. Now I don't have to wiggle my brake pedal just right to get the lights to turn off.

If anyone else is having this issue and still has the stock brake bulbs, or any incandesant bulbs for that matter, fix it ASAP. The heat from those bulbs is enough to crack the tail light covers if they're on for long enough, ask me how I know. :mad:
 
I just used a cheap steamer to remove tint from an '00 4Runner. I didn't even steam the tint very aggressively, and when I pulling on the tint, the tint film shot off the window and took most of the glue with it. I was shocked. I only had to clean 10% of the window area (with a single edge razor blade) where the glue stuck.

To remove the tint, I was ready to break out the ammonia and vinegar, etc., but the steamer was fast and efficient. The tint on the windows was of high quality and professionally applied, so that may have made a difference.
This is what I’m hoping to do. Going to take the rear window out to do some paint repair along the edges of the gasket anyway. That’s when I’ll try using the steamer. Will report back when I’ve given it an honest go.
 
City Racer Headlights

Finally pulled the trigger on their headlights. I was driving down some two lane backroads at night and any oncoming car washed my headlights out, forcing me to drive blind until they passed. This is what you'll get in the package.


IMG_1209.JPEG


Pretty simple and straightforward. Two really nice headlights and a set of adapters that will allow these to plug directly into a stock fj60 harness.

IMG_1216.jpg


Glamour shot of afterwards but I wanted to highlight the screws that need to be removed for this job. The upper right screw sits on the core support beneath the hood. You don't need to remove the turn signal lens screws because it attaches to the headlight housing.

IMG_1210.jpg


Once you remove the cover you'll have to remove the plug that powers your turn signal and you'll be greeted by your headlight sitting in its bucket. Our headlights are held in by a ring that's supposed to slide once the screws circled in red are loosened. If your is like mine that will not be the case and you'll have to remove that retaining ring along with it's screws.

The two screws circled in yellow are your headlight adjustment screws. These do not need to fiddled with if your stock headlight alignment is good to go. The left screw will move the headlight left and right (duh) and the top one moves the beam up and down. I messed with mine and thankfully there was a color difference in the screws that allowed me to tighten them back to factory settings without having to align them myself.

The green circle shows a spring that needs to remain attached to the headlight bucket. Not a huge pain to get back into place with a flathead if it comes out.

I didn't highlight them, but a sharp eye will notice three rectangular notches along the rim of the headlight bucket. These serve as alignment aids when you install new headlights and thankfully these City Racer lights do. The back of the light will have standoffs that will sit in these notches. Another easy tell is that each lens says DOT SAE and that needs to be on top.

To install your new headlight, plug in the adapter harness into the body harness and then the headlight itself. Then reverse the removal steps listed above. To save you some time and frustration, the retaining ring can only go on one way due to the spacing of the screws circled in red. If you have to force it, it's probably wrong.

IMG_1211.JPEG


Searching for grounds is fun with how small the grounding wire ring terminal is. I used the forward mounting bolt for the washer fluid bottle on the driver side fender and you can see it snaking behind the plastic here. I had to pull some plastic out of the way to make it work here and I'll probably move it in the future. The short wiring harness is a little too tight for my liking here and it's dangling aimlessly below my intake.

IMG_1212.JPEG


For the passenger side I used this small bolt near the radiator. I had to remove my battery and battery tray to get to it but there are very few options that'll work on this side. I'll have to double check what this bolt holds and I'll make an edit when I find it. It's wise to function check these to make sure the grounds are good before everything is buttoned back up. They're leaps and bounds better than my stock headlights and they bring a more modern look the the front end. Light brightness is great but the throw seems to be lacking. My 3rd gen tacoma had diode dynamics LED headlights and I could see much further into the distance than these.

The lower power draw of these headlights will prevent the high beam indicator from illuminating in your dashboard when you turn them on. This is supposedly fixed by swapping out that indicator bulb with an LED as well. I'll find out when I complete my fj62 dash upgrade.
 
@TheEngineer Those look great. I wish I lived in a non-snow state: I need that incandescent heat to melt ice in the winter.

Some of us are pondering the high beam indicator issue in another thread. I want to figure it out, but haven't gotten there yet.
 
The parts dash you posted looks like a 62 dash...?
 
@TheEngineer Those look great. I wish I lived in a non-snow state: I need that incandescent heat to melt ice in the winter.

Some of us are pondering the high beam indicator issue in another thread. I want to figure it out, but haven't gotten there yet

Thank you! And that incandescent bulb heat is no joke. Cracked my rear tail light lens because my brake lights were staying on. I was looking at KC headlights from a jeep but they’re 4x more expensive and that only gets you one headlight. If I get on with my dash swap and order the LED dash bulbs I’ll before you guys figure it out I’ll let you know.

The parts dash you posted looks like a 62 dash...?

Yeah, I’ve got almost all the parts for the 62 dash swap. Thinking about dropping the lower dash at a body shop. There’s some rust and cosmetic issues from the donor cars poor condition.
 
I'm eager to see what your 60 will look like with the Volks mounted up with tyres. Would love a set of my own one day!
Same here haha, I've seen them on some 70 series and one other 60 that someone sent me a photo of. The setup that came with the truck has really grown on me. My problem is I want to get all five wheels mounted at the same time and I'd like to carry the spare with me on a bumper mount. So to get the Volks on and me satisfied I need a new bumper and some ARB parts. I'm going to put their TPMS sensors and LINK system in the truck eventually. To get everything I want and the way I want it is going to be more than just the cost of tires unfortunately.
 

Users who are viewing this thread

Back
Top Bottom