OME Lifts discussion for the FAQ (1 Viewer)

This site may earn a commission from merchant affiliate
links, including eBay, Amazon, Skimlinks, and others.

Romer

fatherofdaughterofromer
Moderator
Joined
Sep 14, 2003
Threads
547
Messages
11,683
Location
Centennial, Colorado
This FAQ deals exclusively with an OME lift. There are other lifts provided by Slee, and Man-a-Fre. Links for those lifts are included at the end of this FAQ. One of those lifts might better fit your application. OME is the most widely used and so we will focus on that for this discussion. The concepts here can then be applied to the other lifts via the links.

suspension_systems.jpg

Please bear in mind that every truck is slightly different and each truck will potentially behave differently to each set-up. Adding any lift will cause driveline issues that are not serious in a stock setup to be exacerbated in a lifted set-up. e.g. marginal U joints and drive shaft balance issues will begin to make noises and vibrations. Please see the Drive Shaft section in the FAQ.

So you want to lift your truck? First there are a lot of questions you need to answer. The lift you put on should match the near term condition of the truck. In other words, if you won't be installing bumpers and a winch for a while, you need to size the lift without them.

Also, when planning a lift, you should discuss it with some of our local supporting vendors, Slee Off Road, Cruiser Outfitters and Man-a-Fre all carry and support OME lift kits and components. In fact, we would like to thank Christo Slee and Kurt from Cruiser Outfitters as some of the info here-in was utilized from their tech sections. Christo supplied the information on Castor in support of this thread. Also, cruiserdan and Beowulf posts were used as inputs along with other forum members.

There are several things to consider when doing a lift:
  • Springs - Main factor for determining lift
  • Shocks - Main factor for determine of axle play
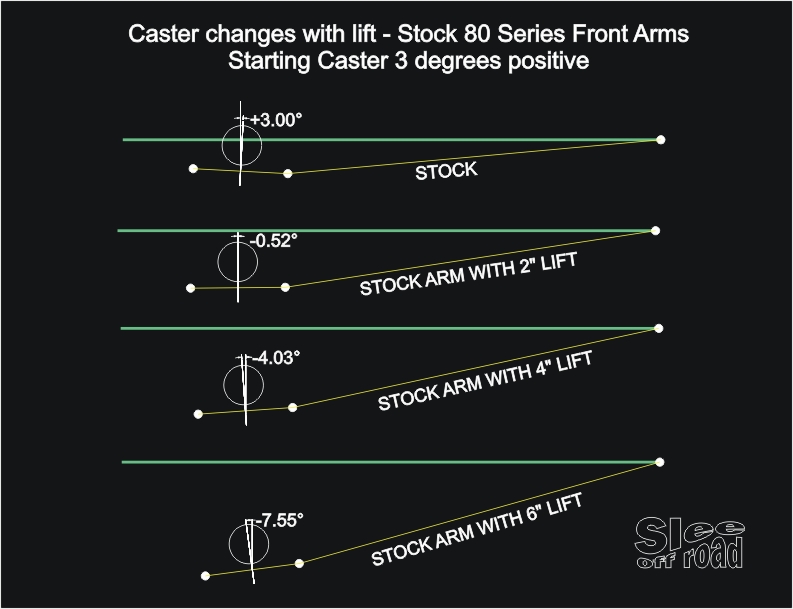
  • Castor - correction required to return steering to normal based on lifts effects on driveline and steering components. Usually done on OME lifts via a Castor correction kit (Bushings in the control arm).
  • Steering Damper
  • Brake Lines - Longer lifts and spacers may require longer brake lines
  • Swaybar Brackets - Extensions to swaybar for taller lifts to prevent damage
  • Control Arms - Replacements are available to compensate for lift, but not needed for most OME lifts.
  • Tire Size
  • Tire Bumpstops - Modifications typically only required for 35: tires and up.
  • Spacers - Used at top of springs to make spring lift taller
So what size lift do you want?
 
Last edited:
OME makes lifts from stock hight up to 3.5" based on the loads specified below. Un weighted, they could be as high as 5". However, the resulting lift depends on what accessories you cary. Armor, Bumpers, Winches, Tools, and Trail Spares will all weigh a lift down.

If you have a Lexus LX450, the stock suspension is much softer than the 80 series Toyota venison. The softer ride tends to provide more lean around corners and a lot of people don't like it. Just changing to the stock height OME will make a great improvement.

The nice thing about an OME lift kit, is that once you have a basic OME lift installed, you can swap springs as you add armor and accessories to maintain the same basic lift height with the extra weight.
So for the OME you really need to decide 0" lift, 2.5" lift or 3.5" lift. Higher lifts can be accomplished using heavy springs in un-weighted situations or by adding spacers, but the higher lifts take it out of the OME design window.
From Christo Slee's Web Page: Since this is not just another lift kit, it is essential to match the spring rates to the weight of the vehicle.

Here is a an example Rule Of Thumb first posted by Beowulf
==============================================
OME Springs:
General rules:
unladen 864=5" lift or 2" w/400 kg load (20mm wire)
....... 863=4" lift or 2" w/250 kg load (19mm wire)
....... 860=2" lift or 1.75" w/a gas tank (18mm wire)
....... 850=2" lift w/some weight(dual batteries etc)
....... 851=2" lift w/bar & winch, dual batteries, etc
....... Stock springs 16mm wire.
================================================
OME shocks
............. Open ......... Closed
............ length ........ length
N70 ......... 614 .......... 354
N71E ........ 620 .......... 370
N74E ........ 620 .......... 370
N73 ......... 614 .......... 354
N73L ........ 667 .......... 387
N74L ........ 667 .......... 387
================================================

Here are a couple of useful Tables. Note that the J Spring is the same basic spring as the non J, but 1" taller.
This is from Slee's site on springs, expected lift WITH expected weight load.
attachment.php


Table 2 was compiled from information on the Cruiser Outfitters Site
attachment.php

Note that an un-loaded 864 lifts about the same amount as an unloaded 863J (both of which are about an inch or so higher than an 863). It takes twice the weight to lower 864's to any given height as it takes to lower 863J or 863. That's because the spring Diameter on the 864 is wider.

UPDATE Oct 2015

I received an input from a reader that the above springs rates are incorrect and he has provided the following:

looking directly from the current OME pdf it corrects all the confusion that I have had. Here is the correct onfo. The wrong info was saying all three springs where the same wire dia. of .669"/17mm but in reality they are all different. If I knew metric I would have seen this sooner.

The above chart should read as:
851 ~16mm/.629" ~ 8.18 turns
850 ~16.5mm/.649 ~ 9 turns
850J ~17mm/.669 ~ 9.9 turns

This all makes sence now the diameter gets thicker as they add turns to achieve the same rate.

ALSO THE 861 & 862 INFO IS WRONG ALSO... ITS SHOW ONLY SINGLE RATE BUT THEY ARE DUAL RATE 170/250 ish.
 
Last edited:
So as stated previously, the first step is to select which spring set you are going to use.

For example, A stock rig with 33" or smaller Tires would be perfect for the OME Medium 2.5" lift Kit

This would consist of the:

2 x OME 851 Front Coil Springs
2 x OME 860 Rear Coil Springs
2 x N73 Nitrocharger Shocks
2 x N74E Nitrocharger Shocks
1 x SD24 Steering Damper
1 x CA77B Caster Kit
1 x Caster Bushing Press Piece

This lift would be fine even when Armor is attached. However, the armor, bumpers and winches will weigh this down and your 2.5" lift could turn into a 1.5" lift.

So, say you have an ARB Front Bumper, Winch, Sliders and Rear Bumper Tire carrier and want the 2.5" lift. Many in this application would select the OME Heavy Kit

This would consist of:
2 x OME 850 Front Coil Springs
2 x OME 863 Rear Coil Springs
2 x N73 Nitrocharger Shocks
2 x N74E Nitrocharger Shocks
1 x SD24 Steering Damper
1 x CA77B Caster Kit
1 x Caster Bushing Press Piece

Note, the springs are the only difference between the two kits. From Table 2 above we can see that the Heavy Spring is .8" taller allow for an extra 150 lbs load (see table 1) to get to the same height.

From the Slee Off Road Web Site on the Heavy Kit:
This is the kit that we install for trucks that have a replacement front bumper, winch and rear bumper installed. The spring rates can support 110-250lb additional up front weight and 440lb additional weight in the rear. With the additional weight, the total list will be between 2" and 2.5". If extra carrying capacity is required in the rear, the springs can be replaced with Extra Heavy rear springs that can accommodate up to 880 lb additional weight.
The steering damper assist with kick-back in off-road situations, especially with running over-size tires. The caster kit returns the truck's steering geometry to stock.
It should be noted that if the Heavy Load suspension is used in an application where there are no additional weight on the truck, it could lead to a harsh ride as well as vibrations and handling anomalies.
 
Now that seemed easy, but there are other factors.

For the Front:
A WARN 12K wink weighs more than an 8K winch and lots of people are running dual batteries. This extra weight will weigh the front down, losing some of the lift. Custom made spacers or the 1" Mr. Gasket Spacers can be used to help offset this. The Metal Custom spacers are superior because the Rubber Gaskets wear out and can get crushed.

The other alternative is to run 850J springs in the front. This gives an extra 1.2" to help offset the additional weight in the front.

For the Rear:
Lots of people run drawer systems full of tools and spare parts. They have CO2 Tanks installed, Refrigerators and other items that weigh down the rear more than the stated weight load of the 863 OME heavies. There are 864's and 863J's as options.

cruiserdan ran the following test:
cruiserdan said:
Today was the day to finally get around to replacing my 863's with 864's. I usually pack a LOT of weight and I bang the arse end on a regular basis. :doh:

Background:
OME 863's are "good for" 200kg additional weight over their standard spring, that equals 440 lbs over here and the 864's are good for a whopping 400kg (880 lbs) over standard.

As the tongue weight of my boat approaches 300 lbs and we typically stuff the back of the vehicle with 2 gigantic ice chests and tools, ETC and I pack additional fuel, the 863's are marginal at best.

Findings:

Ground to bottom-of-rear-flare measurements netted a gain of 1.25 inches of lift OVER the 863's........ :)

In order to see how much weight it would take to get the vehicle back to where it was with the 863's I started stacking full .30 caliber ammo cans on the tail gate..... :grinpimp: It took 5,640 rounds of M2 Ball (430 lbs) to drop the vehicle back down that 1.25 inch gain.

Interesting. It takes about 200 kg to get the 864's down to the height of the 863's, exactly the amount of additional weight the 864 is supposed to handle.... ;)

attachment.php


The top photo is my "standard load" which is about 50kg in the back. This is my drawers, CO2 and my standard tools. In this photo the main and sub tanks are full.
The second photo is with 100kg additional weight in the back and the third is with 200kg additional weight.
I am not running packers at either end.
attachment.php

attachment.php

attachment.php

I think the 864 (my set-up) may be considered "extra heavy" and the 863/J considered "heavy"
What you referred to as a "J/2.5 heavy" combo may be an 850J/863. This particular combination yields a fairly "level" truck with a moderate rear cargo load. An 863J vs an 864 is about the same unloaded height as I mentioned above. So this can be a bit tricky to achieve the stance you are looking for.
If the 850J/863 is a bit too level, the 864 will really raise the rear fast and an 863J may be a better choice as it will compress faster than the 864.
 
Note, that selecting your springs based on your weight load should not require the change of shocks Castor corrections or anything else. All the rest of the parts in the kit will be the same.

That allows someone who installed the 2.5" lift kit in a stock configuration to swap out the springs as the weight increases.

For example, adding an ARB Bull Bar and a 9K winch would justify swapping the medium spring (OME851) out for the Heavy Spring (OME850). If you install a 12K WARN and have a dual battery set-up, an OME850J can be used.

Swapping the springs is simple.

The above assumes your tires are 33" or smaller. and you selected your springs to maintain a 3" or less lift based on your installed "toys"
When you go outside the design range of the OME kits, many other factors come to play and this is where the variability of everyones rig comes can give different results. What works for one rig, may cause driveline or Castor issues with another
 
  • Like
Reactions: TAB
Now some want a bigger lift than the 2.5" to 3" lift OME is designed for. They will use the larger springs without the weight or add spacers to increase the height of the lift. Drivibility and Castor issues develop here.


You might ask, what is Castor and why do I care?

The dictionary definition of castor is "a small wheel usually free to swivel used to support and move furniture, trucks, and machines." An example of castor is the front wheel on a shopping cart. When you push a shopping cart, the wheel is forced to steer in the direction you push the cart.
Castor is measured in degrees, the amount the steering pivot (king pin) is angled back from vertical. Because the tire patch is located behind the steering pivot (king pin) the cornering side forces will try to unturn the steering. This is why race cars have power steering.
Castor causes the tires to steer in real cars, also. There is a little difference, however, in cars castor causes camber when the steering forces it off its normal position. These camber changes cause slight changes in tire loads. Many times these small changes are enough to influence the car's handling characteristics. The amount of castor is very often used to adjust the car's handling characteristics coming into a corner.

Any lift kit will have an impact on Castor. Castor problems become drivibility issues and driveibility issues turn into Saftey and Relibility problems.

From the Slee Off Road Web Site:
By lifting the truck, the front axle moves away from the frame. Due to the design of the front control arms, the axle will tilt forward and reduce the caster angle. Stock caster for a 80 Series Land Cruiser is 2-4 degrees positive.
sleeoffroad said:
caster_with_lift.jpg

Here is a drawing on how caster changes with lift. The drawings shows the locations of the frame mounted bushing and the two front bushings. The axle center line is shown, as well as the caster angle. The axle was set at 3 degrees positive caster at stock height. The axle was then dropped 2" and the new caster measurements are shown.
We initially estimated about 1 degree of caster loss per 1" of lift. This was from installing different lifts on vehicles and then having the caster measured. Due to a lot of variables involved, this was not 100% correct. From the above you can see that 1.7 degrees of change per inch is more accurate.
Also, when you measure the traditional "2 Degree" bushings from Old Man Emu, you will also see that they actually correct closer to 3.3 degrees. So they are still the correct adjustment for a 2"-2.5" lift.
Our caster plates yield 8 degrees of correction and the current control arms we sell are 11 degrees.
We are aware that a lot of people do not install Castor correction. Mostly this is due to not having the right tools to do the job. They are then convinced that their trucks handle ok, but they are not aware of how good it can handle. We have installed the caster bushings for a lot of customers, that ran the truck without it for a while, and I have yet to meet one that did not comment on how well the truck drives. now.
There are also some that do not install the bushings due to reports of cracked front housings or arm mounts. Indeed this has happened in the past, but we believe that it mostly happened in Australia where the driving conditions are a lot different from here. Also, this might have been from earlier OME bushings where the center metal sleeve was a lot larger and the polyurethane a lot smaller. We have not seen a single case of this in any of the trucks that we have serviced or installed the bushings on. We have seen cases where the center metal sleeve has separated from the urethane.
Caster can also be corrected by some DIY ways of slotting the mounting holes and welding washers on the outside. This accomplishes the same as the caster bushings, in that it rotated the axle back to stock location. The problem with this is that you are limited in the adjustment you can make, and if done to severely, the tie-rod that runs behind the axle, will hit the front control arms when the suspension articulates. This can result in a bent tie-rod or your steering binding up.

peepers said:
On the highway the truck does not wander per say. If I can keep the wheel straight it will track straight. But, if I move the wheel slightly the truck seems to "dart" in that location. Is this what out of spec caster angles could feel like?
Jason Andrews said:
Yup! Thats what it is. It is especially important for emergency maneuvers. Also when you brake in town your tires and steering will follow the road more....it will veer in a direction if road is slanted etc.
 
Last edited:
What do the Control Arms do and when Should I consider swapping them out?

When the castor is off to the point that Castor plates and the OME bushings won't correct it back to stock, new control arms can correct this. For eaxmple, above Christo states that his Control Arms can correct castor 11 deg, which with a 6 inch lift would put it back to stock at +3 deg as shown in the graphic above.
 
Last edited:
The charecteristics between the regular shocks and L shocks are shown in Beowulfs rule of Thumb up front and are repeated here:
===============================================
OME shocks (in mm's)
............. Open ......... Closed
............ length ........ length
N70 ......... 614 .......... 354
N71E ........ 620 .......... 370
N74E ........ 620 .......... 370
N73 ......... 614 .......... 354
N73L ........ 667 .......... 387
N74L ........ 667 .......... 387
================================================
When do I need to change to the L Shocks? and when do I need to change to extended brake lines
Tools R Us said:
The L shocks will allow more suspension droop, recommended with 3.5"+ lift. I ran Ls in the rear with 863s, liked the extra flex with that setup. On my unloaded truck Js netted almost 5" over stock in the rear and 3.5" in the front.
A great discussion going back and forth on L vs Reg OME shocks, bump stops and other factors can be found here
 
Last edited:
What are bump stops and what do they do? When do you need to move the bump stops and how do you do it?
Bump Stops prevent the suspension from "bottoming" as the vehicle hits large road irregularities.

Walking Eagle said:
from another thread:

I can think of 3 reasons for lowering bump stops.

1. Longer springs that would over compress.

2. Longer shocks that would bottom out.

3. Larger tires that you want to keep from rubbing.


Why do I need to be concerned about extending my diff breathers and what is that? Extended diff breathers are for when you want to wheel you new lift through water. Without the extended diff breathers, water will get into your axle and a proper axle rebuild should be done to prevent damage.
 
What about running bigger tires. How do the bigger tires add to the equation?
Slee Off Roads Article "Lift Size vs. Tire Size"

Essentially, with the standard 2.5" lift kit, 33" tires are the largest that can be run without rubbing or "stuffing" issues.
Larger tires can be run when spcaers are added to the springs to bring the lift above 3-4"
 
Of Course there are other lifts and Lift kits. These can be bought in kit form or piecemeal to build your own. As always, it is recommened that you contact the dealer for advice on your specific application. This FAQ does not cover any of these other kits.
Slee Off Road:
sleeoffroad.jpg


Slee 4" Lift Kit
Slee 6 " Lift Kit


Man-a-Fre:
maflogo2.gif


Man-a-Fre sells a 4" lift kit which is made up of OME J springs, L shocks and Man-a-fre components.


cruiseroutfitters.jpg


Also Cruiser Outfitters sells Lift kit components and is another source. All 3 are supporters of ths site and we appreciate their support.

These may be better suited for your application. If you utilize one of these lifts and want to do a write-up on it, we will link it here for reference.
 
I recived an e-mail asking to add the following to the FAQ, this seemed the best place to do it. I have always just used the rule that the longer spring goes to the side of the axle with the longest difference between the diff and the hub

I have been researching lean on my 80 series and have discovered that my springs on the front end were not correctly installed. After speaking with ARB Usa I received an explanation that I think would be worthy to include in the FAQ about suspension. Most of the thread searching I found and instructions on Slee's site refer to PS and DS springs. Mine were marked A and B. Basically this rule of thumb should be followed for spring placement and I think it could help others down the road.

Email text from the ARB Technician I spoke with....

"The way we recommend to install the coils on the 80 is with the B spring (B is taller than A for this truck) front driver and rear passenger. We recommend it this way due to the additional weight on the front driver corner. However, as long as you stagger the A and B coils the vehicle should sit level unless you have added more weight to one side than the other in aftermarket accessories"
 
Hi, needed some advice on recently installed ARB stock height suspension on my 1995 80 series . As expected the ride is firmer but i think there seems to be an issue with the front springs. The front springs seems to have not much of a gap within the coils and they seem compressed without much room to "spring". When i brake the vehicle doesn't lean forward ( You know when you suddenly brake ). The engine is a 1HDT and there's also a light bullbar that came with the vehicle originally.
Not sure if im correct or not but it seems i might need to replace the front springs with heaver ones?....or its just me and this is how things are supposed to be. The vehicle also seems to be sagging more on the front end vs the rear after i replaced the suspension.

This is what i installed:
1991-97 Toyota Land Cruiser /
LX450 - Old Man Emu Stock Height Replacement Kit

2 x OME 2861 Front Coil Springs
2 x OME 2862 Rear Coil Springs
2 x 60018 Nitrocharger Sport Shocks
2 x 60020 Nitrocharger Sport Shocks
1 x SD24 Steering Damper
 
Hi,

Need some inputs on my new OME suspension set up.
I have installed:

2 x OME 851 Front Coil Springs
2 x OME 860 Rear Coil Springs
2 x N73 Nitrocharger Shocks
2 x N74E Nitrocharger Shocks
1 x SD24 Steering Damper
1 x CA77B Caster Kit

When i measure the gap between the tyres and the fender flare I see that the rear seems to be sitting higher than the front by about an inch, wanted to check if this is normal or something wrong with the installation? As far as I understand performance suspension systems should correct such evenness, if there is something wrong, how I correct it now?
 
This is how OME designed it.
To fix the stink bug look you can add a 30mm front spring spacer on top of the front coil or ask who you purchased it from to return it for a 850 (2850). The 850 will have the same 220lbs spring rate, but 1" taller.
 

Users who are viewing this thread

Back
Top Bottom