Navigation
Install the app
How to install the app on iOS
Follow along with the video below to see how to install our site as a web app on your home screen.
Note: This feature may not be available in some browsers.
More options
Style variation
You are using an out of date browser. It may not display this or other websites correctly.
You should upgrade or use an alternative browser.
You should upgrade or use an alternative browser.
This site may earn a commission from merchant affiliate
links, including eBay, Amazon, Skimlinks, and others.
More options
Who Replied?

TLC Norway
woodwelder
A joy to come back here to admire your work and read on.
What products do you use on the rubber boots like the shifter boots?
Only thing I've had good luck with is called Polytrol, but it's a bit sticky for a year before it dries up completely.
Cool that you could use the 70 series rear washer lid. I dig that the inside shape also doubles as a funnel to get the fluid at the right place!
Another question, I see you have the same grommet as me for the PTO shifter. My carpet only has a cut, do you have a boot for the carpet as well, or is there another solution? Never seen the original setup complete.
- Thread starter
- #243
For rubbers I wash them with a alkaline solvent diluted with water or for more stubborn dirt as raw. Megaclean -puhdistusaine | Tampereen Pesuainepalvelu - https://www.tampereenpesuainepalvelu.fi/tuote/megaclean/ It also loosens paint from plastic and rubber surfaces. I use this for cleaning everything except fabrics. For fabrics I use Chemical Guys Lightning Fast Stain Extractor for Fabric | Chemical Guys - https://www.chemicalguys.com/lightning-fast-stain-extractor/lightning-fast-stain-extractor.htmlA joy to come back here to admire your work and read on.
What products do you use on the rubber boots like the shifter boots?
Only thing I've had good luck with is called Polytrol, but it's a bit sticky for a year before it dries up completely.
Cool that you could use the 70 series rear washer lid. I dig that the inside shape also doubles as a funnel to get the fluid at the right place!
Another question, I see you have the same grommet as me for the PTO shifter. My carpet only has a cut, do you have a boot for the carpet as well, or is there another solution? Never seen the original setup complete.
After that I spray rubbers with this. https://eshop.wurth.fi/Rubber-care-...e&CampaignName=SR001&VisibleSearchTerm=rubber
I leave it soaking over night and then wipe off the excess. It does not stay sticky and brings back the original shine on rubber. This I use for indoor rubbers. For exterior rubbers I use https://www.cleanyourcar.co.uk/ultima-ultima-tire-and-trim-guard-plus-340ml
For plastics I use this. Amazon product ASIN B00KN0UOEE
The funnel is a nice feature. All the 60 lids I have had some scratches on them so this was a good solution to get a clean lid.
Cut in the carpet is the original solution. No rubber boot on PTO stick. You can see the original setup before disassembly in the first post of this thread.
- Thread starter
- #244
Now when sticks are in place I tried reverse lights. This time they came on from gear stick not fog light switch.

Dome light switches in. New rubbers for rear doors.

Lights work.

New foam to the pouch.

Newly zinced bracket and cleaned cover for the relay.

On their place.

Next the holder for the jack. Looks delicious and lower pin broke off when remowing.


Sanded the stud flat and drilled a hole for M6 thread. Then thinned out a M8 bolt for M6 thread. The thread became more like just cosmethic but it works.

Screwed it on to a cleaned mount with thread locker.


And in the car.


Edge strips on.

Firewall and hood seals cleaned and with new clips.


Dome light switches in. New rubbers for rear doors.
Lights work.
New foam to the pouch.
Newly zinced bracket and cleaned cover for the relay.
On their place.
Next the holder for the jack. Looks delicious and lower pin broke off when remowing.
Sanded the stud flat and drilled a hole for M6 thread. Then thinned out a M8 bolt for M6 thread. The thread became more like just cosmethic but it works.
Screwed it on to a cleaned mount with thread locker.
And in the car.
Edge strips on.
Firewall and hood seals cleaned and with new clips.
Last edited:
- Thread starter
- #245
I went to get this from the warehouse. I have lost the knob from one in the car. On the way back I slipped and fell. After that I had to go to the emergency and now my right hand does not work like it should. I can not lift it or reach something with it.

Despite that I refurbished the knob the next day.

About three months ago I found this on ebay.

I had to have those rubbers. After some time I had to make a low ball offer to the seller. And now they are on my refurbished jack.

More therapy work. Gathered together bags from my stash.

Wrenches got a new zinc. Pry bar is new. Rest are from wrong Toyota bag.

HJ should not have three of these. But when the original plastic clip is there I just have to forgive myself.

Screwdriver got just a clean an treatment on the handle.

Another thing I have to forgive myself is this stopper. Does not belong to HJ but it is just too fancy for leaving out.


All the things.

And there it is with the jack. Rubber band got a clean and treatment.

New lock, sticker and spring for the latch. Clip is refurbished.

I found a nos lock. The clip thing is cleaned.


New rubbers. Washer and nut are black. Didn't want to zinc just the two parts.

Latch mounted. I noticed that the cap does not say "Diesel" so have to order a new one.


Now I have to wait for my arm to heal so I can continue with the interior.
Despite that I refurbished the knob the next day.
About three months ago I found this on ebay.
I had to have those rubbers. After some time I had to make a low ball offer to the seller. And now they are on my refurbished jack.
More therapy work. Gathered together bags from my stash.
Wrenches got a new zinc. Pry bar is new. Rest are from wrong Toyota bag.
HJ should not have three of these. But when the original plastic clip is there I just have to forgive myself.
Screwdriver got just a clean an treatment on the handle.
Another thing I have to forgive myself is this stopper. Does not belong to HJ but it is just too fancy for leaving out.
All the things.
And there it is with the jack. Rubber band got a clean and treatment.
New lock, sticker and spring for the latch. Clip is refurbished.
I found a nos lock. The clip thing is cleaned.
New rubbers. Washer and nut are black. Didn't want to zinc just the two parts.
Latch mounted. I noticed that the cap does not say "Diesel" so have to order a new one.
Now I have to wait for my arm to heal so I can continue with the interior.
- Thread starter
- #246
Small update on the interior. A bit nicer environment this time. This is the future winter storage for Snow White.
Extra carpets for taking measures. Front one was not very helpful.


Ten cutting some new paddings. I had to glue two together to get the right thickness.

Pieces glued on to refurbished carpets.


Then back to the dirty garage. Emptying the interior, vacuuming and wiping.

Then with help from my wife we got the carpets in.


70 series hand brake has the switch a bit in front of the carpet. Maybe need to do some mod to it.
Then some details. Knobs for the sticks. I had to paint white markings on shifter knob. Right one is nla and the closest replacement had no white markings.

Diff lock levers and hand brake pouch.

More knobs. Hood knob needs some detailing.

Accelerator pedal stopper with the rubber. I was quite sleepless for couple months because of that rubber. I saw it in parts diagram pictures. Tried to ask around for it with no luck. Then when I was searching something else in one of my spare bodys I noticed it had the rubber. I was afraid of touching it for for years so I would not loose it. Now it is on it's place.

Extra carpets for taking measures. Front one was not very helpful.
Ten cutting some new paddings. I had to glue two together to get the right thickness.
Pieces glued on to refurbished carpets.
Then back to the dirty garage. Emptying the interior, vacuuming and wiping.
Then with help from my wife we got the carpets in.
70 series hand brake has the switch a bit in front of the carpet. Maybe need to do some mod to it.
Then some details. Knobs for the sticks. I had to paint white markings on shifter knob. Right one is nla and the closest replacement had no white markings.
Diff lock levers and hand brake pouch.
More knobs. Hood knob needs some detailing.
Accelerator pedal stopper with the rubber. I was quite sleepless for couple months because of that rubber. I saw it in parts diagram pictures. Tried to ask around for it with no luck. Then when I was searching something else in one of my spare bodys I noticed it had the rubber. I was afraid of touching it for for years so I would not loose it. Now it is on it's place.
- Thread starter
- #247
Now when carpets are on place and and I need space in my storage room for other hobbies it was time to put things in the car.
in the future I need to get 12V from the cigarette lighter so I decided to hide a little converter for it. The light stays as 24V but the lighter itself became 12V. I think it is nicer this way than with a separate 12V lighter that the car previously had or some plug in version hanging from the socket. I did not use the best part to drill holes on so the ash tray part got a new zing plating after rust removal.


With the panel on I got to test the last electric features. All works. Rear glass heater is still a mystery if it works, but I will never use it anyway. After mounting the panel I noticed that the light for switches should be green.

Green cover for bulb and and back in. Added also the knobs and cover plate for ac-button hole.

Voltage converter for the radio was also dead. I have connected it to the original radio plug and it seems not to be working. So I had to make a new power supply for it. I was going to do it like a mechanic shop would have but then I came up with an idea to make it nicer. I have many kinds of scrap wires laying around so I built a oem-look power supply. I used connector housing and red cover tube from side indicator. Other connector is from rear washer pump. Wires are from tail lights and back wire harness. I connected it to the Power Outlet box continous and ACC output. Then some electrical tape around the wires and a original type radio connector from a Toyota to DIN connector adapter.


Then to the seats. Washed the rails in dishwasher to get all the grease and filth washed away.

I would have wanted to dismantle them totally but it was not possible. So masked all the good sections and mediablasted the rust spots. And then some spray paint.


Then back seats. Washing the small things.

Powder coating.


Flex seal.

Back rest handles had to be dismantled. One lever was broke off and one pin was bent. Some treatment for plastics and back together.


Metal strips was a pain. Not any of my three rear seats had the long ones in good shape. Best one had only one dent that I tried to straighten out. Needed a bit bondo before paint.


in the future I need to get 12V from the cigarette lighter so I decided to hide a little converter for it. The light stays as 24V but the lighter itself became 12V. I think it is nicer this way than with a separate 12V lighter that the car previously had or some plug in version hanging from the socket. I did not use the best part to drill holes on so the ash tray part got a new zing plating after rust removal.
With the panel on I got to test the last electric features. All works. Rear glass heater is still a mystery if it works, but I will never use it anyway. After mounting the panel I noticed that the light for switches should be green.
Green cover for bulb and and back in. Added also the knobs and cover plate for ac-button hole.
Voltage converter for the radio was also dead. I have connected it to the original radio plug and it seems not to be working. So I had to make a new power supply for it. I was going to do it like a mechanic shop would have but then I came up with an idea to make it nicer. I have many kinds of scrap wires laying around so I built a oem-look power supply. I used connector housing and red cover tube from side indicator. Other connector is from rear washer pump. Wires are from tail lights and back wire harness. I connected it to the Power Outlet box continous and ACC output. Then some electrical tape around the wires and a original type radio connector from a Toyota to DIN connector adapter.
Then to the seats. Washed the rails in dishwasher to get all the grease and filth washed away.
I would have wanted to dismantle them totally but it was not possible. So masked all the good sections and mediablasted the rust spots. And then some spray paint.
Then back seats. Washing the small things.
Powder coating.
Flex seal.
Back rest handles had to be dismantled. One lever was broke off and one pin was bent. Some treatment for plastics and back together.
Metal strips was a pain. Not any of my three rear seats had the long ones in good shape. Best one had only one dent that I tried to straighten out. Needed a bit bondo before paint.
Last edited:
- Thread starter
- #248
Then rust remowal and paint.

Assembly time. First the bottom. This is where I started. Previous owner had removed the plastic carpet with a knife to get seat cover hooks fastened. Luckily the original from the car was in good shape.


And this is the result.


Then the back rest. Before.


And after.


Rear seat belts.

Assembly time. First the bottom. This is where I started. Previous owner had removed the plastic carpet with a knife to get seat cover hooks fastened. Luckily the original from the car was in good shape.
And this is the result.
Then the back rest. Before.
And after.
Rear seat belts.
Last edited:
- Thread starter
- #249
And again with help from my wife we got the seats mounted.


Steering wheel and column plastics are on just for show. Lower column plastic is broken and needs to be replaced. Just wanted to sit on the drivers seat and enjoy a bit. Last time I sat here was in january 2016.

Steering wheel and column plastics are on just for show. Lower column plastic is broken and needs to be replaced. Just wanted to sit on the drivers seat and enjoy a bit. Last time I sat here was in january 2016.
Last edited:
- Thread starter
- #250
COntinue with interior.
Empty holes filled. Steering column plastics also permanently fastened as I found the right screws.

Newly painted "cruise controll",

Then some decals. I dug out the decals bought from Cruiserworld. Tire pressure decal looked wrong right away. I did not even remember how the original looked like but I was sure it looked different. So I made a new one from picture.

And it sure looked wrong. Cruiserworld on the right.

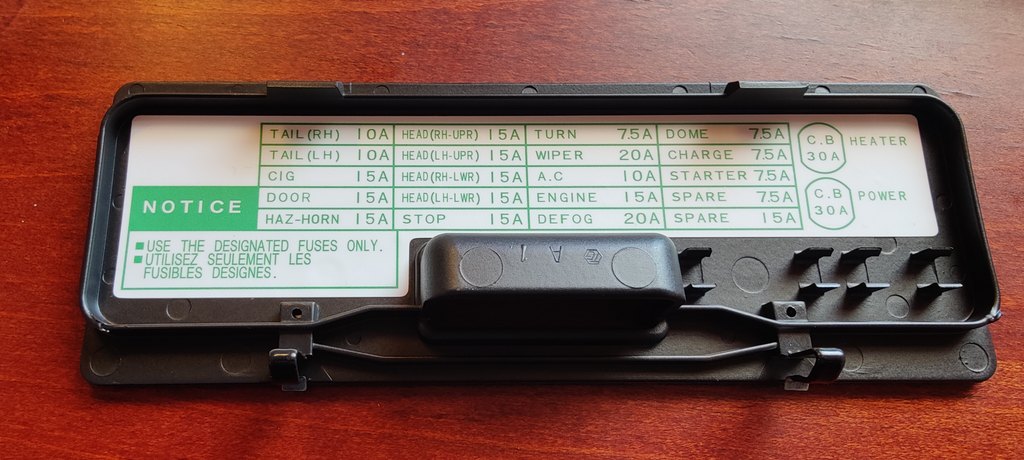
Then I decided to buy a new fuse box lid. As the original sticker is nla I had to make one. At the same time I made a new door sticker also.

Print quality on the one bought from Cruiserworld is really bad (bottom one in the picture). Don't know if the text is right on my decal as it is made with couple different online translators. But it looks better.

Fuse decal missed one letter so I had to order a couple more. I also changed the decal from gloss to matt. Gloss did not feel right. Then stuck them on the car. Door seal needs to be cleaned. Noticed from picture it has some overspray.


Also found a place for the rust treatment decal.


These rubbers has been laying around for so long so decided to put them on their places.

Back to the interior.
Some plastics to the trunk.

Glued the last piece of headliner.

More plastics.

And edge strip to the upper part.

Then the sides. First the speaker mounts.

It was a bit scary to make holes for the speakers. Decent cards are so hard to find. I drew a template from backside of panems on some scrap panels. Then transfered the markings to the ones to be used. I used a sharp knife my grandfather made for me to make the holes. It was quite easy but i was afraid for the knife to slip. Last I used the template that came with the speakers to trim the holes.

Empty holes filled. Steering column plastics also permanently fastened as I found the right screws.
Newly painted "cruise controll",
Then some decals. I dug out the decals bought from Cruiserworld. Tire pressure decal looked wrong right away. I did not even remember how the original looked like but I was sure it looked different. So I made a new one from picture.
And it sure looked wrong. Cruiserworld on the right.
Then I decided to buy a new fuse box lid. As the original sticker is nla I had to make one. At the same time I made a new door sticker also.
Print quality on the one bought from Cruiserworld is really bad (bottom one in the picture). Don't know if the text is right on my decal as it is made with couple different online translators. But it looks better.
Fuse decal missed one letter so I had to order a couple more. I also changed the decal from gloss to matt. Gloss did not feel right. Then stuck them on the car. Door seal needs to be cleaned. Noticed from picture it has some overspray.
Also found a place for the rust treatment decal.
These rubbers has been laying around for so long so decided to put them on their places.
Back to the interior.
Some plastics to the trunk.
Glued the last piece of headliner.
More plastics.
And edge strip to the upper part.
Then the sides. First the speaker mounts.
It was a bit scary to make holes for the speakers. Decent cards are so hard to find. I drew a template from backside of panems on some scrap panels. Then transfered the markings to the ones to be used. I used a sharp knife my grandfather made for me to make the holes. It was quite easy but i was afraid for the knife to slip. Last I used the template that came with the speakers to trim the holes.
- Thread starter
- #251
But in the end they fit nice. Led light+camera picks up different shades on drivers side. It does not look that bad in real life.


No need to crawl around in the trunk anymore so decorated the lower lid also.

Swapped the fuses to genuine ones. Also bought the missing fuse puller. Noticed also that the puller did not work with aftermarket ones. I wanted fuses with numbers so decided to buy original ones and as a bonus they work with puller also.

And the new lid.

Then tested the speakers with radio. Something strange is with the radio. Needs more testing along with front speakers.

No need to crawl around in the trunk anymore so decorated the lower lid also.
Swapped the fuses to genuine ones. Also bought the missing fuse puller. Noticed also that the puller did not work with aftermarket ones. I wanted fuses with numbers so decided to buy original ones and as a bonus they work with puller also.
And the new lid.
Then tested the speakers with radio. Something strange is with the radio. Needs more testing along with front speakers.
red66toy
Supporting Vendor
Outstanding work as always! Those decals are awesome.
Interesting rear speakers! I hadn't seen that mounting variant before.
Love your attention to detail!
Interesting rear speakers! I hadn't seen that mounting variant before.
Love your attention to detail!
DirtDauberGarage
SILVER Star
THIS IS BEAUTIFUL!! Great job!!
- Thread starter
- #255
Speakers are nos from late 80's to early 90's. They can be found on 1990 Fujitsu Ten catalogue.Outstanding work as always! Those decals are awesome.
Interesting rear speakers! I hadn't seen that mounting variant before.
Love your attention to detail!
Autoradio vintage Fujitsu Ten Folder 1990-4 - https://antique-autoradio-madness.org/TenRadio/FujitsuTen-cata1990-folder_4.htm
I have seen these same on maybe three 60 series here in Finland. One had them on front doors. Placement is close to original rear speaker positions. Brackets are my own design to get them positioned where I wanted.
@Samppahj
Wow! Your attention to detail on this build is superb.
THIS IS BEAUTIFUL!! Great job!!
Thank you all for support!

yes, yes n thanks. but, you know planes fly in this direction also n my door is openYou must take another visit to Finland. You know where I live and you are welcome anytime


Similar threads
Users who are viewing this thread
Total: 1 (members: 0, guests: 1)