Builds HJ60 Snow white

This site may earn a commission from merchant affiliate
links, including eBay, Amazon, Skimlinks, and others.

For rubber I use solvent and ultrasonic cleaner or toothbrush or steel wool or all those combined. When you wash or scrub off all the dirt and the top layer of rubber it looks like new. After cleaning I use silicone free rubber treatment. Würth rubber treatment is available here in Finland but not necessary in US. But you could use something that is meant to be used on tires with a semigloss finish. For plastic I use only solvent and ultra sonic and toothbrush or some other quite stiff brush. After cleaning I use 303 Aerospace Protectant. That is a US brand so you can get it somewhere. That 303 is really great stuff and if I remember correct it can be used on rubber also. Or they have a different product for rubbers.

Curious what solvent you are using for the rubber and plastic? Just something like mineral spirits?
 
Curious what solvent you are using for the rubber and plastic? Just something like mineral spirits?
Alkaline solvent diluted with water about 1:5. Called Megaclean, manufactured here in Finland. Bunch of fine sounding ingredients can't translate them, don't even know what they are. It is made for washing trucks and other heavy equipment. Dissolves oil, tar and road salt. That is what it says on the label.
 
Air cleaner came from powder coating. New sticker on and to the engine bay.
IMG_20210601_183253.jpg

IMG_20210601_183343.jpg

IMG_20210601_183447.jpg


Refurbished front markers. New paint and made new seals from 3mm epdm strip. The "glass" is also new.
IMG_20210530_153636.jpg

IMG_20210615_170642.jpg

IMG_20210601_091136.jpg


Problem with expansion tanks cap got sorted. HJ49 or something similar cap was right. The pipe had to be shortened but otherwise bolt on.
IMG_20210608_132904.jpg

IMG_20210609_094110.jpg


"Self made" dim light bezels got some color on them. First SEM Bumper coater, then SEM Structure paint, light sanding and top coat with SEM Bumper coater.
IMG_20210611_104436.jpg


Seats were at upholstery shop in the spring. They got new vinyl and fabric to the sides. I did the seats last autumn for the first time but the vinyl was a bit off with color and grain. I could not live with that so I butchered a passenger seat to get the vinyl from it. They said that they don´t have exactly same fabric as oem but close. Yeah right.
IMG_20210212_150333.jpg

That fabric was totally crap so I sourced a fabric more like oem and one more trip to the upholstery shop. Now it looks right.
IMG_20210614_143150.jpg

IMG_20210615_163102.jpg


At the same time vinyl surrounding for the trunk panel was changed.
IMG_20210614_143221.jpg


Fire wall covers got some paint. Only ones that I got off without damage had some paint spray on them. Remowing the paint made scrathes so they had to be painted.
IMG_20210607_181438__01.jpg
 
Did some refurbishing for the winch also. The one that came with the car was quite good but the lever and the knob was rusted and did not move.
Screenshot_20210701-105857.jpg

Screenshot_20210701-105851.jpg

Some paint after dismantling and cleaning.
IMG_20210603_172653.jpg

That spring was the main reason for disassembling the whole thing. I wanted to get it yellow again. It does not show much when everything on place so well used time again. But now the lever and knob moves freely and nice. Had some new brake pads so changed that also.
IMG_20210615_205029.jpg

And finished product. Everything for the winch is discontinued. So had to make a new seal for the end cover. Found some oem look aftermarket oil seals so happy with that.
IMG_20210617_162611.jpg

IMG_20210617_162631.jpg

IMG_20210617_162644.jpg

IMG_20210617_163035.jpg


I have looked about 5 years for a decent trunk floor mat. Now I found it and had to take it home.
IMG_20210619_192915.jpg

Wash.
IMG_20210619_193436.jpg

And the result.
IMG_20210620_115514.jpg

It became very clean compared to the starting point. Only flaws are very bad fading and a small bald spot. Also the edge lining has disappeared on the left side. But we will see if I can do something about it.
IMG_20210620_115537.jpg


Along with the carpet I got rear seats. A nice surprise was that the corners did not have holes. I had the corner vinyls replaced earlier for my previous seat but it had same color and grain mismatch as the drivers seat. But now I have a good one instead.
IMG_20210619_192033.jpg


As last pedals with new rubbers and brake fluid in.
IMG_20210621_144847.jpg

IMG_20210621_181612.jpg
 
On spring I ordered Depo turn signals from ebay. Quality was quite poor but I thought if they fit then they are ok.
IMG_20210610_135541.jpg

IMG_20210610_135547.jpg

Couple months later I could not deal with the quality. I tried to dismantle original lamps with some heat and I got the lenses separated. Originals got a good clean and new paint and assembled with Depo lenses. I became more happy with them.
IMG_20210715_121229.jpg

IMG_20210715_152328.jpg

I also found two wires without rust so I got more happy.
IMG_20210715_121639.jpg


Another PITA was filling plug threads on transfer case. Threads went bad when I was filling the oil. I looked in the hole and thought there was a piece missing. When I started to disassemble the case I could investigate it better via PTO opening and found out that there was no piece missing.
IMG_20210627_150159.jpg

I decided to use a Helicoil for a easy fix.
IMG_20210629_192442.jpg

When waiting for the Helicoil kit I started to worry about the whole process. How could I get the new thread straight? That lowered my motivation even more. After some internet surfing I found from Völkel a special thread tap.
IMG_20210712_170745.jpg

It has both M18and M20 threads. I got the new thread started with the remains of old thread and It went straight and easily in.
IMG_20210712_170106.jpg

IMG_20210712_170135.jpg

I also found a picture here on Mud and got the speedo cable bracket on its right place. New oils also in all boxes.
IMG_20210713_165357.jpg


Waiting for the thread kit, motivation, etc. Did some wiring for the radio and 24V->12V converter.
IMG_20210723_123317.jpg

IMG_20210723_142442.jpg


Found a tow hook on ebay. Bought it just because of that small plate. Mine was a bit rusty and the part is NLA so had no other choise to get it.
IMG_20210727_144031.jpg

IMG_20210727_144315.jpg


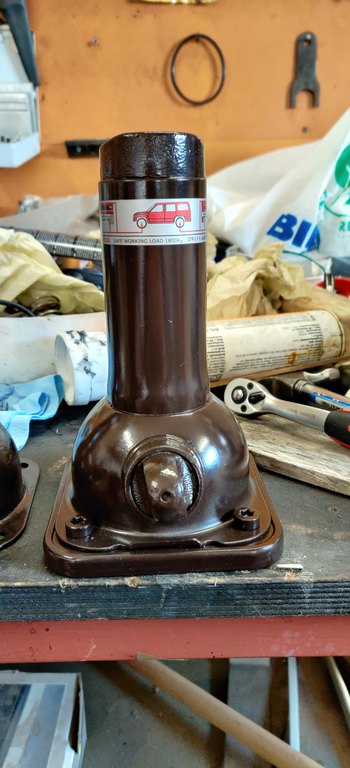
Was not happy with the jack I refurbished earlier. So I did a overhaul on another. Dismantled the whole thing so the blasting sand does not get to wrong places. Much better now.
IMG_20210805_172856.jpg

IMG_20210806_184803.jpg


At the same time I powdercoated various parts I coated also screws for the lights. Cleaned the wires and mounted new washer nozles.
IMG_20210807_111349.jpg

IMG_20210807_111358.jpg
 
I had 5 pcs. of these panels. Only one was totaly good and not broken or cracked anywhere. I went to a paint store twice to get the correct color and paint for it.
IMG_20210728_131712.jpg

Best parts from all 5 and some cleaning.
IMG_20210728_142618.jpg

IMG_20210728_141018.jpg

Then paint.
IMG_20210729_125155.jpg

IMG_20210729_125204.jpg

IMG_20210729_125214.jpg

Had to re-paint the instrument cluster also.
IMG_20210729_133242.jpg

IMG_20210729_133350.jpg


Went and put some acid in the batteries. While waiting in the store I found this vintage water bottle and had to buy it. Now it is easy to fill the water in batteries.
IMG_20210802_121804.jpg

After acid and charging did some hiding of Trane logos and now they look like period correct Finnish made batteries.
IMG_20210802_202238__01.jpg


Air filter in and new gasket for the lid.
IMG_20210807_130606.jpg

IMG_20210807_130611.jpg


A quick fix for the horns.
IMG_20210808_165533.jpg


Powder coated the vacuum canister and cleaned the hoses. Clamps are new. Same with the radiator jar. Radiator cap has to be replaced with a more correct one.
IMG_20210808_180144.jpg

IMG_20210808_180154.jpg

The batteries looks amazing with the vintage look.

I am happy I refurbished turn signals. No rust visible from behind.
IMG_20210808_174130.jpg


Now it has a face and starts to look like a car. I am happy with those Depo lenses. And the best thing is that every light will have at least new lenses.
IMG_20210808_171806.jpg

IMG_20210808_180232.jpg
Looks fantastic! What paint did you use for the dash plastic?
 
I had 5 pcs. of these panels. Only one was totaly good and not broken or cracked anywhere. I went to a paint store twice to get the correct color and paint for it.
IMG_20210728_131712.jpg

Best parts from all 5 and some cleaning.
IMG_20210728_142618.jpg

IMG_20210728_141018.jpg

Then paint.
IMG_20210729_125155.jpg

IMG_20210729_125204.jpg

IMG_20210729_125214.jpg

Had to re-paint the instrument cluster also.
IMG_20210729_133242.jpg

IMG_20210729_133350.jpg


Went and put some acid in the batteries. While waiting in the store I found this vintage water bottle and had to buy it. Now it is easy to fill the water in batteries.
IMG_20210802_121804.jpg

After acid and charging did some hiding of Trane logos and now they look like period correct Finnish made batteries.
IMG_20210802_202238__01.jpg


Air filter in and new gasket for the lid.
IMG_20210807_130606.jpg

IMG_20210807_130611.jpg


A quick fix for the horns.
IMG_20210808_165533.jpg


Powder coated the vacuum canister and cleaned the hoses. Clamps are new. Same with the radiator jar. Radiator cap has to be replaced with a more correct one.
IMG_20210808_180144.jpg

IMG_20210808_180154.jpg

The batteries looks amazing with the vintage look.

I am happy I refurbished turn signals. No rust visible from behind.
IMG_20210808_174130.jpg


Now it has a face and starts to look like a car. I am happy with those Depo lenses. And the best thing is that every light will have at least new lenses.
IMG_20210808_171806.jpg

IMG_20210808_180232.jpg
Incredible work!
 
Rattlecan paint. RAL790-M is the color. As it is metallic paint I used satin clear for topcoat. Also from rattlecan. Used SEM Bumper coater as primer.
Sweet! Thanks!
 
A staggering amount of thorough and detailed work - it's gonna look as though it just rolled out of the factory. Now I know what you fellas do during those dark months up there!

I can barely keep mine road legal let alone consider a fraction of this level of resto and it wasn't too flash to start with. Hats off to you mate!
 
How did you refurbish your turn signals, or any other part which has corrosion on the metal parts? I can't figure out how to properly refurbish some parts, including minor rust removal, without removing the existing zinc coating on the metal... For example, my tail light housings are in OK shape, but the bulb sockets have rust on them. I'd like to get them back to new but not sure how.
 
How did you refurbish your turn signals, or any other part which has corrosion on the metal parts? I can't figure out how to properly refurbish some parts, including minor rust removal, without removing the existing zinc coating on the metal... For example, my tail light housings are in OK shape, but the bulb sockets have rust on them. I'd like to get them back to new but not sure how.
I use Fluid Film to keep them going and coat the 'connected' connections with dielectric grease (the exposed outside parts). That has helped me so much.
 
How did you refurbish your turn signals, or any other part which has corrosion on the metal parts? I can't figure out how to properly refurbish some parts, including minor rust removal, without removing the existing zinc coating on the metal... For example, my tail light housings are in OK shape, but the bulb sockets have rust on them. I'd like to get them back to new but not sure how.
I have removed the rust with citric acid in ultrasonic cleaner and then had them re plated with new zinc coating and yellow passivating. Not so cost efficient with couple of small parts. But in youtube you can find videos how to do it yourself. You need some chemicals and a battery charger or some other power source. That is something that I have wanted to try but with this project all nuts and bolts etc have been zinced so the volume has been so big so I have not done it myself. I have also found out that even parts wich have plastic parts like tailgate locks are successfully zinced. The plastic parts looks like new also after zinc process. And all the small pipeclamps that have rubber coating are also been zinced with success. If the rubber has been bad on some used clamps I have removed the rubber and dipped them in flex seal after zinc.
 
Painted horns with semi gloss. Did not like the matt finish.
IMG_20210810_192303.jpg


More jars.
IMG_20210810_190256.jpg


Positive cable with new rubber cover.
IMG_20210817_200540.jpg


Speaker wires and voltage converter. Speaker cables are NOS Fujitsu Ten. I used oem rubbers and small tube for the cables to go in to doors.
IMG_20210810_181710.jpg

IMG_20210810_181825.jpg

IMG_20210810_181655.jpg


When putting the instrument panel in it rubbed on steering lock button.
IMG_20210817_190955.jpg


So had to disassemble the whole thing once again and fix the scratch with some new paint. While doing it I decided to spray some clear coat on warning lamps. They came out much better looking so it was worth it.
IMG_20210821_190618.jpg

IMG_20210821_190627.jpg


It was such a struggle with the speedo cable so I decided to replace it with a new new one. After waiting for it for three weeks Amayama informed that it is not available. So I had to order it to my local dealer and wait for one week again.

Waiting for the cable i gathered all the tail lights. I had a decent right one. Sourced a decent left one from a scrap yard.
IMG_20210810_141920.jpg


I had too much time to think about the corroded lamp housings so I decided to take the wires off and...
IMG_20210825_131549.jpg


Had to order new ring terminals from china for the lights. So I decided to fix the boot carpet. Glued some material on bold spots and sprayed the whole thing. It became a bit too dark but at least it has no sun fadings and has now a solid color.
IMG_20210831_110740.jpg

IMG_20210831_110753.jpg


Also assembled the winch a bit.
IMG_20210905_133022.jpg

IMG_20210905_133035.jpg


Cleaned tail light seals and cut new extra seals from 3mm epdm foam as originals are.
IMG_20210814_120926.jpg


When the terminals arrived it was time for assembling the lights. New paint etc. Screwed earth wires back with M2x2mm screws. Also made a new foam for the terminal.
IMG_20210826_113538.jpg

IMG_20210906_184806.jpg

IMG_20210906_184816.jpg

IMG_20210906_185430.jpg
 
@cruiserdan, this could be great to have at the Landcruiser Museum😉.
 
Amazing work. Thank you for sharing all of this.

I really want to see you drive this thing. Winter (and salt) is on the way - does that mean we all have to wait til next summer?
 

Users who are viewing this thread

Back
Top Bottom