Navigation
Install the app
How to install the app on iOS
Follow along with the video below to see how to install our site as a web app on your home screen.
Note: This feature may not be available in some browsers.
More options
Style variation
You are using an out of date browser. It may not display this or other websites correctly.
You should upgrade or use an alternative browser.
You should upgrade or use an alternative browser.
Builds Here we go (FJ-40 getting a 3B/Turbo/H55f)...
- Thread starter DanS HJ-45
- Start date
This site may earn a commission from merchant affiliate
links, including eBay, Amazon, Skimlinks, and others.
More options
Who Replied?DanS HJ-45
SILVER Star
- Thread starter
- #422
My goodness! A month without updates?!??!
That ends now.
Job number 1: remove engine/transmission from the chassis. Then mount the engine into the engine stand (BTW--the rotating Omega stand is AWESOME, how did we live without it?)).

The axles separated from the frame...
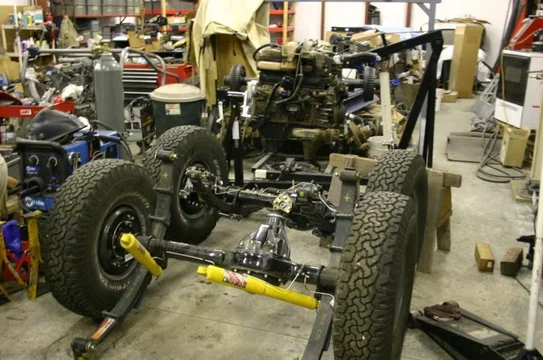
And the frame devoid of all hardware sitting on the floor.
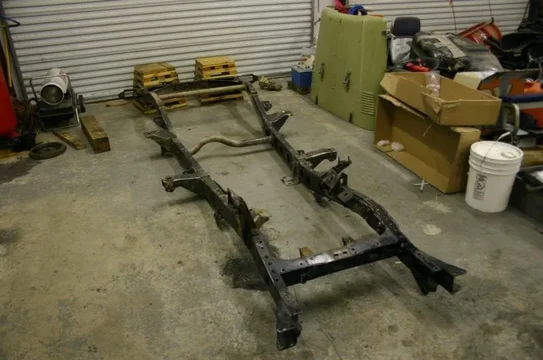


That ends now.
Job number 1: remove engine/transmission from the chassis. Then mount the engine into the engine stand (BTW--the rotating Omega stand is AWESOME, how did we live without it?)).

The axles separated from the frame...

And the frame devoid of all hardware sitting on the floor.

DanS HJ-45
SILVER Star
- Thread starter
- #423
I added some gussets to the frame tie ins for the roll cage. Sorry for the blurry picture.
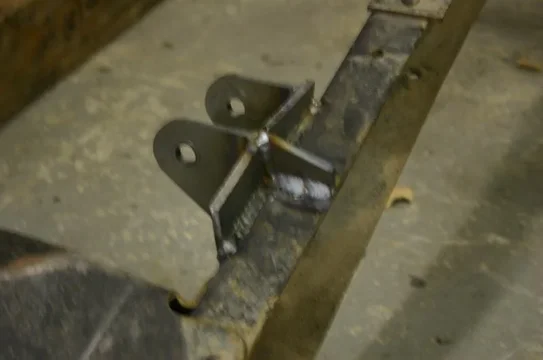
Then we turned the frame upside down, and I finished the welds for the 60 PS conversion, the cage tie ins, and the transmission crossmember. (why can't all my welds turn out this well?)

And then the frame got to take a ride...

It's off to blasting, and will hopefully be back early next week, and Dad will spend some quality time with the POR and the frame.


Then we turned the frame upside down, and I finished the welds for the 60 PS conversion, the cage tie ins, and the transmission crossmember. (why can't all my welds turn out this well?)

And then the frame got to take a ride...

It's off to blasting, and will hopefully be back early next week, and Dad will spend some quality time with the POR and the frame.
DanS HJ-45
SILVER Star
- Thread starter
- #424
Then I turned my attention to the engine. I basically took a bunch of pictures and stripped it down to the block for painting.
First off: a question. What is this? It looks like a 5th glow plug in the intake manifold to me. I wasn't aware they did that. It's hooked into the same glow plug bus bar as the 4 in the cylinders, so....


Second: there was another thread asking about flipping the oil filter on the 3B. Here's why you can't.


First off: a question. What is this? It looks like a 5th glow plug in the intake manifold to me. I wasn't aware they did that. It's hooked into the same glow plug bus bar as the 4 in the cylinders, so....


Second: there was another thread asking about flipping the oil filter on the 3B. Here's why you can't.

DanS HJ-45
SILVER Star
- Thread starter
- #425
The oil cooler has a crack in it. How big of a deal is this? It doesn't appear to leak, and it will be coated, so I'm not TOO worried about it, but it's still a crack that I don't like. I see it on the inside of the cooler housing too, so it's more than just a casting error.
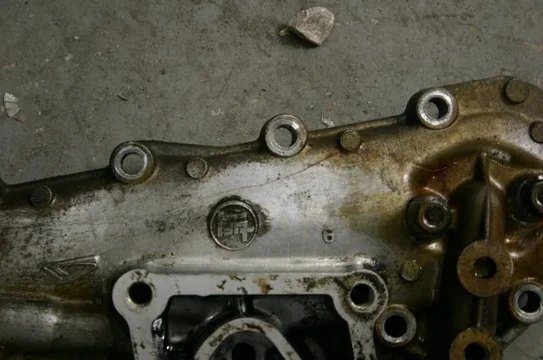
And just some generic pictures of it being disassembled... (including the match marks for the IP)

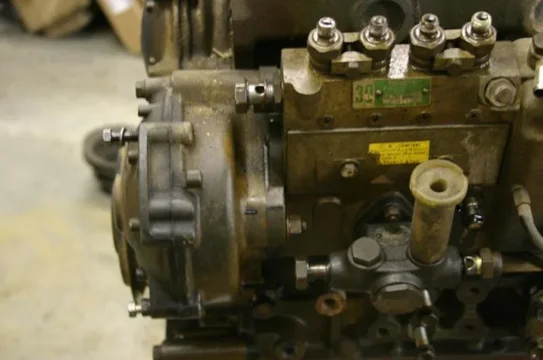


And just some generic pictures of it being disassembled... (including the match marks for the IP)


DanS HJ-45
SILVER Star
- Thread starter
- #426
I've heard that Australians consider changing the diff oil when the diff fails. Seeing inside this engine makes me think there's truth to that. Talk about sludge!
Here's the inside of the rocker cover.

And the valve train...


Luckily, it cleans up easily enough with some scrubbing and solvent, but still.... I did run seafoam in the oil while we had it running, so I'm not sure if that helped much or not. Either way, sludge begone!


Here's the inside of the rocker cover.

And the valve train...


Luckily, it cleans up easily enough with some scrubbing and solvent, but still.... I did run seafoam in the oil while we had it running, so I'm not sure if that helped much or not. Either way, sludge begone!
DanS HJ-45
SILVER Star
- Thread starter
- #427
But, with a little work with the wire wheel, some solvent and a little elbow grease...
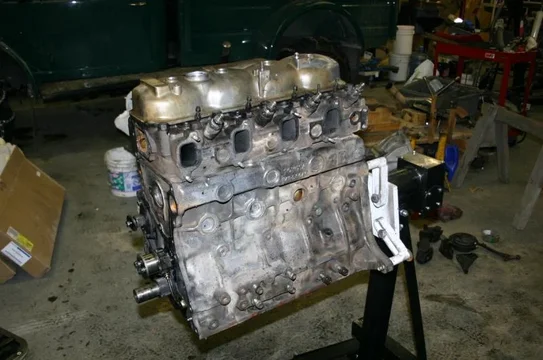
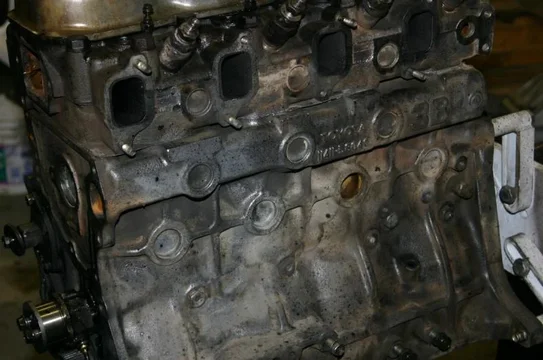
Yeah, a little paint and it'll look like new!
That's it for now. Next week I've got a few days to work on it, and I'm intending to get the engine painted, and most reassembled, and hopefully the axles back under the frame (and perhaps the engine and transmission back into the frame as well).
Before we know it, the tub will be back from paint, and it would be AWESOME to get the rolling chassis with an engine in it to be ready for the tub.
Dan
Are you gonna replace the rest of your freeze plugs with brass?
DanS HJ-45
SILVER Star
- Thread starter
- #429
Are you gonna replace the rest of your freeze plugs with brass?
Haven't decided. It'll probably depend on the freeze plugs being included in our rebuild kit or not. I don't see any leakage in any of them, or evidence of it in the past. The second to last one on the left side that you see was pulled to install a block heater. The block heater was removed for paint.
Dan
Although not an issue now, i highly recommend that you consider it. I had 2 rot out on me before. not with that particular engine though. Its not funnest thing to do while still in the rig. All depends on how long you are planning on keeping it too.
crushers
post ho
fifth glow plug? take a pic from above and show me the hole.
it would take a few applicaitons of seafoam and or auto tranny fluid to clean that engine up, pretty bad
flipping the oil filter works well but get the proper housing instead.
cracked oil cooler, if you are concerned then replace it. me, if it isn't flexing or leaking then leave it alone but i would want to see it in person before making a recommendation from 20,000 km away.
i want your dodge!!
Where that 5th glow plug goes looks like the same hole where the resistor mount for the superglow system is located. I have never seen a 5th glow plug in the 3B? If it is a glow plug it would not offer much benefit, may help #4 cylinder and that is about it.
Cheers,
Daryl
Cheers,
Daryl
- Joined
- Dec 8, 2006
- Threads
- 158
- Messages
- 2,974
- Location
- Greenfield, MA
- Website
- thecarpentryway.blogspot.com
That "other glow plug" is the current sensor, part of the Superglow set up
DanS HJ-45
SILVER Star
- Thread starter
- #435
Just to clarify...

This is a current sensor? We've got 10.5V glow plugs, so if this engine had superglow it'll be deleted anyhow, so would I be better to remove it from the intake manifold and simply power the glow plug bus bar (and the 4 glow plugs?)
Thanks guys. Questions, questions and more questions.
Dan


This is a current sensor? We've got 10.5V glow plugs, so if this engine had superglow it'll be deleted anyhow, so would I be better to remove it from the intake manifold and simply power the glow plug bus bar (and the 4 glow plugs?)
Thanks guys. Questions, questions and more questions.
Dan
I got a core 3B from a BJ42 that had its oil cooler housing split open while out on the road. Bled out the engine and before the guy realized it was a problem it started to knock. Probably uncommon but I'd inspect the housing really close in deciding to run it or not.
Your 5th glow plug is part of the glow controller system of the super glow setup.
It is used in series as soon as the the glow light go's out on My 1981-84 BJ 60s, (3 of them so far).
First stage is the both main solenoids relays close on key on engine cold (haven't done temp readings on the sensor to the FSM yet) to the 5th glow cable wire , and also the 2 separate wires feeding the buss bar. after a few seconds to (time // temperature) the first relay opens stopping power to the wires that feed the buss bar , and then the currant only flows through the 5th glow plug of the glow controller that is in series with the other 4 plugs that are in parallel.
This keeps the 4 glows plugs warm and the controller (5th) heating the intake manifold air as it controls amperage to the 4 glows .
Good system , just need the controller box to work the system .
I mentioned this before in another post , but was told there's no such thing.
so i guess it's just us two now.
As with frost plugs / freeze plugs , seeing it has a block heater , Im leaning towards someone use coolant / antifreeze that should have a clean internal cooling system, if you see lots of internal rust , and the rad came out with brown water, then I would have a real close look at the plugs. Problem the plugs are also in the Cyl head machining jackets , and there's the real crappy ones to replace. There also much thinner in material. They are a separate part #'s from any kit I've seen. I have replaced a few of mine only.
Your Oil cooler cover looks cracked from a freeze , and I would replace it. the gasket for it is available , but from that cover to the cooler member itself i used Teflon covered metal gaskets , turbo shops have them as large drain gaskets. Those were NLA.
The sludge should be cleaned out if your thinking of doing a re-bearing of the crank , and I would check the oil piston cooling valve , one of mine had a bum gummed up spring , that on hot idle let the oil pressure drop. The setting of the cooling valve is 2 bar. (so @ 2bar and less it closes ,oil squirters stop squirting).
VT
Good luck on your engine.
Last edited:
DanS HJ-45
SILVER Star
- Thread starter
- #438
Good, glad I'm not crazy with the "5th glow plug!"  I'm thinking that I'll just remove it (or disconnect it) since the truck is going with 10.5V GPs and a wilson switch. That's probably the simplest thing to do, and simple is great in my book--and being superglow I'm sure I can't just put full voltage to it.
Yeah, I'm going to dye penetrant test the oil cooler housing, but I suspect I'll need to find a new one. Somehow I suspect that'll be kind of hard to find just a oil cooler from someone parting one out (PM me if you have one--to anyone reading).
I'm not thinking of touching the crank or pistons (maybe I should?), but I definitely want to de-gunk everything. I pulled the freeze plug to put in the block heater, and the engine was shipped by itself, so I have no idea how the original radiator looked. That said, when I ran it (and had it up to temperature a few times--with a radiator flush in there to help clean it out) I got an awful lot of nasty rusty stuff out. Almost muddy in parts of it. So I think I'll get to work finding a freeze plug set (or rather, checking to see if we have them in the rebuild kit we bought from Radd), just to be safe. (well, also because new freeze plugs look AWESOME installed in a freshly painted engine--but that's just simple mechanical bling).
Dan
Your 5th glow plug is part of the glow controller system of the super glow setup.
It is used in series as soon as the the glow light go's out on My 1981-84 BJ 60s, (3 of them so far).
First stage is the both main solenoids relays close on key on engine cold (haven't done temp readings on the sensor to the FSM yet) to the 5th glow cable wire , and also the 2 separate wires feeding the buss bar. after a few seconds to (time // temperature) the first relay opens stopping power to the wires that feed the buss bar , and then the currant only flows through the 5th glow plug of the glow controller that is in series with the other 4 plus that are in parallel.
This keeps the 4 glows plus warm and the controller (5th) heating the intake manifold air as it controls amperage to the 4 glows .
Good system , just need the controller box to work the system .
I mentioned this before in another post , but was told there's no such thing.
so i guess it's just us two now.
As with frost plugs / freeze plugs , seeing it has a block heater , Im leaning towards someone use coolant / antifreeze that should have a clean internal cooling system, if you see lots of internal rust , and the rad came out with brown water, then I would have a real close look at the plugs. Problem the plugs are also in the Cyl head machining jackets , and there's the real crappy ones to replace. There also much thinner in material. They are a separate part #'s from any kit I've seen. I have replaced a few of mine only.
Your Oil cooler cover looks cracked from a freeze , and I would replace it. the gasket for it is available , but from that cover to the cooler member itself i used Teflon covered metal gaskets , turbo shops have them as large drain gaskets. Those were NLA.
The sludge should be cleaned out if your thinking of doing a re-bearing of the crank , and I would check the oil piston cooling valve , one of mine had a bum gummed up spring , that on hot idle let the oil pressure drop. The setting of the cooling valve is 2 bar. (so @ 2bar and less it closes ,oil squirters stop squirting).
VT
Good luck on your engine.
Hey Dan, if you are pulling the superglow stuff, can I have some of it as a backup for my system? Would make it worth your while! Shop time maybe!?!?!

DanS HJ-45
SILVER Star
- Thread starter
- #440
Hey Dan, if you are pulling the superglow stuff, can I have some of it as a backup for my system? Would make it worth your while! Shop time maybe!?!?!

Absolutely. I suspect that the only thing that will get reused will be the bus bar itself. As long as I can find a bolt to fill that hole, I'm pretty sure we can work something out...
Dan
Similar threads
Users who are viewing this thread
Total: 1 (members: 0, guests: 1)
