Builds Here we go (FJ-40 getting a 3B/Turbo/H55f)...

This site may earn a commission from merchant affiliate
links, including eBay, Amazon, Skimlinks, and others.

You are in the wrong line of work need to open your own custom fab shop.

Don't think the idea hasn't crossed my mind..... If things at my current employer get any worse, that's probably exactly what I would do...

waiting for time said:
Have you figured out the lid yet?

I think so. At least in my mind. I need to iron out the details with Kevin, to see if it's even possible, but in the meantime I'll just cut a bit of wood and fiberglass it, then add some simple latches that will grab the "lip" that I have around the opening. I don't want an actual opening lid, I want to take the whole lid off, so that actually makes it easier to fabricate.

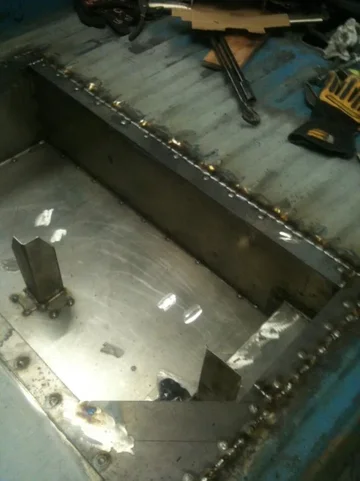
Today I finished cutting the lip I just talked about, which also will finish the floor of the bed. I just got it thoroughly tacked before I ran out of time today, but that's all right. It's almost all virgin 16GA metal, so welding and smoothing the seams should go pretty quickly next time I get to work on it.
bed 1.webp

I then bent up some 5/16" rod, took the M8x1.25 die to the ends of them, and fabricated some new radiator core support rods. The original one on the right was broken, and the one on the left hit the steering shaft, which is why I decided to make my own. It was much easier than I thought, actually. I don't know why I've been procrastinating this job for so long...

The left side...
rad support 1.webp

And the right... It's hard to see through all those wires, but it's there. It bends around the PS lines, and then bolts to the frame with a factory bolt hole that was going to be empty , so I like this solution...
rad support 2.webp

I'm not sure if I like how both sides end with a fairly vertical length of rod, as I'm worried that it might crack someday, but we'll see. The rod is just bent, not nicked, kinked or anything else that would seriously weaken it, and both brackets that bolt to the frame are somewhat gusseted for strength.

That's it for now. I'm back home in Colorado right now, and have to go back to work tomorrow, so hopefully next week I can get back down and get some more done...

Dan
bed 1.webp
rad support 1.webp
rad support 2.webp
 
Nice work Dan.

But a radiator full of coolant is quite a weighty beast!

And I think you've severely weakened your radiator braces by incorporating those bends in them.

(Your radiator will definitely move significantly forward IMO in any "frontal impact" situation.)

:beer:

(Just a friendly heads up.)
 
For the lid of the box could you make it a tray of some sort once you flip it over. (Could have more tools strapped in it or have foam cut outs to hold stuff. Also, if you lined the inside of it part of it with foam you could have a knee pad when you are changing a tire. Or lastly a piece of canvas that folds up and works like a knee pad, but you also have a tarp.

I am sure something cool will be fabbed up for a lid. As always looking good.
 
(Your radiator will definitely move significantly forward IMO in any "frontal impact" situation.)

That's something I hadn't thought of.... if the truck takes a bump (either from a collision, wheeling, or even from parking and hitting the curb) the radiator will definitely have some weight going forward....

I think I'll probably remake those rods when I get home, see if I can't find a way to make them extend further back, and without that elbow..... Easy enough, 5/16" rod is like $4, and the rest is just my time, and a little 1/8" scrap, oh and some cutting oil...

Dan

If that is a problem you can always make a third one on top to the firewall like in a willeys jeep, that is if you have the space above the engine.
 
I was thinking a gusset of some sort across the bend would work. If there is any room to be had?
 
doing this for a living ...
take it from someone that does, your customers will be very few and far between if you charge what you need to charge to keep the lights on in the shop and at home.
and
self employment is not all sunshine and roses. no benefits, no steady income, feast or famine is the rule of the day
plus
no matter how good you are you will have tire kickers, information suckers, frugal individuals that will waste your time. you will have dead beats that refuse to pay, tons of promises to pay and even when you do the best job, you will have customers that complain and bitch.

seriously, this is a semi-retirement occupation that you engage in to keep from being bored and to have a bit of spare income for your own hobby.

you will need a thick skin and the ability to tell a potential customer you don't want to do their work.
cause
if you are not making any money then why are you doing the job? you could be working on your own jobs for nothing and have something to show for it when you are done.

if you have any questions or want to chat before you take the leap i will be happy to give you 30 years of self-employment history ...

keep up the great work, looking real nice.
 
Have I been lazy? Yes, and no.

I left the camera up north, so cell phone pics will have to do (sorry Josh)...

First off: it's mostly back apart now. And why, you might ask? Well because it's been spending some time with a soda blaster. That's right, most of the body parts have been blasted and are ready for paint...
blasted 1.webp
blasted 2.webp

Still finishing up the toolbox, but I finished the welds putting it into the floor, so all that's left is to grind these down smooth...
toolbox.webp
blasted 1.webp
blasted 2.webp
toolbox.webp
 
I also did some thinking (with the help of Alia176) and decided that it didn't need a frame tie in for the roll cage B hoop, that the plates on the top of the fender wells would protect the occupants just fine....

And then I remembered that the 90 degree stiffener supports inside the fender wells were rusted and had been tossed. So I would either have to make a new stiffener or the frame tie ins.

Obviously I went with the frame tie ins. It was probably easier than reproducing the stiffeners. Enough chitter-chat though: here's some bad pictures.

The right side...
b hoop 1.webp

And the left...
b hoop 2.webp

We flexed the cruiser as best we could, and there's plenty of room between the tires and the frame tie ins, so no worries there.

I really need to dig up a camera. These pictures blow. And I've been busy wrapping up the wiring harness. I'm really hoping that I can pull the tub off of the frame again tomorrow (or monday morning) and get it in for blasting and paint too....

Our blaster is even going to rent us his booth to paint this (he's 2,000 feet lower, and not as much moisture down there in the winter, so that's all a good thing).

More tomorrow...

Dan
b hoop 1.webp
b hoop 2.webp
 
welkom back and thanks for the pics, its better to see crappy pictures than no pictures.:grinpimp:

Did you find a solution for the lid on the toolbox?

Still waffling on a solution for the lid, but not worried about it. Right now I'll probably make one out of plywood/fiberglass or ABS plastic, but eventually I'll probably make a metal one (or have one made--with ribs). I'm not too concerned about it though, because it's a REALLY simple thing to make, no matter what I make it out of.

Dan
 
Quiet: yes.

Idle: no.

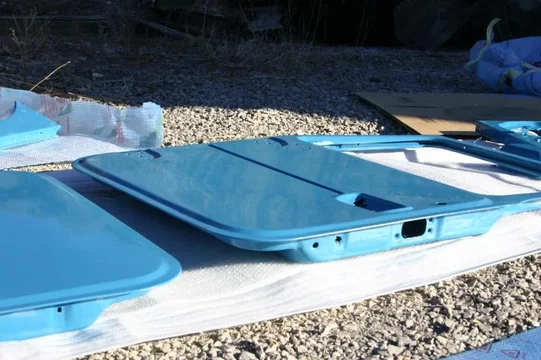
So, everything except the tub itself, and the soft top tailgate is back from paint. Dear Lord it's beautiful!
paint 1.webp
paint 2.webp

The camera batteries died before I could get much more than these pics, but suffice it to say we've got glass in doors and it's sliding and everything! Very, very cool.

I'm finished up the last of the bodywork on the tub, hoping to get it to the blaster and paint early next week... To do:
  • One 2" square section of the floor to fix rust.
  • One floor pan patch left, will be done when tub is on the ground upside down--easy job then.
  • Remake the antenna brackets--I decided that I just couldn't live with them getting in the way of the windshield folding down, so longer ones in the morning...

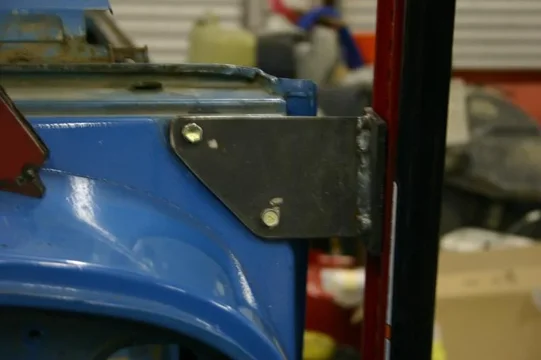
I also got around to making the hi-lift bracket for Dad's truck. One of those little jobs that would otherwise be on the "to do" list for far too long. So, it's done.
hi lift.webp

Unfortunately that's it for today, but tomorrow the camera will be out swinging! I've got other projects to attend to also (like the front axle of the 60, and playing with the 1HZ, but...), but I intend to get the 40 really ready to finish paint and get it back on the road. We're planning to bring it to CM11, so only 3 more months to get it going now...

Dan
paint 1.webp
paint 2.webp
hi lift.webp
 
Not a whole lot of awesome pictures, but a lot of progress today. Little odds and ends, really, but...

The hi-lift mount. Simple, strong, cheap. ;)
hi lift 1.webp

I also made new CB and HAM antenna brackets. Now the windshield should be able to fold down and not hit the antennas. They also match, the left and right sides.
antennae.webp

But here's the good stuff (some of it). The front bib. I powdercoated the headlight buckets black (yes, I know they are supposed to be plated metal), and installed the roundeyes. bib.webp

This made us realize how bad the bezel looks, so it will get repainted too. When we took the truck apart, we decided it wasn't in need of a repaint, but now on the newly painted bib, it clearly needs some new cygnus white...

That's it for today. I should have snagged pictures of the door that is now reassembled (new window felts are AWESOME, by the way), but I didn't, so...

Dan
antennae.webp
bib.webp
hi lift 1.webp
 
OK, not a lot of pictures, but I have been BUSY.

Tying up odds and ends, the front axle on my 60, etc...

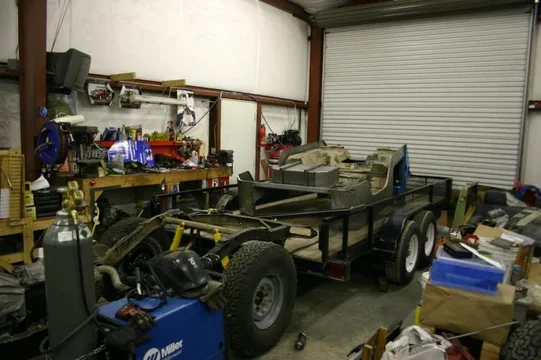
But here's the only picture that matters...
trailer.webp

That's right, the tub is on the trailer, ready to head into town for blasting and paint. :bounce::bounce::bounce:

That is all.

Dan
trailer.webp
 
LOL!!
when i first glanced at the pic i thought i saw a 6X6 in the making, then i realized it was a trailer. darn.
 
LOL!!
when i first glanced at the pic i thought i saw a 6X6 in the making, then i realized it was a trailer. darn.

Same here! I was thinking "wow, this build took a hard left turn":lol:
 
The tub is off to blasting....

BIG thanks to Alia176, he chained up one of his cruisers to help Dad get it into town (yes, there was quite the storm out).

I of course have no pictures, because I won't be back to the shop for another week or so, but hopefully the next pictures you see are of the tub painted!!!!

Dan
 

Users who are viewing this thread

Back
Top Bottom