Awesome job Dan. Your a first class fabricator with alot of patience. And it shows.
Navigation
Install the app
How to install the app on iOS
Follow along with the video below to see how to install our site as a web app on your home screen.
Note: This feature may not be available in some browsers.
More options
Style variation
You are using an out of date browser. It may not display this or other websites correctly.
You should upgrade or use an alternative browser.
You should upgrade or use an alternative browser.
Builds Here we go (FJ-40 getting a 3B/Turbo/H55f)...
- Thread starter DanS HJ-45
- Start date
This site may earn a commission from merchant affiliate
links, including eBay, Amazon, Skimlinks, and others.
More options
Who Replied?DanS HJ-45
SILVER Star
- Thread starter
- #342
What did I do today? Not all that much really. I did a bit of helping with the other cruiser, but I certainly got some stuff done on the 40.
First off, I finished the right side of the cage and the seatbelt brackets. To be accurate, I have tacked them in place ready for me to finish weld them...

I also trimmed and tacked up the right front frame tie in for the cage. How's this suit you all? I like it. Should keep the cage from transmitting vibrations to the body, while being removable it we should need it.


First off, I finished the right side of the cage and the seatbelt brackets. To be accurate, I have tacked them in place ready for me to finish weld them...

I also trimmed and tacked up the right front frame tie in for the cage. How's this suit you all? I like it. Should keep the cage from transmitting vibrations to the body, while being removable it we should need it.


DanS HJ-45
SILVER Star
- Thread starter
- #343
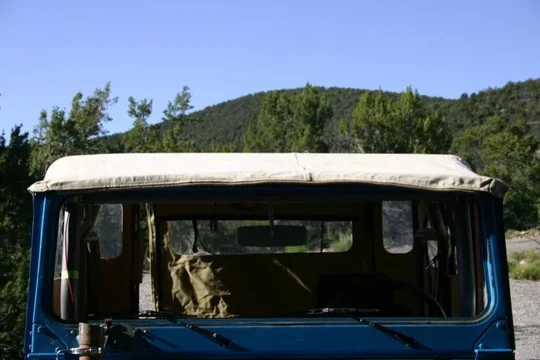
You may have noticed earlier that the soft top bows were on...
I need to fabricate the windshield channel for the soft top, so the only good way to get started for me is to put the rest of the top on.
Before I did that, I wanted to get some good pictures of how much room between the soft top and the MT Jackson Cage.


I need to fabricate the windshield channel for the soft top, so the only good way to get started for me is to put the rest of the top on.
Before I did that, I wanted to get some good pictures of how much room between the soft top and the MT Jackson Cage.


DanS HJ-45
SILVER Star
- Thread starter
- #344
DanS HJ-45
SILVER Star
- Thread starter
- #345
Last three for the day...
All pictures of the soft top from the inside. Plenty of room around the cage and the radios.


So, with that done, tomorrow I'll finish the frame tie ins for the cage, and troubleshoot the one wiring issue I've got. And maybe, just maybe I'll start messing with the bed floor or tailgate.
Dan


All pictures of the soft top from the inside. Plenty of room around the cage and the radios.


So, with that done, tomorrow I'll finish the frame tie ins for the cage, and troubleshoot the one wiring issue I've got. And maybe, just maybe I'll start messing with the bed floor or tailgate.
Dan
DanS HJ-45
SILVER Star
- Thread starter
- #346
Which leads me to a question: Is the windshield channel curved of straight? I'm sure that it attaches along the curve of the windshield, but does the soft top get a straight edge, or a slight curve to it?
Answering my own question....
All pics stolen from https://forum.ih8mud.com/40-55-series-tech/247086-post-pics-your-oem-reproduction-top-fj4xs.html


And one more, but with the later model windshield (with the washer motor on the bottom)...
So, to put it simply: curved. I wish I wasn't so groggy last night to have not thought of searching first.
Dan
DanS HJ-45
SILVER Star
- Thread starter
- #348
So, I finished the frame tie on the left side too. And with that done, I finish welded both sides and put them back in.

And a pic of the left one installed...

After that, I decided to start fabricating the tailgate. First thing I did was cut a 1x1" 16GA square tube to length along the bottom of the tailgate opening. To that I welded a pice of 1/8" strap and drilled holes in it to match the factory ambulance door catch bolt holes.


And a pic of the left one installed...

After that, I decided to start fabricating the tailgate. First thing I did was cut a 1x1" 16GA square tube to length along the bottom of the tailgate opening. To that I welded a pice of 1/8" strap and drilled holes in it to match the factory ambulance door catch bolt holes.

DanS HJ-45
SILVER Star
- Thread starter
- #349
Next step was to weld to uprights for the edges...

From this point, you can easily see how two little tabs will extend out and use the factory ambulance door bolt holes to secure the whole assembly to the truck.
After that I spent a lot of time thinking. I don't like having to swing the tire out of the way just to get into the back, so I mounted a center upright and boxed it to the outside on the left side. This way the right side will be able to open up so you can climb in, but still not have to open the tire carrier at all.

That's all for today. I've got an idea for something I haven't ever seen done before for the rest of the tailgate, so you'll just have to wait until I get back to fabricate it before you will get to see what I'm thinking....
But I'll give you a hint: it has some storage area, and an integral step to help climb into the truck.
Dan


From this point, you can easily see how two little tabs will extend out and use the factory ambulance door bolt holes to secure the whole assembly to the truck.
After that I spent a lot of time thinking. I don't like having to swing the tire out of the way just to get into the back, so I mounted a center upright and boxed it to the outside on the left side. This way the right side will be able to open up so you can climb in, but still not have to open the tire carrier at all.

That's all for today. I've got an idea for something I haven't ever seen done before for the rest of the tailgate, so you'll just have to wait until I get back to fabricate it before you will get to see what I'm thinking....
But I'll give you a hint: it has some storage area, and an integral step to help climb into the truck.
Dan
Looking great Dan !
But I think you may regret making the left "gate" fixed ? I hear what you say about having to open the sparewheel but if you plan your packing layout properly, you only need to open the wheel once a day when overlanding etc
But I think you may regret making the left "gate" fixed ? I hear what you say about having to open the sparewheel but if you plan your packing layout properly, you only need to open the wheel once a day when overlanding etc
Last edited:
DanS HJ-45
SILVER Star
- Thread starter
- #351
The logic goes like this:
We'll see. Hopefully today before I have to head back to work I'll get to make a few "test runs" and see how I like it.
Dan
- The primary use of the vehicle will be simple running about.
- It will have the rear jumpseats installed.
- It will carry more than two people pretty regularly (primarily any time any of us kids are home)
- When that's how it was used before I took it apart we really only used the right side ambulance door to get in and out anyway.
- When it does get used for some adventuring, it's easy enough to roll up the sides or back and grab stuff that way.
- The tailgate design will be stronger with only half of it opening (well, the door part of it will be, anyway). This part is kind of key, as there will be a LOT of weight on that tailgate door occasionally.
- Leaving one side fixed means it can be used as storage for things like oil.
- Because I'm just tying into factory bolt holes to hold the thing into the truck, I can decide to change it easily later on.
We'll see. Hopefully today before I have to head back to work I'll get to make a few "test runs" and see how I like it.
Dan
The logic goes like this:
- The primary use of the vehicle will be simple running about.
- It will have the rear jumpseats installed.
- ..
DanS HJ-45
SILVER Star
- Thread starter
- #353
So, I did get a good bit done on that tailgate after all....
Here's a simple frame for it, with some temporary hinges welded onto the door to see if it works out (teaser alert: it does).
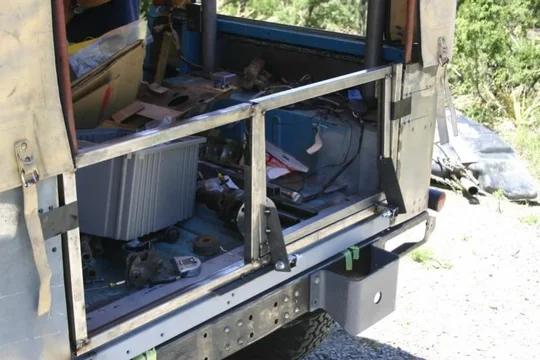
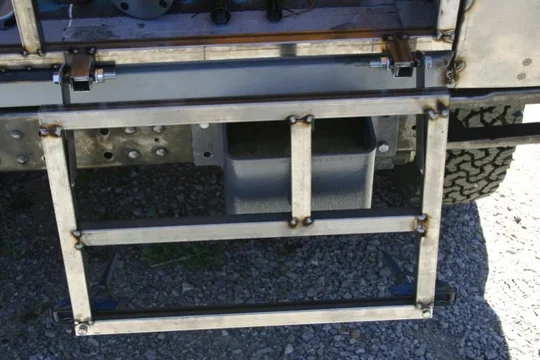
Then I kept adding more stuff to it. I need a bit more internal support, so I added some of that. I also drilled and bolted on the latches I intend to use (from an old Toyota Hilux pickup).



Here's a simple frame for it, with some temporary hinges welded onto the door to see if it works out (teaser alert: it does).

Then I kept adding more stuff to it. I need a bit more internal support, so I added some of that. I also drilled and bolted on the latches I intend to use (from an old Toyota Hilux pickup).


DanS HJ-45
SILVER Star
- Thread starter
- #354
Two more pictures.
This is how it opens up. Note the angle (and the fact that it rests on the bumperette). Those two things will be key in the near future.
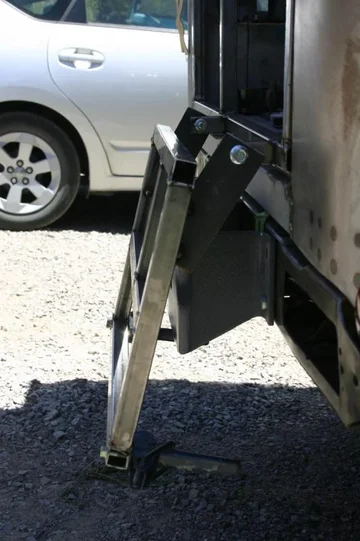

OK, that's all I have time to post today, but suffice it to say I'm liking how this tailgate is coming along. I think it will serve Dad's needs nicely...
Dan


This is how it opens up. Note the angle (and the fact that it rests on the bumperette). Those two things will be key in the near future.


OK, that's all I have time to post today, but suffice it to say I'm liking how this tailgate is coming along. I think it will serve Dad's needs nicely...
Dan
Cool idea with the folding down rear step. If you are in town I say you should drive it down to the meeting. You already have the license plate issue taken care of with that duck tape. It is looking great can't wait to see some paint on it.
I really like that idea for a rear gate/step. Mine is dented and rusty so i might steal your idea.

crushers
post ho
yes curved.
you can use the soft top reciever bars for a YJ jeep for a simple bolt, pop rivit, weld on. it has to be snug enough that the wind pulling across the top at highway speeds does not allow the top to float.
love the under floor tieing parts. clean and original (to me anyway)
you can use the soft top reciever bars for a YJ jeep for a simple bolt, pop rivit, weld on. it has to be snug enough that the wind pulling across the top at highway speeds does not allow the top to float.
love the under floor tieing parts. clean and original (to me anyway)
DanS HJ-45
SILVER Star
- Thread starter
- #359
OK, I had an overnight in Albuquerque last night, so I got paid per diem (a whole $1.65 an hour baby!!!) to go up to the shop and tinker with the 40....
No good pictures, but I got a package from Radd Cruisers which included a pigtail of the wiring for the 3B alternator. So I mocked it up and plugged it in (after spending WAY too long convincing myself that Dad's truck has a Tirrill Regulator setup vs, an IC Regulator).
Proof!
YouTube - 3B alternator working
Now, for some reason the ammeter isn't working, and I didn't mess with it's wiring at all, but I'll have to dig into that later. Either way, I at least understand the wiring for the alternator. All I need to do at this point is put some new connecters on the wire and press them into the plug. After that, the wiring is pretty danged much DONE. I've got to troubleshoot the ammeter and that ARB locker issue still.
Dan
DanS HJ-45
SILVER Star
- Thread starter
- #360
As always, the job, and the fact that I'm now living 400 miles north of Dad's cruiser is getting in the way of getting it done, but I did get some time to work on it and make some headway...
Unfortunately I seem to have forgotten to download pictures off of my camera onto the computer, so cell phone pics are most of what I can offer...
In a nutshell, I skinned the tailgate. So far so good. I need to remake the door itself just a touch smaller. I made it fit beautifully, and then decided to skin the tailgate itself by bending the 16GA sheet over the corners. So, it's basically 2 16GA thicknesses too wide to fit in the opening.

Before I get to the other pictures of some stuff that I fabbed, I thought I would simply inform you all that sometimes I simply win at all that is manly. Last week was like that. These are two separate days around the shop. In our shop is a friend (source3)'s 1973 FJ-40. It's getting the 2F that came out of Dad's 40. Look carefully, you can see it in the shadows of the shop. It's green (and VERY clean and rust free). The yellow one outside belongs to Bad Mojo, who was up helping with the work on the green 40, as well as checking out Dad's 40. The Dodge was just in the way. It had to go outside so I could replace the timing belt and other PM on the faux lux.

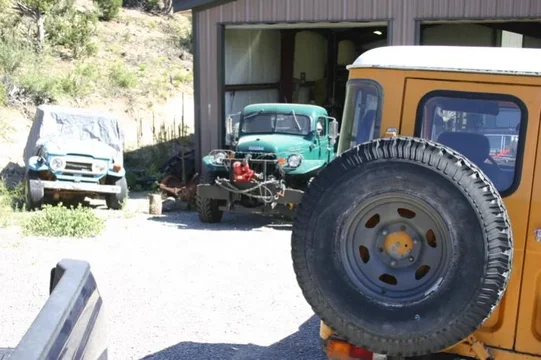


Unfortunately I seem to have forgotten to download pictures off of my camera onto the computer, so cell phone pics are most of what I can offer...
In a nutshell, I skinned the tailgate. So far so good. I need to remake the door itself just a touch smaller. I made it fit beautifully, and then decided to skin the tailgate itself by bending the 16GA sheet over the corners. So, it's basically 2 16GA thicknesses too wide to fit in the opening.

Before I get to the other pictures of some stuff that I fabbed, I thought I would simply inform you all that sometimes I simply win at all that is manly. Last week was like that. These are two separate days around the shop. In our shop is a friend (source3)'s 1973 FJ-40. It's getting the 2F that came out of Dad's 40. Look carefully, you can see it in the shadows of the shop. It's green (and VERY clean and rust free). The yellow one outside belongs to Bad Mojo, who was up helping with the work on the green 40, as well as checking out Dad's 40. The Dodge was just in the way.


Similar threads
Users who are viewing this thread
Total: 1 (members: 0, guests: 1)


