Builds Mail Order Ride - My HDJ81 (1 Viewer)

This site may earn a commission from merchant affiliate
links, including eBay, Amazon, Skimlinks, and others.

Thanks. Everything I've read has suggested this motor vehicle should be quicker, so I'll be banging through all the possibilities soon. If I can get it more highway-able by summer, I'll be happy.

I turned another year older yesterday, so as part of getting quicker, I maybe overindulged :beer: and gained two pounds.

full


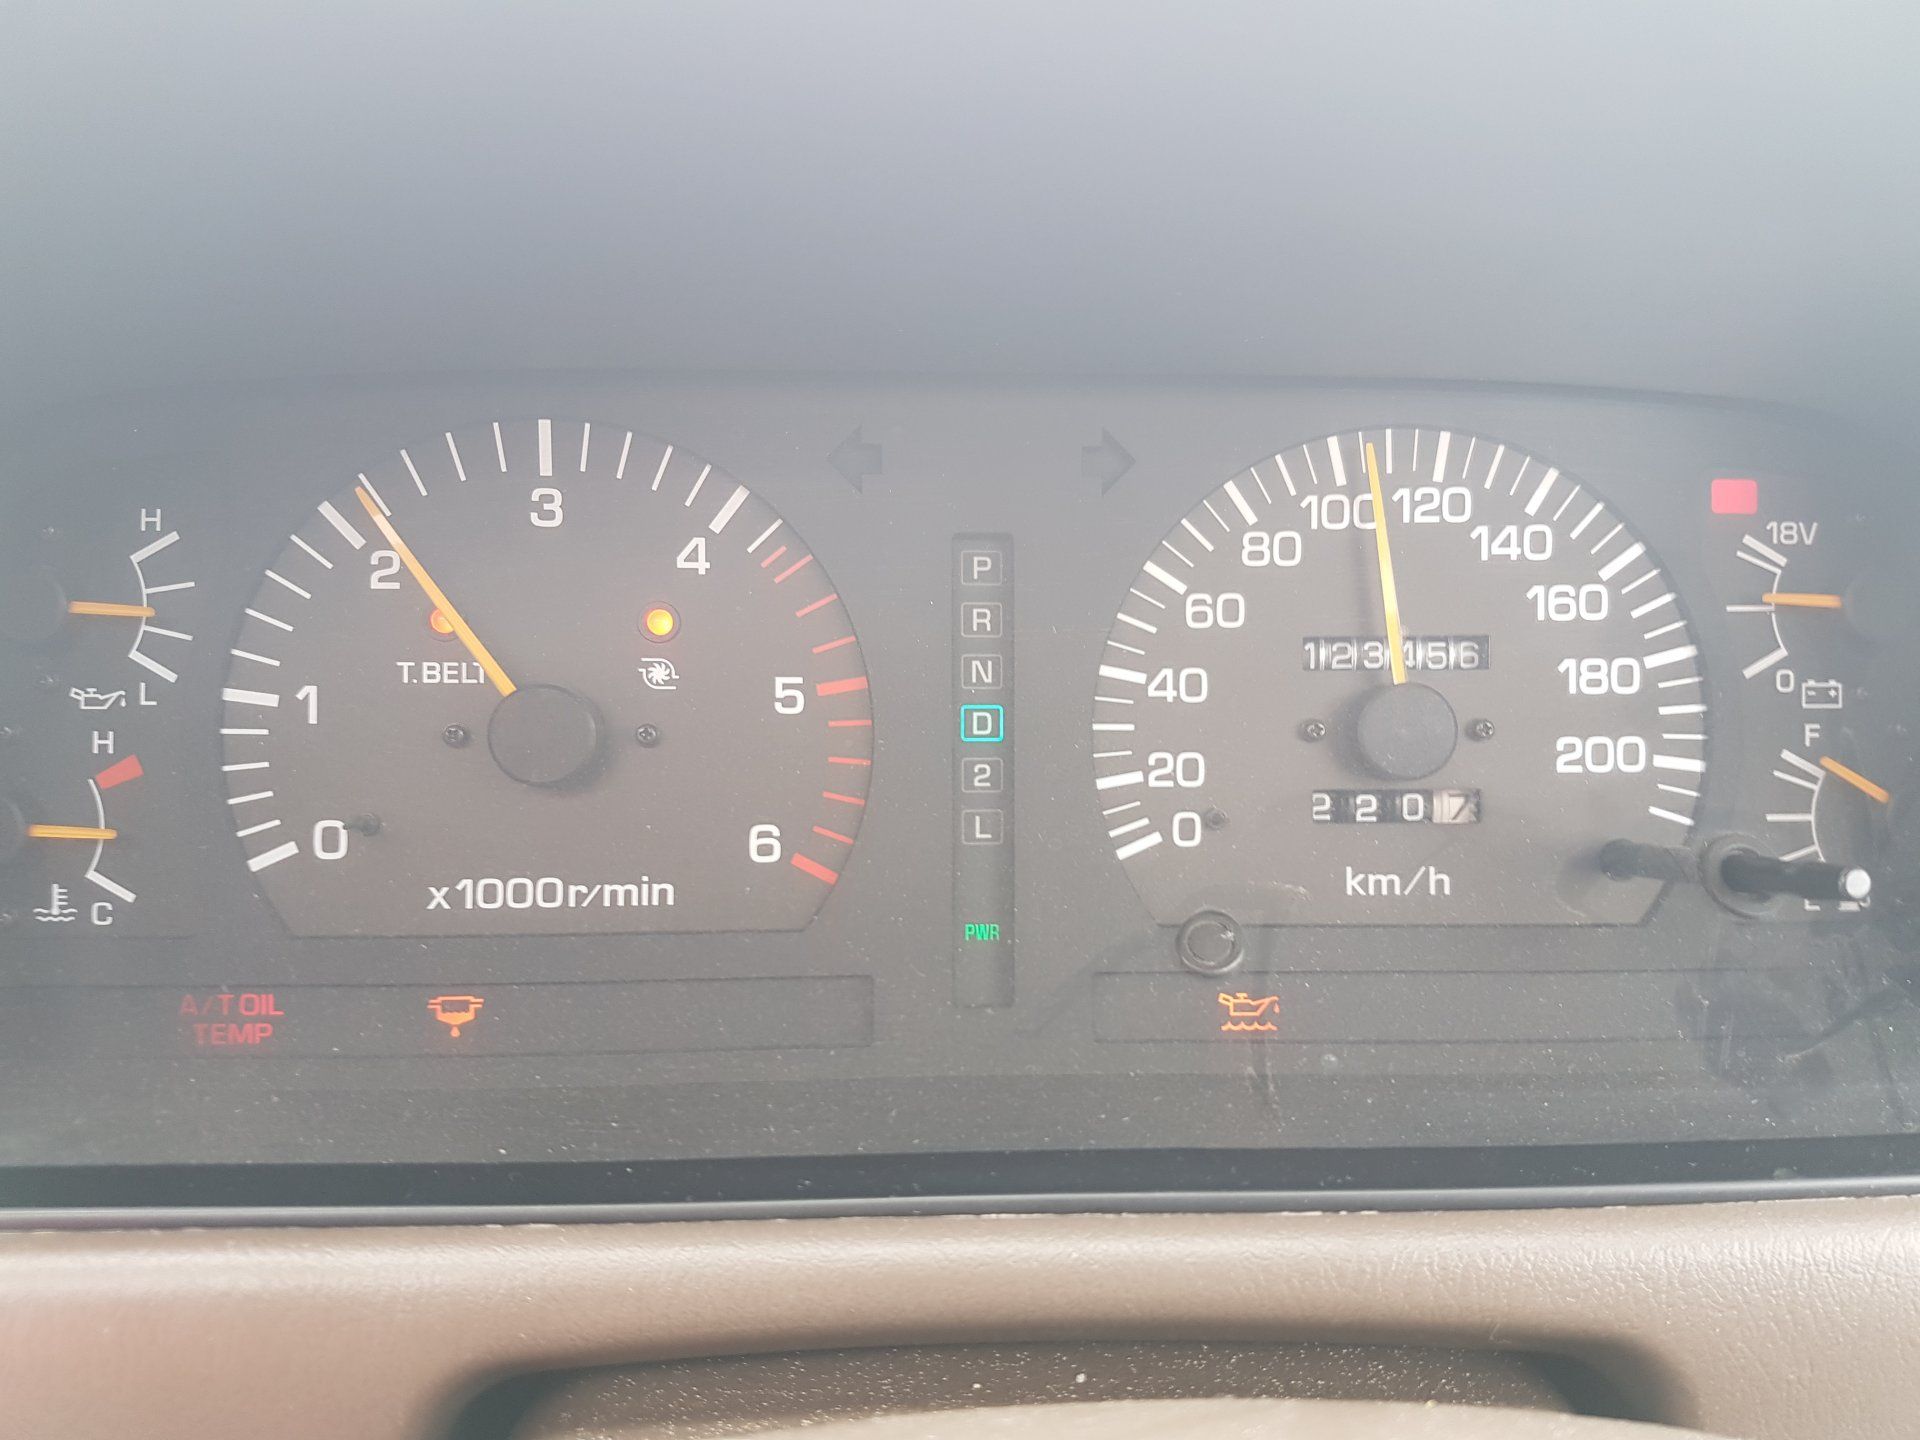
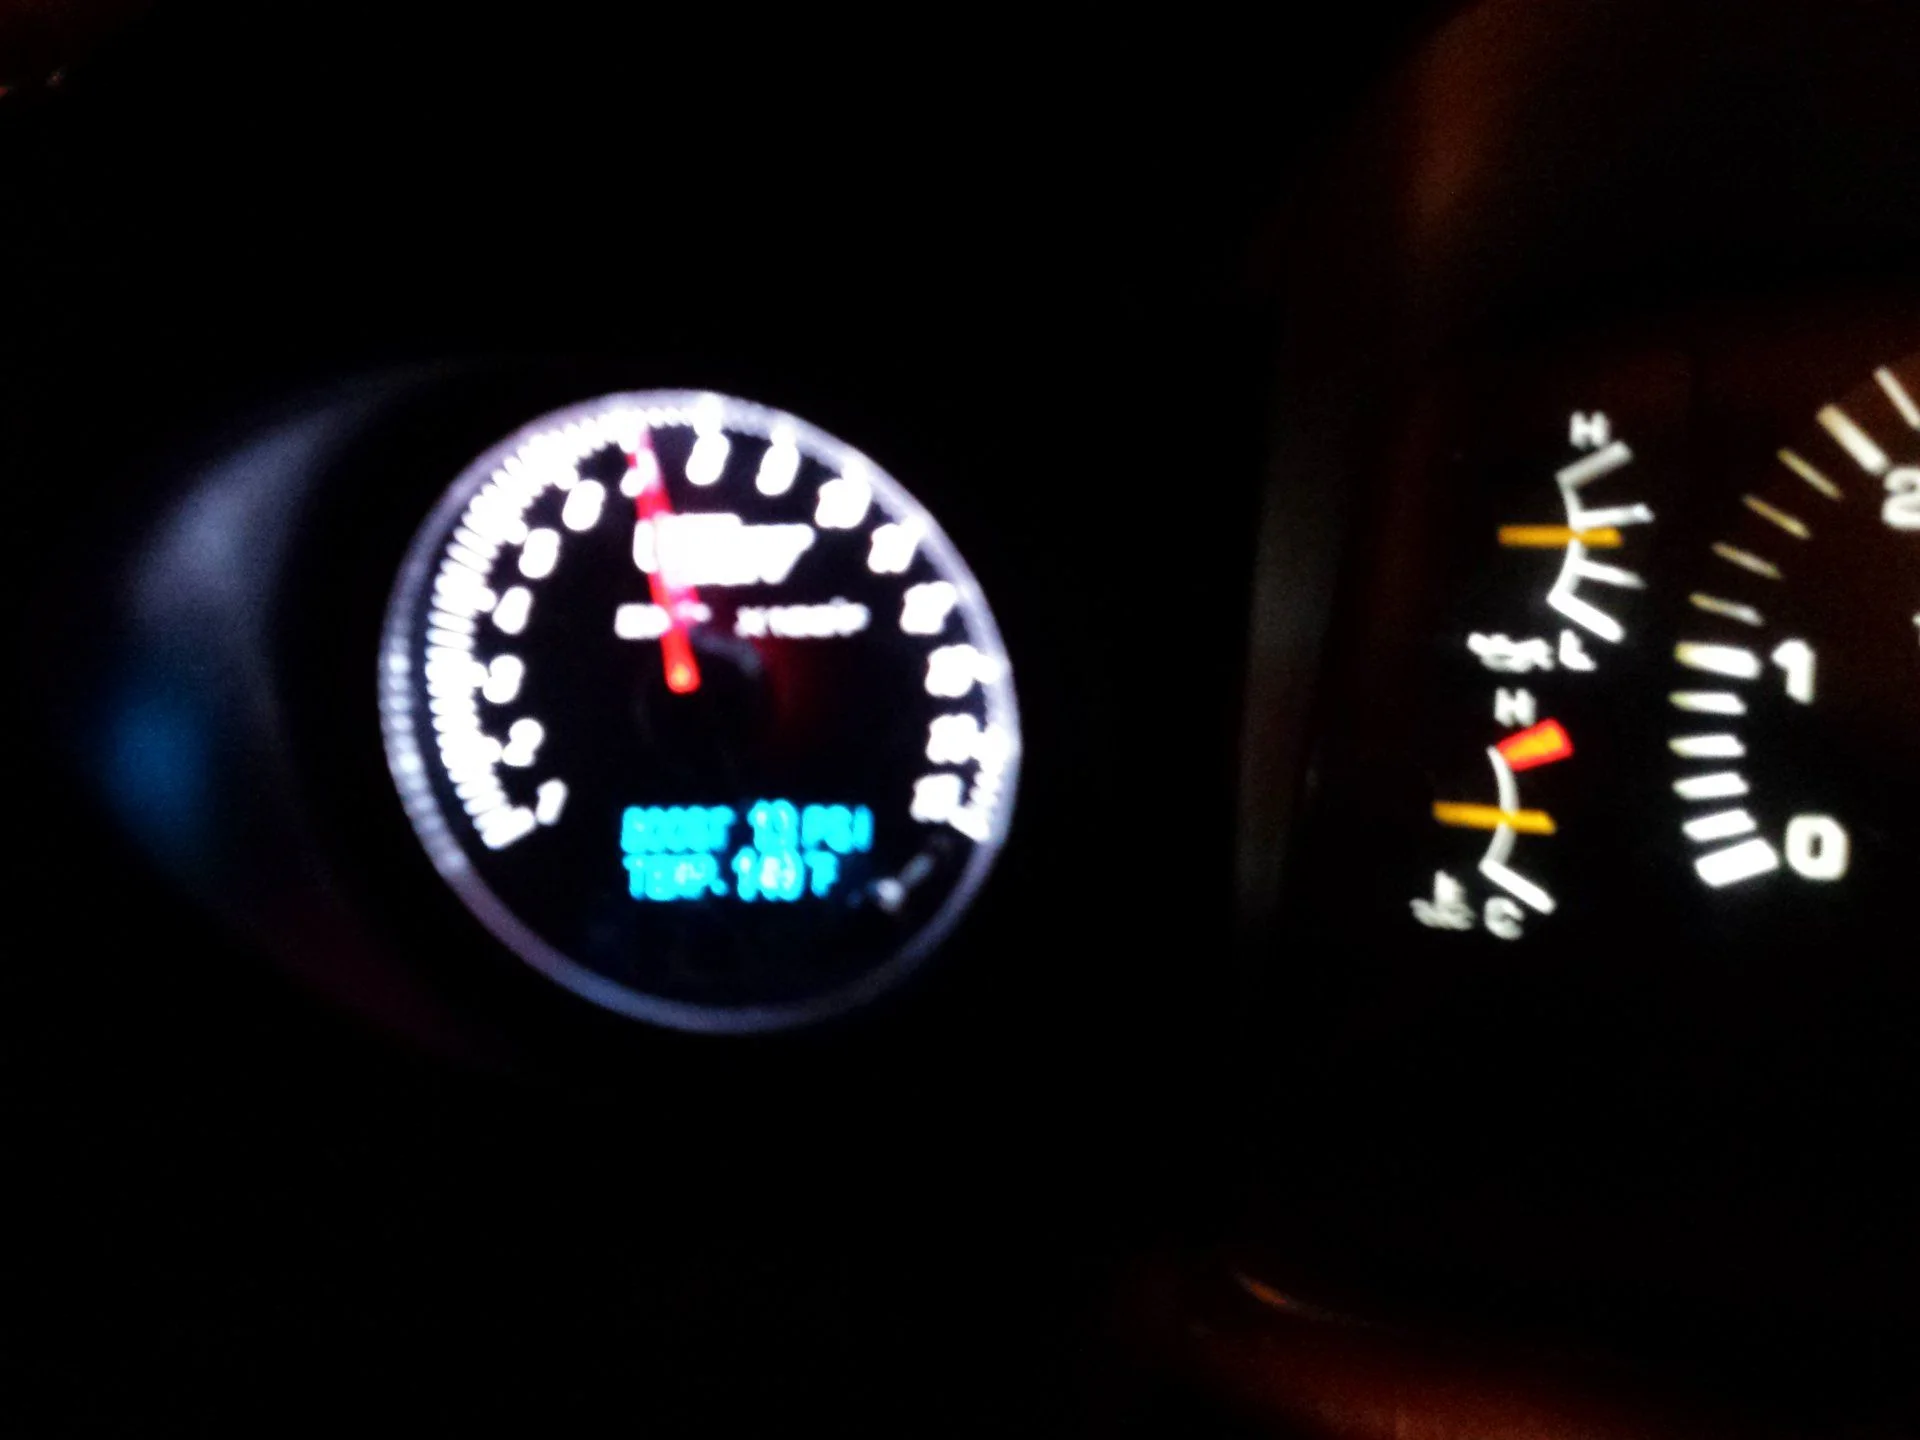
That shaky, blurry image is supposed to show 13PSI of boost, but it's tough to take a picture at night while in a heavy ass vehicle bouncing along on an Alberta highway at -25C. Yeah, I got myself one of these and installed it.

full


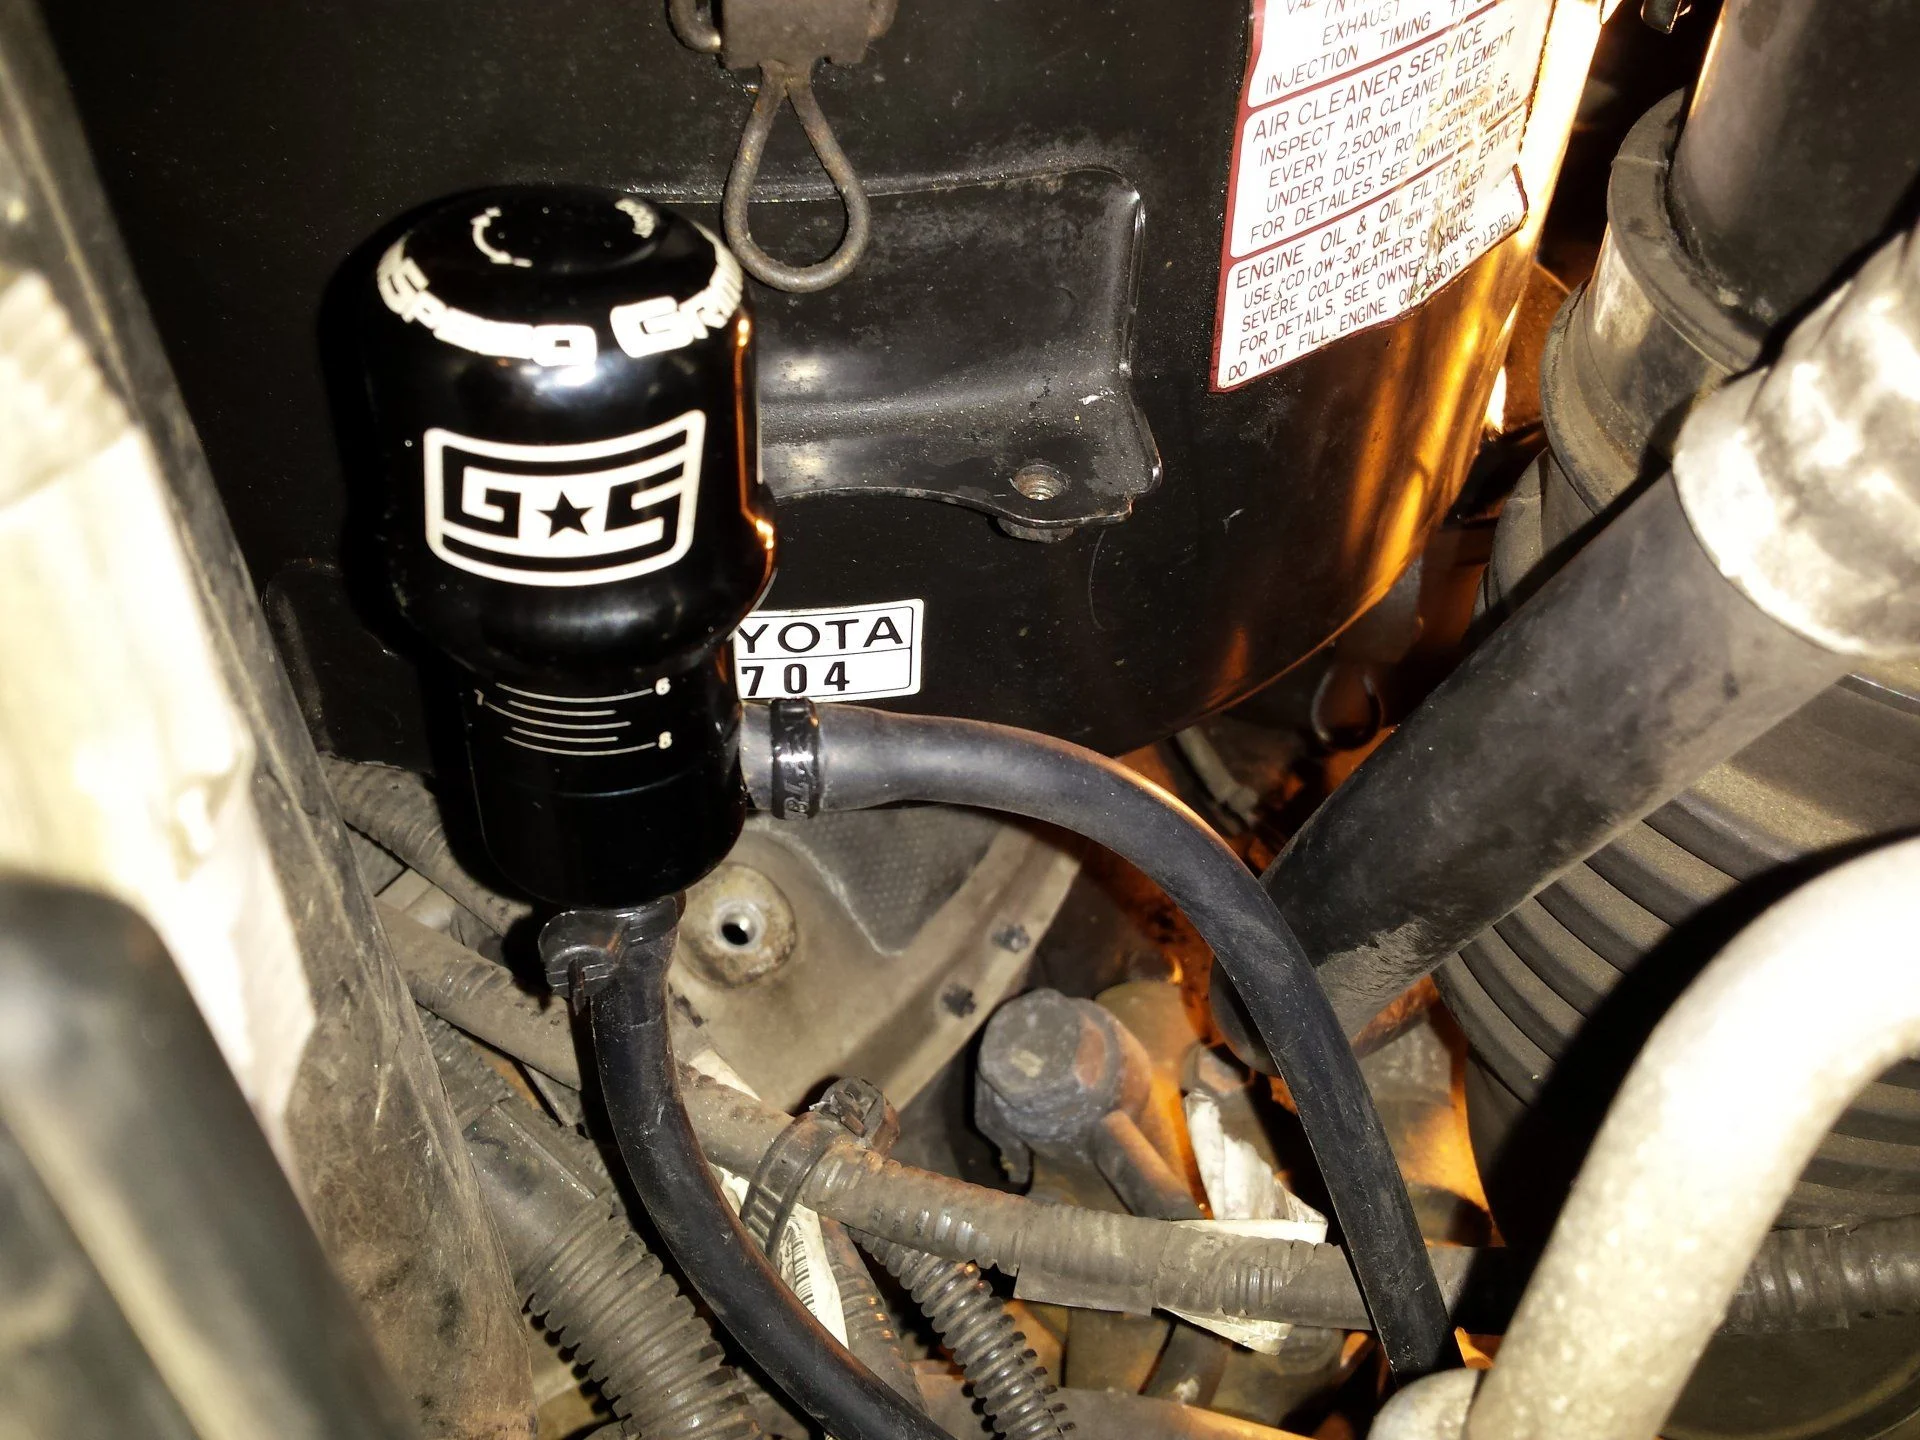
GrimmSpeed Universal Manual Boost Controller. Build quality seemed good, nobody seemed to have any complaints when I checked around online, price was reasonable and I thought the name of the company was cool. After a really boring amount of time starting and stopping down a highway in the dark, it's at 13PSI, EGTs are at around 750f in 3rd at 100kph, but I don't necessarily trust that today because of the fact that it is -25c out there right now. I'll adjust and play with fuel and stuff slowly during more regular weather.
 
Sure. Here's the pics. The front bracket has the control arm sitting in the 4" drop position, and the bottom hole measures 6". This has led me to believe that I have a 4" lift installed on the vehicle, but I don't know for sure, because I don't know what the stock height of everything is. It's beefy, but it looks like it will kill my breakover angle, and I will probably end up dragging on them quite a bit. You can see the big swaybar drop extensions in the picture too.

I have no clue whatsoever what brand of lift this is. The brackets are a mystery to me, the coils have no names or numbers on them that I've been able to find yet, and the shocks were ProComp in the front, and Ranchos in the rear.

There is also an adjustable rear panhard that I had to play with today. I noticed the new tire on the right side was rubbing the exhaust ever so slightly, just when going over big bumps, then when measuring apparently the right side was closer to the frame than the left. I adjusted the rear in order to pull the right side wheel out about 1cm to give it just a bit more clearance and be closer to equal. I know the rear axle is going to shift during axle movement, but my understanding would be that the right side is the side that's always going to pull closer when getting stuffed, so I would think that side should actually be FURTHER out, rather than the other way around. I'll drive it for a while and see how it goes. Might even move it out further.

full


As part of the lift that was pre-installed, the rears have adjustable lower control arms already in there. I haven't touched them, or even checked what the angles are yet. I'll get around to more investigation during the winter maybe.

full


The vibration I'm referring to isn't constant, and it's not really felt like a vibration. It's a bit tough to explain, but it's like a mixture of a rattle/shake/vibrate/grind noise when at higher speeds, like 80kph-110kph. If I kinda EASE off the skinny pedal, so I'm giving it SOME fuel, but not quite enough to accelerate is the only time I hear it. If I have cruise control on (and it's even doing it's job, thanks to the utter lack of acceleration when in O/D on this thing) I hear it rather frequently. When I pulled the front shaft and the noise went away, then I noticed the notching feel of one of the joints, I thought I had it figured out, but I guess not, the new joints have made no difference whatsoever.

Other things I have read say that once you start hitting the over 3" of lift, the driveshaft can induce vibrations. Hence, the suggestion to go to a DC shaft to eliminate the problem. That's too much money to think about at the moment though.

I know when putting the shaft back in, I noticed the Ujoints are out of phase, then I got worried and thought I maybe screwed up when I cleaned out the slip joint, but then after some reading online and in the FSM, apparently Toyota, in their infinite wisdom, decided that the front shaft on these trucks have to be out of phase. Weird, but I'll leave it for now.

Maybe later when I have some time I'll throw the gopro under the truck and go for a drive and try to narrow down the source of the noise, but for now, I guess I live with it.
 
Great thread! My Brother -In-Law lives in Qatar and we have been talking about possibly finding a good HDJ81 to bring back to the States......
 
Fantastic read. I had the same 80 few years back same color too. I found with the auto gearbox it is a bit sluggish.
I read a lot about how well the Diesel cruisers run. For me no Diesel 80 ran as well as the 4.5 and mine is the carb vertion. The diesel is a nice open road cruiser it's no race car.
 
After a very long process, drawn out with help from one of the busiest holiday seasons we've ever gone through, sliders are done.

Made 'em out of a 2x3 main bar, with 1-1/2" outer tubes, 2x2 support brackets and 1/4" plate for the gussets and mounting brackets. Ended up welding them myself, 'cause I figured "why the hell not, I like to learn stuff and what's the worst that could really happen". Some welds ended up better than others as I progressed, but I think they'll be more than fine. Rearmost support bracket is bolted to a piece of 4" C-Channel that I got welded to the frame (didn't trust myself with that one). Received some free sandblasting thanks to a customer contact at work, blew clean, degreased, primer'd, scuffed and then shot with a box of leftover Raptor Liner inside a makeshift paint booth in the garage. Last time we used the Raptor Liner, we had the Shutz gun that it comes with, but figured throwing it out and buying another one for $25 was easier than cleaning it. The new gun I was able to find and buy from Cambodian Tire has a larger threaded bit on it, so it didn't fit the bottles. Duct tape worked fine. I did 2 coats of Raptor at 50 psi, then did a 3rd coat at around 35psi from a much larger distance to give it a really rough final texture, in the vain hopes it might help with foot traction a bit.

But I also think the rough coating looks cooler. :princess:

They pass the "jump on it like a madman" test.

full


full


full


full


full


full


full


full


full
 
I spent the last few months working on some other projects around the house before returning to the truck. I am still hammering out the finishing touches on the rear bumper, but in the meantime i wanted to take care of something else easier.

The front shocks were in really bad shape, and were allowing me next to no travel compared to what I had available so i upgraded.

full


full


Icon 2.0s, apparently valved for the 80 series. These things combined with new sway bar bushings makes a world of difference in road manners.

They also happen to be much prettier.
 
ARRRRRRRRRRRRRGGGGGHHHHHH!

Was driving back from the mountains on Sunday and was about to hit a big milestone: 123456kms! Fun, right?

full


About 50km earlier, all my dash indicators decided to light up. Truck is otherwise running fine, and manages to carry on another 200km or so like this with no issues. Quick search indicates it's likely an alternator that decided to give up the ghost. Check it with a voltmeter, 12.6V on each battery when off, sucked down to 11.3V while running. Take the alternator in to get it load tested, she's bad.

None of the normal parts stores have anything close to able to help me, but a Local Cruiser shop gives me a Terrain Tamer alternator, brand spanking new. It cost a bit much, but, whatever, at least it's there, right?

During "installation", I'm struggling to get the bolts in far too long, trying the top bolt first, bottom bolt first, top one loose, top one tight, all to no avail. I decide to put my phone camera up there to see what the issue is:

full


No matter where on the adjustable bracket the top is sitting, this is what the bottom looks like. Just not quite there.

The replacement unit that i was given is a 27060-17171, and all indications online say it's for my truck, but a slightly higher amperage unit; 110A instead of the 100A 27060-17181 Denso unit that was in it.

So, why is there nearly 1/4" difference here? Why is this simple repair becoming so damn frustrating?

Going to try to jam an alignment bar in from the backside tomorrow and see if I can pry it down enough to force the bolt in, but other than that, I just don't know right now. Supposed to use the truck for another camping trip only about an hour away this weekend, and would really like to have an alternator in place to do that.

If this is too much trouble and I'm stuck waiting for the old one to be rebuilt, I might be needing to charge up batteries and just driving without an alternator for the weekend. Good thing the diesels don't need spark, right?
 
There are 2 different alternators on these, the difference physically is the distance center to center between top and bottom mounts which is about 5mm different. Only way to check is to have both alternators on the bench and measure them.
You could try removing the top bolt and them put the lower one in. If you do have the smaller alt and should have the big one the upper adjuster will need to be modified as it has 2 bolts holding it to the engine and doesn't move up and down.


Bottom bolt first, top bolt first, didn't make a difference.

What sense does it make to have two different alternators that are so close to being the same? I would think it makes more sense to have slightly different brackets on vehicles, but use the same alt. So much for that legendary Toyota engineering prowess.

I'll see whats available, but i guess if i pull the top arc bracket off and ream the holes a bit i can probably make this unit work.
 
Thanks @KiwiDan80 for getting me going in the right direction, 5mm difference just like you said. Here's what I've learned so far.

My current alternator is definitely pooched. Apparently it was burning up the housing, so the rebuild shop can't even repair it without a core to work with, but there are no cores available anywhere because it's the oddball alternator. Yay.

There was the original 80amp alternator used in pretty much every diesel 80 from 91-97. During the 95-97 production years, there was a different 100amp version, which is apparently what I have/had. The 100amp version doesn't really exist in the aftermarket, and the OEM version available from overseas is well over $1100CAD.

That is an unacceptable cost to me.

There are two different upper brackets that were offered for these trucks to accommodate the different size housings on the alternator, stamped either #1 being the 80A, and #2 being the 100A. The cruiser shop had one of those brackets available, stamped #1. When I get home tonight I'll be pulling the A/C compressor off so I can get at the bolts, and hopefully I have a #2 bracket, which will mean I can put this other more readily available alternator on instead.

27060-17181 - 100amp alternator
27060-17171 - more common 80amp alternator
16381-17020 - the #2 100amp bracket
16381-17010 - the #1 80amp bracket

Here's a look at the different brackets side by side from some Russian website where someone has apparently gone through this already.

post-463-0-07943000-1369129390.jpg


This also means that if someone really wants an extra 20amps out of their diesel 80, but still stick with OEM Toyota parts, they can order the bracket for like $5, and then try to find an alternator for the price of roughly one mortgage payment.

More as this story develops.
 
RADD Cruisers on Vancouver Island has a high output alternator option as well, might be worth looking into. I'll bet it uses the #1 upper bracket though. I've also seen people use a Tercel alternator on HDJ81's, but don't have any more info than that.

So the wiring harnesses and everything else is the same between the 80A and 100A setups, just the upper bracket that's different?

Yeah, both of the units look absolutely identical, except that the mounting bolt holes are 5mm wider spaced on the larger output, and the overall body was maybe a couple mm deeper at most. You can't tell the difference without measuring.

The mid-90s Tercel alternator comes in either a 60a version or the 80a version. I assume that its the 80a version that might be a bolt in replacement, with the smaller bracket, but i didn't investigate that too deeply.

I might speak with RADD later about their higher output option but at this moment i want the truck running more than I'm concerned about the output; I'm not exactly loaded with electrical devices right now. Still good to know what options are out there.
 
The information on the brackets and alternators appears to be correct but it ain't exactly fun to do. A person needs to:

Remove air intake pipe to make room.
Remove the a/c compressor, but leave the lines hooked up, just move it out of the way.
Remove the fan and fan pulley in order to access the bracket bolts.
The bracket bolts are the same bolts that hold on the water pump, so you will likely lose a bit of coolant.
Replace bracket with other size.
Install new alternator.
Put everything back together and top off coolant.

That's the good.

The bad in my case is that after installing everything and starting up the truck, new alternator howls immediately and puts out 11.4v to batteries. Batteries have 12.4v when sitting. I shut the vehicle down almost immediately so hopefully whatever the problem it is that remains I haven't destroyed this alt. Some quick tests show my grounds are all low resistance (0.2ohms via multimeter, anyway).

I'm going to check over some more things before bringing the batteries back to be checked at the store first thing tomorrow morning and possibly replaced under warranty. One of them looks a little low on water but the plates aren't exposed yet and is maybe somewhat bulged on one side, but voltages seem not unreasonable. If the battery is what toasted the alternator somehow I'm going to be furious. They are just Canadian Tire junk, so i doubt i would have any recourse in getting them to pay for my new alt too.

Frustrating to say the least. Supposed to be going camping tomorrow afternoon and would much rather take the truck, even if it is just at a car friendly campground.

Edit: in a sudden burst of inspiration, I'm going to put some charge on these batteries if possible and try again first, see what kind of difference that makes. I also double checked all my connections, ground and otherwise. I'd like to assume that being an electrician for 17 years i should be qualified to do that in a half decent manner, but you never know.
 
Last edited:
Not to muddy the waters too much, but you can modify the 130/150 amp alternator from a Sequoia. I did the Photoman conversion to my 80 when I had the 1FZ-FE, and we then used that alternator with the 1HD-FT. The extra mount point on the alternator had to be shaved off, but it fits and works great.

full

I'm guessing that ends up being cheaper too, eh? Just cut a mounting point off, but the plug on the back is the same?
 
The loom plug from the Sequoia needs to have the pins from the 80 swapped, but that was easy-peasy. Lots of info in the @Photoman thread about how to wire for the FZJ. Not sure if the wire colors or pin outs are same on the HDJ loom, but it should have the same number of wires.

I bought the alternator used on the cheap and added a new set of brushes. Turns out a constant 14.7v no matter how many things I have running.
 
On the HDJ alternators that are series parallel they have a specific regulator as the main battery feed goes to the l/h battery and gets 24v when cranking. If the incorrect regulator is used they will charge but the warning lights stay on.
This may be an issue with fitting other alternators, but it is possible to get a regulator that has a dummy terminal in the plug in place of the sense terminal and they dont have the same issue.
 
All good info to have, options are always nice.

Batteries tested ok, which i kinda expected, but still nice to know for sure. With them charged up, they were sitting at 12.77v. All connections seem good with really low resistances and no significant voltage drops while vehicle is off. Start the tuck, still at 12.77v, but no voltage drops apparent anywhere. So the alternator not charging, but at least no howling noise. Blip the throttle, output climbs up to 14.3v and all Is well. The left hand battery that's directly connected to the alternator sees a touch more voltage, but just 14.3 compared to like 14.19 on the rh battery. Maybe I've got an intermittent bad connection starting to form inside the starting changeover relay or somewhere else? Alternator just needs to be pushed a bit to get running happily? Kinda wish i had borrowed a DC clamp meter from work to check what kind of loads are being pulled (I've only got an AC clamp with me right now, and my big multi can only do up to 10amps in series).

This has me seriously confused, but at least its running right now.

I'm going to plan on taking every electrical confection off, cleaning them with emery cloth, and replacing/ upgrading some of them as i see fit. Hopefully there are no lingering problems after that.

Here's a photo of the differences in the brackets for those who are interested.

full
 
On the HDJ alternators that are series parallel they have a specific regulator as the main battery feed goes to the l/h battery and gets 24v when cranking. If the incorrect regulator is used they will charge but the warning lights stay on.
This may be an issue with fitting other alternators, but it is possible to get a regulator that has a dummy terminal in the plug in place of the sense terminal and they dont have the same issue.

Good point on the 12v vs 24v. My system, though it has dual batteries, is and always has been a 12v system. Setup with one battery as the truck starting/running circuits, the other as the household/camping circuits.

No 24v relays to deal with, thankfully.
24v = a whole different :worms:
 
FWIW the Sequioa alt is definitely not just a bolt on deal for the 1HD-T. I have one and have tried - using both versions of the factory bracket.

It is certainly doable but a custom bracket will be required.
 

Users who are viewing this thread

Back
Top Bottom