No foam! That's a good sign
") Definitely needed to be changed though
Definitely needed to be changed thoughFollow along with the video below to see how to install our site as a web app on your home screen.
Note: This feature may not be available in some browsers.
This site may earn a commission from merchant affiliate
links, including eBay, Amazon, Skimlinks, and others.
Definitely needed to be changed thoughThat garage is cleaner than my dining room!When the Caddy gets left out in the storms.
View attachment 1995582
I ordered this Tee fitting already as preventive measure. My noob question is where is this located?
I ordered the metal version of this, is there anything else I need to have like special clamps or anything? Or special hoses since it’s the metal version that I will using?
Just waiting for delivery..
View attachment 1995220
80psi at a load of 3640 lbs per tire. That would mean loaded rig weight of what... 14,560 lb truck ??? Heavier load means higher psi to get the optimal rubber deformation as it contacts the ground, etc. etc. Assuming it's all linear (which it probably isn't) half that weight (7,200+ lb truck) would put you in the 40psi range which sounds about right to me.Based off BFG’s spec sheet yes the 275/70R18 sits at 33.2 inches, however on the same line it also indicates the tire pressure to be at 80 psi.
View attachment 1995458
Finally after some modifications to the OE tow adapter. I was able to install my RIGd multi-fit ultraswing. Cant use the tail gate, but I do not mind. I love having a removable option instead of a new rear bumper.
View attachment 1995794
View attachment 1995795
View attachment 1995796
It was priced a little lower and I received a discount, which allowed me to buy the accessories and still be less than the Wilco. I would like the use of my tail gate but like I said dont really miss it right now. May change my mind later, but now I'm happy with it.z
Any reason you didn't get Wilco Hitchgate? You could still use your tailgate then.
z
Any reason you didn't get Wilco Hitchgate? You could still use your tailgate then.
It was priced a little lower and I received a discount, which allowed me to buy the accessories and still be less than the Wilco. I would like the use of my tail gate but like I said dont really miss it right now. May change my mind later, but now I'm happy with it.
I hear yah man, I can still use the hatch which is why I'm not worried about it. Especially right now I'm not doing any crazy multi day overland trips. Another reason why I dont mind not having a roof rack either. I'm running 275/65R18.Can't imagine NOT being able to use my tail gate. It's the mod we'd all do, if it didn't already come oem as a tail gate. What size tires are you running. EDIT: can see in your post, 275/65/18. You can fit a fairly big tire up underneath, and if you do the spare tire lift, even more so. I'm running an inch bigger than you and the diameter works underneath. I like the look of it for sure, but the use of the gate and hatch is where it's at, imo.
Side note - these do trigger the dead brake light warning light - anyone know of a better way to get rid of that without tape or pulling the panel and yanking the bulb?
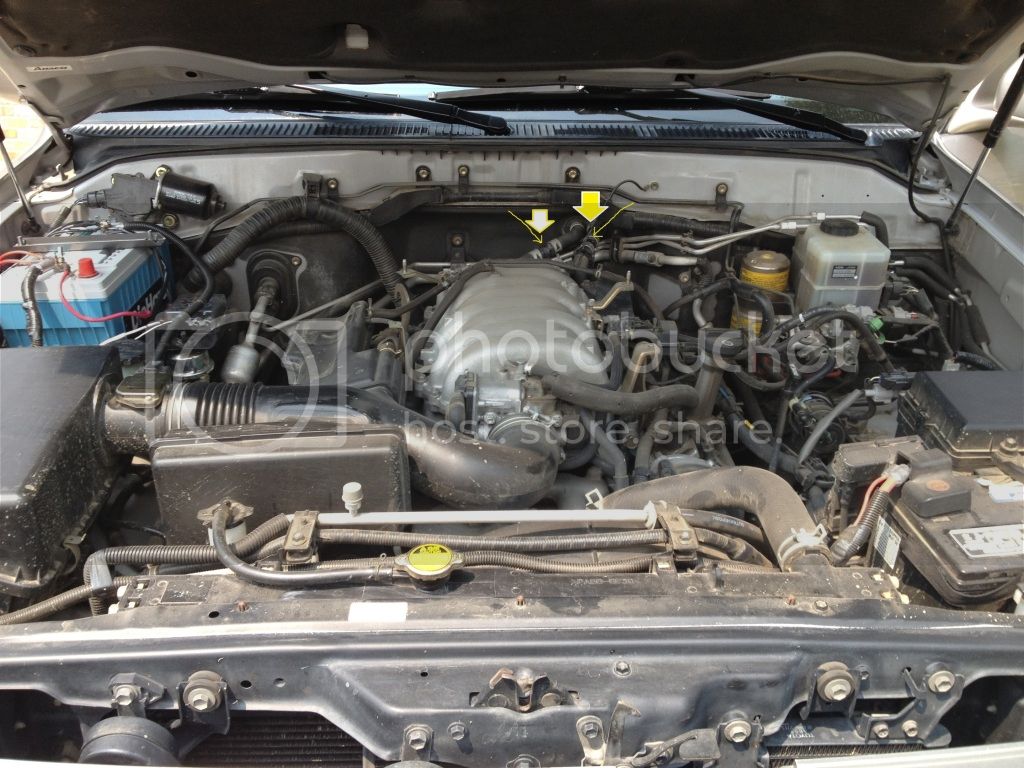
At the back of the engine, just forward of the firewall. Almost, if not center of the engine in the bay.
I went with the metal as well, just used the original hoses as they were in good shape. I used worm gear clamps, the OEM clamps aren't going to cut it on the new tees (in my experience).
Do yourself a favor should you ever need to remove them again, and remember to position the clamp screw or tabs (whichever you use) up so you can get to them easier. From the factory they're not conveniently placed.

Only if you want to replace them both.I think I see it. I actually see 2 TEEs.
View attachment 1996009
Does this mean I need 2pcs of those TEE fittings?
")
 forum.ih8mud.com
Ok I will be first to ask, where did you get the part? part #?Fresh gear indicator. Need to get a new shift lock cover, since the old worn one looks out of place.
View attachment 1996114
View attachment 1996113