OEM NipponDenso A/C expansion valve retrofit

This site may earn a commission from merchant affiliate
links, including eBay, Amazon, Skimlinks, and others.

cruiserbrett

GOLD Star
Joined
Feb 19, 2002
Threads
104
Messages
2,662
Location
Washington, DC
I know this doesnt apply to alot of folks out there, but for the few that do have an OEM air conditioning system on a 9/'73 and later FJ55, if you try to install the A/C and its been sitting open to the elements or uncharged, its a good idea to install a new expansion valve.

Unfortunately the toyota one is discontinued, but aftermarket ones can be had. The original one is a straight through design, where the outlet and inlet are 180 degrees apart. Common aftermarket ones are 90 degrees between outlet and inlet. If you search hard enough a company somewhere has a reproduction ford expansion valve that is identical to the toyota one that I saw at one point a few years ago, but it cost over $100...

What you are going to need:
Expansion Valve: Factory Aire part number 4608 or 38608. $15.99 from kragen
Brass 3/8" Flare Nut From home Depot, for 3/8" copper tube ~$2.00
Solder On Male 3/8" Flare Fitting From home Depot ~$4.00
Copper Tubing 3/8" Maleable Tubing, Roll. *I bought this a few years ago, no idea on price, but you will only need about 24" so befriend a heating and A/C guy and he should hook you up so you dont have to buy a roll of 20'
Flaring tool
Prestite Tape Black rubbery/cork/tar tape for insulating A/C stuff. I got it from a local A/C shop for 12.95 roll. I used about 1/8 of the roll on this job
Tubing bender to fit 3/8" tube

Misc wrenches(19/22/24/25/and 1 1/16")


Okay, what you need to do is flip the evaporator upside down, and remove the 3 screws that hold the shield on the bottom. Cut away the old crusty prestite tape and you will see this:
old txv installed.webp

This is what you will need to remove:
old TXV.webp

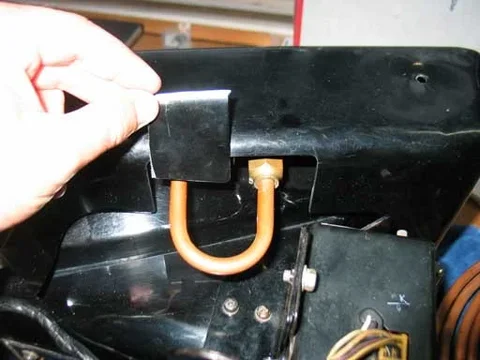
Now fit the new TXV(expansion valve) in place. cut approximately a 24" piece of tube and put an inverted flare on one end. Slip the brass nut all the way to the new flare and then you will need to bend the tube to fit similar to what I did in this picture:
new txv installed.webp

You will notice the male end is just slipped on the end of the tube. Trim this tube end to about the same length as the larger one, minus the depth of the fitting, and have this fitting silver soldered onto the tube. ***regular home pipe solder will fail with the heat and vibration*** so make sure its silver soldered or brazed. I took mine to a local radiator shop and they soldered it up for $5...
old txv installed.webp
old TXV.webp
new txv installed.webp
 
Now,you will notice the shield doesnt fit anymore, so trim like this:
shield cutout.webp

Then its time to do a leak test. I bought a 5/8"(IIRC) flare cap and capped the large outlet. With a rubber nipple on the blow gun, I applied air pressure to the new tube and sprayed a mixture of soapy water from an old simple green spray bottle. Any leaks will show up by making bubbles. Tighten down the fittings and then its time to recover all the copper with the prestite tape. Leave room for the firewall grommets and re-install(or install for the first time) your re-fitted evaporator....

good luck.
shield cutout.webp
 
John,
Going to run r134a. Its way to cheap compared to r12 these days. I drained and flushed everything, and have a new reciever dryer to use, plus all barrier wall o-ring hoses. If you are going to convert, you will have to make new hoses, since the old r12 hoses arent barrier wall and wont hold r-134a for long.
Too convert you need to get new hoses made, change compressor oil to PAG or Ester, and get a new reciever dryer. Lots of good reading online if you search "converting to r134a" on google. Do not just use those crappy kits at autozone. You need to evacuate the system, vacuum it down, ensure it holds a vacuum, and then charge with r134a. Best to take it to a shop, but do the cleaning/flushing work yourself.
Lou,
firewall grommets are discontinued, so I have raided all the ones I can find that are the same size from older toyota cars when I go to the junkyard. Not too many have the correct sizes, but from time to time I find ones that fit.
 
Brett; thanks for the info on the firewall grommets; any particular model I need to look into?

Lou
 
As an UPDATE to this thread:

I finally go time to get this all back together.

Here is what I did:
Cleaned/flushed evaporator(OEM 30 year old one)
Converted to new expansion valve
New $17 receiver dryer with O-ring fittings
Sanden 508 modern compressor, formerly r12, but drained oil and installed proper amount of PAG oil.
Aftermarket 14" x 20" modern parallel flow condensor( O-ring fittings)
Barrier wall hoses, made for the new o-ring fittings in most of the system.
Charged with 1.9LBS of R134a

Results:

With it sitting at the shop, not moving, at about 1400 rpm, the air outlet temp at the vent was 39 degrees farenheit. Thats actually lower than it was with r12. Dunno if I got really lucky with the charge amount, but I doubt it would be possible to get it any lower, since the A/C amplifier senses the air outlet temp, and to prevent icing the evap, was shutting off the compressor about 30% of the time...

All in all, anyone that complains that the stock A/C doesnt work well can upgrade the components and get a very cold system. The outdated compressors, and condensors are just not up to par. the evaporator and expansion valve are just fine, and can retain the OEM appearance inside, while running upgraded underhood stuff.
 
Brett. awesome thread:clap:
took my old evaporator to the vintage air peeps in Bham and they told me the evaporator was bad and I would probably have to go entirely vintage air:frown:at over 1000$:bang:. aside from the expense I prefer the look of the original set up!
questions for you;
can the old evaporator be repaired?...do you think it is probably the the expansion valve being old and worn out?
want to be able to ask semi educated questions:hhmm: TIA

Lou
 
Lou:
the only thing that really makes a difference is whether the evaporator passes a pressure leak test. Make sure they dont have the expansion valve in there when they test since it should be replaced. What you want to test is just the evap. so remove the expansion valve, the copper tubing and brass fittings etc. then pressure test. everything else can be replaced/repaired. you can easily make a tool to do a leak test. get a 3/8" flare cap top block the high side. get a 5/8" flare cap, drill a hole, solder onto a 1/8" NPT female "T", and get a NPT threaded schrader fitting, and a 0-100 psi 1/8" NPT gauge. assemble this, and pump up with a bike pump to 30psi. let sit for two days in stable environment and read the pressure. should be right about 30 psi in a few days, give or take a psi or so for temp changes.


Troll:
which fittings are you refering to? Inlet of exp valve and firewall liquid line are 3/8 flare. suction line at firewall is 5/8" flare IIRC. outlet of exp valve is 1/2" flare.

John:
Its an option. I like the OEM fit/look better than vintage air. As for flushing I used(probably at the shock of some A/C techs) brake cleaner on the metal parts. sprayed it in, rolled the evap all over, drained, flushed, drained, flushed etc. After that it was dried for a half an hour with dried compressed air, until no trace of brake clean could be smelled.

Having done service to the factory A/C three times now, I can save folks some trouble.

#1: dont bother with ancient OEM compressors and condensors. having tried the old OEM route, the compressors have no service parts anymore and damn they cause some serious resonance in the cab.
#2: change the expansion valve. cheap and not too time consuming.
#3: r134a works just fine. I am sure there is a bit of a difference at higher ambient temps, but its 1/10th the cost of r12 in san diego.
#4: spend the money and get all new barrier wall hoses made, using o-ring fittings everywhere except the two flare style firewall connections. the oring fittings are much less prone to leakage( and 100 times easier to get sealed up), and the barrier wall hose is really a must for r134a since it can permeate the old single wall rubber hoses found on OEM systems in the FJ55's....
 
Unfortunately the toyota one is discontinued, but aftermarket ones can be had. The original one is a straight through design, where the outlet and inlet are 180 degrees apart. Common aftermarket ones are 90 degrees between outlet and inlet. If you search hard enough a company somewhere has a reproduction ford expansion valve that is identical to the toyota one that I saw at one point a few years ago, but it cost over $100...

Wonder if this was the ford expansion valve?

eBay Motors: 1969-70 NOS FORD AIR COND EVAPORATOR EXPANSION VALVE (item 190250355654 end time Sep-16-08 19:00:00 PDT)

says

Ford 1969-70 full size car air conditioner evaporator expansion valve. C9AZ-19849-A. Fits all 1969-70 full size cars with integral air conditioning.
 
#1: dont bother with ancient OEM compressors and condensors. having tried the old OEM route, the compressors have no service parts anymore
#3: r134a works just fine. I am sure there is a bit of a difference at higher ambient temps, but its 1/10th the cost of r12 in san diego.

I concur!! I have the OEM A/C setup in the '55 and I'm running R134a for ease of service when I am back home (I could have had some other refrigerant installed here in Central America but I wanted servicability as well).

My compressor is a newer model that bolts up to the 3B diesel block in my '55 and is still currently available.
 
bad evaporator........repair or change?

Brett;..... a bit disheartened today ..........here is the deal; got my stuff back from Birmingham.....their quote was ONLY:eek: 2600 $ for Vintage Air install using the underhood stuff from my 74.....was told that there was a leak in the evaporator but they did not or could not tell me if it had been tested with the expansion valve off?!:frown: am a bit at loss on your suggestion for a pump set up to test it.........can follow directions but have difficulty visualizing the set up without pix:frown:.......did take a printout of your recommend for a test set up and got some very blank stares at the local AC place :hhmm: Questions;
#1.. is there another evaporator that might fit?
#2..how did you install the Sanden compressor?
#3..can you please post pix of your set up?
TIA

Lou
Lou:
the only thing that really makes a difference is whether the evaporator passes a pressure leak test. Make sure they dont have the expansion valve in there when they test since it should be replaced. What you want to test is just the evap. so remove the expansion valve, the copper tubing and brass fittings etc. then pressure test. everything else can be replaced/repaired. you can easily make a tool to do a leak test. get a 3/8" flare cap top block the high side. get a 5/8" flare cap, drill a hole, solder onto a 1/8" NPT female "T", and get a NPT threaded schrader fitting, and a 0-100 psi 1/8" NPT gauge. assemble this, and pump up with a bike pump to 30psi. let sit for two days in stable environment and read the pressure. should be right about 30 psi in a few days, give or take a psi or so for temp changes.


Troll:
which fittings are you refering to? Inlet of exp valve and firewall liquid line are 3/8 flare. suction line at firewall is 5/8" flare IIRC. outlet of exp valve is 1/2" flare.

John:
Its an option. I like the OEM fit/look better than vintage air. As for flushing I used(probably at the shock of some A/C techs) brake cleaner on the metal parts. sprayed it in, rolled the evap all over, drained, flushed, drained, flushed etc. After that it was dried for a half an hour with dried compressed air, until no trace of brake clean could be smelled.

Having done service to the factory A/C three times now, I can save folks some trouble.

#1: dont bother with ancient OEM compressors and condensors. having tried the old OEM route, the compressors have no service parts anymore and damn they cause some serious resonance in the cab.
#2: change the expansion valve. cheap and not too time consuming.
#3: r134a works just fine. I am sure there is a bit of a difference at higher ambient temps, but its 1/10th the cost of r12 in san diego.
#4: spend the money and get all new barrier wall hoses made, using o-ring fittings everywhere except the two flare style firewall connections. the oring fittings are much less prone to leakage( and 100 times easier to get sealed up), and the barrier wall hose is really a must for r134a since it can permeate the old single wall rubber hoses found on OEM systems in the FJ55's....
 
Lou, sounds like you need an A/C shop that can "think outside the box". Here in Guatemala they got the factory evaporator going with a control system they had to put together (the factory control system doesn't work with a diesel engine because there is no coil signal to tell the system the engine is running) provided the compressor, converted to R134a at my request (it could have stayed as R12), put it all together and charged and tested it for.......


about $400 US!!

How about a killer vacation? Tell the wife that you're going to take her to Mexico and make a detour to Guatemala City!
 
Brett;..... a bit disheartened today ..........here is the deal; got my stuff back from Birmingham.....their quote was ONLY:eek: 2600 $ for Vintage Air install using the underhood stuff from my 74.....was told that there was a leak in the evaporator but they did not or could not tell me if it had been tested with the expansion valve off?!:frown: am a bit at loss on your suggestion for a pump set up to test it.........can follow directions but have difficulty visualizing the set up without pix:frown:.......did take a printout of your recommend for a test set up and got some very blank stares at the local AC place :hhmm: Questions;
#1.. is there another evaporator that might fit?
#2..how did you install the Sanden compressor?
#3..can you please post pix of your set up?
TIA

Lou

Lou. what he is suggesting is you use two caps to cap off the evap. Modify the big one to accept a T fitting with a guage and a schrader valve ( a the stem that is similar to what they use on car rims)


If you cannot make it. I can make one for you and mail it down.


Lou do you have a Black light? Most fishermen have one or even the kids. I can get you some die that you can put into the coil to find the leak. If you don't want to go that route. Take the evaporator housing apart and measure along with some pics of what looks like. I bet I can find a replacement.


Also as Brett has stated on a 2f. Best way of mounting a compressor is to get the motor mount and alternator mount off a later 2f. Most 60 series had these. Most compressors will fit to this. And your stock Alt bolts right in. Problem is the crank pully which will also need to come from a fj60 also.

These guys make all that easy as you can use these without all the fuss. They have a bunch of parts for A/C units. Great site and has been updated. Sherman has one I believe.


Aftermarket Air Conditioning For Automobiles and AC parts
 
evaporator replacement

Marshall, Charles.........thanks for the input..........trip to Guatemala would be a delight........but with small children at this time would not be practical....would love to though as was there in the late 60s..........many fond memories:).....good thing is that I have the 3 groove pulley installed on the crankshaft also have a bracket for a york AC compressor.......I know it will not work with the Sanden I would like to use.....but maybe I can ghetto rig it some how to run the Sanden.........have all the underdash controls and evaporator box/housing...thought it was going to be simple when I called Vintage Air.....got a bad feeling when I got the estimate from the Vintage Air Dealer in B'ham who grinningly told me it would ONLY be around 2600$:frown:
plan is this evening to take the evaporator housing apart and take pix of the evaporator along with measurements..........Brett's pix on the thermostatic valve replacement are great.......just need to figure how to adapt the Shanden to the 1 1/2 F motor and how to plumb it.....Thanks again:cheers:

Lou
 

Users who are viewing this thread

Back
Top Bottom