My UZJ40 Build - 2UZ iForce V8 and a750f 5spd auto (1 Viewer)

This site may earn a commission from merchant affiliate
links, including eBay, Amazon, Skimlinks, and others.

You are making great progress !

Good help is hard to find... The combined age of my helpers (all 4) don't add up to one of yours lol

I've been looking into many a great build these days on Mud ... And this is one... Look forward to seeing yours done

Love to see interior pictures of dash and console at night when it's done... It's going to look great!

You are blessed in many ways :)

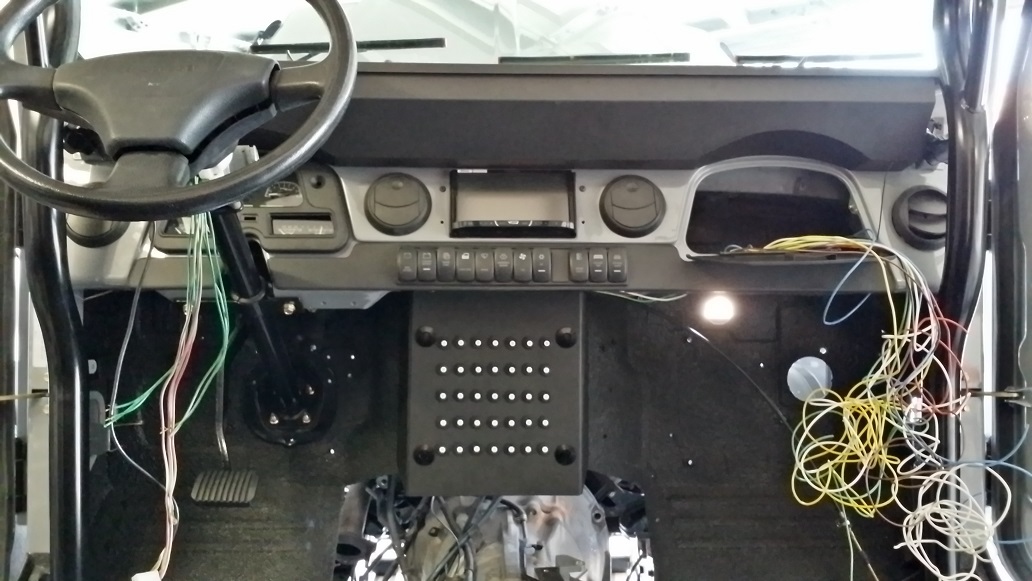
I don't have any with the console in, but here's the dash!

20140602_171913.jpg


DAMN! Killer build!
This is what the FJ Cruiser SHOULD HAVE BEEN!
This is my dream 40.

Thanks! That's a very nice compliment!

It's too bad they discontinued the V8 in 4Runners, and never had the option of the 4.7 in the FJC, that would have been great!
 
Riley - Very enlightening, educational and entertaining!!

@Fast Eddy was right on point, when he said, "My god man! That guy who builds Icons has nothing on this."!!

You should definitely think about a second career, down the (off) road!!
 
Speaking of wiring, Danny, here we go!

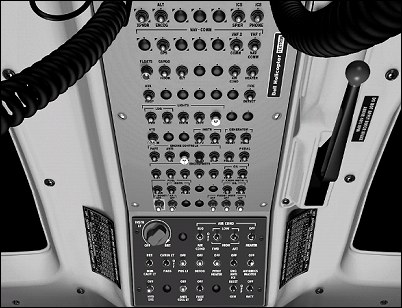
I did not want any fuses in the vehicle, only circuit breakers. There's nothing worse than not having a fuse when you need it! I also like the look of aircraft interiors with circuit breaker panels:

Bell 407 helicopter panel:
p5.jpg


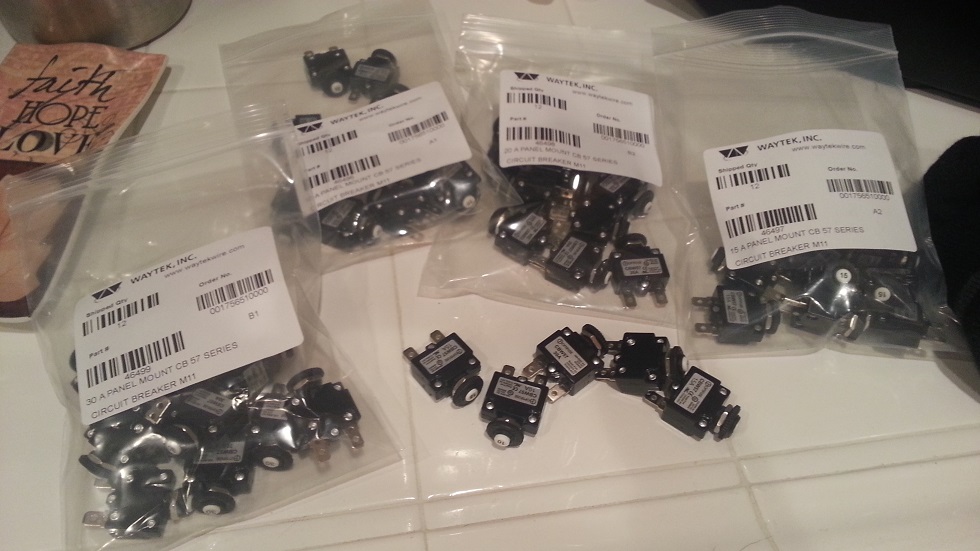
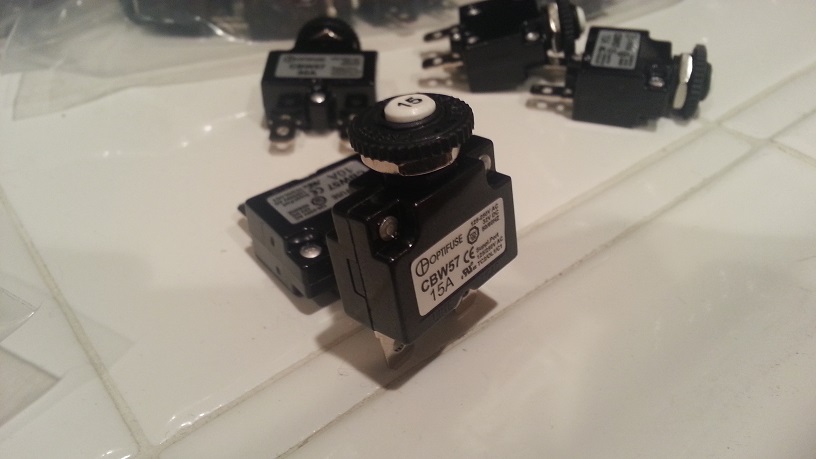
I bought some circuit breakers from the company I buy all my wiring from. Anywhere from 10a to 40a.

20140117_203029.jpg


20140117_203105.jpg


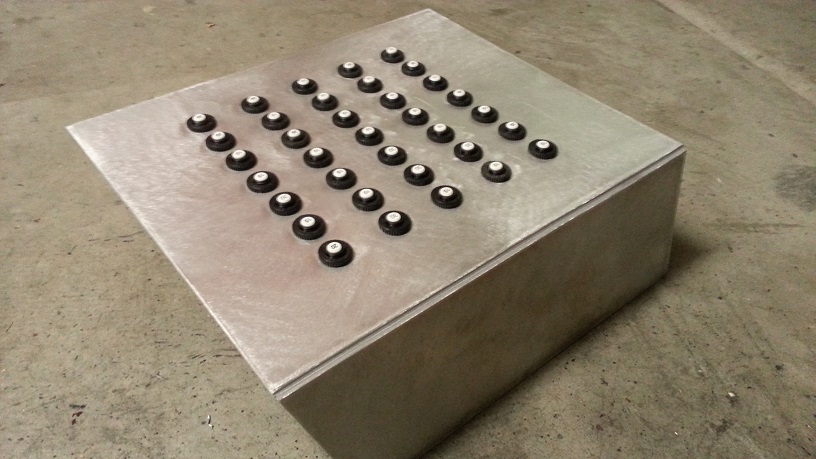
I decided to make my own, so I used my metal brake and bent some aluminum and drilled holes:

20140331_215317.jpg


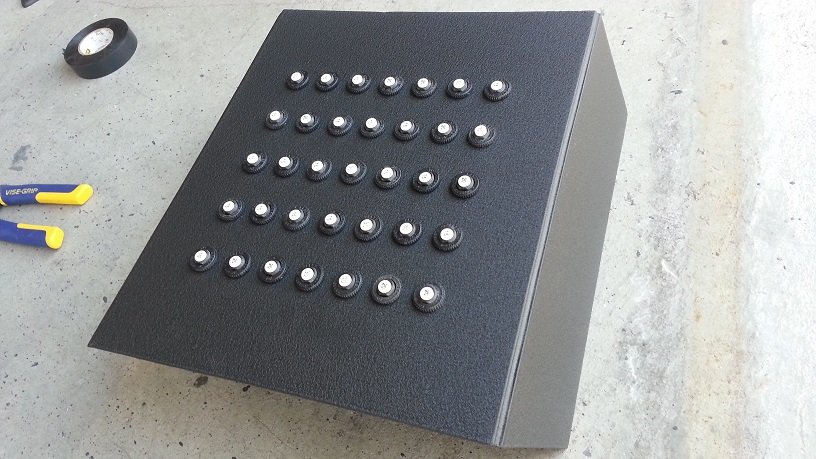
And powder coated to match the rest of the interior, or course:

20140407_160158.jpg


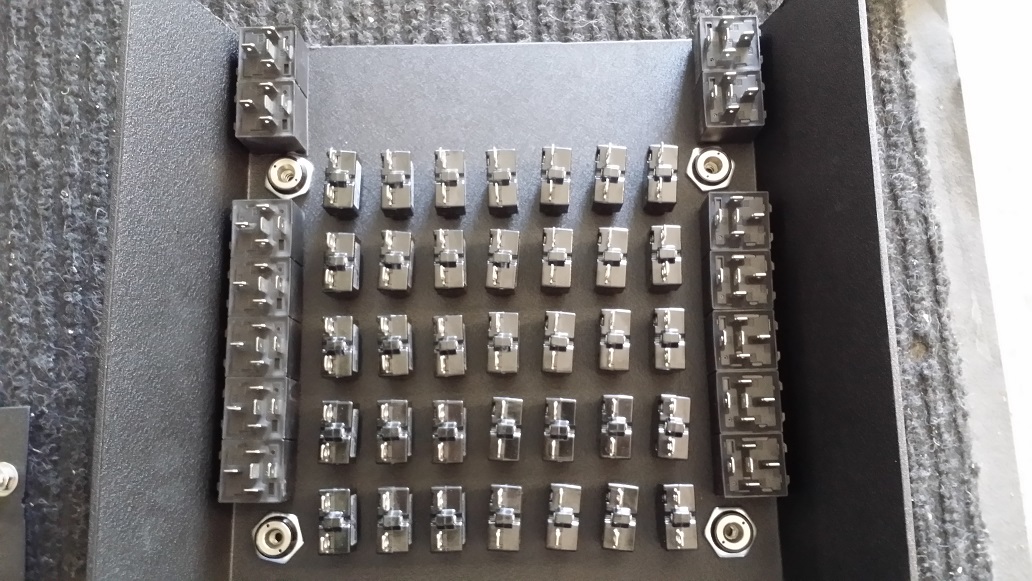
The inside of it. Circuit breakers on the inside, and relays lining the outside:

20140513_142709.jpg


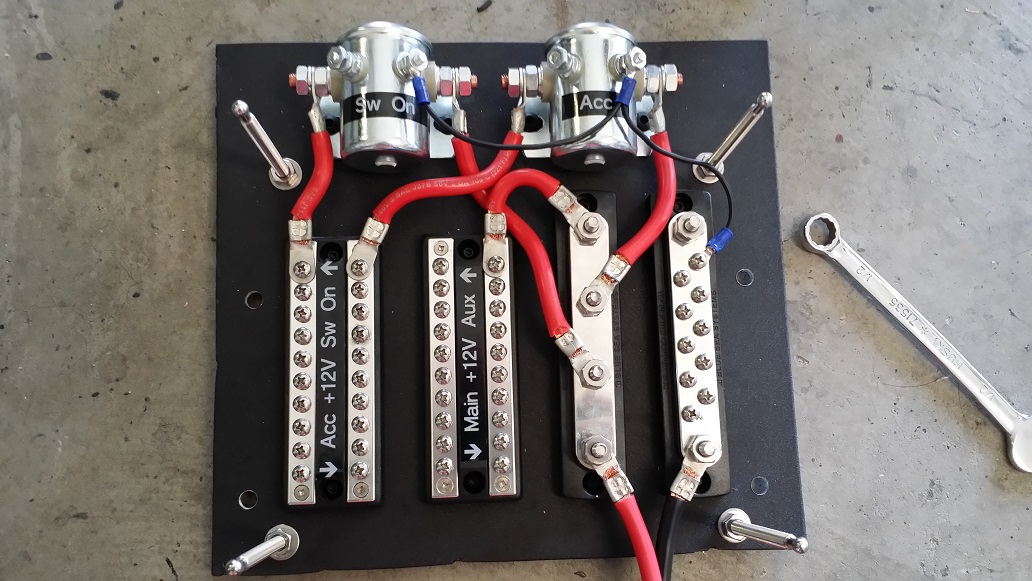
The reason the sides of the panel are bent back is to hide the main piece of the electrical system. The circuit breaker panel attaches to the back panel, shown below.

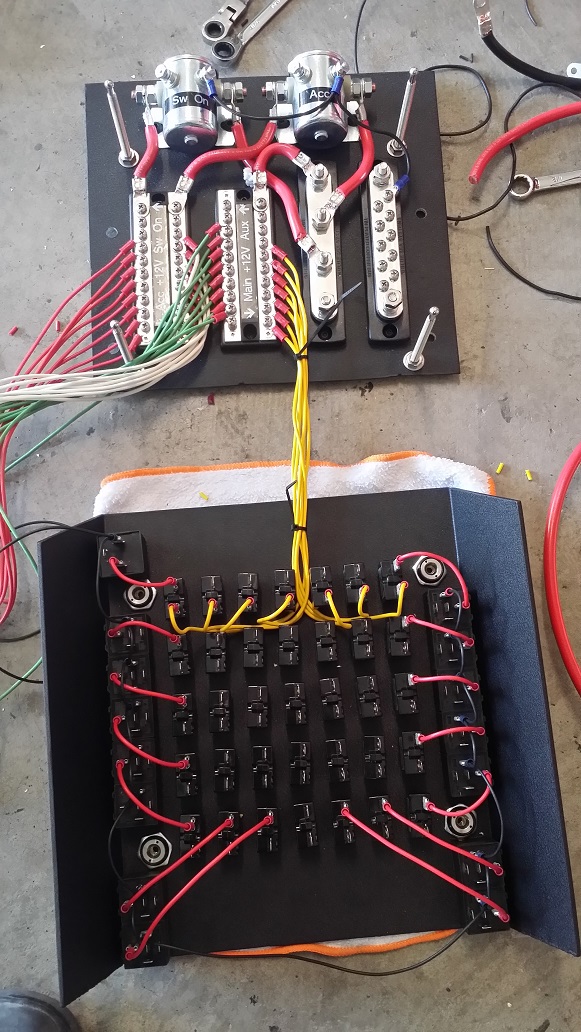
Two continuous duty solenoids energize different bus bars. They are all labeled. Far left is BATT switch in ON position. Second from left is ACC position. 3rd left is constant power from main batt, 4th left is constant power from aux batt. Far right is ground bus.

The four posts on the outside corners support the circuit breaker panel:

20140513_163032.jpg


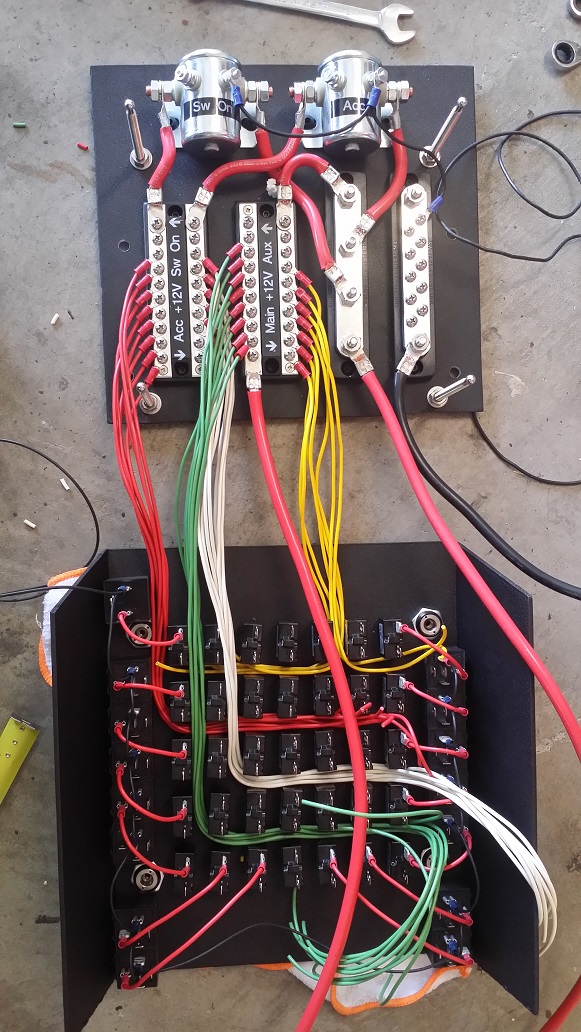
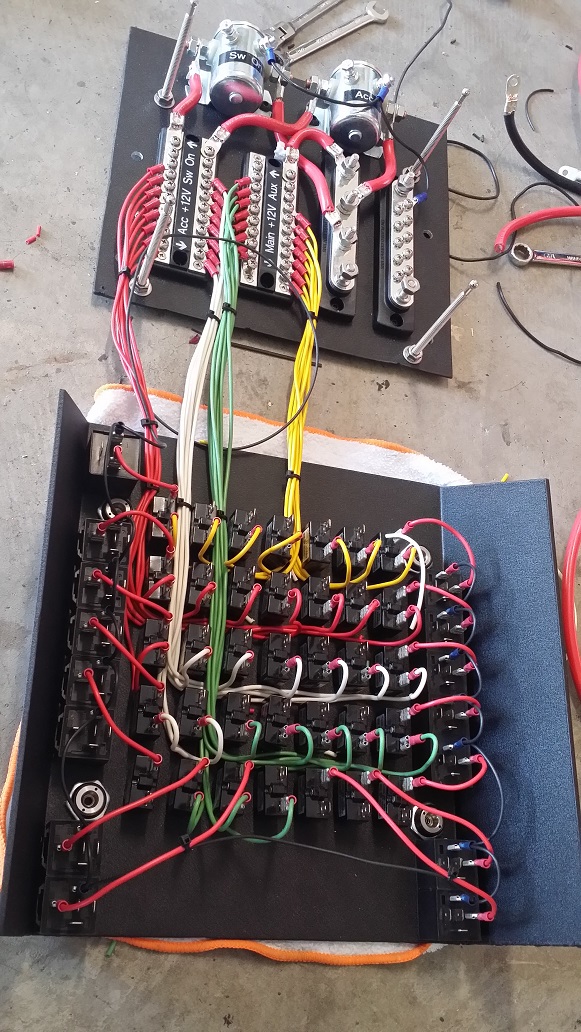
Dropping wires down to the circuit breakers.

YELLOW = Constant main batt
RED = ON position main batt
WHITE = ACCY position main batt
GREEN = Constant AUX batt

20140513_174317.jpg


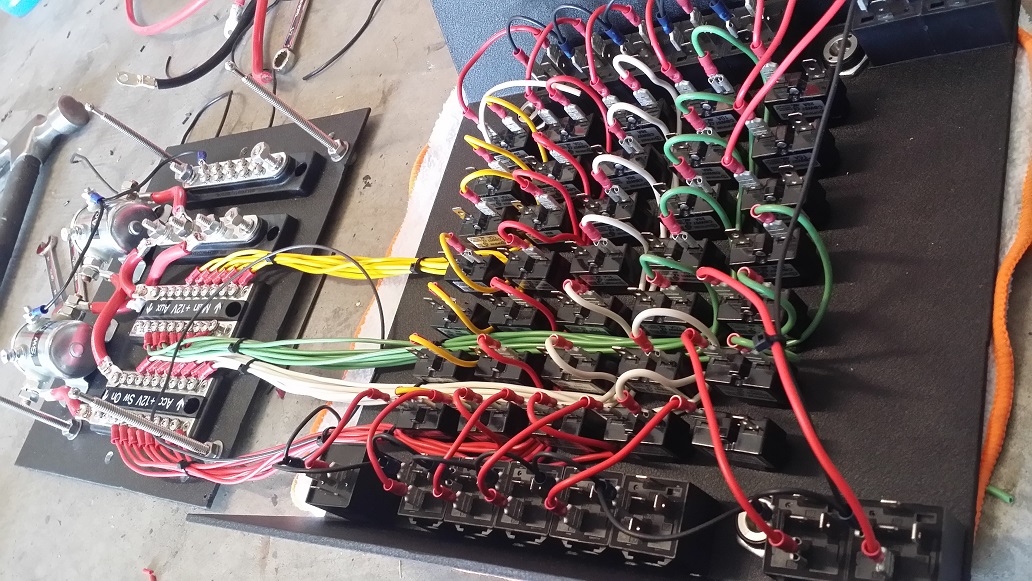
Cutting to length and connecting:

20140513_175953.jpg


Circuit breakers and relays energized:

20140513_182736.jpg


20140513_182755.jpg


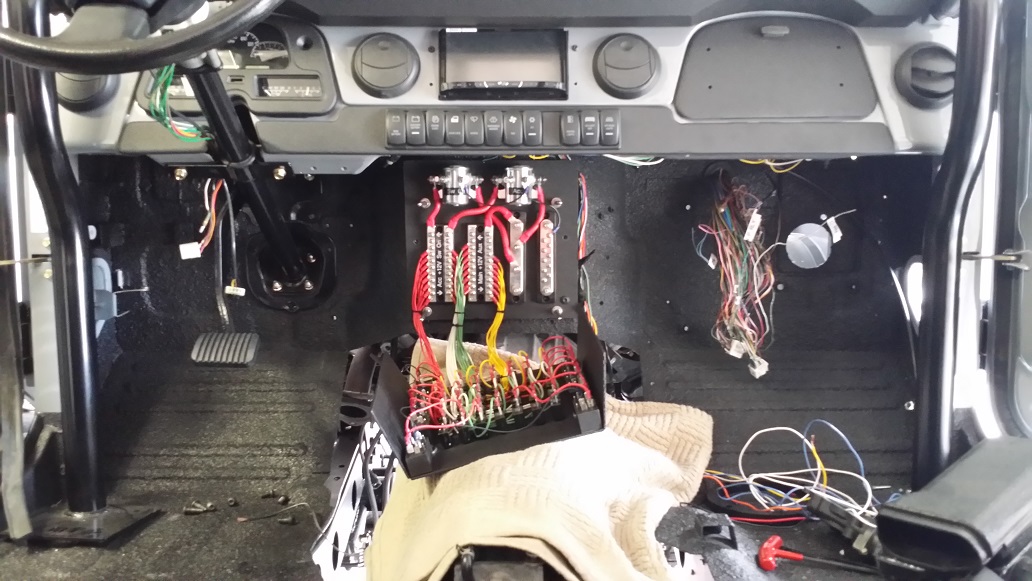
And, both units together and mounted on the firewall:

20140522_171311.jpg


20140506_093354_Richtone(HDR).jpg


For those of you wondering, I used these http://www.quik-latch.com/ in anodized black to secure my door panels and circuit panel. They are awesome!

I think it moved! Love that wiring setup!
 
I was able to find an 8274 locally on craigslist for $200. I knew it needed a rebuild, but it was well worth it!

Right after I bought it:

20130112_132038.jpg


Tearing it down:

20130610_153652.jpg


Rebuilding with all new seals and rebuild kit from WARN. Also used the aluminum cover from the seller on eBay, rather than the plastic WARN cover. Everything was sand blasted and cleaned before being repainted.

20130708_123430.jpg


Loaded with new synthetic line!

20130709_123243.jpg
 
I was hooked before, but now I'm hanging on for details about your rear vent actuators...... Freaking awesome idea.

If only there is an option for the sliding windows on my LX?

Dam
 
Some of the things in this post might be out of order, but some people might be curious about them, so here they are:

Obviously, both drive shafts needed to made from scratch. I wanted the rear to be a double cardan because of the length and the angle. I was able to take my frame down to Adam's Driveshaft in Henderson. They are awesome, and I'd highly recommend them.

The rear ended up being about 19.5" long. I don't remember the length of the front, but its........ very long!

20131014_081039_HDR.jpg


20131015_091526_HDR.jpg


20131015_153742.jpg


Squaring up for the placement of the iForce badge:

20140115_161429.jpg


Even though the paint looks somewhat dull in some pictures, here's a close up of the gloss in it. The paint is 1H5 Cement Gray. The clear coat is Imron, which they use on aircraft. It is very durable!

lcbadge.jpg


There are 3 round 'ports' on my center console:

20150103_190500.jpg


The part that looks like an ignition actually is. Its the factory ignition switch out of a 2003 4Runner. This is one of the more important parts of the build. There is a key transponder built into the top of it. It reads the RFID code in the key, allowing the fuel injectors to fire. There is no way to wire around this. Not only is there a key transponder, there is also a key transponder ECU. They key transponder ECU tells the main ECU that the key is the correct one.

The two Blue Sea ports are pictured open below. One 12v port and one twin USB port:

20150103_190513.jpg


The key in the console does not turn, it just stays there. I left the ignition there as a holder for it. I actually cut the key down to make it easier to carry and identify. As I said earlier, the 40 will not start without that specific key.

20150207_194325.jpg


Shortly after we moved to Vegas, we bought a 2003 4Runner. I wanted this exact year and model. It has the 2UZ and a750 transmission. So that means it had almost everything I was putting in my 40, minus the 100 series transfer case. There were quite a few times along the way I had to refer to the 4Runner for things that I did not have documentation on. It was the next best thing to having a complete donor vehicle. My poor fiance has had to drive it more than once with wires hanging out from behind the glovebox after I was digging around in it!

Up at Red Rock Canyon:

4r.jpg


Out behind our house playing after a rare Vegas downpoor:

20131123_145826_5.jpg


I wanted all of the wiring in the vehicle to look somewhat factory. I had 3 different sizes of braided wire sheathing. Here is an example of one of the harnesses I made.

The 3 plugs on it are for tail lights, side marker lights, and vent window actuators. The other leads are speaker wires and 110v outlet power.

20150104_153432.jpg


Another example of how I'm trying to keep a clean, factory look. This is the fuel sender. There are also many places in the vehicle where I replaced phillips head screws with socket head. This is one of those places...

20141217_200143.jpg


This is the underside of the shifter cover I had painted to match the vehicle. Since I'm mounting it to the console, I had to make my own lighting. These are 2 triple LED strips that illuminate the P R N D 4 3 2 1 indicators. Much brighter than stock... I like it!

20140628_132244.jpg


20150207_200136.jpg


I had thought about having my exhaust made, but I had done most everything else on the vehicle, so why not try this too?

I bought a variety of bends from mandrelbends.com. I also got a 2-1 collector, Magnaflow muffler, and 2 V-band clamps for easy disassembly. I used the factory exhaust manifolds. From there, I had Nefarious Kustoms cut me 2 flanges to mate with the OEM manifolds. Then it's 2.25" pipe to the 2-1 merge. After that, it's 2.5" all the way back.

Here is is tacked up:

20141205_142610.jpg


I did have to extend some wires in the harness. These in particular are for the mass air flow sensor. There are no butt splices in the vehicle. Everything is soldered and heat shrinked where possible. This was also covered with braided sheathing when done.

20140522_161208.jpg


Here's another important item for those thinking about this swap. There are a few small variations of wire harnesses throughout the 02-04 years for different Toyota V8 vehicles. This is one of them. As I posted earlier, I was using a Tundra engine and 4Runner harness/ECU. On the Tundra, the injectors and knock sensors are in the same plug, and that plug goes to the ECU. On the 4Runner, only the knock sensors go straight to the ECU, but the injectors (+) side go straight to a power source.

Below you'll see my solution to the problem. I cut off the Tundra plug, ordered the 4Runner plug for the knock sensors so they would plug into my harness, and made my own plug for the injector power wires (on the right):

20140522_161530.jpg


I mentioned in an earlier post that I wanted complete control over my transfer case. I am using my center diff lock switch to put the vehicle in 4WD. I did not want a lever on the floor for high/low, so I am using a Dakota Digital 110lb linear actuator and actuator controller. The setup they sell worked perfect for my needs. It has three easily programmable presets, so of course, I made them HIGH / NEUTRAL / LOW. I will still hook the position switches to lights to confirm. The switch panel that Dakota Digital sells is very slick as well. The buttons are actually lights that light up when they are pushed. They remain lit until the actuator is in that position. Here is a video to demonstrate. I just need to find a place to mount the switch panel..... probably in the console somewhere.

 
Last edited:
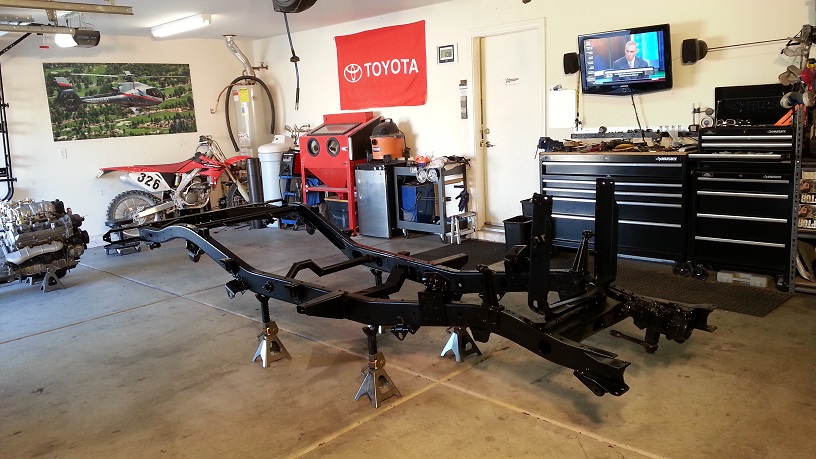
While the body shop had the body, I was able to spend some time on the frame. Fortunately, the Tundra engine mounts are the exact same width apart as the 40 frame is wide. But if I set the engine down on the Tundra mounts, it sat a bit low. I made some spacers and reinforced the sides of them with 1/4" steel.

I posted this picture in the first post, but this is ground zero. You can see the motor mounts:
20131105_130833.jpg

^^^ this is very cool tech!
Care to post some detail pics of the motor mounts on your frame?
 
Last summer, we made the decision that we wanted to stay in Vegas for a while. We had lived in our rental for 2 years, so it was time to buy a house. In September 2014, we closed on our first home and moved in that week. We were so excited!

The hardest part about the move was the 40. It was very close to running..... but it wasn't. That meant taking certain things off of it, securing others, and packing all my tools and parts that had not yet been installed. Our new house was only about 2 miles away, but I still had to have a flat bed move it for me. I couldn't tow it yet because it did not have functioning brakes.

Getting ready to go. Kind of sad cleaning up the garage that I had spent so much time in the last 2 years.

20140920_122546.jpg


Loaded it up on the flat bed. The first time in almost two years since it had seen daylight!

20140920_125838.jpg


Holding my breath, looking for parts falling off!

20140920_125920.jpg


Made it! Pheeeeewwwwww!

20140920_130948.jpg


Sitting proudly in front of the new home...

20140920_133141_Richtone(HDR)-1.jpg


Unfortunately, I took about 3 months off from working on the 40. Numerous small house projects took priority. One of the bigger was the garage. I have a very difficult time working on anything if my tools are not organized and my work area is not clean.

What the garage looked like before we got it:

20140825_144823_Richtone(HDR).jpg


20140825_144901_Richtone(HDR)(1).jpg


Part of the reason we chose this house is because the garage has 10' ceilings. The garage doors are only 7', but I have a contractor that will put 8' doors in.

Right now, there is about 1/8" of clearance between the top and the garage door on the 40. I want to be able to put the rack on soon though, so I'll have to raise the doors.

The two Toyota's in their new hom:

20141003_164943_Richtone(HDR).jpg


Installing RaceDeck Freeflow tiles:

20141111_194226.jpg


All done!

20141112_114904.jpg


And new tool storage in. After 3 months, I can start on my 40 again!

20141216_193049.jpg


We are extremely fortunate to have such a nice first home! Still need to finish painting the garage, install more outlets, hide TV cables, and install more lighting.
 
Last edited:
Did you have to raise the opening of the garage? Openings are typically 7' I believe. That's pretty involved with the header and stucco. But based on your attention to detail (and budget) that was a non-issue... ;)

I have not hat to yet. When I brought the 40 here for the first time, it was just over 7' high, so it would not fit in and out of the garage with the fiberglass top on. Now that I've loaded it up with the interior, it sits at about 6' 11 7/8" ! I will end up raising the garage door so I can drive in with the rack on top. We also use the roof top tent on the 4Runner pretty often, so it would be nice to have that fit in the garage as well.
 
This build is sick!

Getting update withdrawals...

Thanks for following along guys... I really appreciate it! New updates coming soon. I've been busy on the 40, and the fiance and I went camping on Valentine's weekend.

20150213_175614.jpg


I'm hoping to get the 40 smogged on this week. I know I don't need to, but I don't want a 'Classic' or 'Old Timer' plate. I want the vintage early 80's style blue Nevada plate with no writing on it, other than the plate number. It should pass no problem. I don't think I'll need a cat since it did not have one in 1976 from the factory. A 2UZ with no cat should burn much cleaner than a 2F with no cat!
 
Here's another post about the past couple of years, things I've done, people I've met, and cruisers I've bought....

Throughout the last few years, I've bought and sold a few Land Cruisers. They have each been very unique, and a lot of fun. Even though they took a lot of time away from my main 40 project, I was able to work on them, hang out with friends, and sell them for more 40 $$$.

On average, I look at craigslist a few times a day. I usually look for 40's or 40 parts exclusively. One day, I decided to look on MUD at the 80's For sale section. I came across an FZJ80 that was currently not running and the owner was basically giving it away.

I got pretty excited!

I looked at the location, and it was in Pahrump, NV, about an hour west of Las Vegas.

I got even more excited!

I noticed the ad was posted about 6 minutes before I stumbled upon it. The timing was perfect! I called him right then, set up a meeting time, and agreed on a price.

The seller even dropped it at my house for an extra $50! I got it the next evening.

20121227_162341.jpg


A quick rundown-

97 Land Cruiser
ARB front and rear lockers
Slee heavy duty lift
Slee sliders
35" KM2's
ARB front bumper
Front seats just recovered with leather

The seller had just changed the head gasket. After putting everything back together, there was still a knock in the bottom of the engine. I think he got pretty discouraged after a bit of diagnosing, and gave up. I started taking it apart to trace the noise. It was extremely difficult, because when it was apart, I couldn't run it to pinpoint the rattle. I had to reassemble the motor numerous times to see if it was better.

It turned out it was a tooth on the gear that was between the crank and power steering pump. Each revolution, it created a loud sound, similar to rod knocking. I ordered brand new gears from Toyota, and it was fixed!

So of course, the first thing to do after it was running was take it to the desert!

_DSC1208.jpg


_DSC1295.jpg


_DSC1252.jpg


Even though I thoroughly enjoyed working on and driving the 80, I ended up selling it a few months later for almost twice what I was into it. Although that seems like a good profit, I had close to 80 hours into it. That $ went straight toward my project funds. I knew if I kept it, I wouldn't use it very often, and I did not have room to store it.

Next up, a 78 40 series. Yet another local seller about 6 months after the 80 sold. He was the second owner and bought it only a few years old. It had been sitting for about 10 years when we went to look at it. At the time, I was going to pass on it, but a good friend of mine that went to look at it with me decided he wanted it. So, we loaded it up on a flatbed and took it home!

20130930_210755_LLS.jpg


After cleaning it up a bit, my buddy took it from there. It's a beautiful, well running rig now. He's done an outstanding job with it!

20131008_174101_HDR.jpg


And yet another 78. This one has a strange story about how I acquired. I'll try to keep it brief-

I was driving around in Boulder City, NV, which was about 20 minutes from our house, looking at neighborhoods to possibly buy a house in. As I passed by a house, I noticed the unmistakeable sight of a white fiberglass 40 top behind somebody's fence. I knocked on the door, and no answer. I go on my way and forget about it. Then, about a week later, for some reason I told my fiance I wanted to drive back and ask about the 40 again. Off we went!

The 40 was still there, but once again, no answer at the door. So I left a note with my business card. It said 'If you're interested in selling your FJ40, please call me'. Pretty straight forward!

About a week goes by and nothing. Then I get a call from an older lady. She asks what I'd be willing to pay, and I tell her I don't know till I look at it. She tells me she'll call me that weekend so I can come look at it.

That weekend rolls around and she doesn't call. I had her number, so I called her. We set up a time the next day, and I went to see it!

This is how it had been sitting for 15+ years:
20140125_144510.jpg


Come to find out, between the time the lady called me the first time, and the weekend she was suppose to call me, her husband passed away. He was the original owner of this 40. She was now ready to sell it, the house, and everything else she owned so she could move to Oregon and be closer to her daughter.

We agreed on a price, and off it went to my house!

20140127_093303.jpg


Unloaded and wiped off:

20140127_101126.jpg


I spent quite a bit of time cleaning this one up, but never got it running before I got a good offer on it. Because I had modified my 76 so extensively, I really wanted to keep this one to have an original too. But, there were too many mods on this one I didn't feel like working around. The biggest were:

Horrible job cutting fender flares
Aux tank fuel door
Big holes in firewall for A/C lines

I also wanted a 60's 40 for the original, so I'd keep looking. After cleaning up the 78 a bit more, it was gone in no time.

20140127_101155.jpg


20140204_165618.jpg


Before it left, my buddy stopped back by to pay a visit! Look how much nicer the blue 78 looks now!

20140203_172000_LLS.jpg


As I mentioned earlier, I had been looking for an early model, stock 40 to go with my 76. A few months ago, I came across a 67. After looking at it and agreeing on a price, it was time to take it home! At one time, it had a Chevy 350 in it, but had been removed. So when I bought it, there was no engine.

First seeing it:

20141110_162348.jpg


Loading it up! Seems to be all too familiar sight by now... taking a Land Cruiser home on a flat bed!

20141110_163711.jpg


The hard top on it was from an early 80's. If the top was period correct, I might have kept it, but since it wasn't, I took it off and sold it, including all 4 doors.

20141114_140612.jpg


I was fortunate enough to find a local MUD member selling a complete 1F drivetrain out of his running 67. He is in the process of upgrading to a 2F. I went out and helped them pull the 1F and load it on my trailer.

20150103_141729.jpg


So that's it for other cruiser's. We are down to two. I'm waiting till I finish my 76 before I start on the 67. There will be another build thread coming soon for that one, but it will be the polar opposite of my current build!
 
Last edited:
Riley - where's that camp spot? I don't recognize it, but it looks like it could be the bottom of a Lake Mead cove... except for the scattering of snow.

Since you are gonna be registering NV... are you aware of the new DMV DASH PASS? Scroll down the page to see it. It's really an improvement over sitting with several hundred of your closest friends... now you can get in line from home (or wherever) and sit with one of your closest friends. They text you when you need to head to DMV and which line to get in. If you haven't... try it... you'll like it!!

Hey Danny,

That is Houseboat Cove on the North side of Lake Mead! The white you see is not snow.... just calcium build up. What perfect weather for camping! Mid 70's!
Thanks for the info on the dash pass. I've used it one, and it was great!
 
The first time I saw his 'UZJ40' (last March or April), I didn't know much about FJ40s, in particular, nor mechanics, in general.

Check it out Danny! I came across this picture from that day! You're right, April 8 is when it was taken! That was fun helping you with you knuckles that day!

20140408_161607.jpg
 
that blue, 2 owner, 78 is sweet ... because I love rust so much (lol), would have seriously considered leaving the patina on the hood, etc ... having said that your buddy's done a nice job on it ...
:smokin:
 
Hey Danny,

That is Houseboat Cove on the North side of Lake Mead! The white you see is not snow.... just calcium build up. What perfect weather for camping! Mid 70's!

Thanks for the info on the dash pass. I've used it one, and it was great!

Thanks for the info - I wondered about the 'snow'!
 
Check it out Danny! I came across this picture from that day! You're right, April 8 is when it was taken! That was fun helping you with you knuckles that day!

20140408_161607.jpg

Hey 44! That was the first 'trip' I took in 44 - a drive across Vegas!

I learned a lot and enjoyed meeting and working with you and Allen!!
 

Users who are viewing this thread

Back
Top Bottom