Builds My 40 Build... 20 years and Counting... Purists beware, this may hurt... :D (10 Viewers)

This site may earn a commission from merchant affiliate
links, including eBay, Amazon, Skimlinks, and others.

image-2632668563.jpg
image-4215202459.jpg
image-846825670.jpg
Roof rack... A few years back I built the basket which is 4' wide by 42ish". Originally it went from the windshield frame to the stock roll bar and bar a rigid "Bikini" top secured to its bottom. Since I haven't used it that way in a couple years, I decided to mount it atop the hardtop.

Thule to the rescue. Thule recommends 8" towers, and for good reason. I chose to use the more common 6.5" towers to minimize overhead clearance, because I still like to get into underground parkades and the ferry off this rock. However with the lower towers, the 48" rack barely cleared the glass roof when installed and after loading and settling it just touches. But this means my 6'5" truck & 3" Basket will just squeak into parkades with 6'8" clearance... And even a few 6'6" ones.
 
Last edited:
image-2875780345.jpg
I turned the basket so the load bars are +/- 47" apart. The front bar is 58" wide and the rear 64".

Costs including locks and Keys.
Used Towers with keys $60.
Used 58" bar (& spare bar, 2 extra towers) $20
New 65" bar $50
New keys & shipping $10

Total $140.

They ended up costing more than I first figured, but a lot less than new options... Or even 4 towers. The basket doesn't add any noise on the highway and dramatically increases the storage available.
 
Last edited:
image.jpg
Steps...
image.jpg
image.jpg
image.jpg
 
They are 15" off the ground, yet make it super easy for the kids to get in and out. They'll come off in about 10 minutes for serious offroading. They're a little shiny for my tastes... But I found them "used" through Amazon.com for $30. The box had been opened, but they'd never been installed. Sure beats $250 locally. For $30 plus a bit of shipping, I couldn't have bought materials to build steps. It would be nice to have custom built steps that folded out of the way, but I decided that wasn't going to happen soon enough.

The tread is large enough that my kids can dance around on them.
 
I'll reattach them, or attach some new ones when I have a chance. I don't have any of the actual inprogress, just how it looks 20 years later. Unfortunately, I had them all stored in my profile, and those albums seem to be gone.
 
image.jpg
image.jpg
image.jpg
image.jpg
image.jpg
Any chance of re-attaching those tub pics?

Here are some retakes of the tub. I had to use a hole saw to cut access holes to remove the new tub when I put in the "new" frame.


I'll have to rescan some of the early 90s frame off pics... It's not as much fun recreating a thread that's been raped of all its pictures.
 
image.jpg
 
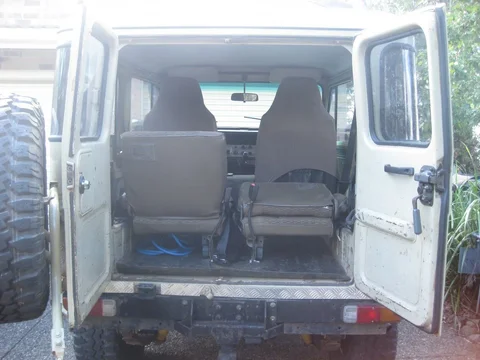
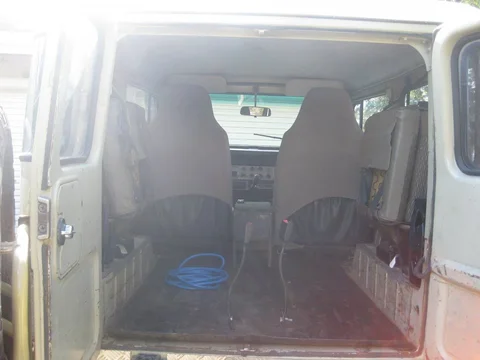
I've long been wanting more flexibility with the rear seats. I've wanted the rear seats to face forward yet fold out of the way when not in use. Solution, 1989 Mitsubishi 3rd row Pajero seats... Anyone install a set?

I read on one Ausie thread that it can be done, and for $50, I figur it'll be worth a go. Unfortunately, my 'Fabricators Easy Button' is broken... So it'll likely be a while before I pull out my working rear bench, and spend a day to redesign the fender mounts to be at the right height and angle to fit with the flat top 40 inner fenders vs Pajero fenders that are closer to 45 °.

Long and short:
1) seat back folds flat and reclines at 4(+/-) different angles.
2) leg to support seat base folds into bottom when seat is folded up to the side.
3) the seat will tuck under the stock rear roll bar when folded up... Freeing up the entire rear cargo area.
4) rear bench is 'split' allowing for one or both to be folded out of the way.
5) in a pinch, they'll fit 3 across the 2 seats.

But you'll have to wait to see my results... Finishing powersteering is currently higher up my list.
 
It's newer friend which is slowing the progress... lol
Ambo.jpg
 
Last edited:
Seems to work on all my devices... Anyone else have trouble seeing the 9000 lb, 7.3 PSD powered, 'big brother'... Crestline Ambulance?
 
I don't see it either...
Ambo.jpg
I've reposted a couple different ways... hope you'll be able to see it now. It's like a 2X40... 7.3 Turbo Diesel V8, 8500 lbs+
 
I had a set of Pajero seats in the back of my BJ42. Was practical, but I wouldn't want to ride back there for too long.
From memory I used a piece of C section steel and had the factory brackets welded to the inside of this. The C section then bolted to the top of the wheel well with a plate inside the wheel well acting like a big washer.
IMG_2880.JPG IMG_2881.JPG IMG_2767.JPG
 
Those are the ones... I won't need to add a plate... the floor is thicker than the truck frame.:D


I had a set of Pajero seats in the back of my BJ42. Was practical, but I wouldn't want to ride back there for too long.
From memory I used a piece of C section steel and had the factory brackets welded to the inside of this. The C section then bolted to the top of the wheel well with a plate inside the wheel well acting like a big washer.
View attachment 1061236 View attachment 1061237 View attachment 1061238

If need be, I'll add some memory foam to them to make em comfy.
 
image 2.jpg

image.jpg

As the rest with my build... 4 years in the making, a hand finished Billet Aluminum hood spear.
I started with a 1x1" piece of aluminum and used: a router, Milling machine, drum sander, file, sand paper, and cotton wheel to turn it into the New hood spear.

FYI, It could also be done with a router, table saw, file, and angle grinder. If was easier to make than I expected, and overall a fun project. It's a great way to finish off a split hood... or add bling to a newer one... :D
 
A few years back a friend gave me a Edelbrock 1406 carb and a S.P.2-P Intake manifold that they pulled off their hotrod. First I swapped in the carb, it smoothed out the idle a lot, ran real nice, and pulled well under load from idle. It worked almost perfectly on my SBC after adjusting the idle speed and mixture.

Fast forward a long time... And I finally threw on the Edelbrock manifold. It has very mixed reviews on the web... Many would even say a friend would give you one. I decided it would be worth the effort to install it.

Results:
1) it looks way better than the cruddy blue manifold which was a mix of blue, black, and rust. And looks are the most important thing on a truck like this.... NOT.

2) At first it idled high... Then I found the idle could be adjusted down to 400 RPM, and it would idle there happily. After playing a bit I set it at about 650 rpm. It idles very smooth, and chugs along at idle even in fourth gear.

3) performance: throttle response is smooth and quick, torque is improved, RPMs increase faster, and it otherwise makes the truck feel lighter. Pulling away from a stop, the tires will chirp, not by dropping the clutch, by getting on it after the truck is moving. Something it wasn't prone to doing after combining 3.70s and 33x10.50 tires.

4) exhaust: I don't have much of an exhaust system on the truck... In 96 when I did the swap I had the muffler shop throw together a quick and dirty exhaust... Figuring it would rust out before so long, and I'd build something better when I wasn't already broke... Well 20 years later, I've replaced the mufflers a few times, but the pipe is still good. Anyways, it irritated me at intersections because of how loud it's been getting. However, now it's almost silent... HUH. Who'd have thought an intake manifold could make an engine quieter... Not me. Any theories? Only other difference was I left the exhaust crossover under the carb blocked off by the gaskets... The old manifold had a ton of crud baked to the bottom, and I didn't feel that could be good for engine health.

4) reputation is that these intakes choke the motor over 4k RPM... Since mine is rev limited to 4k, I figure that problem will never surface... Although I do find it hits 4k much quicker (and quieter) than before.

Moral: don't believe everything you read on the web... For my 350 with an RV cam and higher compression, it performs way better than the stock iron manifold.

I'll report more after I get a chance to wheel with it... Pics to be added also. :cheers:
 
it works better for a couple reasons - first and foremost, the heat-rise/cross over is the worst possible thing you can do to a motor to make it run well. Air/Fuel ratios are heat dependent, in the 70s (when the manifold was made) they cared less about economy and all about emissions. Heating the a/f ratio gets better emissions. In that same vein, aluminum is far better then steel at transferring heat - thus you don't get the heat from the engine heating the manifold as much. The crud on the bottom of the manifold is because the oil baked to it... which, of course, transferred and trapped even more heat. Of course it's lighter, but on a 5000 lb rig... it's really not an issue. Second, the SP2P isn't as good as the Performer manifold, but it was the first dual plane (before, most of what was out there was single-plane), mass produced intake. There is better out there, but free is still a very good price.

The debate nowadays is airgap vs. non-airgap. The argument goes that on a street-driven (read winter driven) vehicle, you need some heat to properly atomize the mixture - especially since the ambient air temps will help cool the intake charge by itself. The argument I'd bet you are reading is the single-plane vs. dual plane argument... some say single plane doesn't cause as much lower-end loss as the old-timers claim but a dual plane chokes flow about 4k.... honestly, they all run pretty well to at least 5500 rpm.

Quieter - you need to add some timing back into the motor. Now that it's flowing better, you can get a bit more advance and it will really run hard. Be sure to check and read your spark plugs as you tune.
 

Users who are viewing this thread

Back
Top Bottom