Intake/Exhaust Manifold Refresh items (1 Viewer)

This site may earn a commission from merchant affiliate
links, including eBay, Amazon, Skimlinks, and others.

Leaving this here for reference:

 
Leaving this here for reference:

Excellent reminder...and link to my old thread. My plans/timeframe have changed a lot since then, but I think the heat riser thoughts are exactly what I needed.
 
So I'm in the midst of a desmog and sniper install on a relatively low mileage cruiser. (43k miles)

There is nothing wrong with the manifold gasket seals to my knowledge, but they are both somewhat old and dingy looking. I was planning to pull them off while I've got the truck apart so that I could have them ceramic coated.

This thread is starting to make me re-think doing it. Am I stepping in a bear trap by pulling the manifolds off an otherwise good running truck?
 
my local machine shop has charged me between $250-300 he's done 3 or 4 now for me and my customers

bummer on the threaded holes

the manifold I took off the truck is in great shape. But the set I bought off mud classifieds that were already machined...unfortunately the intake was a mess. But not a big deal to fix.
 
So I'm in the midst of a desmog and sniper install on a relatively low mileage cruiser. (43k miles)

There is nothing wrong with the manifold gasket seals to my knowledge, but they are both somewhat old and dingy looking. I was planning to pull them off while I've got the truck apart so that I could have them ceramic coated.

This thread is starting to make me re-think doing it. Am I stepping in a bear trap by pulling the manifolds off an otherwise good running truck?

I finally did mine because I had very noticeable exhaust leaks and I was having lots of odd stalling issues and had already replaced the obvious stuff.
After doing the refresh I was able to set the carb and idle and it idles like it should and no more exhaust fumes from under the hood
 
I sent out my cab an distributor to Jim C and it looks like it will be a few weeks. So I decided to take off the manifold and take a look. What really convinced me was my talks with with @Miloslavich and a local cruiser guru named Dale who will be resurfacing the manifold. It turns out like everything else inside the engine there was some serious TLC needed. Originally I could not see any manifold leaks due to the serious grime layer over everything. Once I got in, it was apparent this was the correct move. Many of the bolts connecting the manifold to the block were finger tight and nearly all of the gaskets were burnt up.

IMG_0567.jpg


I spend quite a bit of time today scrubbing off grime on the intake manifold and it looks pretty darn good. I am hoping to paint the exhaust manifold next. Should I hold off on painting the exhaust manifold (bottom one) until I have the machinist look at it.. or is little worry of me covering up anything important like cracks on this piece? Also, the heat riser/hot air intake 90 had broken off one of the attachment points. The heat cloth was also pretty gnarly. Any suggestions on this? Thanks a bunch for all the help.

IMG_0569.jpg
 
Nice work! good call on pulling the manifold and doing it right. Dont paint anything, get it and all the parts to the machinist first before you try and pretty it up. Dale is a great guy, he'll take care of you.
 
So I'm in the midst of a desmog and sniper install on a relatively low mileage cruiser. (43k miles)

There is nothing wrong with the manifold gasket seals to my knowledge, but they are both somewhat old and dingy looking. I was planning to pull them off while I've got the truck apart so that I could have them ceramic coated.

This thread is starting to make me re-think doing it. Am I stepping in a bear trap by pulling the manifolds off an otherwise good running truck?
While doing my Sniper my shop noticed an exhaust leak and I decided to go the Ceramic Header route...also had it machined as suggested here....wasnt crazy expensive to do that....$40.
Screenshot_20201208-100250.png
Screenshot_20201208-104932.png
Screenshot_20201208-100221.png
 
Last edited:
I have done this job twice on two different 60's and the hardest parts both times were (1) separating the intake and exhaust manifolds (those bolts like to seize) and (2) finding someone competent to machine the manifolds flat.

I learned the value of PB Blaster and was able to get the bolts out both times after extensive soaking and patience.

Be real careful about who does the machining, put the manifolds back together first and be sure to tell them not to remove any more material than absolutely necessary.
 
I have been able to loosen both the intake and exhaust manifold bolts. I am down to removing the nuts from the triangular flange that connects to the bottom of the exhaust manifold. The two 17mm rounded in attempts to remove despite using pb blaster and using a six sided socket. The third nut is a 14mm and I am able to slowly work it loose. Looks like I will use a rounded nut remover on the 17 mm's. I am having to go at it from underneath using 1/2 driver and extenders and it is pretty difficult. It is definitely a two person job with one person holding everything in place related to the socket wrench and another person leveraging a cheater bar to generate 80+ lbs of torque. I am wondering if I should torch each bolt to help with removal?
 
I am wondering if I should torch each bolt to help with removal?

Maybe try setting up a vibration with a drift and hammer (ratchet wrench extension) to tap the stud rhythmically after it has soaked in PB Blaster or Kroil overnight. Try to break the corrosion free without damaging the stud.
Heat causes metal to expand, so the nut would expand which is good but so would the stud it's jammed on to, so I don't know if it would help or not. I've never needed heat to remove a jammed nut ever.
I am not sure what the drift and hammer method is?

I can spray the studs from above with pb blaster but should I get some foaming penetrating oil? since the bolt is on the bottom - spraying upward.
 
they should have all been the same size, someone used whatever fit and the 2 larger ones are wrong and very well could be seized to the studs
heat will be your friend, it's a tight area but get it red if possible without damage too the pipe.
get a socket, whatever size and drive it onto the nut and try to loosen
the nuts are special for the application
 
I am not sure what the drift and hammer method is?

I can spray the studs from above with pb blaster but should I get some foaming penetrating oil? since the bolt is on the bottom - spraying upward.

OSS is just saying to hammer-tap (gently) the thing you've sprayed with penetrant to set up vibration that enhances the wicking or capillary action of the lubricant rust buster stuff into the micro-spaces between the bolts/nuts.

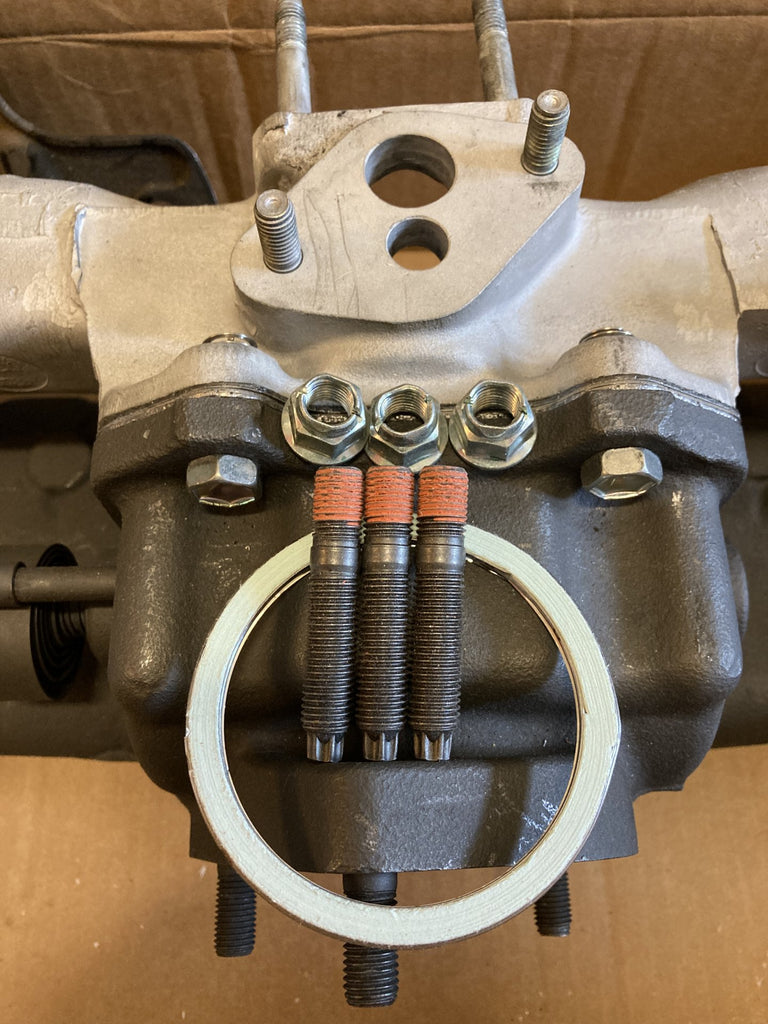
Those Nuts and Studs on the manifold are still available from Toyota. Don't worry too much about buggering them trying to remove unless you make them harder to remove... Also, you can get updated hardware from:


they should have all been the same size, someone used whatever fit and the 2 larger ones are wrong and very well could be seized to the studs
heat will be your friend, it's a tight area but get it red if possible without damage too the pipe.
get a socket, whatever size and drive it onto the nut and try to loosen
the nuts are special for the application
One approach might be to remove the EGR/Air Injection/Smog parts to get better access. Then I would work on it from above. I saw a youtube video where a guy tapped a sharp chisel into the side of a nut to split it - possible solution or too dicey? I've ordered new OEM studs and bolts BTW so I will be starting over with the "right stuff".

I'm leaning towards a desmog setup since a former mechanic decided the system was pointless and plugged the port to the air injector rail. I had no idea what he meant at the time. My air system just blows out into the engine compartment.
 
I got the three nuts off! I did remove alot of the air inject parts to remove one nut from above. The key was, whether from above or below, tapping the 6 sided socket into place so it was nice and snug. However, I removed two out of three studs in the process. Now to cut through a bolt (91611-41035) that attaches the exhaust pipe to a bracket cause it will not budge. Otherwise I can't get the flange to drop away from the remaining stud.
 
I got the three nuts off! I did remove alot of the air inject parts to remove one nut from above. The key was, whether from above or below, tapping the 6 sided socket into place so it was nice and snug. However, I removed two out of three studs in the process. Now to cut through a bolt (91611-41035) that attaches the exhaust pipe to a bracket cause it will not budge. Otherwise I can't get the flange to drop away from the remaining stud.
I could be way off from your description but the way I was able to remove the exhaust downpipe from the bottom flange of the manifold was unbolt the bracket holding the exhaust pipe and also loosen the bolts connecting the pipe to the Cat. I also used a ratchet strap to pull down the pipe. I use the term "loosen" loosely as many of the bolts/nuts etc had to be cut away and replaced.
 
Congratulations @Paullus and no need to cut the bolt. Just try to do something similar to @bcolvin is describing. Keep working from the downpipe back towards the cat. Get things loose back there and maybe use the strap as suggested to pull it down.
 

Users who are viewing this thread

Back
Top Bottom