Builds Ikarus' HDJ81 Aussie-Style Build (3 Viewers)

This site may earn a commission from merchant affiliate
links, including eBay, Amazon, Skimlinks, and others.

BACS is the Boost Altitude Compensation System. It uses vacuum (or the lack therof) to alter the movement of the boost compensator to decrease fueling when over 4K feet in elevation.

So I'll just run constant vacuum on BACS, simulating lower elevation, giving it more fuel, and tune accordingly.

Why not remove the BACS vacuum line completely.
Running constant vacuum, you've effectively rendered BACS redundant, and you're tuning from one baseline with the boost compensator function.
My thoughts would be, remove the vacuum line completely, you'll achieve the same thing, but remove a potential failure point.

If you travel to sea level, fueling may be a bit lean which means lower EGT.
I don't think you'd be down on power as fueling would be the same, but you have denser air.


And the question of the day is... my rear seatbelt buckles are backwards. How would you turn those around?
Fold the belt across itself length ways at a sharp angle, and work the folded belt through the buckle.
5 minutes, tops.
 
In relation to above, not sure if the BACS has a bellows on the compensator rod?

HACS has a bellows that is affected by atmospheric pressure, and acts in a similar way to BACS, but without a vacuum line
 
Instead of getting behind and attaching nuts, why not use rivnuts?

Oh smart, I didn't even think of that. Good idea

Why not remove the BACS vacuum line completely.
Running constant vacuum, you've effectively rendered BACS redundant, and you're tuning from one baseline with the boost compensator function.
My thoughts would be, remove the vacuum line completely, you'll achieve the same thing, but remove a potential failure point.

If you travel to sea level, fueling may be a bit lean which means lower EGT.
I don't think you'd be down on power as fueling would be the same, but you have denser air.


Fold the belt across itself length ways at a sharp angle, and work the folded belt through the buckle.
5 minutes, tops.

That's a good idea. I've heard that the pumps with BACS have a stiffer spring on the fuel pin so the theory is that the BACS vacuum helps pull it downward. But yeah it would be ideal to just remove it and tune from there. What do you think - just leave a vacuum line vented to atmosphere attached to it?
 
Fold the belt across itself length ways at a sharp angle, and work the folded belt through the buckle.
5 minutes, tops.
Took about a minute. Easiest thing ever, I feel stupid for asking. haha. But that's what my build thread is for, for me to ask stupid questions

2023-07-23 09.51.06.jpg
 
Working on placement of boost sensors. Removed the cowl to get better access - this is my favorite tool for this kind of limited access:

KULjGSI.jpg


sRvEGDs.jpg


Pretty clean underneath, but the wiper linkage and bolts are pretty rusty:

29cjMoY.jpg


I'm thinking I'll drill holes here since I can get behind and attach nuts and washers on the other side, and mount my boost sensor here -

qxsxoTP.jpg


And the OEM boost sensor over here since the existing wiring can't reach too far -

S9wWN5G.jpg


Or maybe I shouldn't bother about that one since I'll be overboosting all the time when I upgrade the turbo one day? Not sure.

Other than that, started working on the interior-

gsrTu5o.jpg


Tons of cleaning to do.

lL8bGFA.jpg


I'm going to pressure wash the carpets this week, got quite a few stains.

ctlQdsL.jpg


yx4n8Tz.jpg


Found at least one open plug

VUrappG.jpg


And this purple mystery wire connected to nothing up front and an easy splice on the taillight loom. Took that out.

YLQBu9K.jpg


PbD8JFe.jpg


0bn2eX9.jpg


The last JDM wiring I need to remove is the Active Vacation power supply that went to the back. Looks like it T's into something under the steering column.

hFErqZW.jpg


Removed the rear heater. I should have removed the hard lines when I had my exhaust off.

2LlJIct.jpg


Checked on the blower under the glovebox. No debris but very dusty.

jmzg0uy.jpg


tUdVhd5.jpg


And the question of the day is... my rear seatbelt buckles are backwards. How would you turn those around?

K6KNkgp.jpg
Looking good, I want to tear out my interior at some point but not until I have a new stereo and speakers lined up for install. Now that you have the interior out, are you going to install some noise reduction foil? I have 3 packs of noico ready and waiting. Re your mystery purple wire…..I have a red wire connected to the right terminal of the left battery. It snakes all the way back to the tail and I figured it was some sort of ground wire. The 2 boxes have “short stop” printed on them. I am hesitant to remove this wire unless I know exactly what is going on with it.

IMG_8377.jpeg
 
Looking good, I want to tear out my interior at some point but not until I have a new stereo and speakers lined up for install. Now that you have the interior out, are you going to install some noise reduction foil? I have 3 packs of noico ready and waiting. Re your mystery purple wire…..I have a red wire connected to the right terminal of the left battery. It snakes all the way back to the tail and I figured it was some sort of ground wire. The 2 boxes have “short stop” printed on them. I am hesitant to remove this wire unless I know exactly what is going on with it.

View attachment 3382260
Yeah, you'll have to trace that back and see what it hooks up to. Probably power cable for some sort of aftermarket accessory?
 
This is how the rear hose bypass turned out with all OEM parts:

cZzdDki.jpg


lrpMwFk.jpg


You can see the rear heater lines. Might cap them off just so it's a little more clean.

Got a lot of deep cleaning to do. Just ordered a new shift boot/seal as well since this one is torn:

gnkrlbE.jpg


rgVnpQi.jpg


Subwoofer was long gone and crumbling. Pulled it out for now:

6rFuCVF.jpg


SHhJqdy.jpg


So much potential room in there. I'm interested in that Wit's End quarter panel mount. Anyone else making something like that?

I also found two more small spots of rust I need to take care of before putting everything back together. These are under the rear door weather seal:

dZlklRG.jpg


egxN7Qd.jpg


npsVqit.jpg
 
Did y
Spent a lot of time today reading up on the EGR system, BACS and SICS.

According to what I've read:

BACS is the Boost Altitude Compensation System. It uses vacuum (or the lack therof) to alter the movement of the boost compensator to decrease fueling when over 4K feet in elevation.

SICS is the Startup Ignition Control System. It similarly uses vacuum to deliver less fuel when starting up, for less smoky starts.

So I've decided to remove everything including the BACS and SICS VSVs. I live at 6K feet and mostly travel/wheel around 4K-10K feet. So I'll just run constant vacuum on BACS, simulating lower elevation, giving it more fuel, and tune accordingly. For SICS, I'll also plug in constant vacuum so it gets full fuel all the time.

In theory this should work. We'll see when I finally start it up in a couple weeks. @Rock40 had success with this setup in his epic 1HDFT conversion that I read through today:

And on the Australian FB groups, those guys have removed everything. I love how simple the setup is.

The last VSVs:
MIV5nmt.jpg


ooEbyU9.jpg


New vacuum line:
eyoHWuB.jpg


old vs new

nKL7Gfe.jpg


Recreated some of the stock setup - this is the vacuum pump segment:

1WrsVYG.jpg


Salvaged some T's from the old crossover setup. I'm going to have the line from the vacuum pump run up here, then T into two hardlines that cross the intake manifold:

XUyrCvZ.jpg


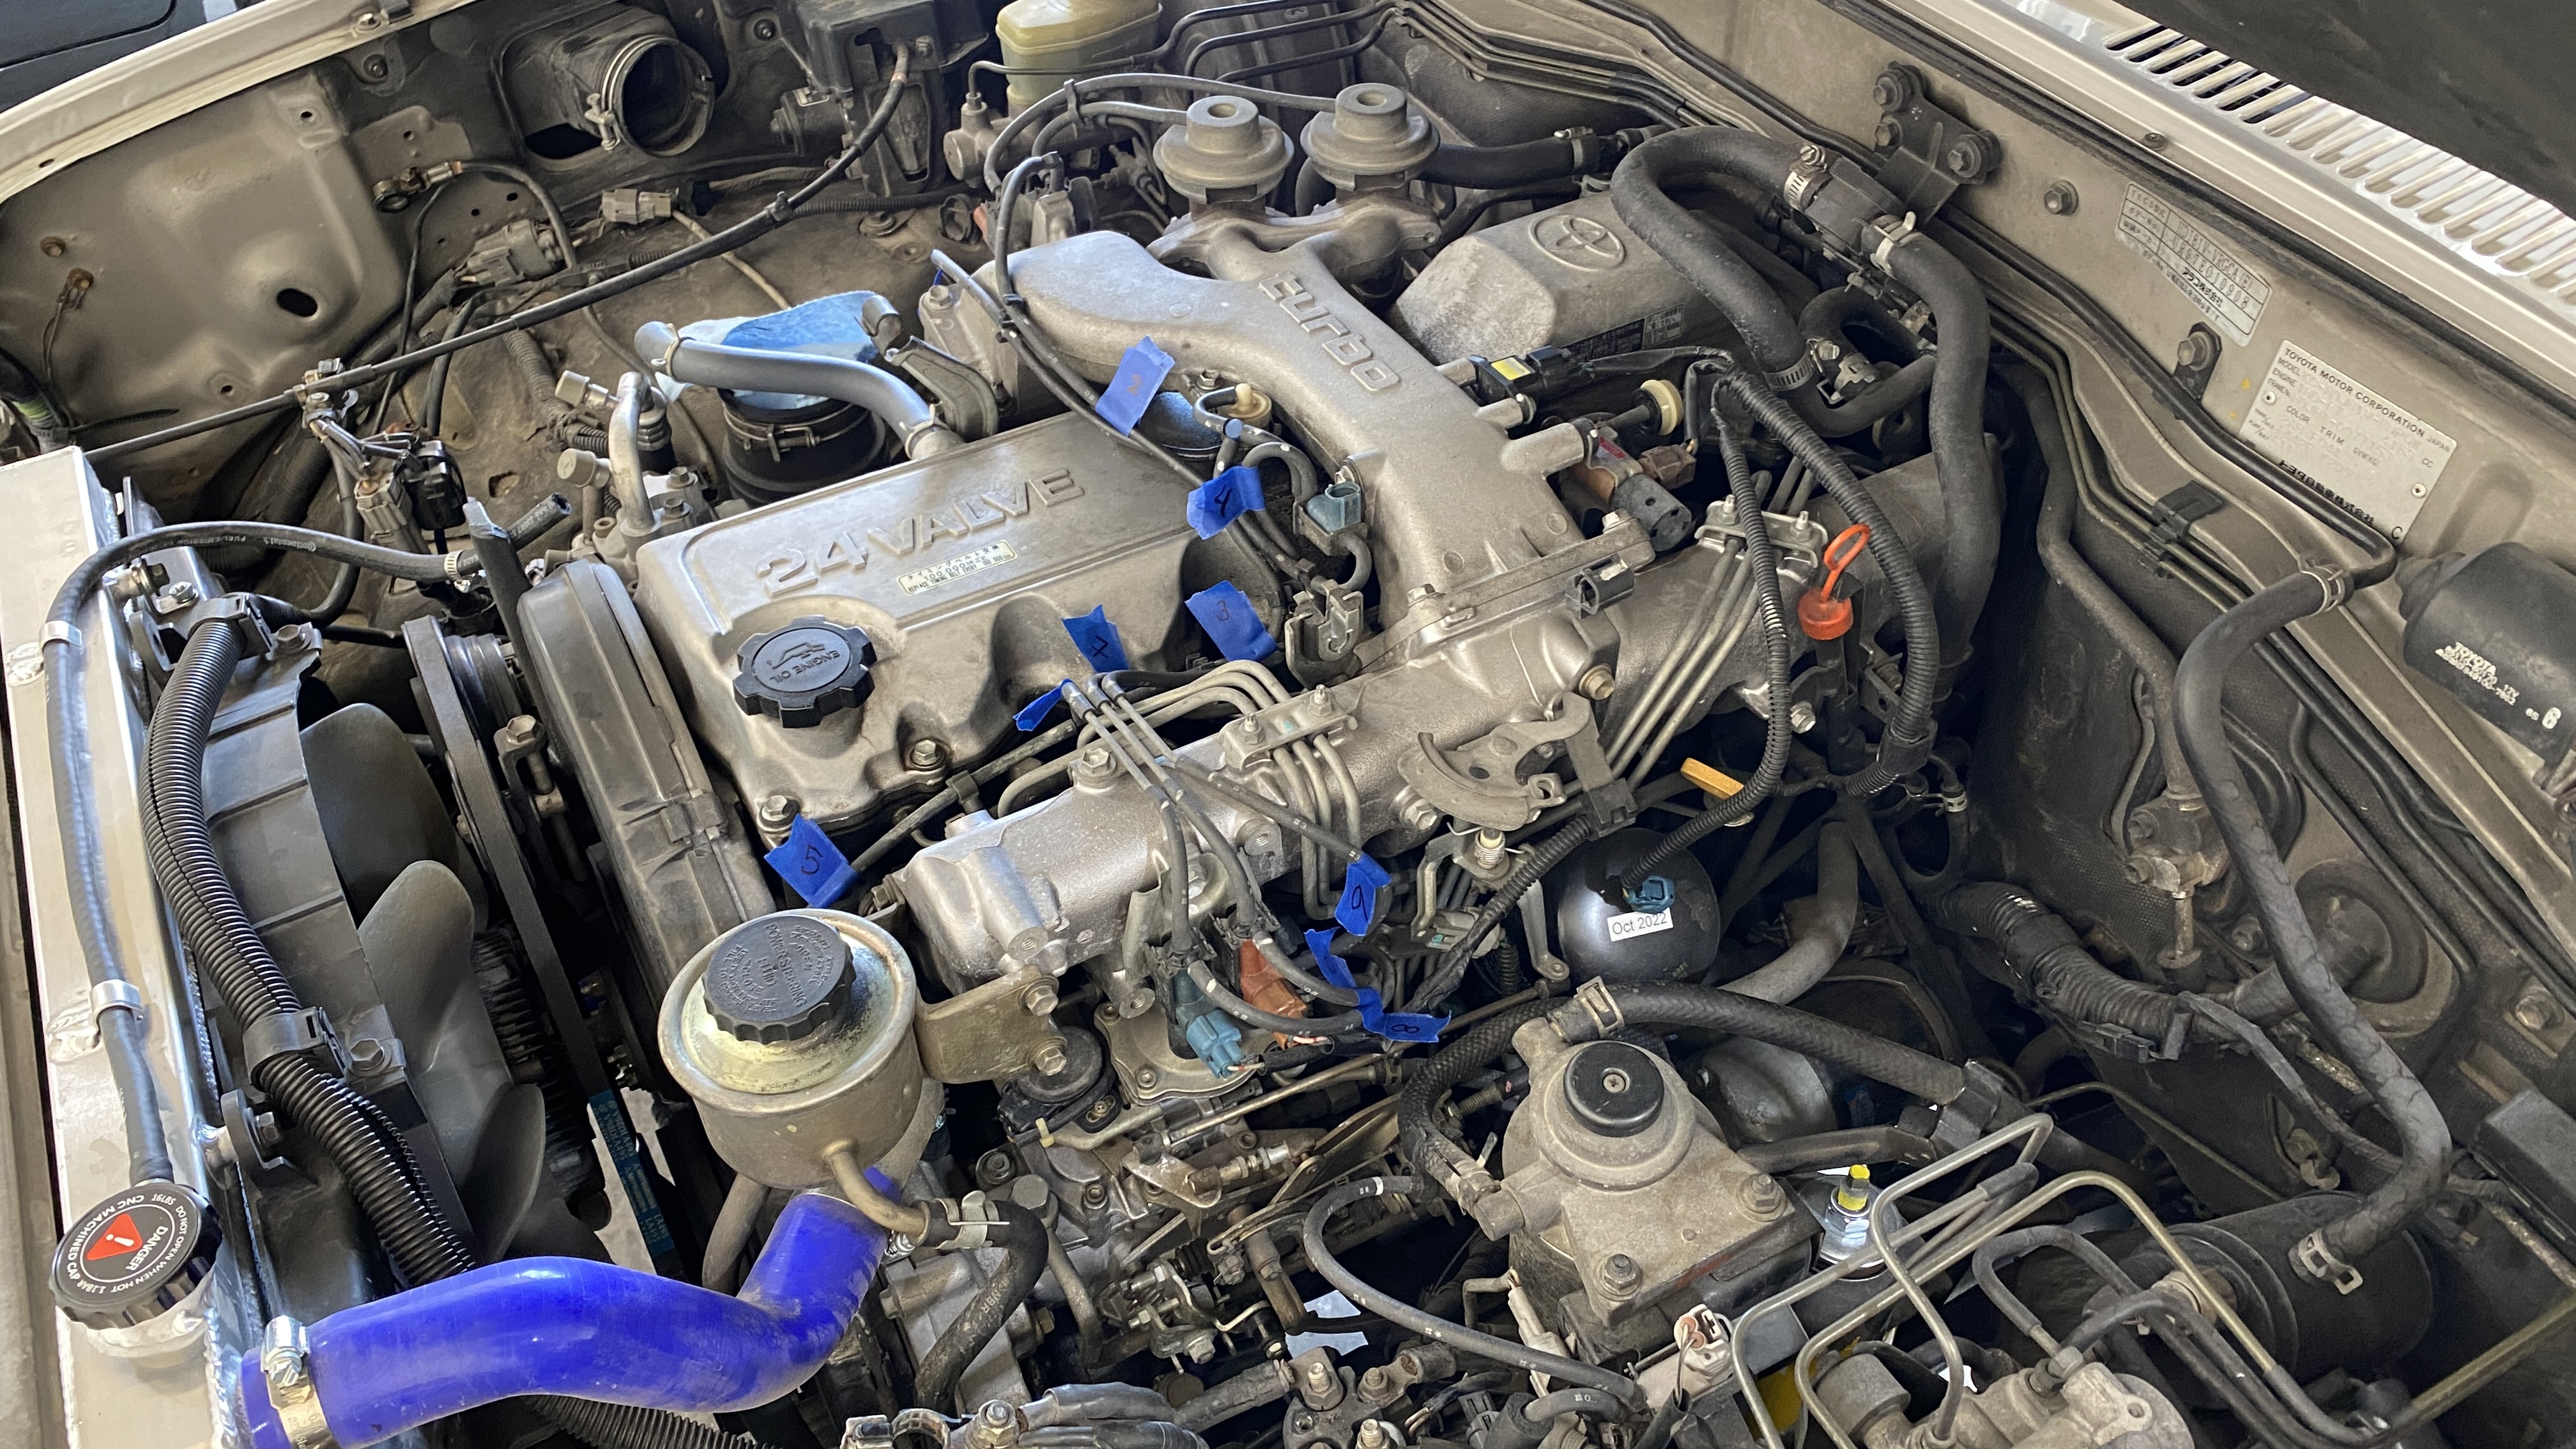
SICS is the canister closest to the engine. BACS is the vacuum port in the middle hidden by the fuel line. Top is the boost comp cap.

8T0siwi.jpg


BACS and SICS plugged into the two vacuum hardlines with new hoses:

0UxSAVq.jpg


I'll most likely run the boost comp cap up to the third hard line, then around the intake elbow to one of the brass fittings.

Not much I can do with all the extra wiring short of dismantling the entire harness. I'll just have to zip tie it out of the way or something -

fFaBavk.jpg


But overall I love how much cleaner and more simple this is getting.

Before:

J1PNlwN.jpg


After:

Vm6QBDv.jpg
Did you try the engine after removing all of that ? You hdj81 must have an emission ecu juste like Mine. The emission ecu controls all of the vsv's but also the intake heater. It also copies the rpm signal from the injection pump and resends it to the cluster. As much as i wanted to take everything appart, i had to leave a few bits in.

The emission ecu reads the boost pressure via the pressure sensor, however, the emission ecu also checks the vaccum also via the pressure sensor. To do so, it actuates that vsv's near the pressure sensor. It is switching the line from pressure to vaccum at idle and also preriodically at lower rpm's.

If you take that one off, or modify anything that will prevent that from working, after 10 seconds of engine running or so you will get the glow plug light to remain on because it indicates an error code in the emission ECU. The intake heater will will work as usual upon startup, but you will constantly get the annoying light later on when driving.

Also, the emission ecu does not care for "open circuits". Unplugging the vsv's won't be detected by the eecu. But surely it expects to read a good vacuum when the vaccum/boost vsv is switched and boost when it's not.

I wanted to take everything out on mine, but unfortunatly i had to keep that very vsv for the p-sensor along with the little oil fumes filter and a couple of vac lines.
 
Did y


The emission ecu reads the boost pressure via the pressure sensor, however, the emission ecu also checks the vaccum also via the pressure sensor. To do so, it actuates that vsv's near the pressure sensor. It is switching the line from pressure to vaccum at idle and also preriodically at lower rpm's.

If you take that one off, or modify anything that will prevent that from working, after 10 seconds of engine running or so you will get the glow plug light to remain on because it indicates an error code in the emission ECU. The intake heater will will work as usual upon startup, but you will constantly get the annoying light later on when driving.

Also, the emission ecu does not care for "open circuits". Unplugging the vsv's won't be detected by the eecu. But surely it expects to read a good vacuum when the vaccum/boost vsv is switched and boost when it's not.

I wanted to take everything out on mine, but unfortunatly i had to keep that very vsv for the p-sensor along with the little oil fumes filter and a couple of vac lines.
Great to know, thanks for sharing.

So why did you have to keep the VSV for the pressure sensor and oil fumes?

Is the constant glow light the only downside to removing everything?
 
Very cool build! Do you by chance still have the JDM door window visors? I'm into weird JDM stuff like that
PM me later. I won't be home for a week or so, but I think I have a set I removed from another HDJ81 in my garage I could sell you.
 
I'm not sure, PO installed them. I should have looked for a model number but the tags were a little torn.

I would guess they're the 2.5" lift no load:
Late to the party, but I think you got the springs right. Here's the detail from the original order on your suspension parts:

Front Springs: C59-166 - Linear Rate - 2.5" with Stock front weight
Rear Springs: C59-167 - Linear Rate - 2.5" with up to 220LBS
Steering Damper: SD59-824 Big Bore Steering Damper (Included)
Front Caster Correction and Bushing Options: RB59-522K - Rubber Caster Bushing Kit 2.5 Degrees
 
I removed the Active Vacation wiring. It consisted of 2x positive leads, a fuse, and a ground. It led under the carpet all the way to the front where it appears to T into a jumper between the ignition switch and the main wiring harness.

vbAHsCb.jpg


HaWLDzj.jpg


It plugged in here - ignition switch on the right in white, harness on the left in black. At first I considered jumping the black/yellow cable on the Active Vacation mini harness but then I realized that the entire mini harness isn't needed, as the EWD shows the ignition switch plugging straight into the main harness. I think this was just an Active Vacation add-on.

0j6fNLs.jpg


I removed it entirely and plugged the ignition switch into the main harness. Anyone replaced their ignition switch recently and can confirm this is right?

PN1O7mj.jpg


Working on the headliner. It's dirtier than I thought it was:

WLl8KFT.jpg


Xg0WgAJ.jpg


Not going to be perfect but it'll look a little better. I'm just going with the "light spray on the microfiber and scrub" method to avoid soaking the headliner.

Ew4d6Tx.jpg


Little gas cap door cleanup:

Qig6tNM.jpg


518KWtt.jpg


Steering shaft dust seal, long overdue:

UvuXyHK.jpg


tuKWAOY.jpg


e4Xu1Ns.jpg


Fender apron/liner cleanup. Some clips were falling out and the middle one got ripped.


7eVlkRl.jpg


7tXsBqC.jpg


ECCdjAd.jpg
 
I removed it entirely and plugged the ignition switch into the main harness. Anyone replaced their ignition switch recently and can confirm this is right?

PN1O7mj.jpg


Yes - That is correct. Just clicked my ignition switch back together yesterday after the interior/HVAC refresh project.
 
Continuing to slowly work on the intercooler install. Got the airbox in - just waiting on 2 vacuum caps for the airbox lid. Plugged the PCV inlet with an HPS 5/8" coolant cap -

BrUkXoF.jpg


qerAOJU.jpg


The AC line bracket on the driver's side was contacting the IC pipe so I cut it down. It just barely clears now but should be good:

NgdNH84.jpg


sgUSE9w.jpg


MGVJdvC.jpg


prwqmUQ.jpg


The middle support on the trim piece under the grille hits the IC so I chopped that off:

QvA6Qfi.jpg


72SRDam.jpg


4YqT7CP.jpg


AKdOh4L.jpg


But I still have some issues with that trim piece now contacting the silicone piping on the wings. I have some more cutting and figuring out to do. PDI said to bend those tabs with the holes, which I tried, but I need to trim even more material off.

rNKrlk8.jpg


SevCok3.jpg


tI6QQCV.jpg


QK6XCnU.jpg


The cuts aren't perfect but I'll clean them up. Overall, not too bad. Even my turn signals fit pretty well which is a concern with the pipes on the PDI kit. The passenger side is sitting on the turn signal and pushing it out a little...

bY8rlVa.jpg
 
While I had the cowl apart I figured I'd refresh the wiper linkage:

hZCH0KZ.jpg


The nut for the wiper motor arm is somewhere in my engine bay or cowl, RIP

uINuY6e.jpg


Working on refreshing the shifter assembly:

SW8Vx9t.jpg


iXP6KB5.jpg


Mx0YseA.jpg


wnX05PA.jpg


kfAWMau.jpg


I wanted to dig into the sunroof console as it was sagging pretty bad - (ignore the mismatched screws, I just put that in upside down so I didn't lose it)

vBFUMeX.jpg


Screws were getting stripped so I replaced those -

DgQ5F4Q.jpg


M6x1.0 65mm

tRteLx7.jpg


I found out why the console was hanging down in the back, the two other screws here weren't screwed into the roof.

gCyDb0c.jpg


Buffed out the altimeter plastic a little with some PlastX. Turned out nice

frVID8F.jpg


goDzxBF.jpg


cjenGuC.jpg
 

Users who are viewing this thread

Back
Top Bottom