How can I figure out why I have death wobble? (1 Viewer)

This site may earn a commission from merchant affiliate
links, including eBay, Amazon, Skimlinks, and others.

bjp

Joined
Apr 11, 2021
Threads
1
Messages
16
Location
Los Angeles, CA
I have a 1993 with death wobble that I've tried to fix and it's still not fully gone. I'm sure there are many things I could blindly try if I had infinite money, but how can I figure out which one is actually likely to fix the issue?

I know this is a bit long, so to encourage responses: I'd be excited to send $50 to whomever first describes a diagnostic procedure which leads to diagnosing an issue that, when fixed, solves the problem. Just throwing out things it could be doesn't count unless accompanied by some test I can perform to confirm or deny whether that thing is actually the main problem before spending money and time addressing it.

When it started
I'm completely new to Land Cruisers and vehicle maintenance in general. I bought this LC in March with 163k miles and I've been baselining it ever since, so I've put less than 1k miles on it. I thought I had the minimum set of stuff done in September so I took it to an offroad picnic about an hour away by paved roads. Just before hitting dirt, I got my first death wobble around 30 mph. I thought "that was crazy", but the pavement was a little rough and I hadn't heard about death wobble before, so I did a bit of light offroading then started home. A fire forced me to take (paved) back roads for 23 miles and I got probably 8 or 9 wobbles. By the end, I was trying to intentionally trigger them to figure out what the trigger was, and I was trying various things to mitigate them instead of just braking hard, but I couldn't find any reliable patterns.

Behavior
The wobbles always started between ~20 and ~55 mph -- I took it carefully on the freeway on the way home after the wobbles on the back roads and got zero wobbles on 28 miles of freeway, then one more wobble on the 1.5 miles between the freeway and my house. The wobbles seem to be more likely to happen while on a slight curve (especially when the curve direction changes), when hitting small bumps (but larger bumps don't seem to do it), and when slightly braking, but even a combination of all these factors doesn't guarantee a wobble, and not all factors are necessary to produce a wobble. Again, I could never figure out when they would or wouldn't happen.

Initial investigation
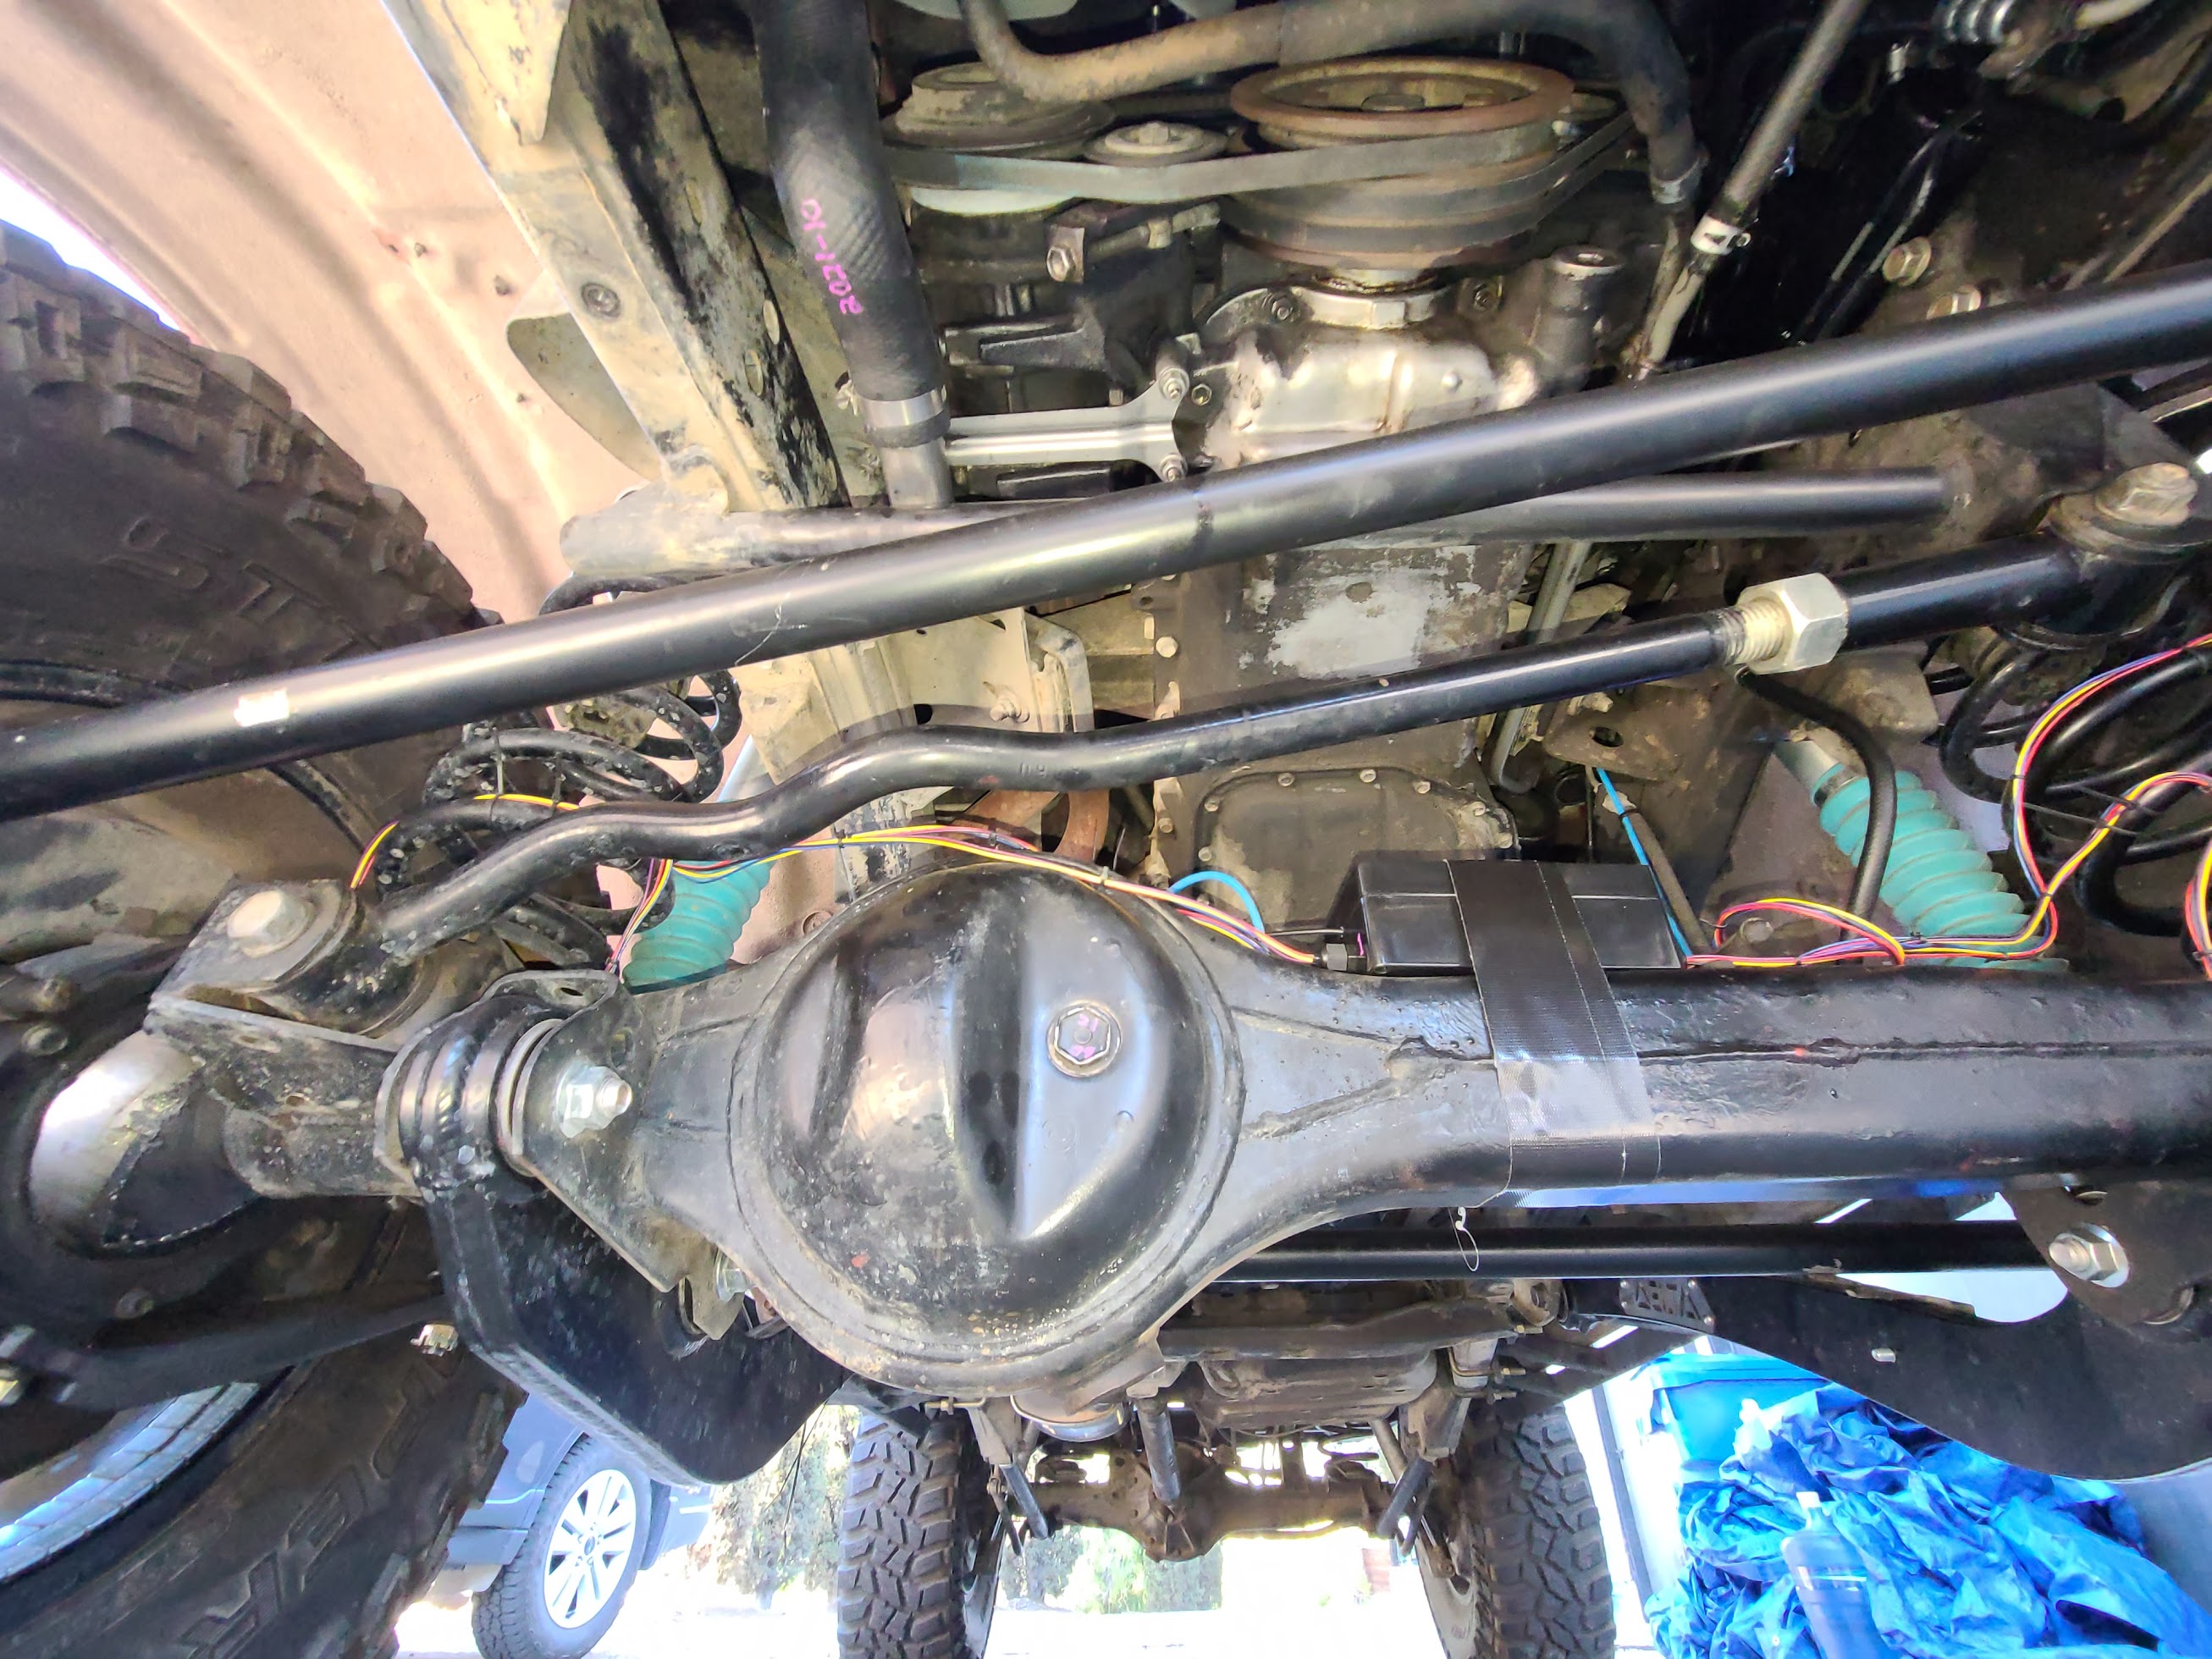
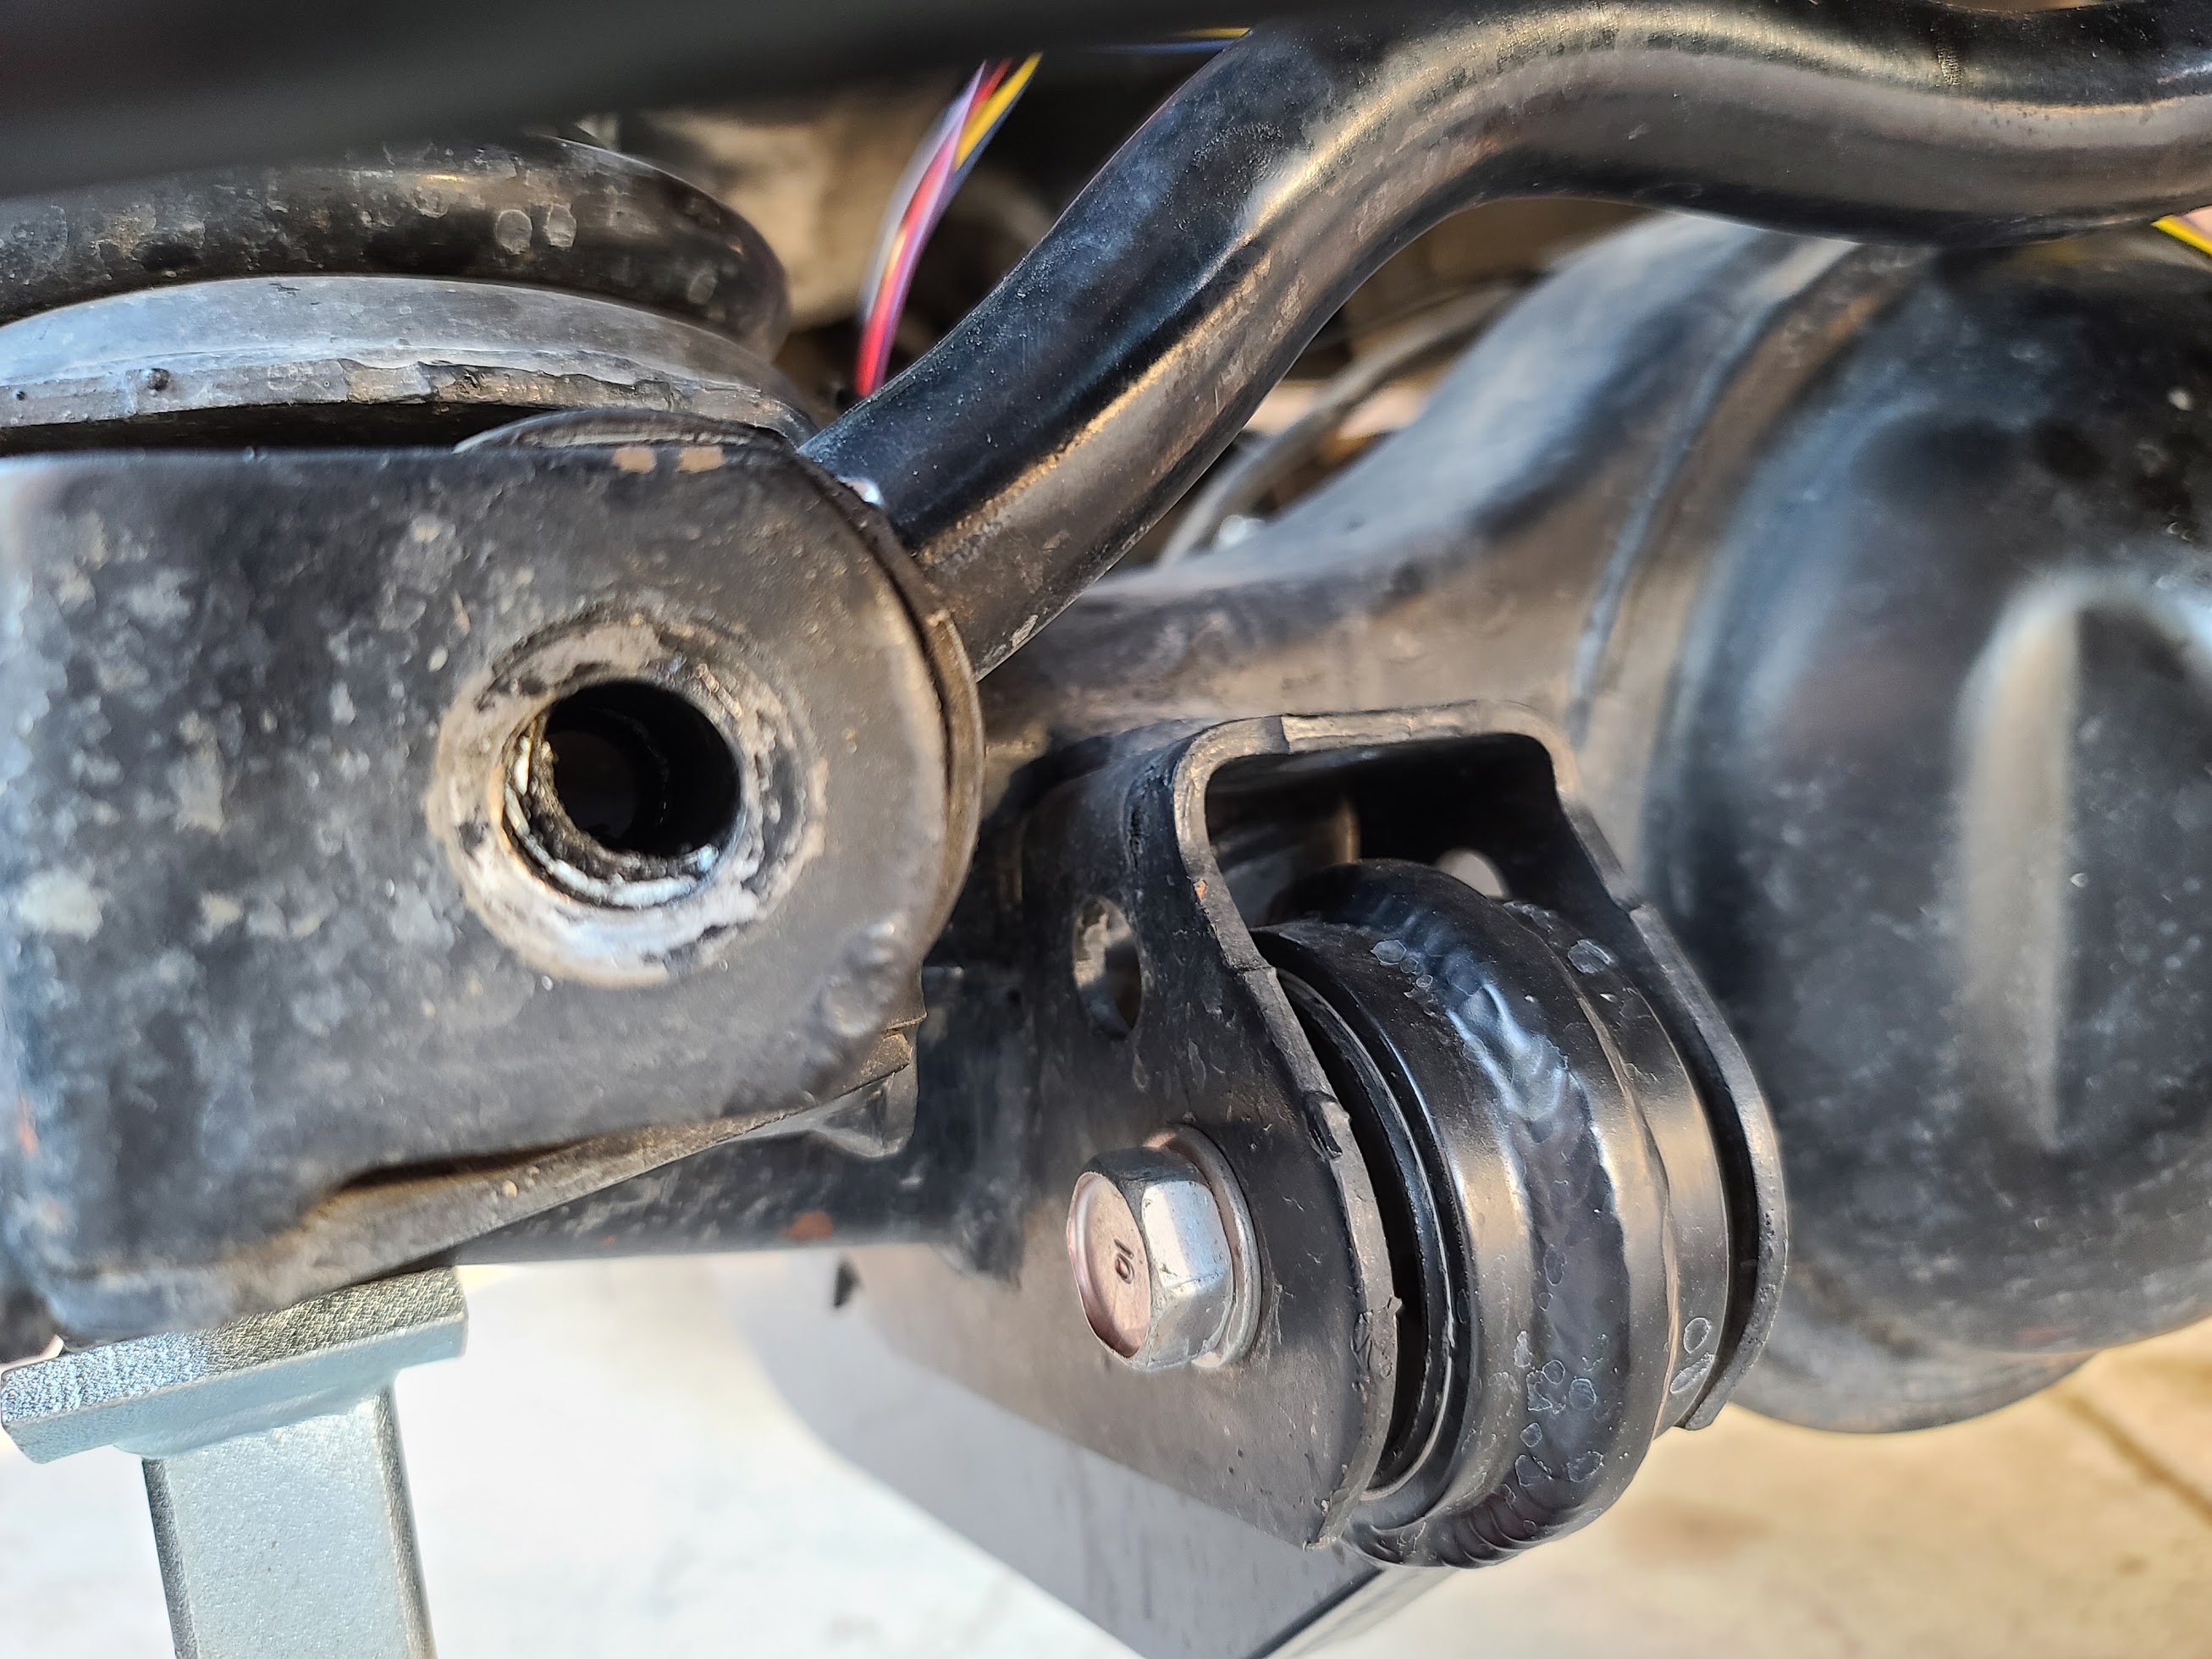
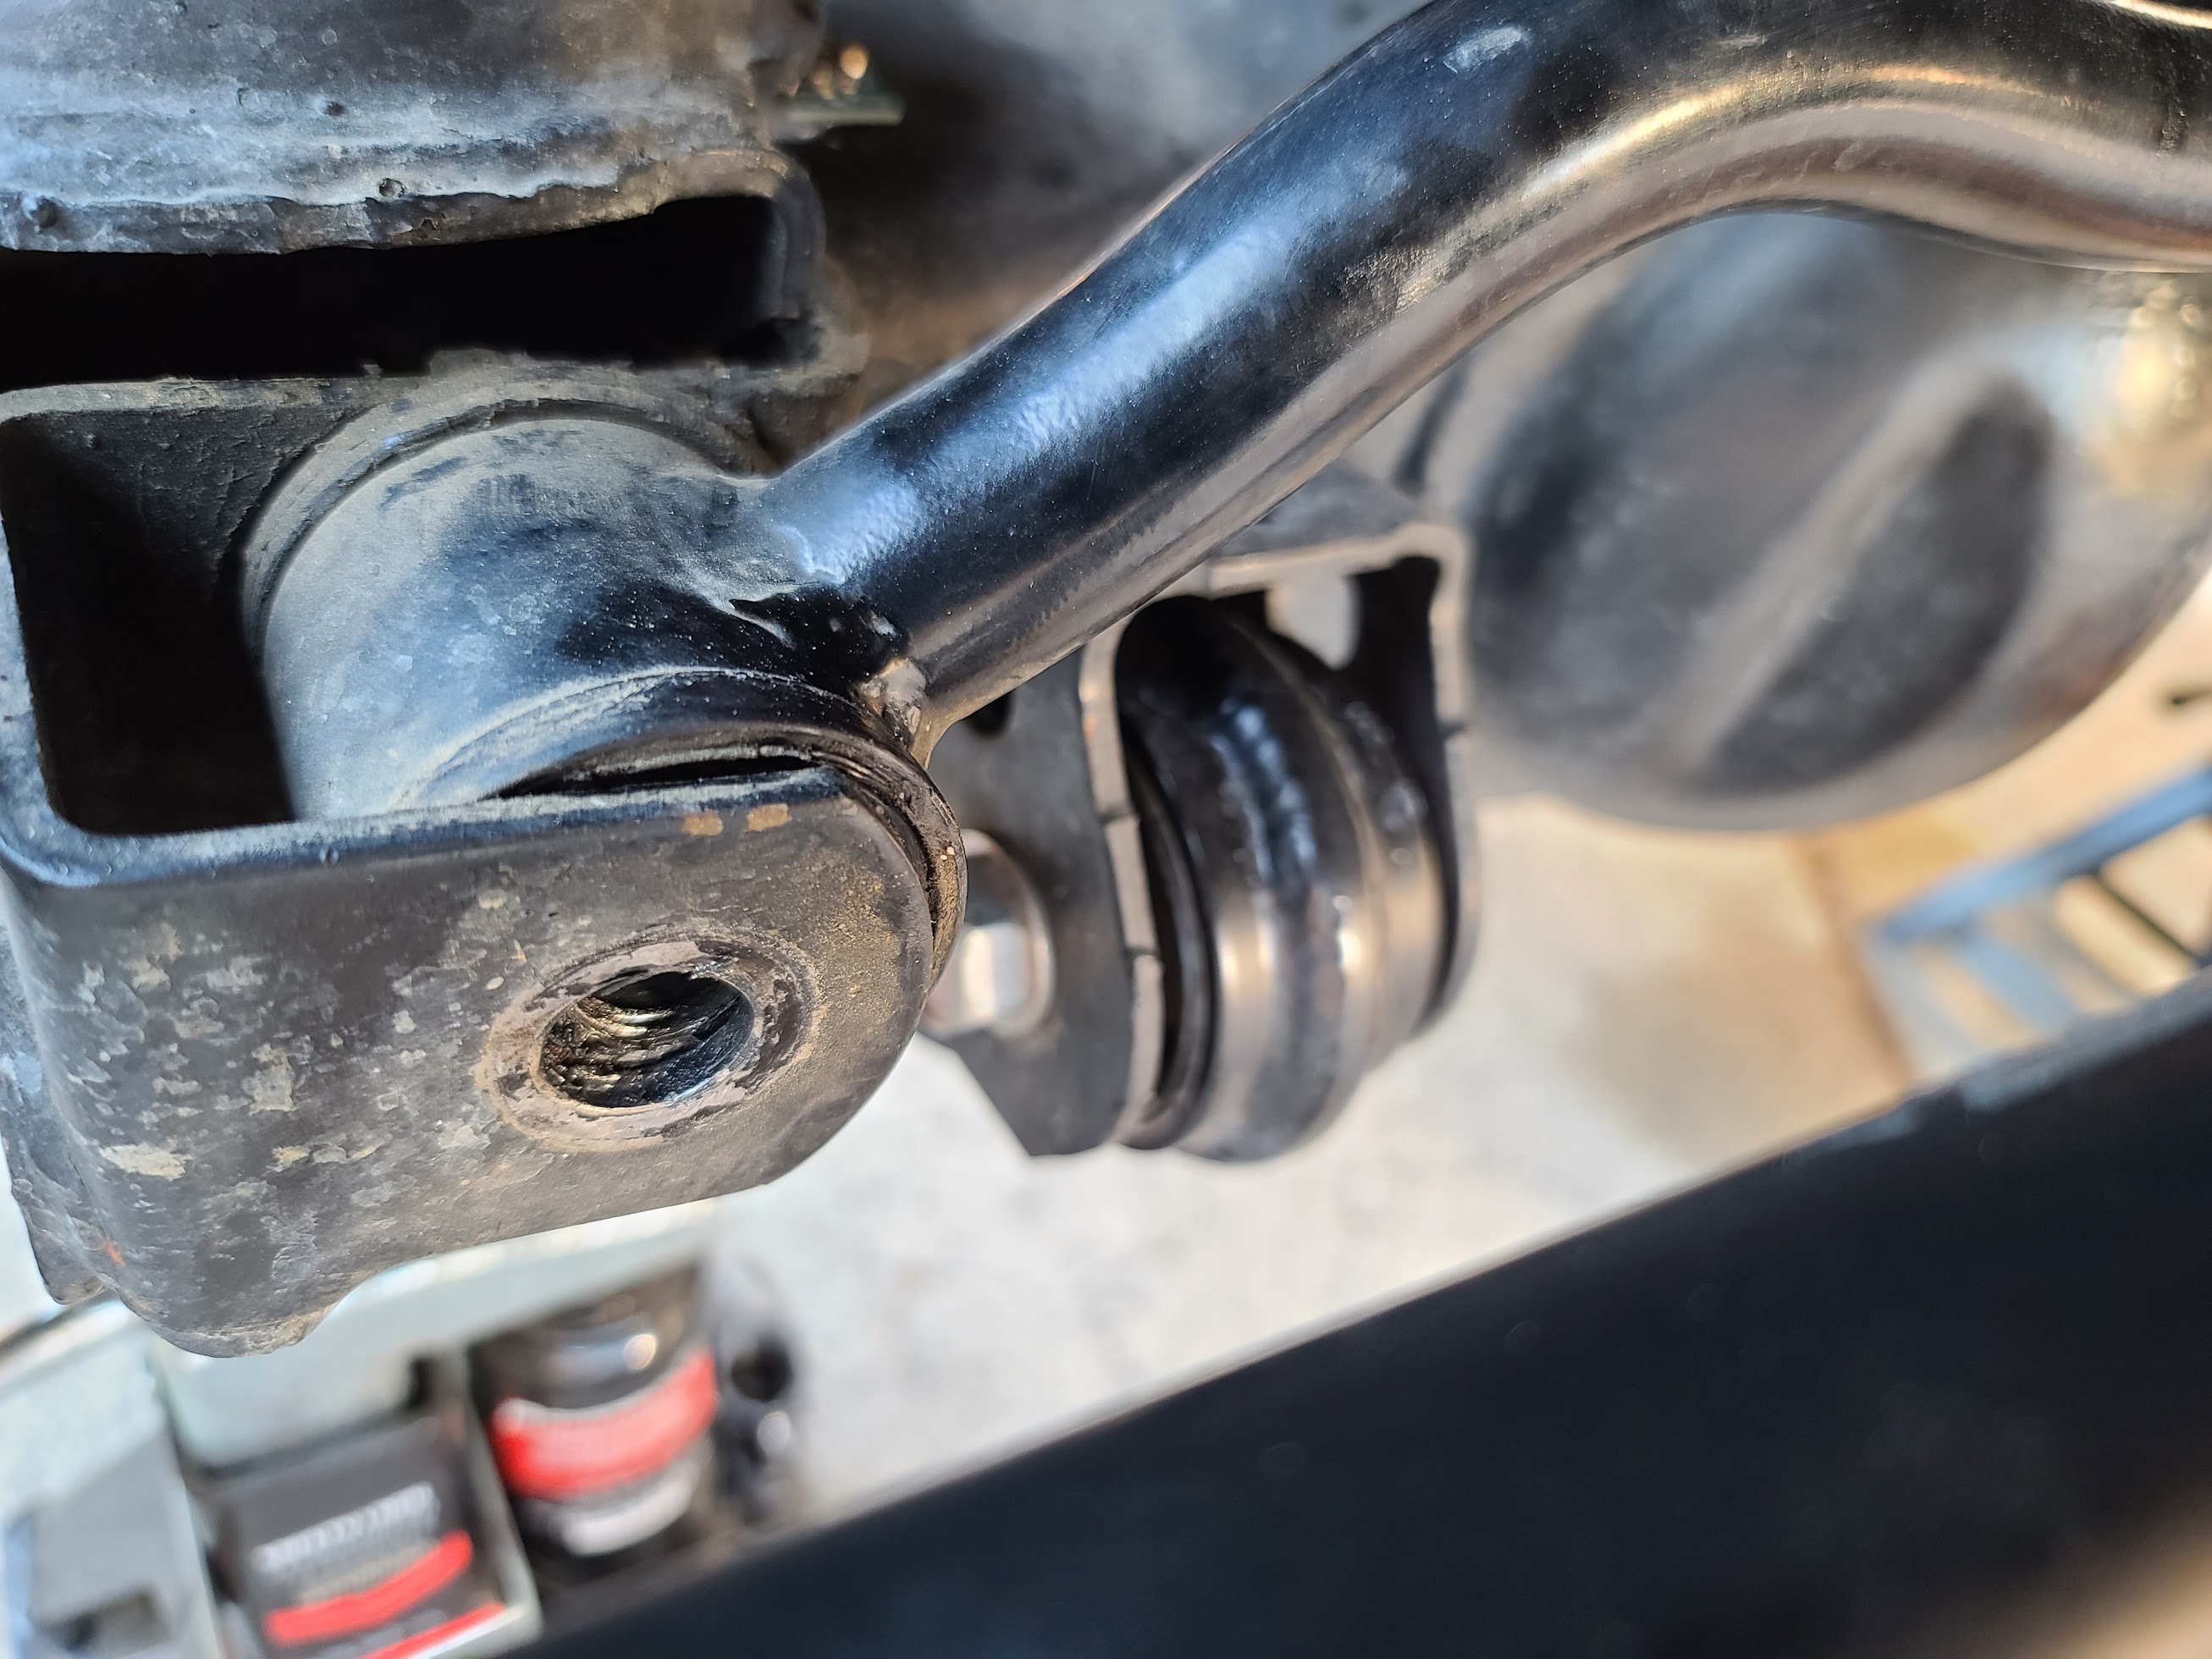
When I got home, I found the jam nut of my front adjustable panhard rod completely disengaged, so I tightened that jam nut. I could grab the drag link or tie rod and rotate them on their axis by hand fairly easily, but I didn't feel any play. I jacked up each front wheel one at a time and tried to wiggle the wheel while grabbing at 12 and 6 and I didn't feel any play. I tried to wiggle while grabbing at 3 and 9 and did turn the wheels a bit, but didn't notice any play. I took off the mud guard of the driver front wheel and looked at the frame and panhard tower around the steering box and didn't see any cracks. I measured 30.15 PSI in front passenger tire and 30.65 PSI in front driver tire, and both wheels still had balancing weights attached (though I can't rule out some falling off). The two of four knuckle nuts I could easily access with my torque wrench were still torqued to at least 71 ft-lbs and the other two were "tight" (both sides).

After tightening the panhard jam nut, I took it back out on a 45mph street and got 2 more wobbles within 3 miles. A member of my offroad club diagnosed needing new rod ends.

Attempted fixes
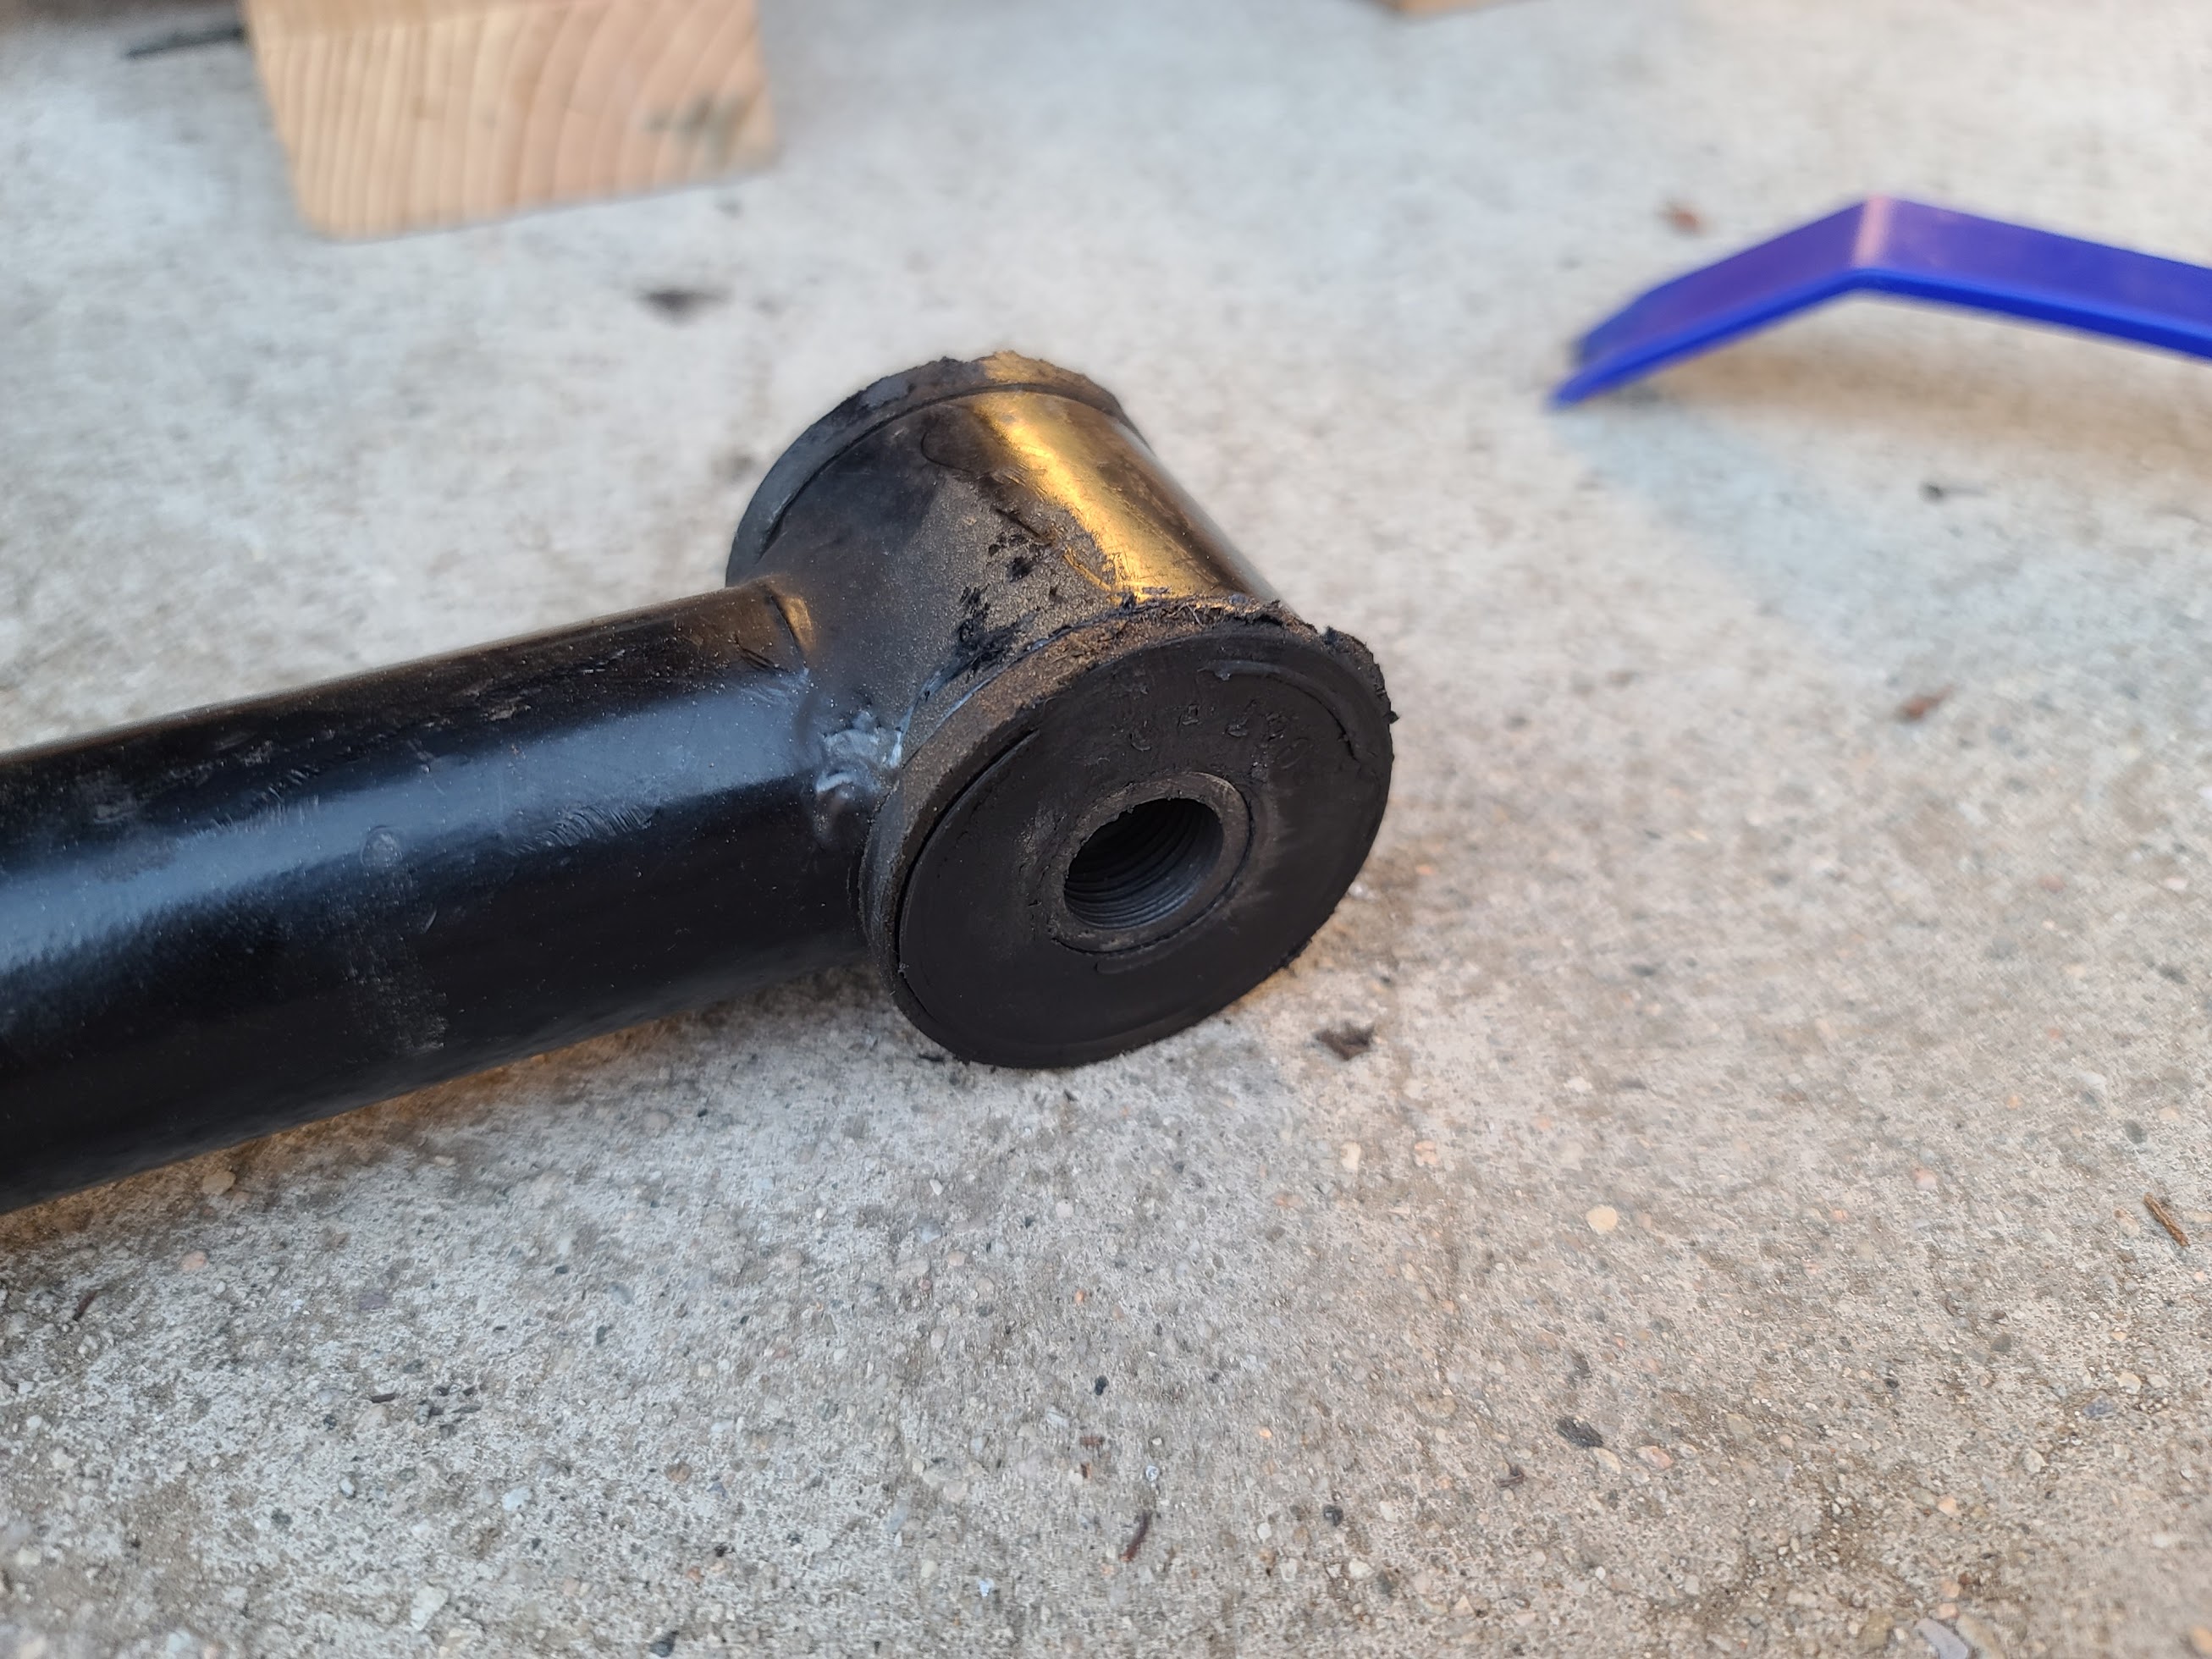
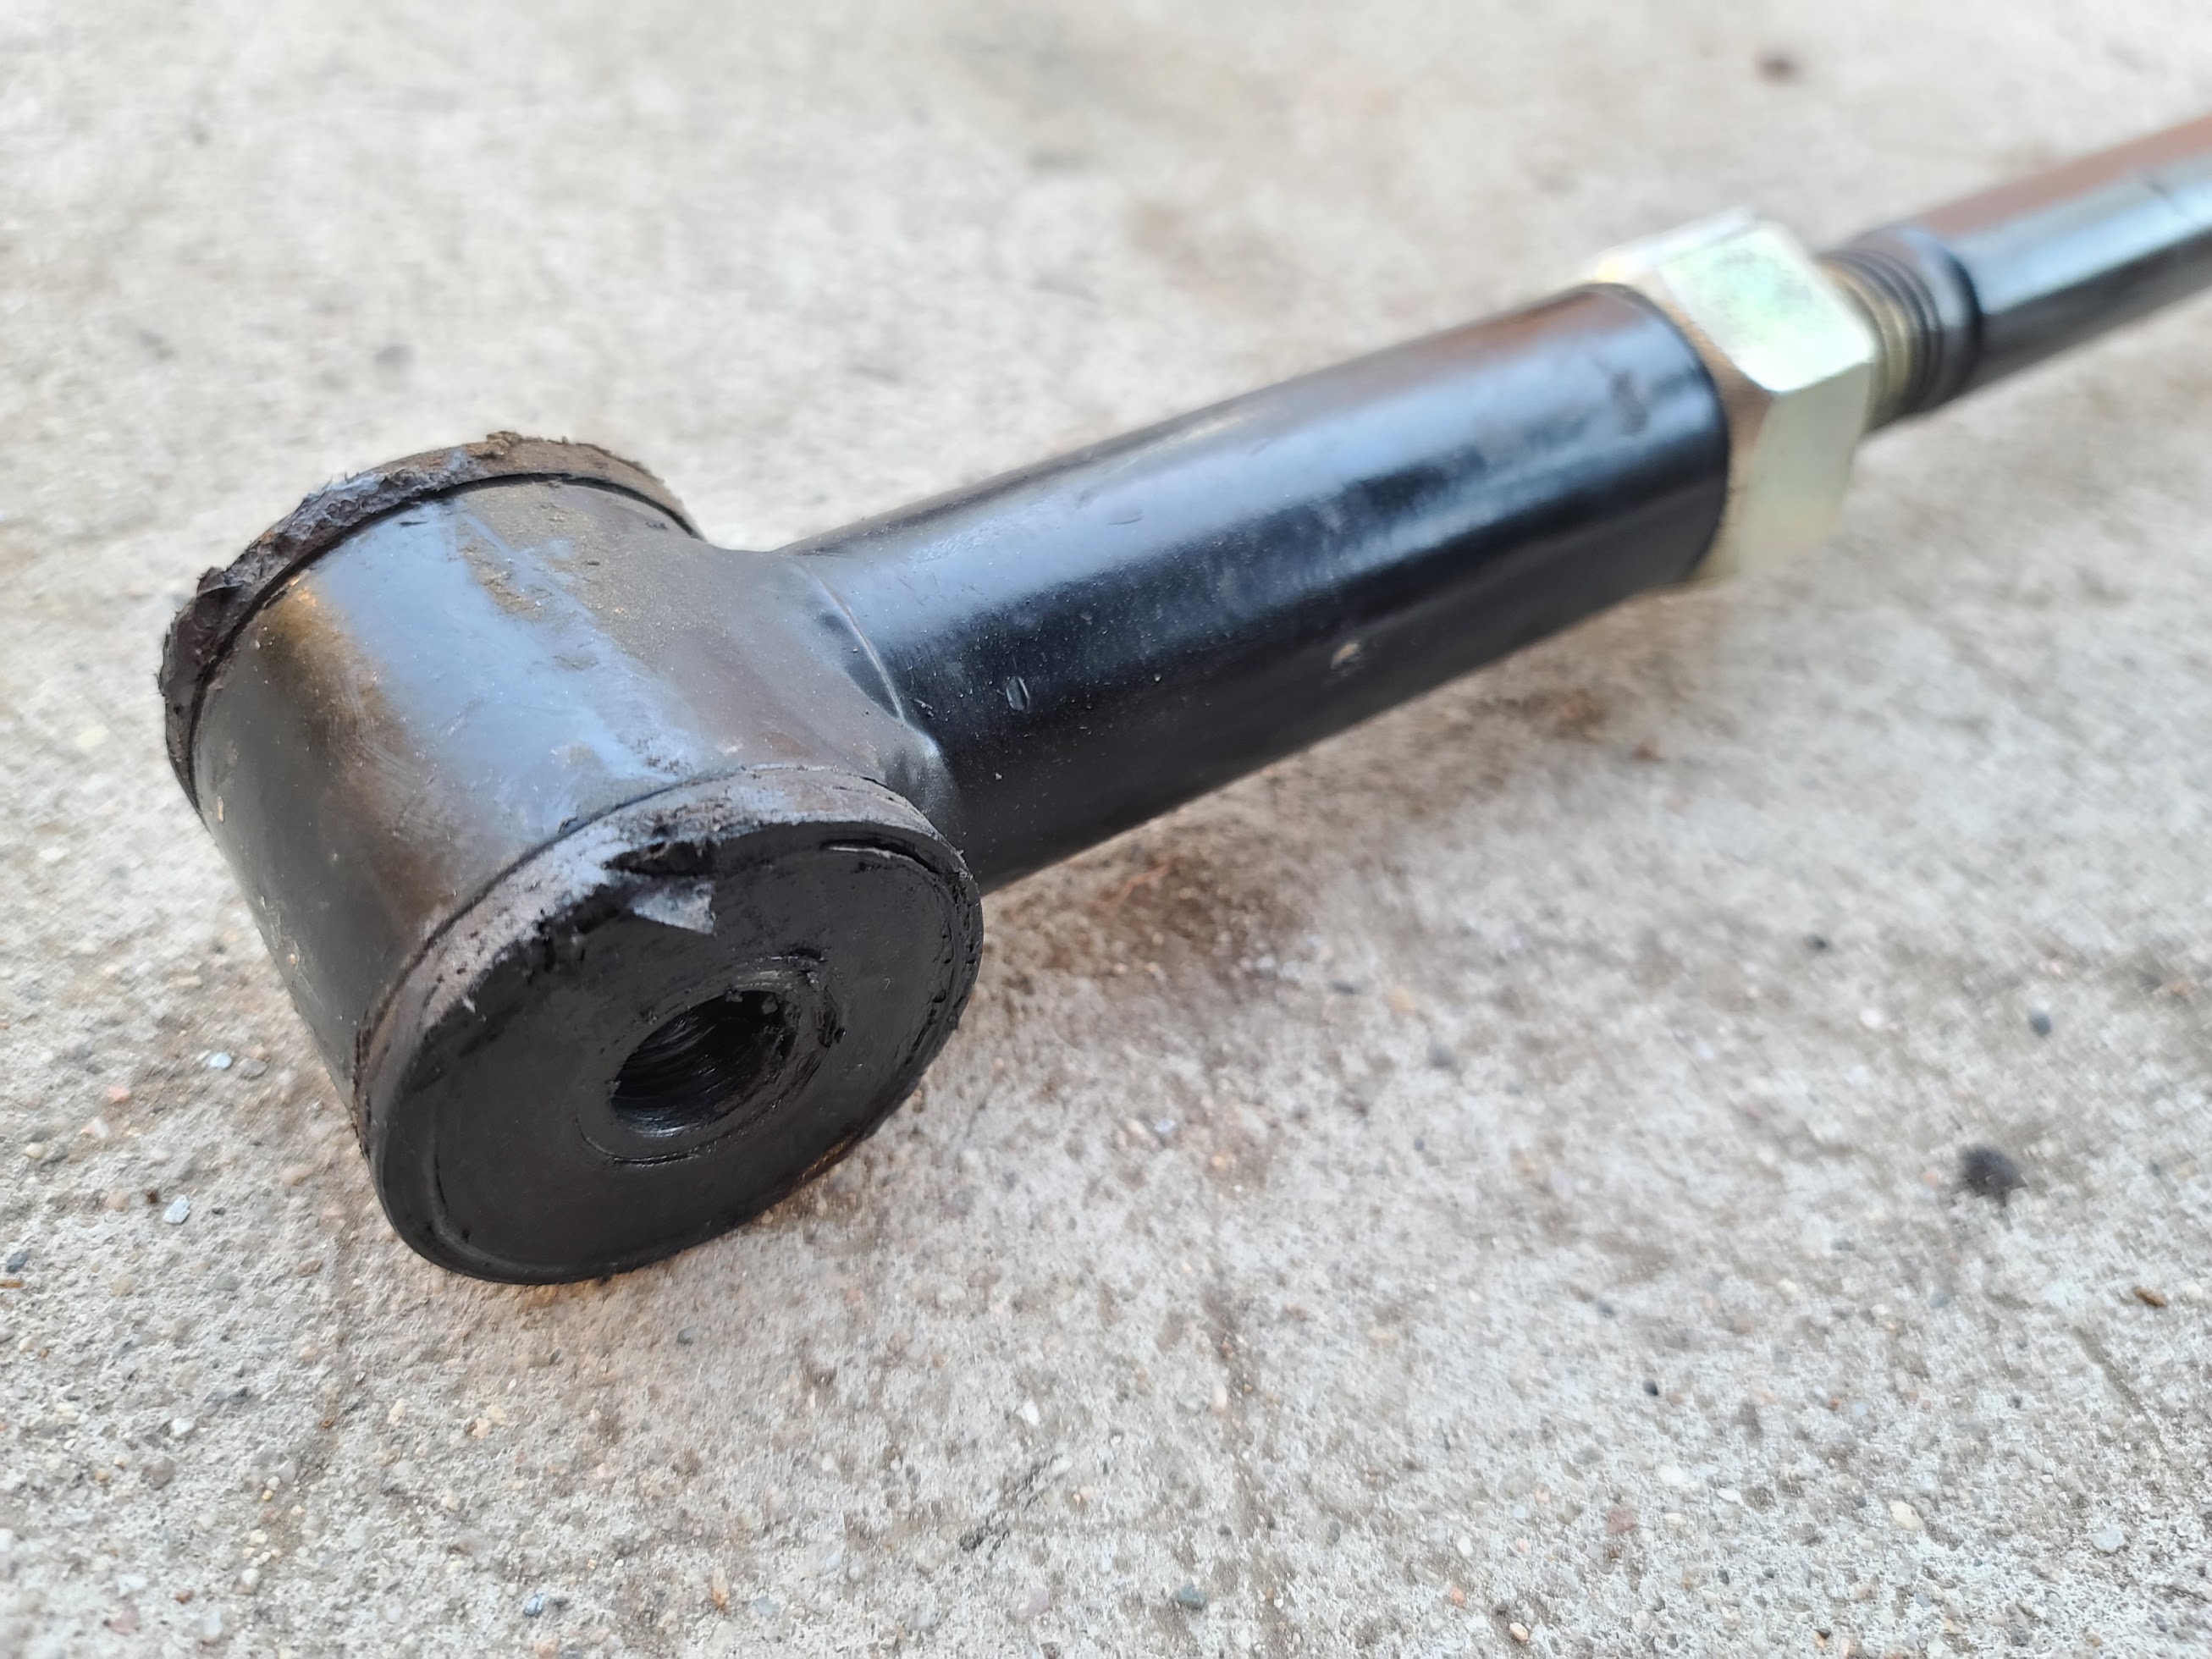
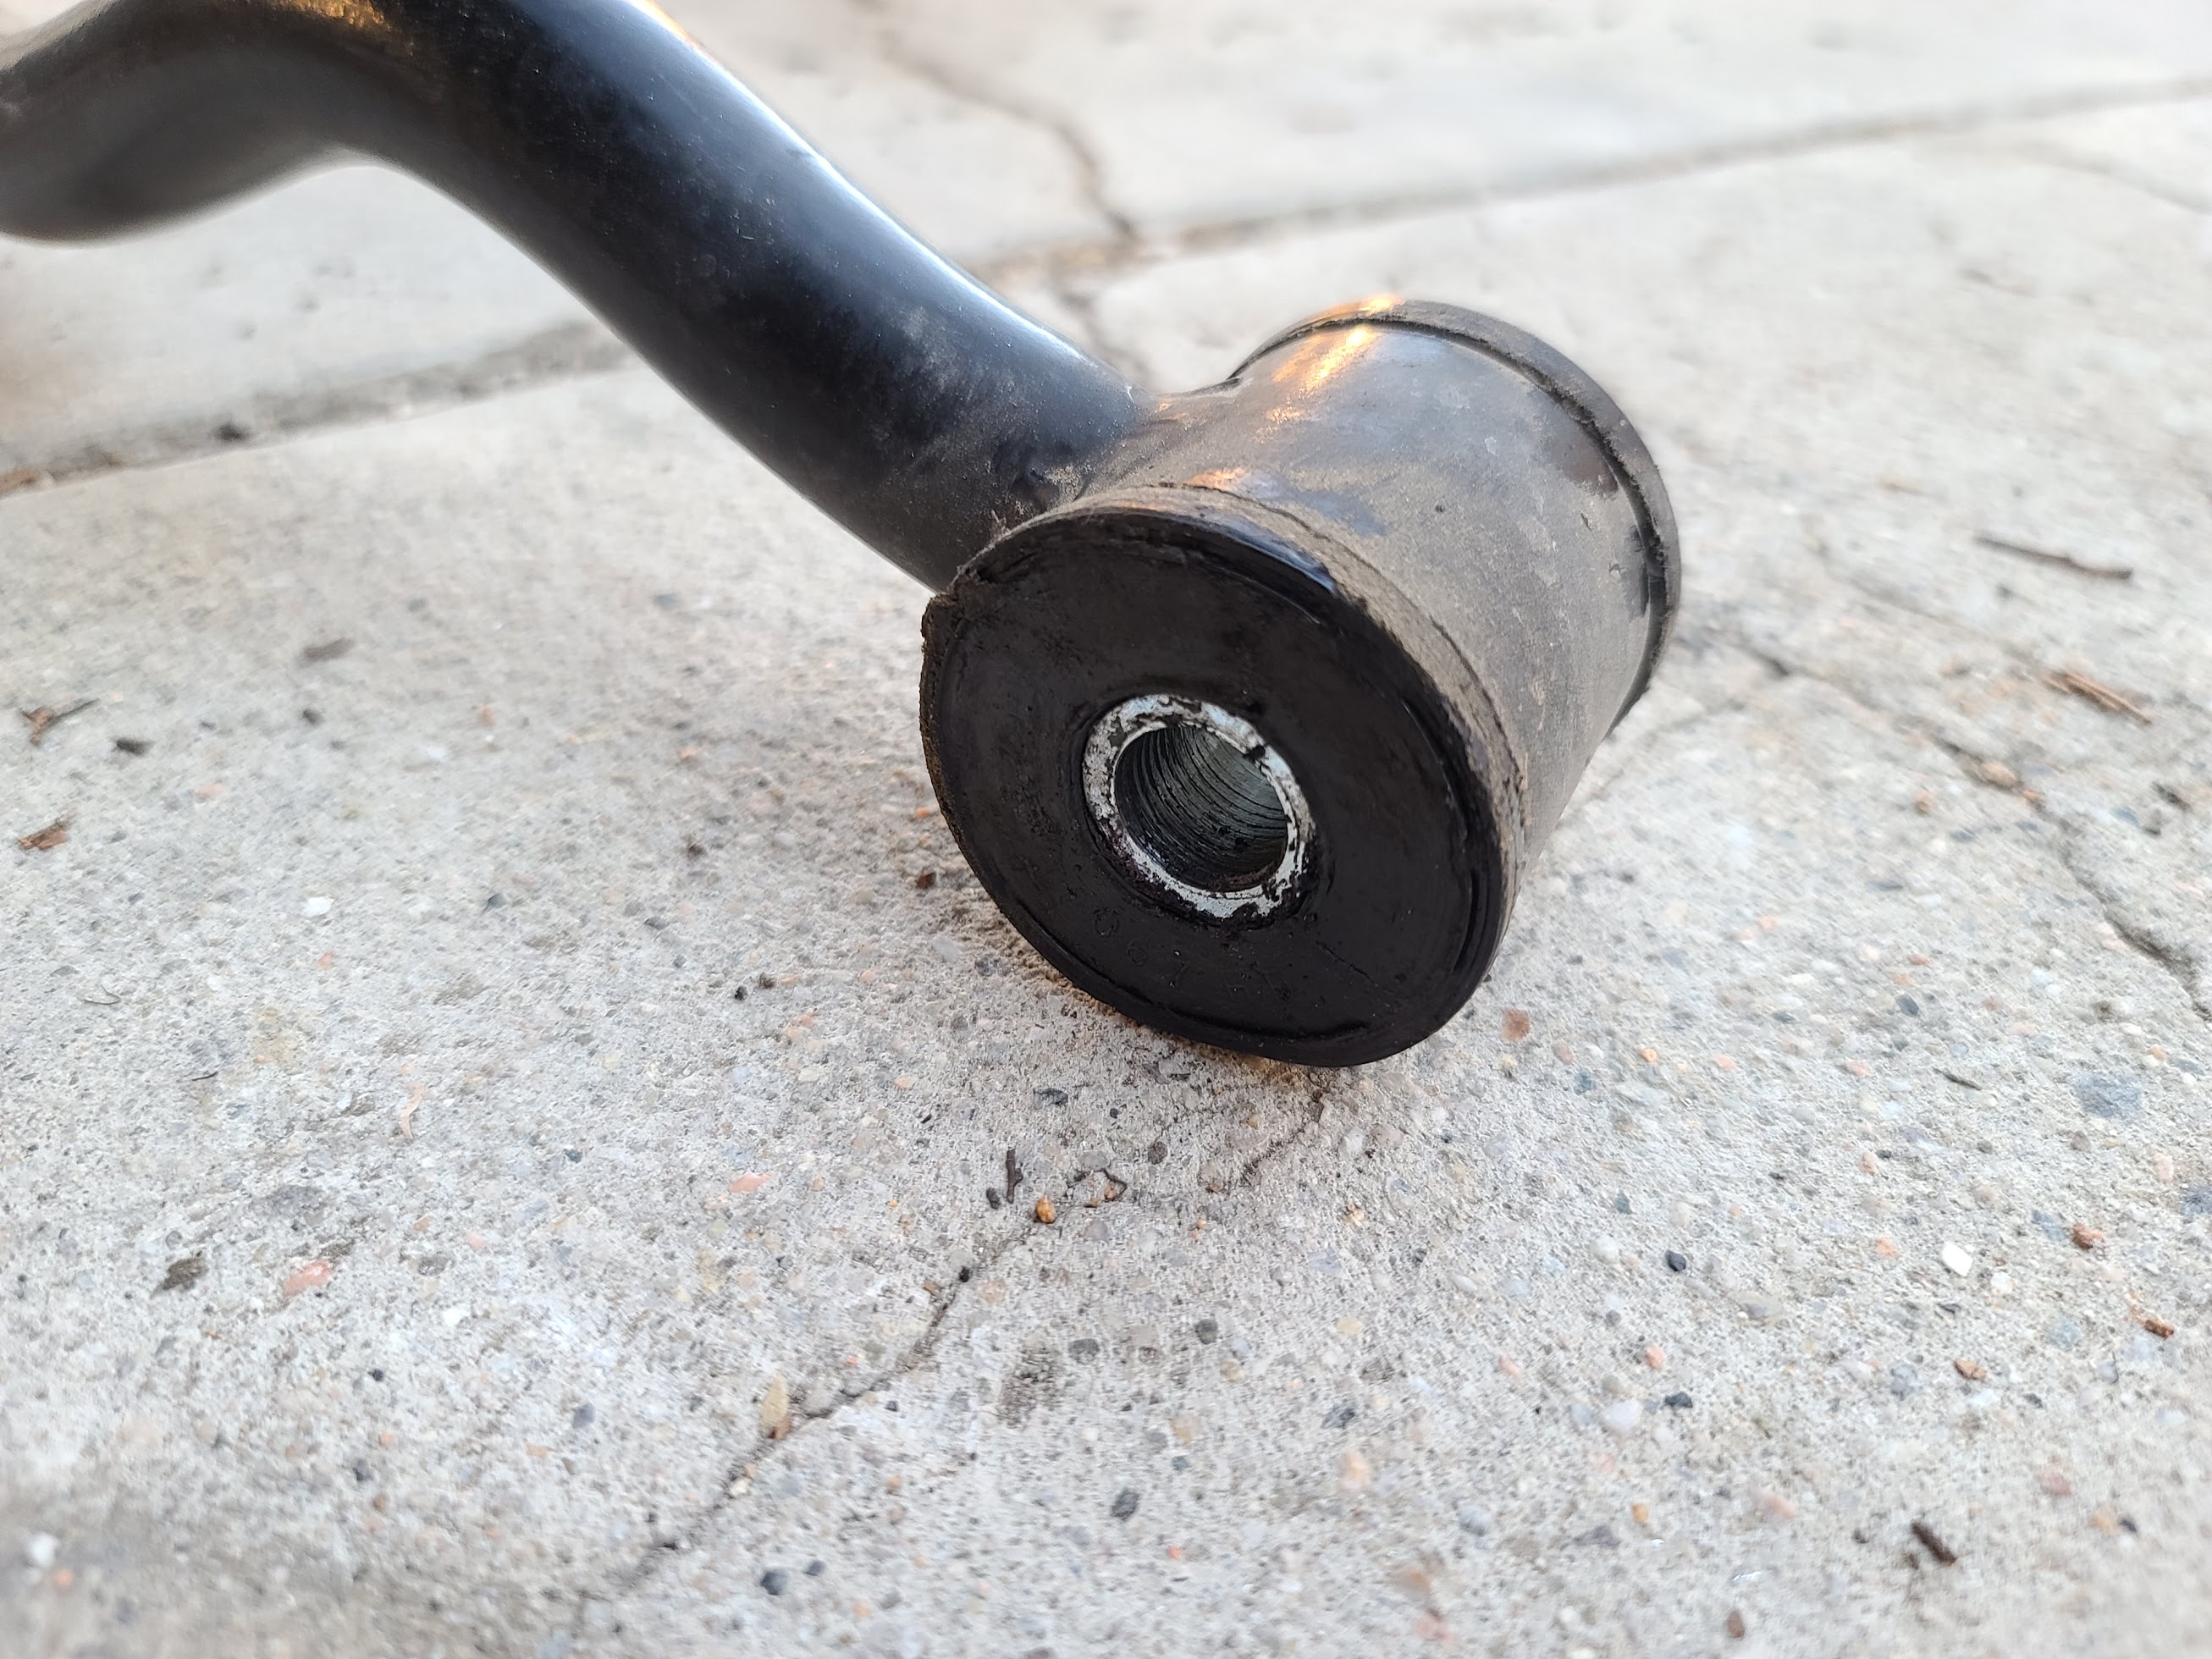
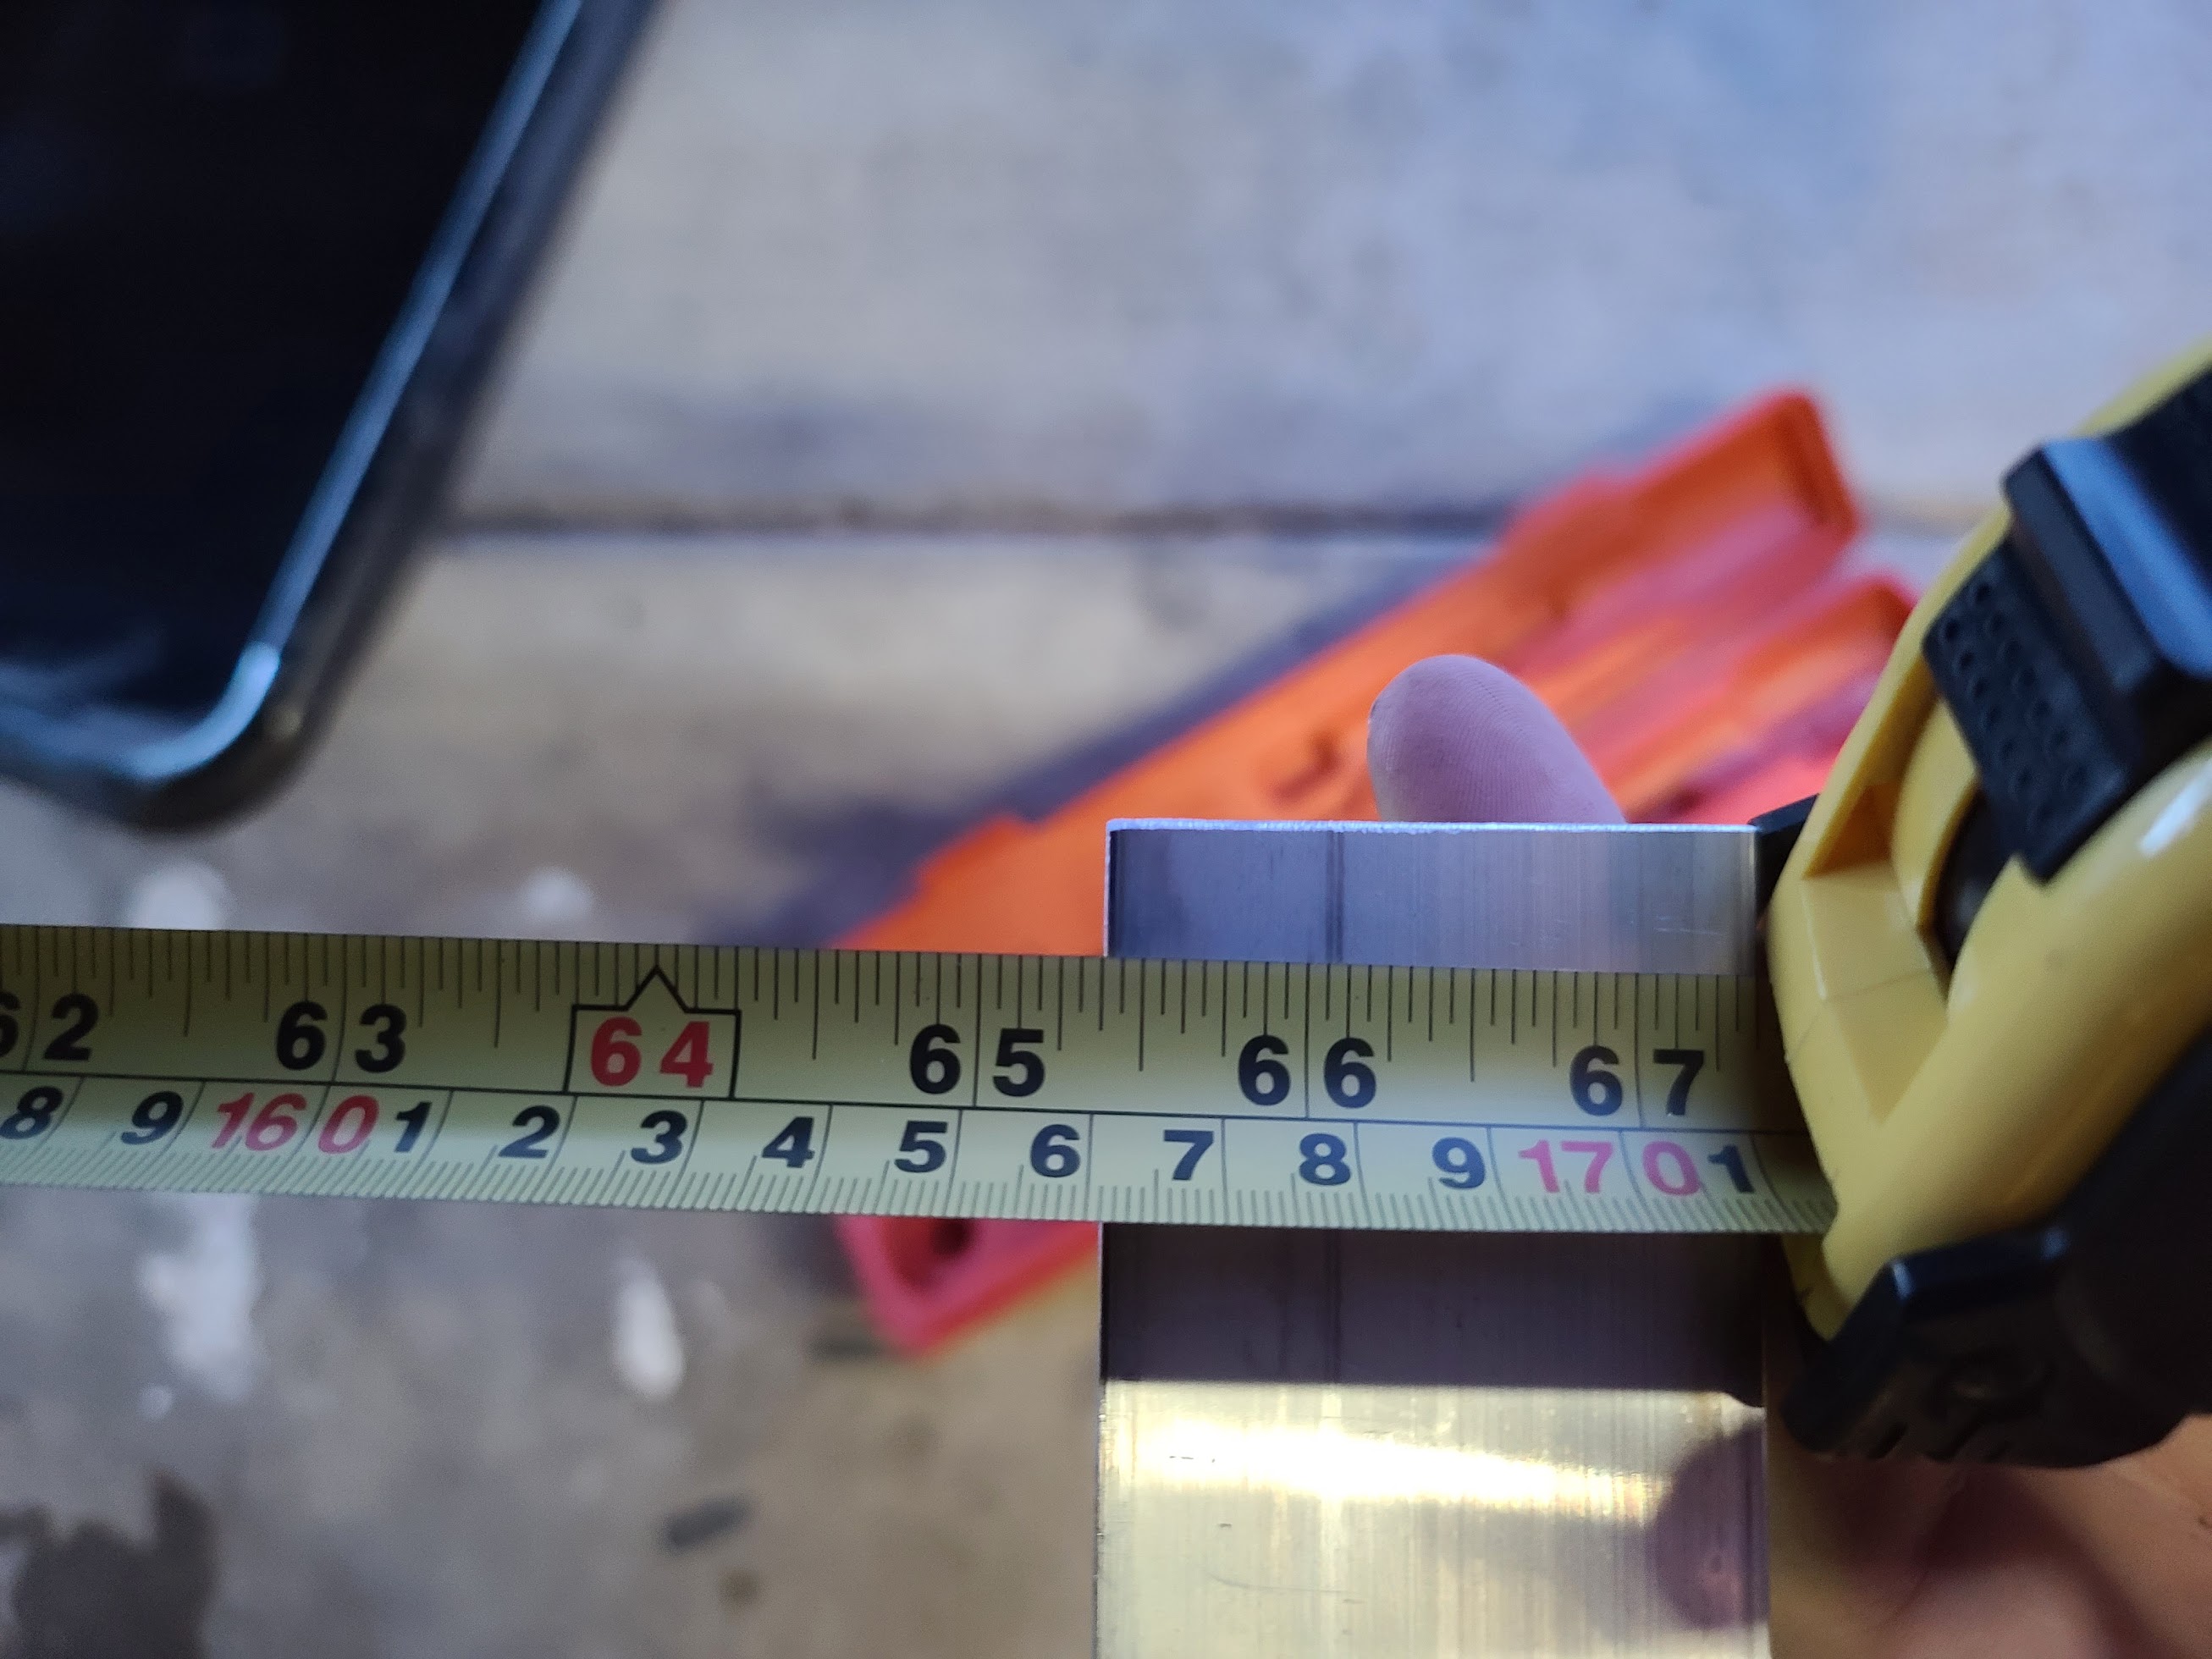
I bought the Trail Gear Heavy Duty Steering Kit which includes a new drag link, tie rod, 4 rod ends, and a steering damper. I took off both rods, damper, and the steering box and had the steering box professionally rebuilt. The old steering damper was pretty much entirely done -- spring only, virtually no oil resistance. When reinstalling the steering box, I replaced the high pressure hose with Gates and the low pressure hoses with Gates from phhkit.com. I installed the new tie rod and used two aluminum angles to set 1/8" toe in at 37" wheel diameter, using two laser pointers to center the steering:
AM-JKLV3AsFfm_f_Aep2X7zeCWn3oG4E3Uj6J8k4gFzTSp86yaOr5vxQTSbEwRRchurt5SAQ106R7kd5BSI3YmZnXX08ITylryWDto_gtg9QffLKqVvY2SlYRavUIjidNBMNznuW47E73VtCN3zpOFDlGflNjQ=w2614-h1960-no
AM-JKLWJzV7fI1riqlhFv63N5t3tIcehExPze8gRz2hdGgp4k3flGlsPX238QlwBvm3pn3sdkD8uZweR19cAihRmaC1AauEKR1ssd2q4ytYQMoFTHkeKNFrsho3NDVp3BIi9ZoMXnP9PWyc-CwUQHmg_7_z4Gg=w2614-h1960-no
AM-JKLX_NWUZ3X4xIMoJtsIW0m4UzD76wFN2qmzhCvOpPsqmu8zh1aVds2ncGKpXdwUjtMhuGtyHVpVLmyV7XIN0RfGsFwN3vSbwa5Q5lfsvMjQXCWHmbRg_M4TPTSbNQTcoPeQJAXf1NlA8eDwQ8anib9_TGw=w2614-h1960-no
AM-JKLV1UDQuTrv9VWAKorOawU7FmIvASj3OLKrSVSZJCrVJZk1qx-mIcJcAD27STOYL-6bs0RDOxud-CwF85ugeOKuyknlk7hgVFbF8PEQDQ7Fm7vEHxkeErEXafkFDy8KjpT89Hj_gyRmt0T9B5Z2nLCp2nA=w2614-h1960-no
AM-JKLVzqvAdly8XmG6k6WZlyebu-4Mf4S3OMUq710EJ23p7en8czy9OzM9QDlG3oxreue87377VoVbPlOiO2w0mjY7hqWtsBMd7WYAXnQzMrHt_Wm59JAjWveZnjC0aMa_CZP2L-tLm2yiubJMragdQaRTgjg=w2614-h1960-no
AM-JKLXSs77TR621Ruxhqg19VJfm7jJFI14QNHnOfzM38XMxDrnGDBHFCktUdd1OeCcpQlqECBp_6YNlunCWQddMjzIjUJfnEhegMB0lyqPHTupGRlh_m2r1PR215x95C5WMZFJeetwZhnMZnQItkZTeFyVmJQ=w2614-h1960-no
AM-JKLX_zmytYQ20veC3SdlYiQ47tYZKVwXiU1icT1efQwpAalCvQCHfVro13AbeoxJbCYMJEDbpi-BD_jGdLHZBKM8oMDwpubeVk4Z4hi76IBAoA13efwBmCCQ7XCnJ-WgW1JXIeXrP9xY9ttcjt4BYR8UneA=w2614-h1960-no

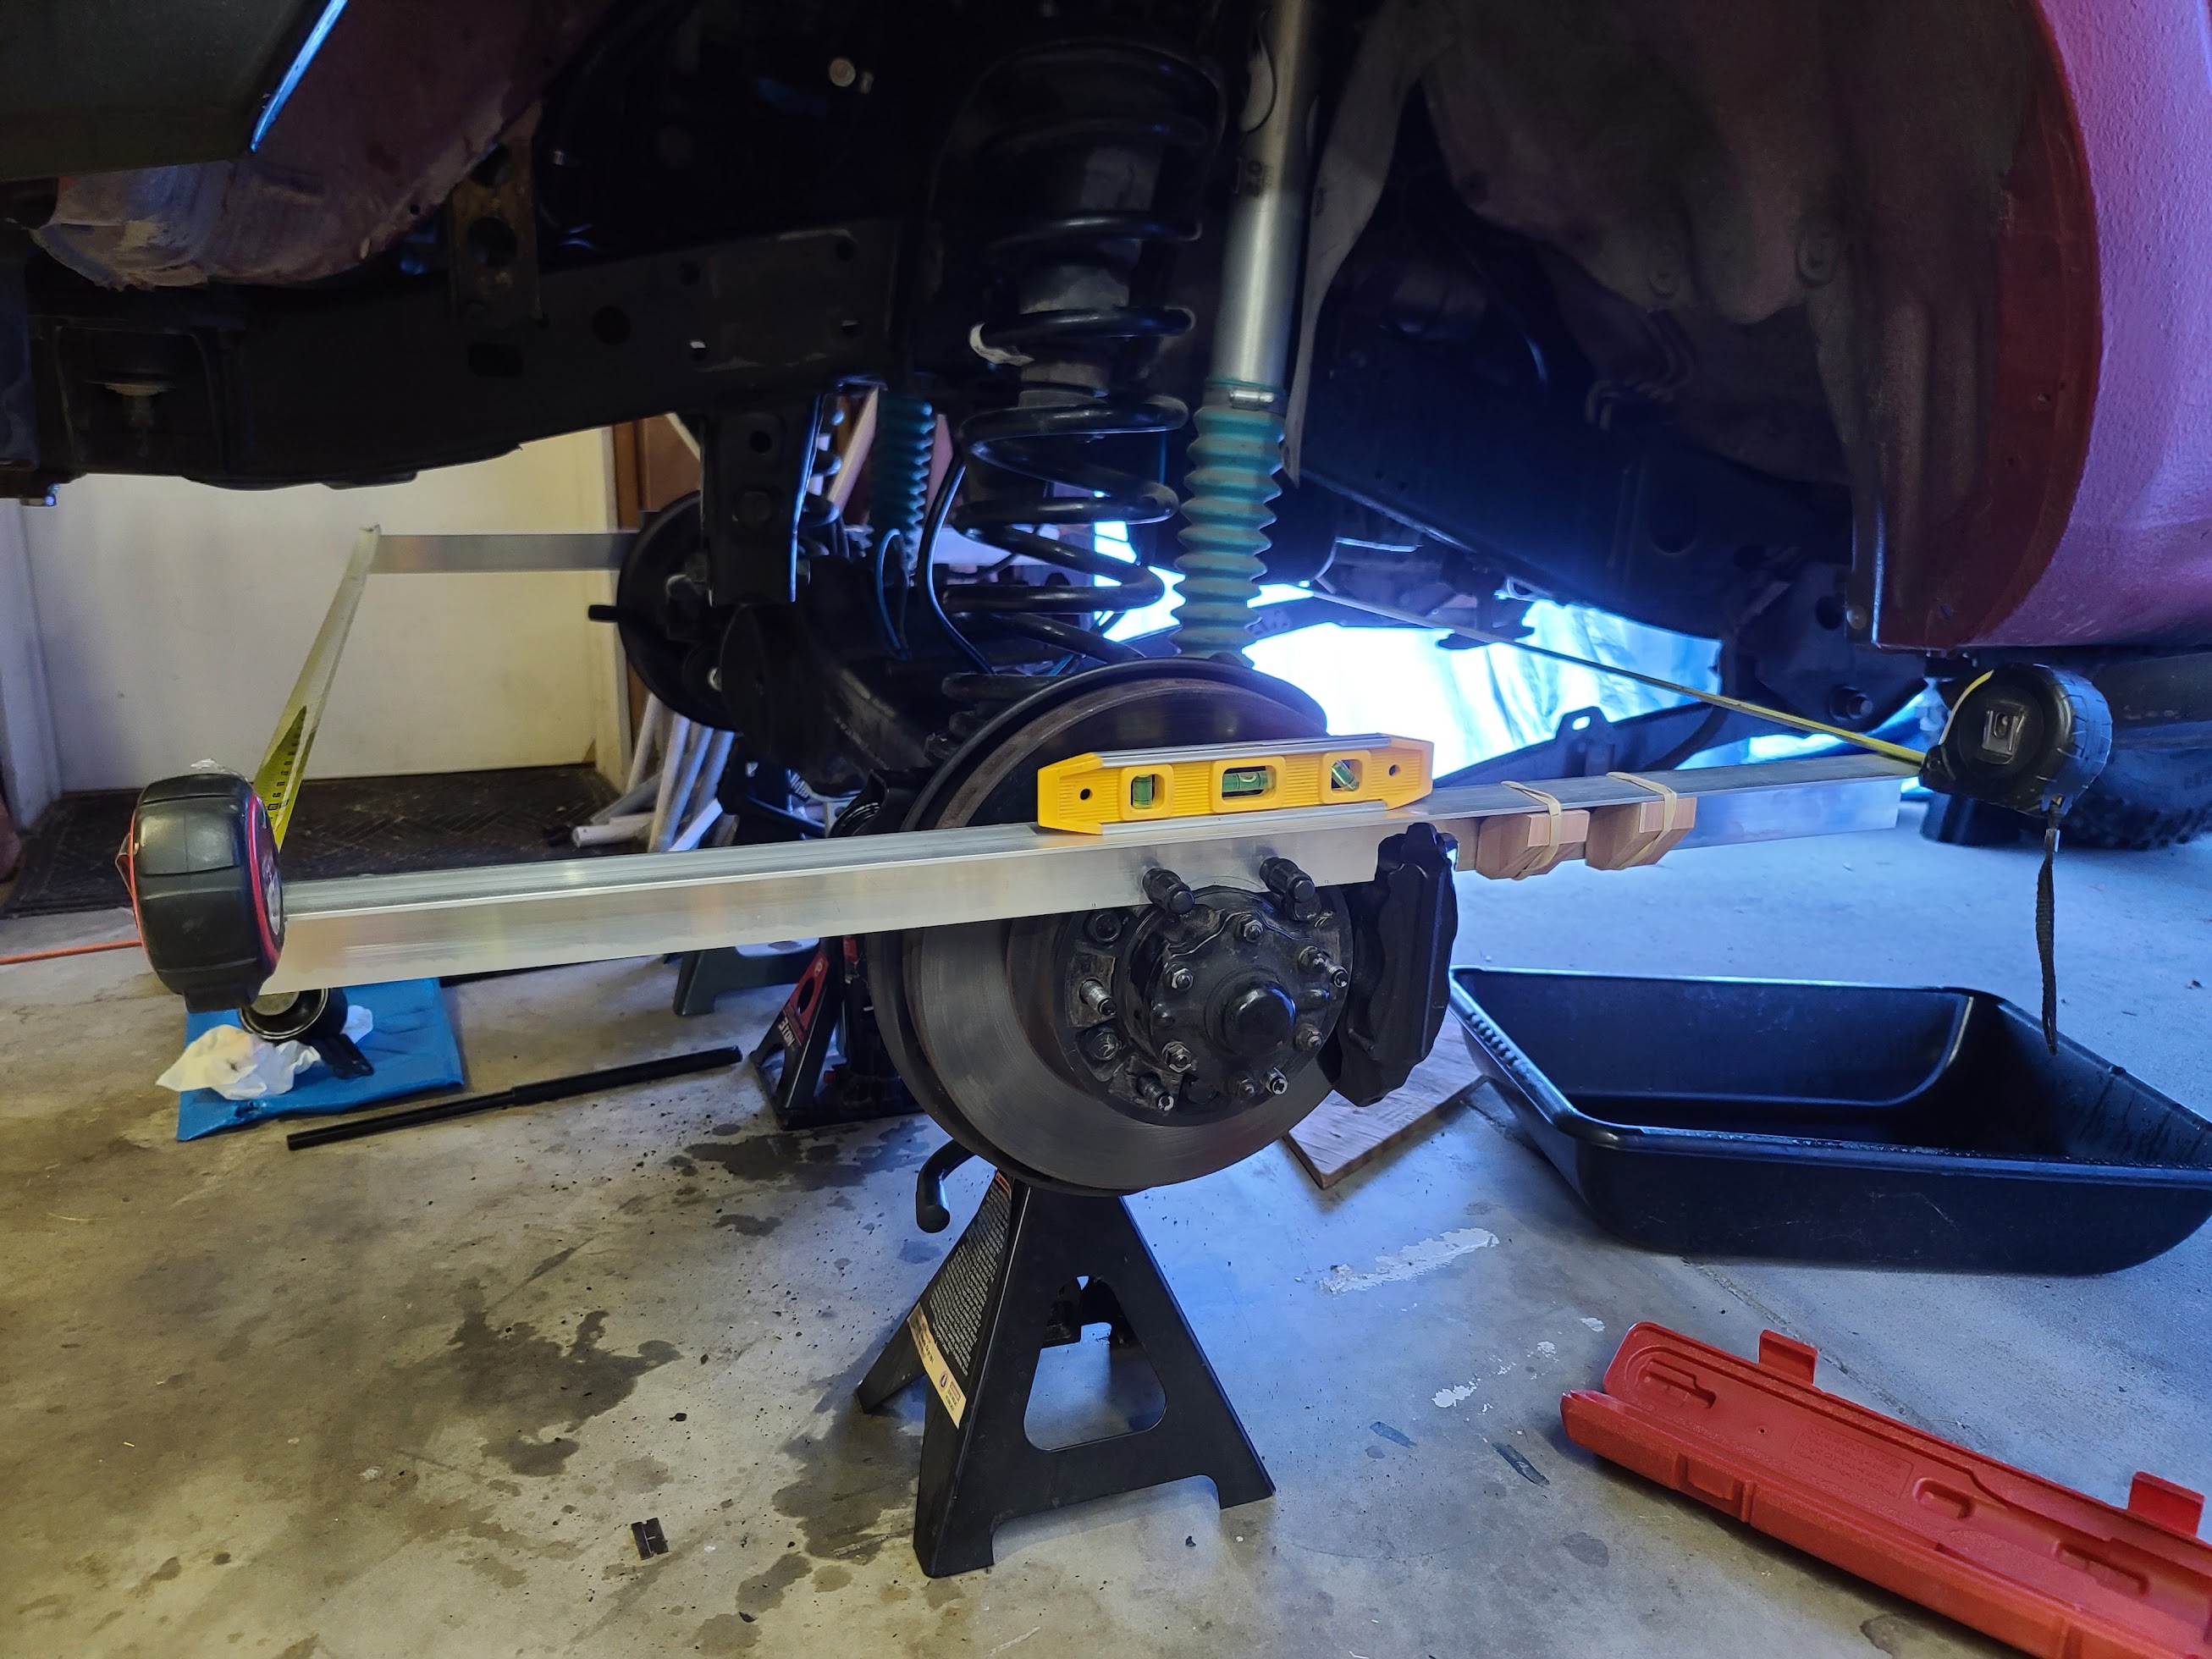
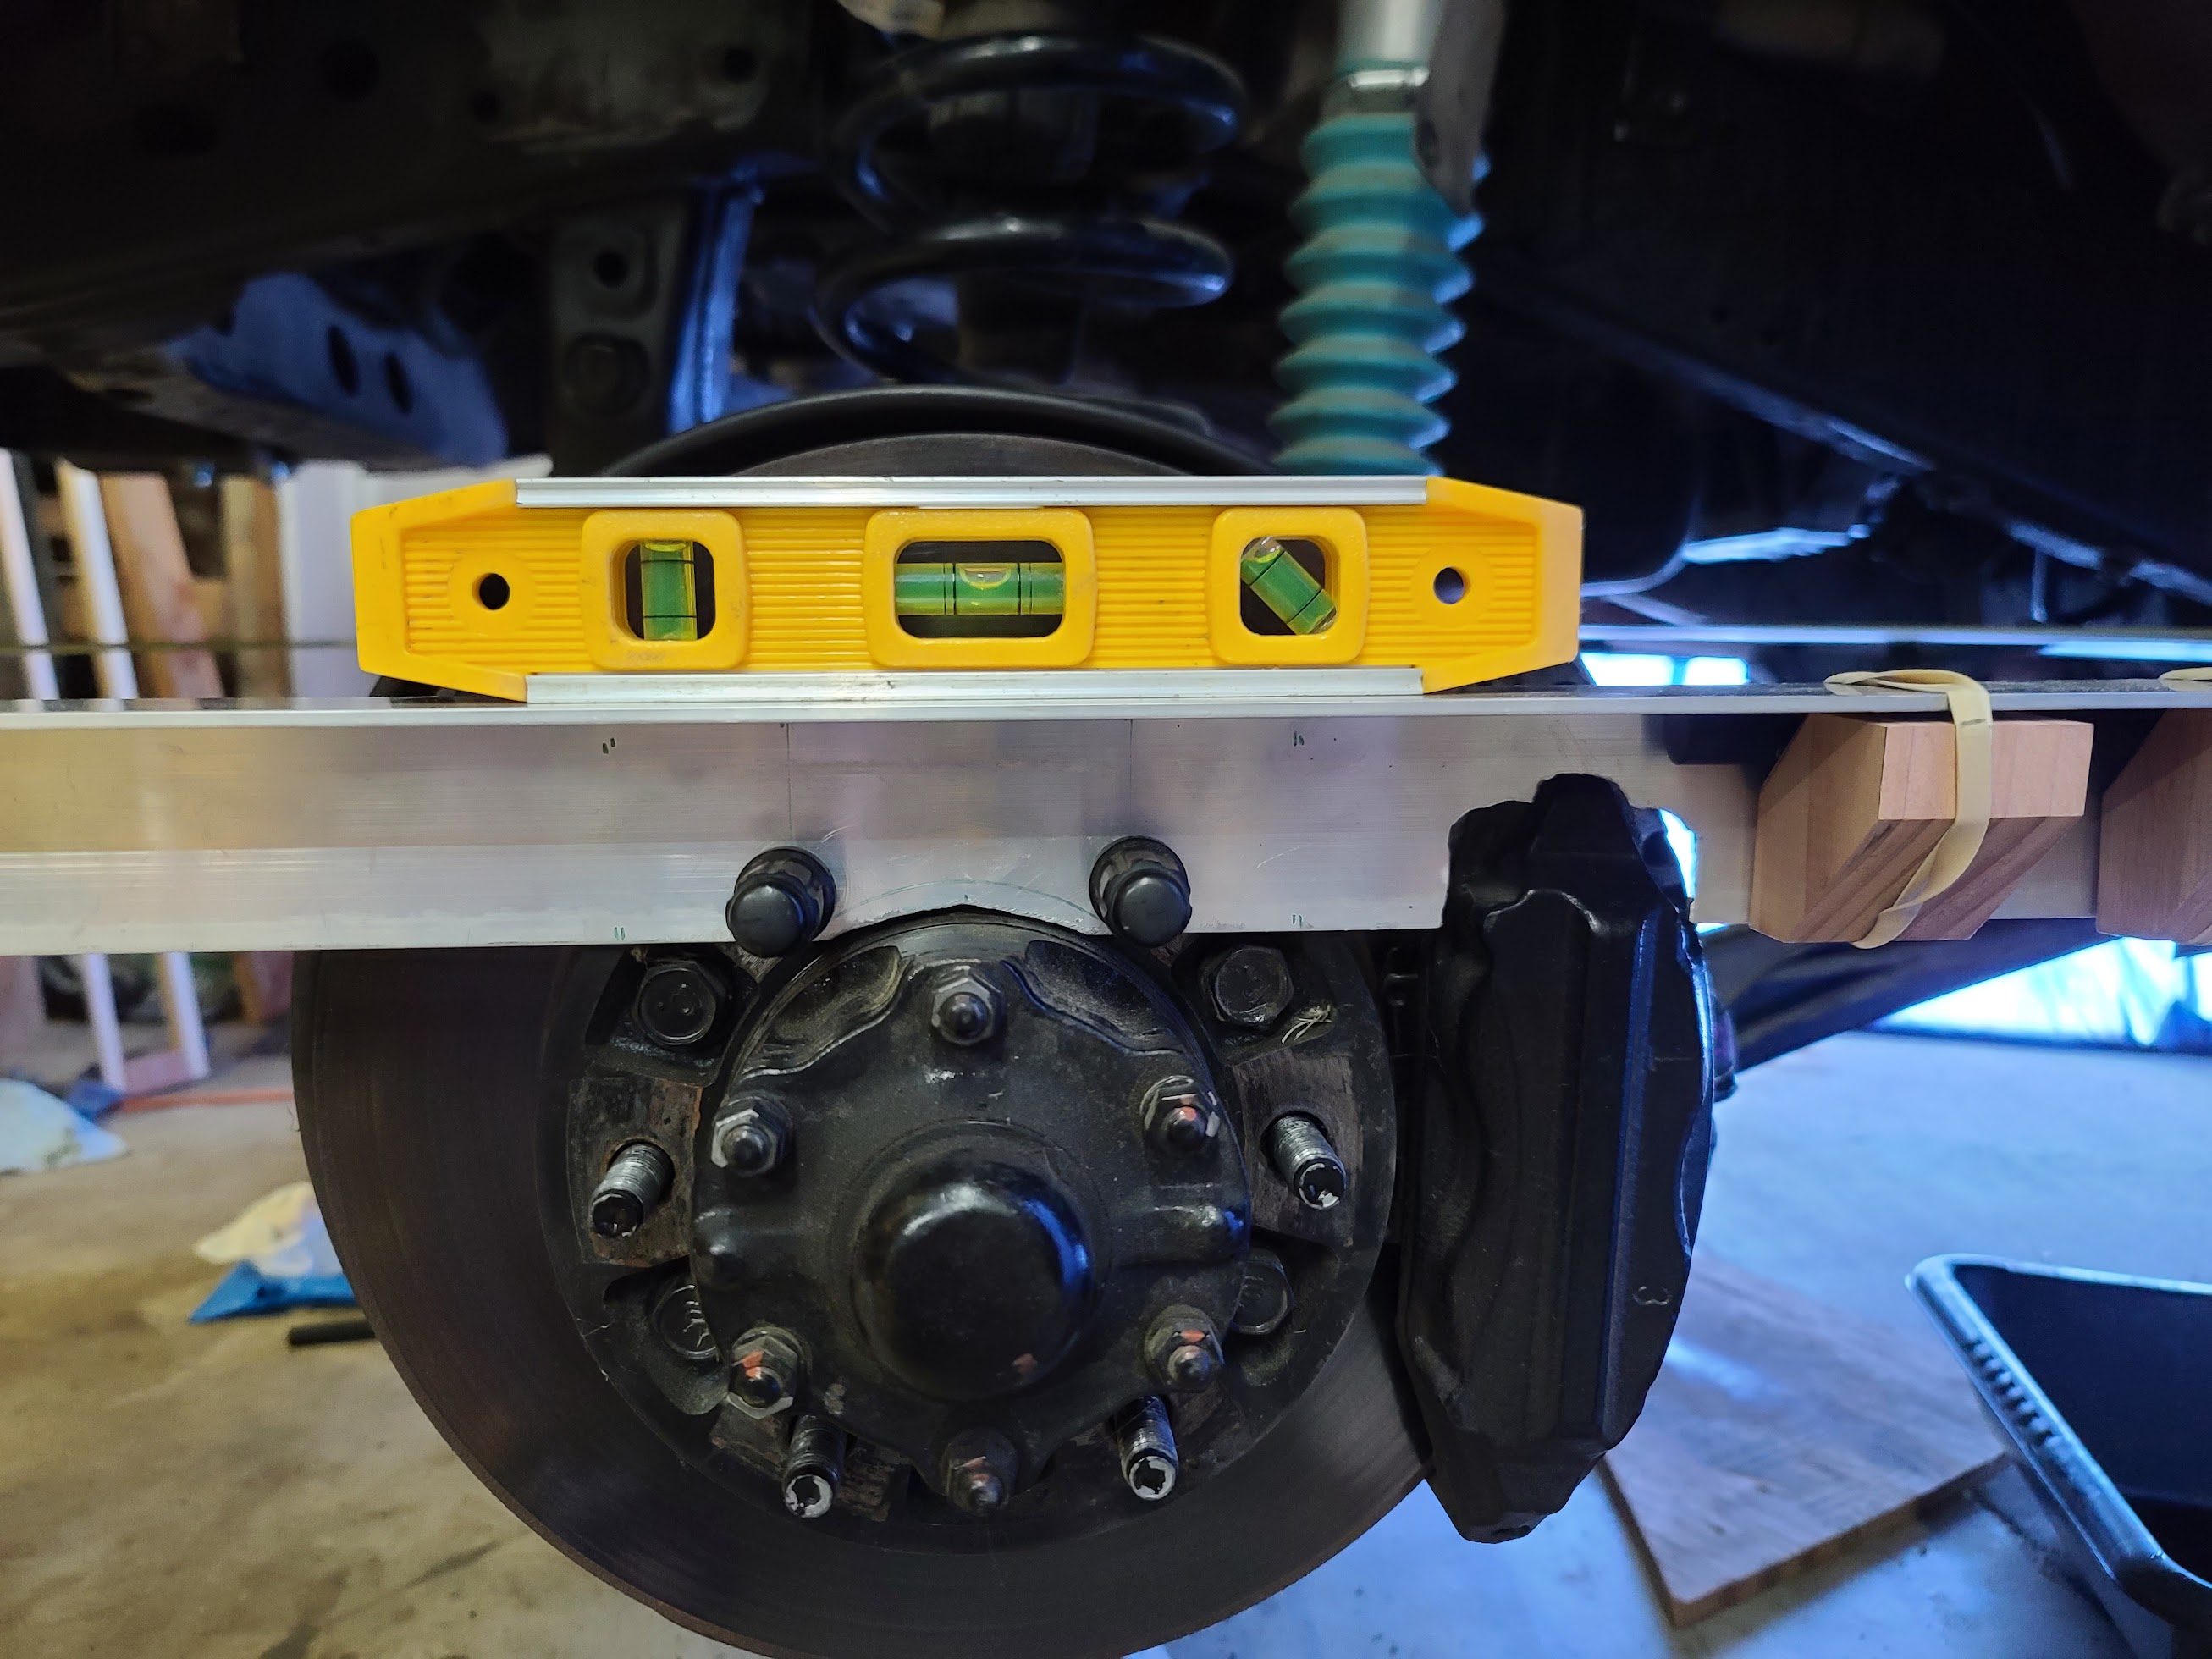
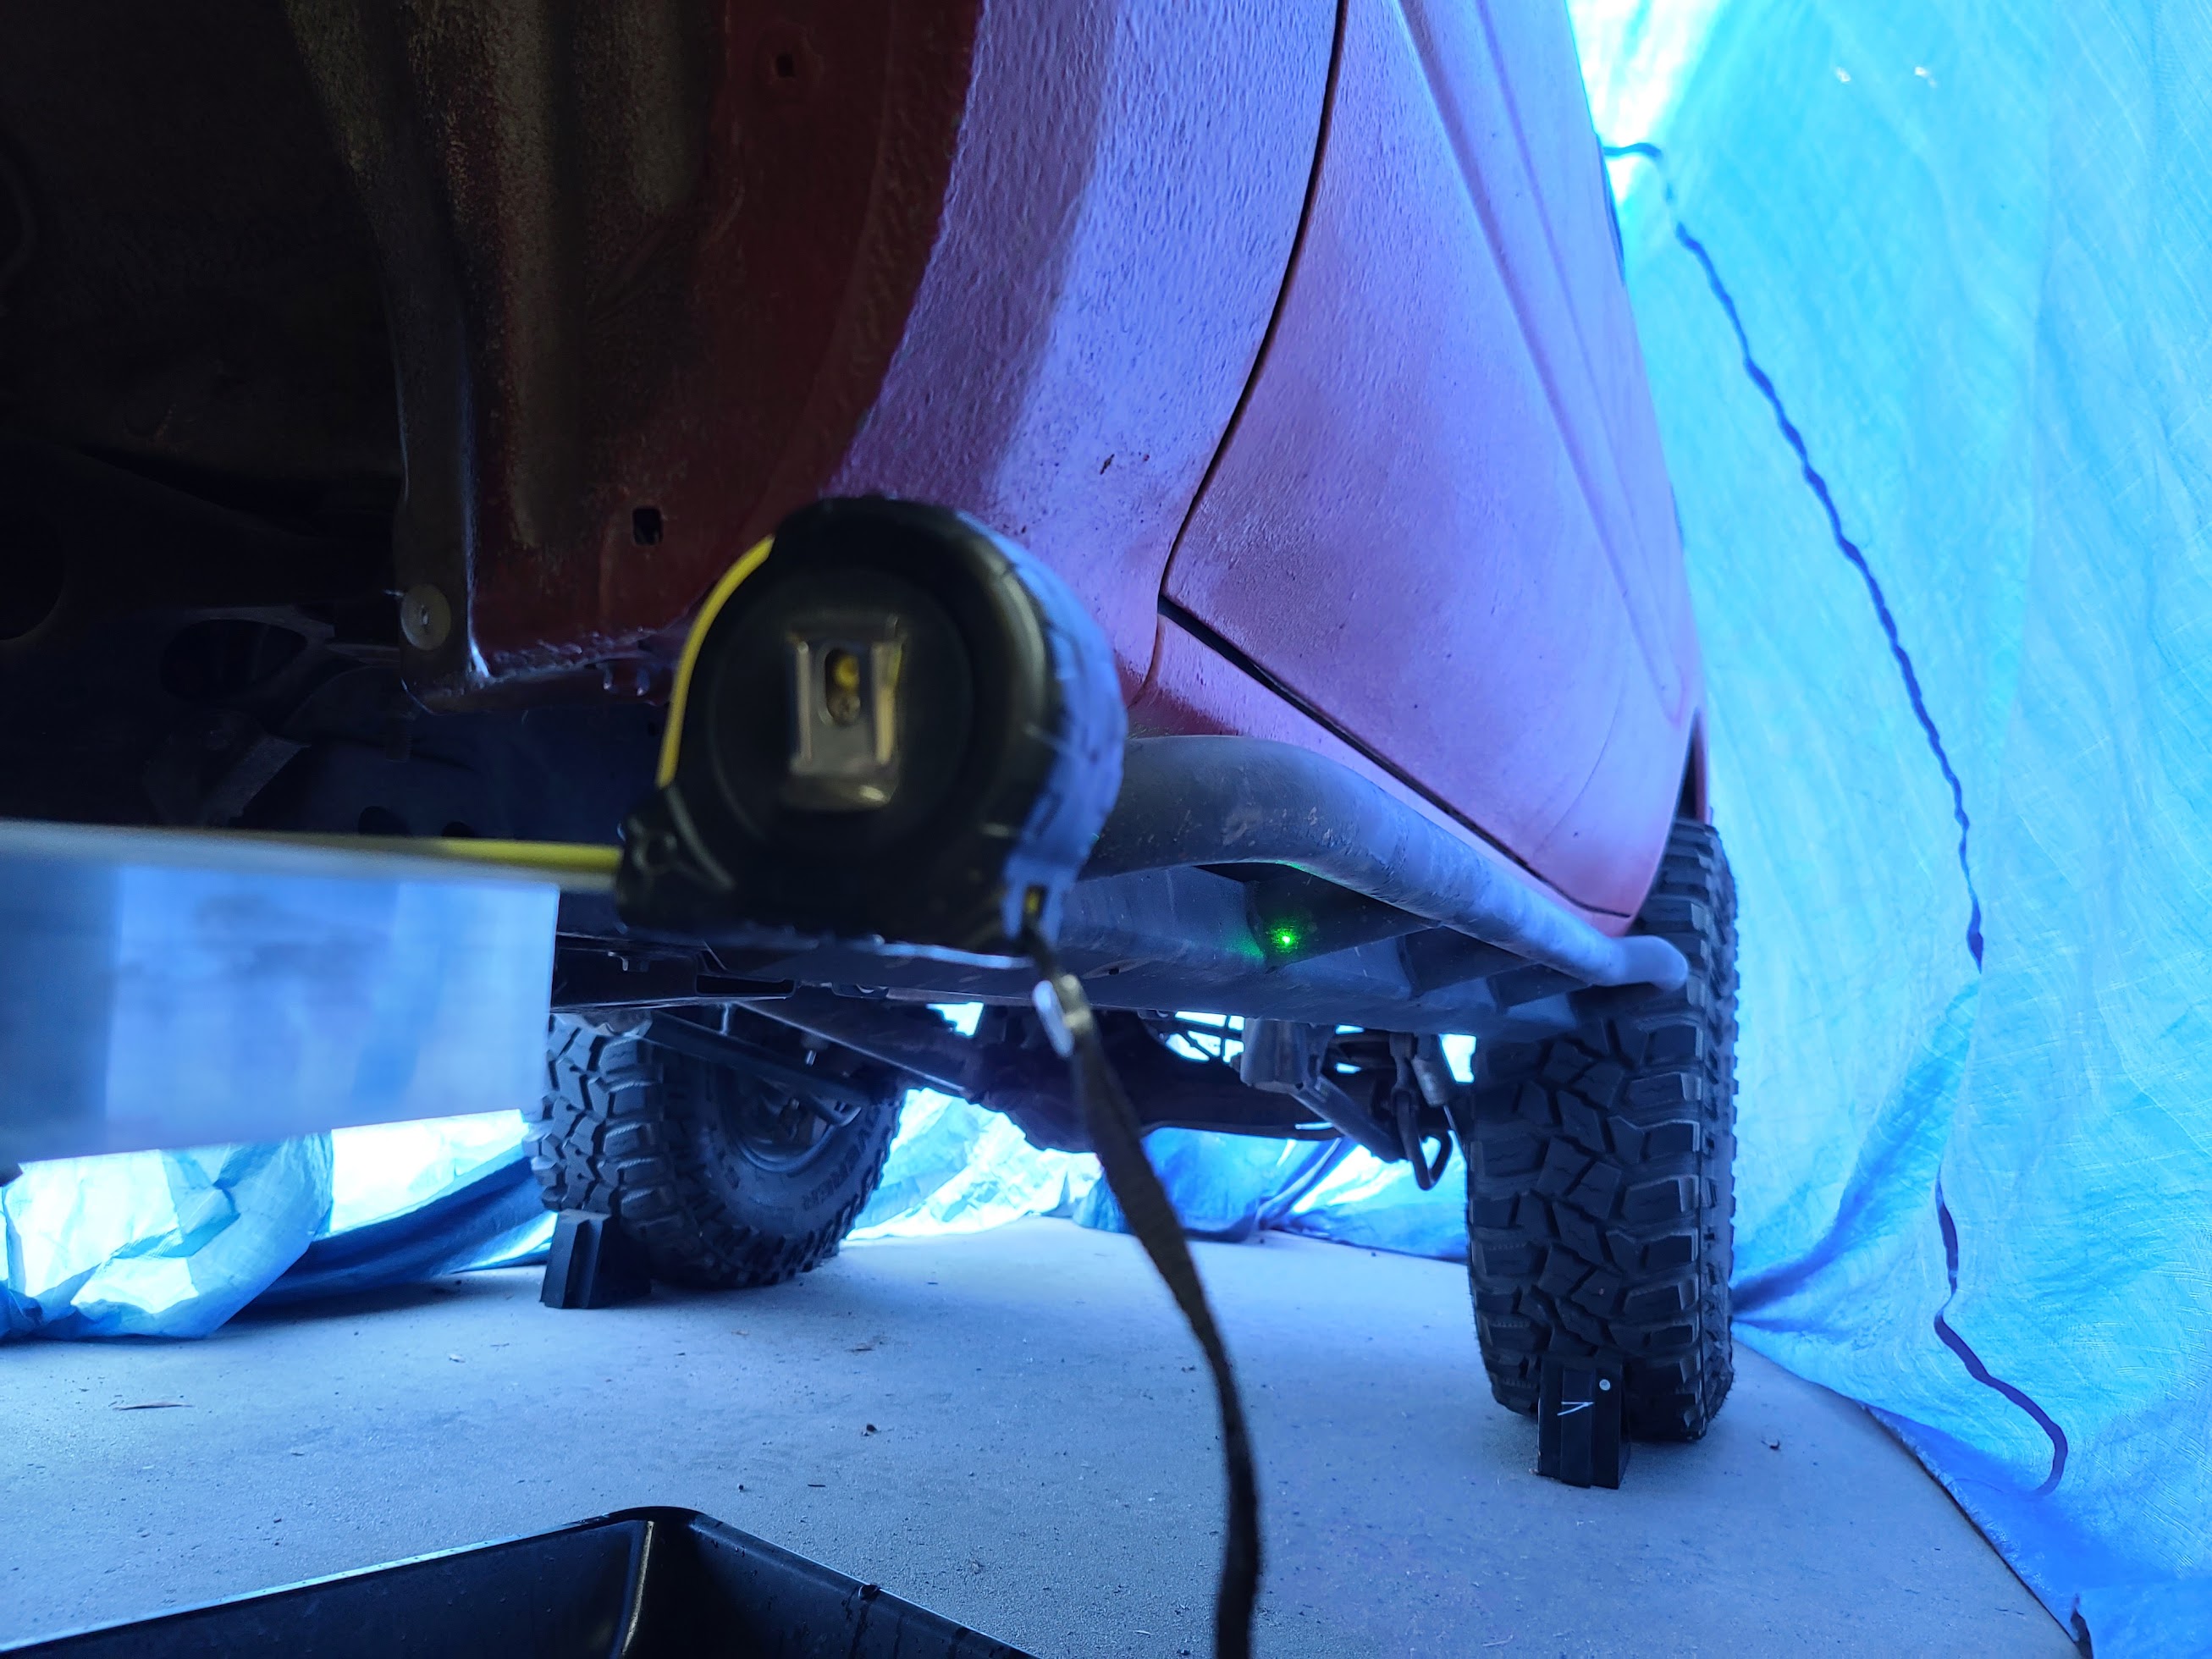
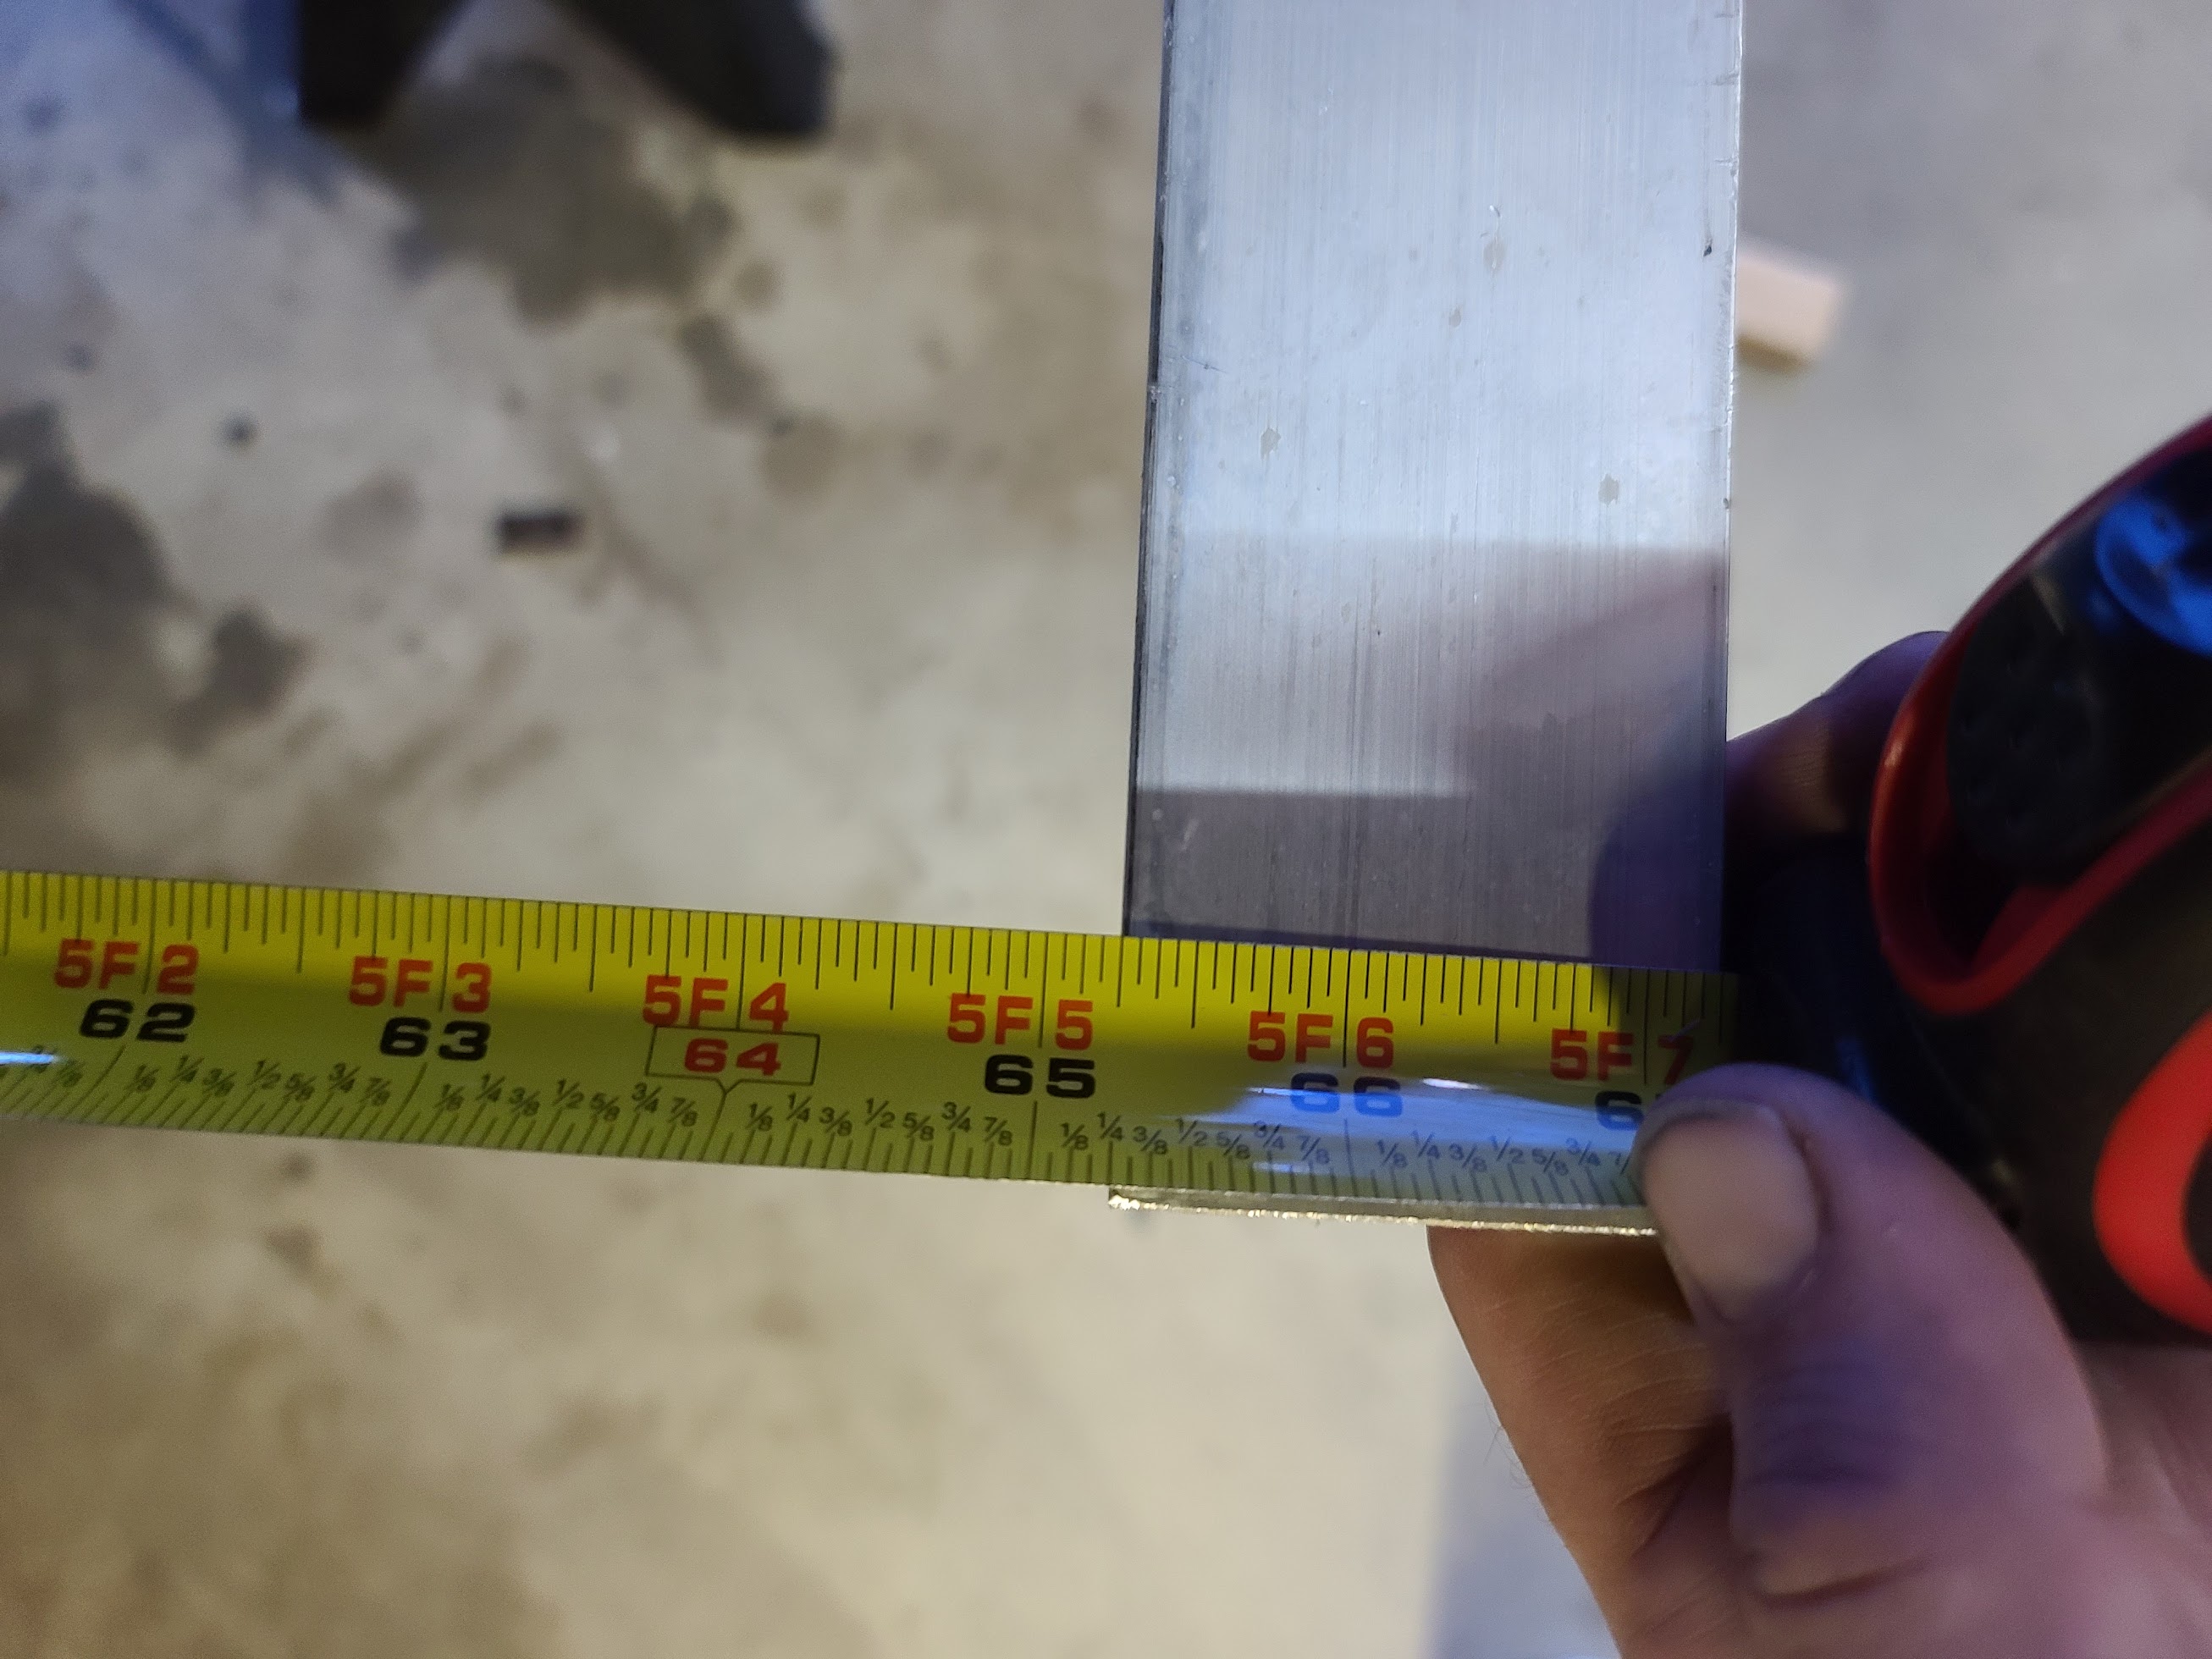
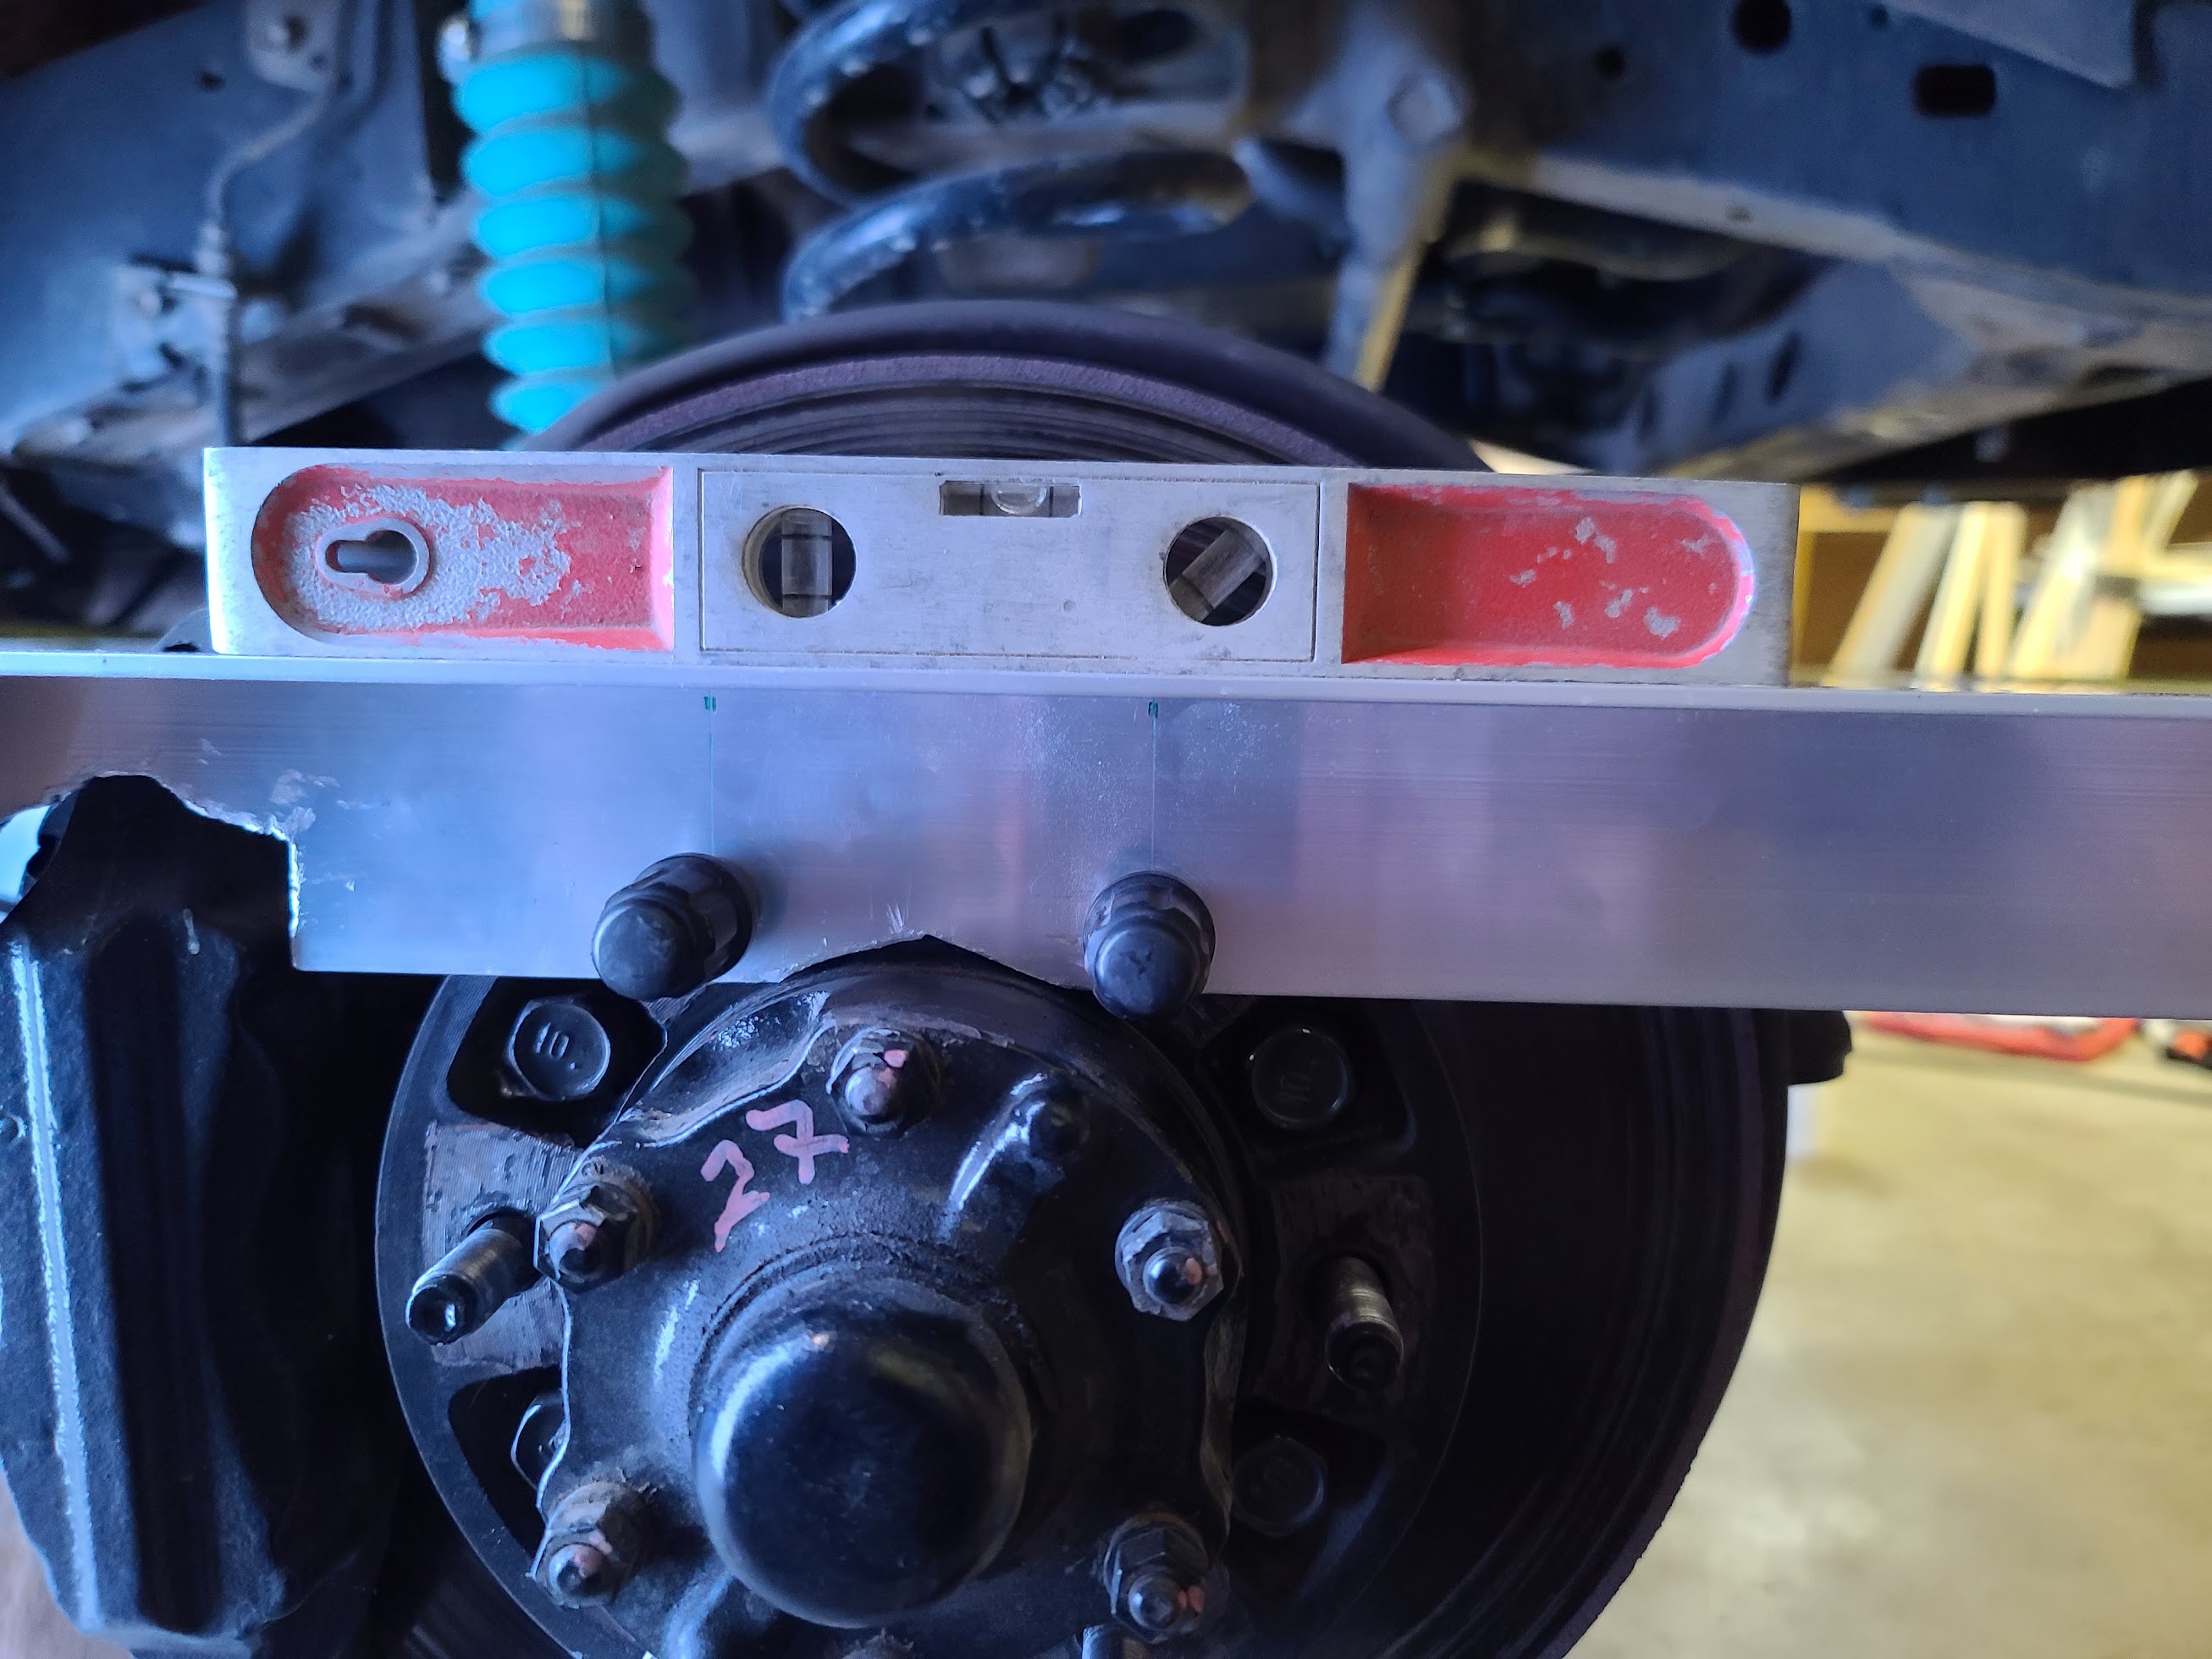
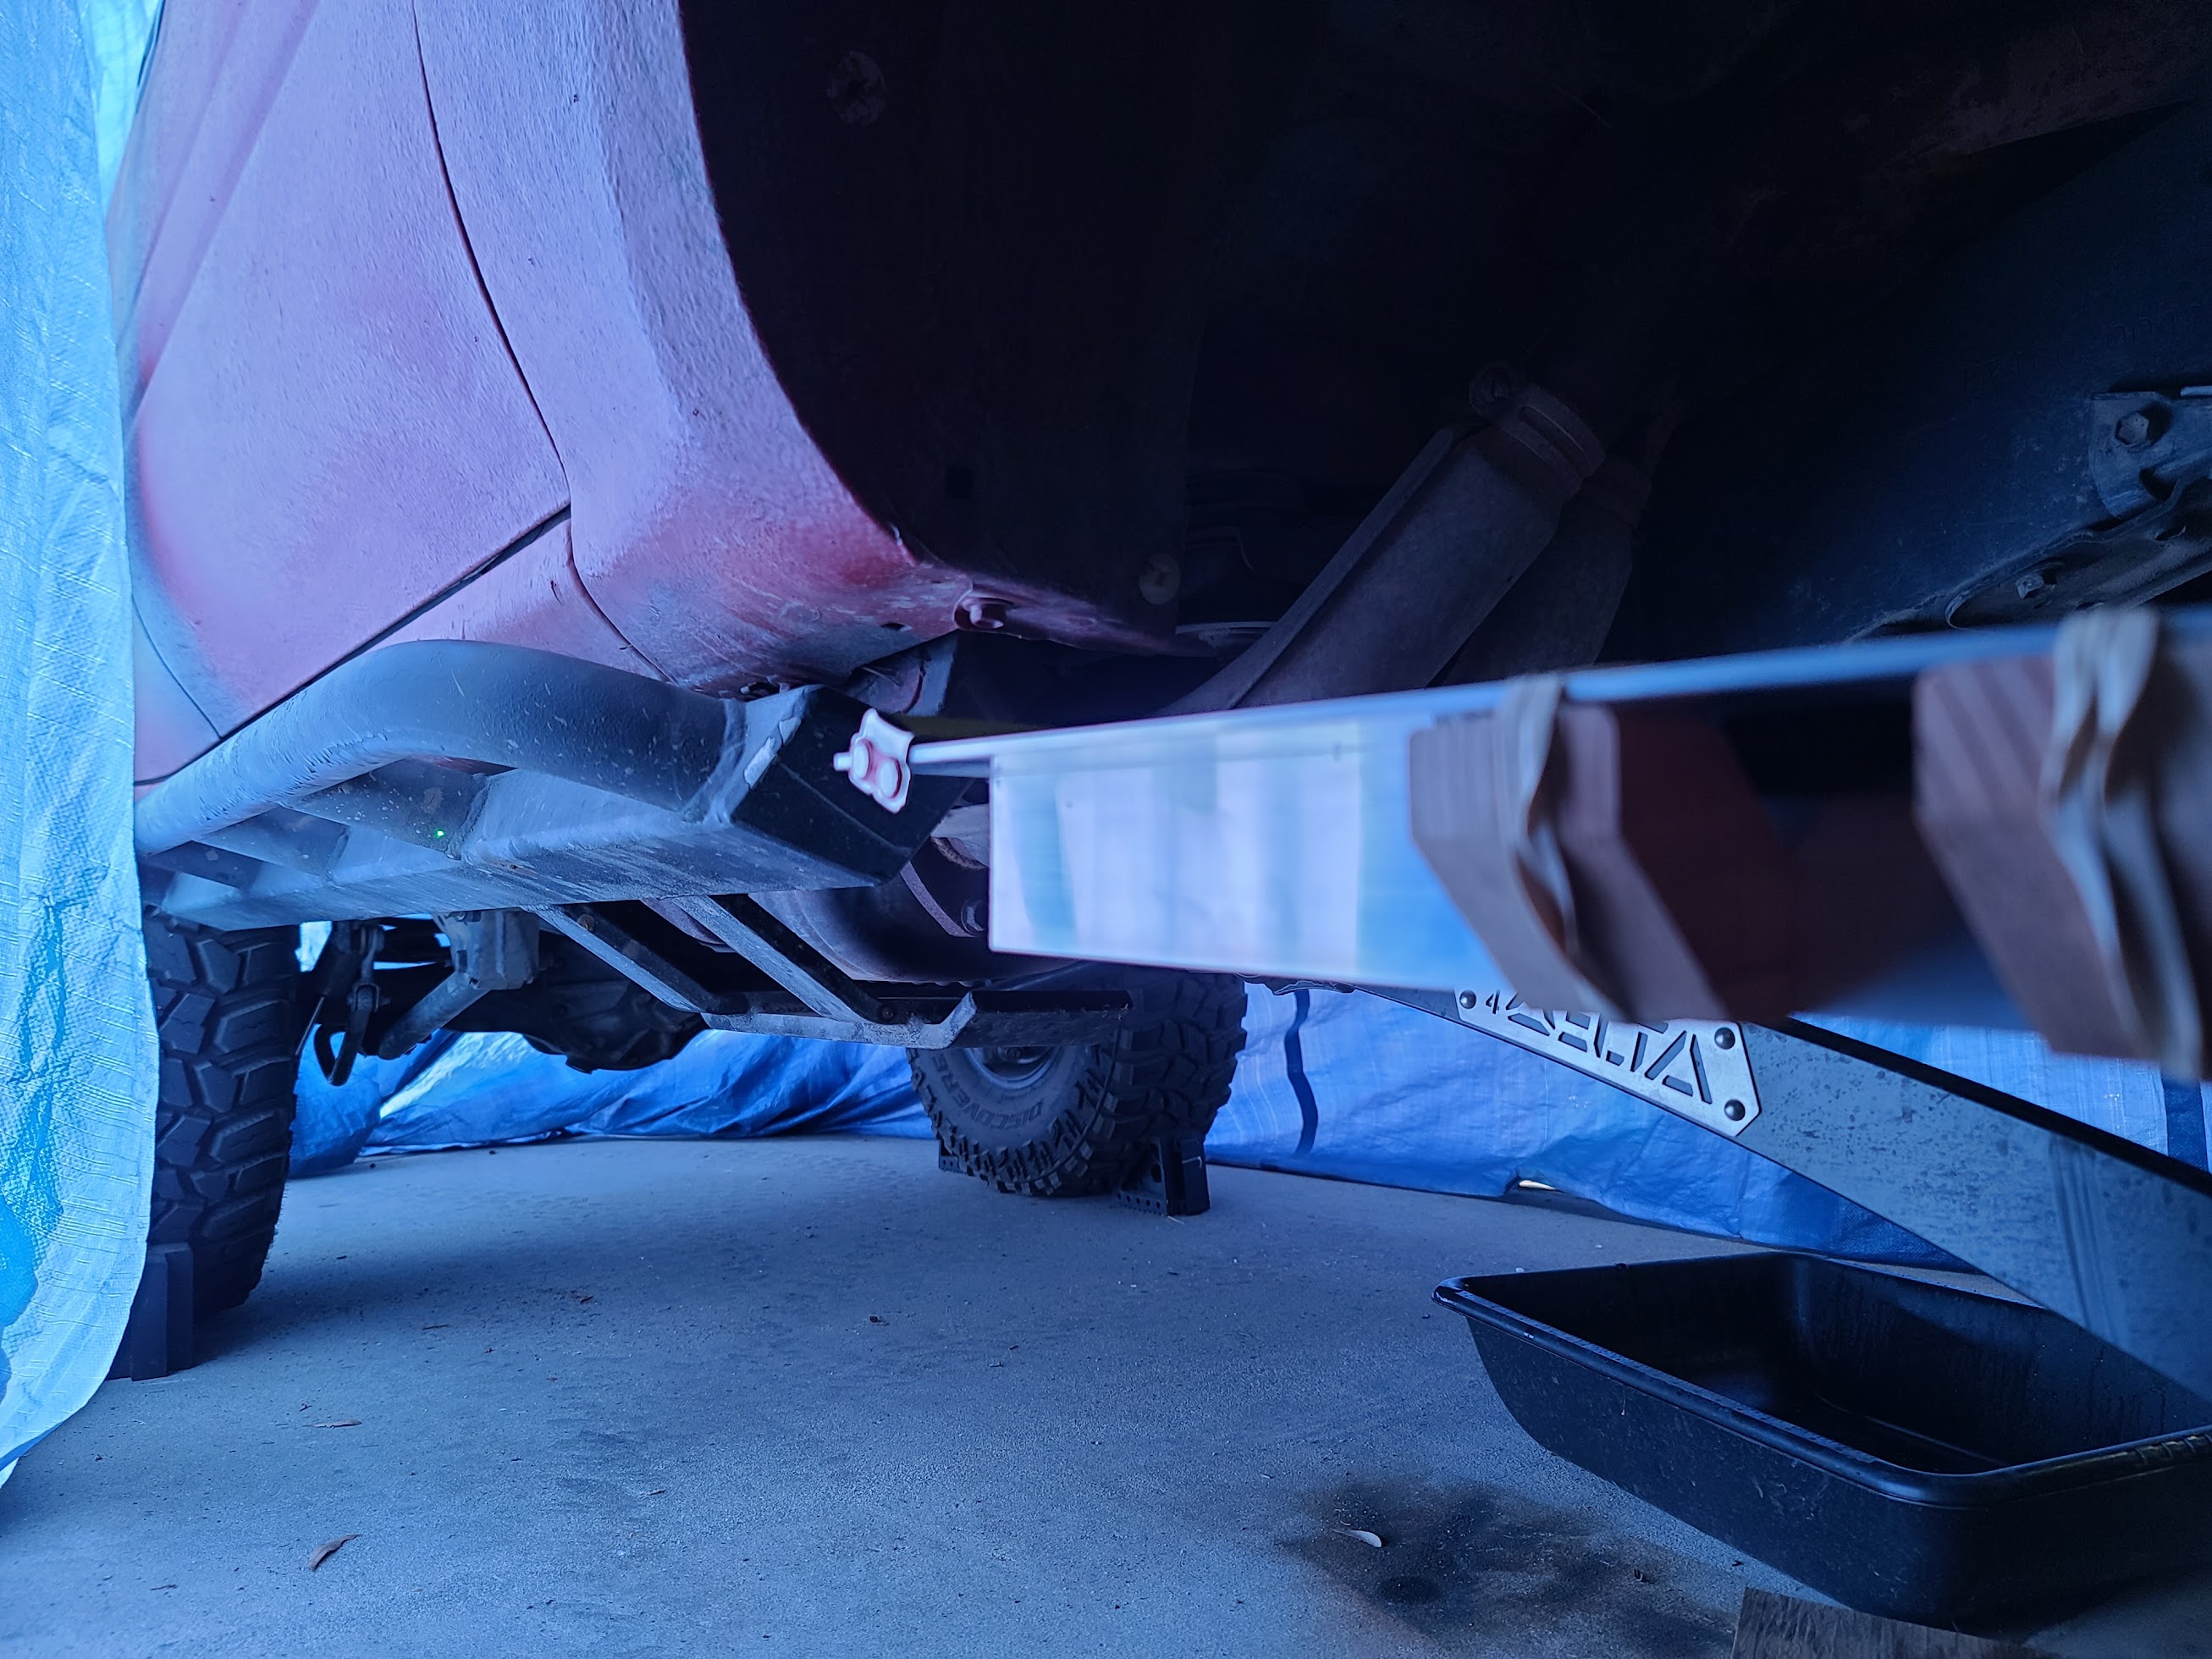
I installed the new drag link and tried to center the steering wheel as closely as possible using the two laser pointers on my alignment jig shown above. All crown nuts torqued to 67 ft-lbs plus whatever was needed to line up the cotter pin holes. The Trail Gear rods use jam nuts and do not have any indents to put a wrench on (!), so I tightened the tie rod jam nuts to TG's recommendation of 75-85 ft-lbs using a giant 14" set of vice grips and a giant adjustable wrench. I tightened the drag link jam nuts with just the wrench to "medium tight" because I knew I would need to adjust the steering wheel position a bit more. I did NOT install the new steering damper because one of the bolts was missing and Trail Gear has STILL today not delivered that missing bolt (they blame PROcomp, the steering damper manufacturer), but my understanding (which could definitely be wrong!) was that the steering damper just masks the issue and is never the root cause, so it seemed ok to leave it out initially. I also got my front wheels professionally balanced. Unrelated(?) to these fixes, I also installed a new Tom Woods DC front driveshaft.

Results
After these fixes, I drove a 38 mile loop including 23 miles of paved mountain roads like the ones that triggered so many wobbles. Zero wobbles. I did feel some "incipient shimmies" (vibrations like the ones that preceded death wobbles) which worried me a little, but I don't know the truck super well so I figured those may just be normal solid axle stuff. Given that I got 2 wobbles in 3 miles before the fixes, I thought for sure I would see wobbles in the big circuit if they were still a problem. The drag link did come loose from its jam nuts during the circuit because I hadn't done the final tightening yet, but even with the drag link working its way loose, still no wobbles. So, I considered the issue probably fixed and moved onto the next work.

Going to the picnic, I also had the AC shut off from overtemp while climbing a steep freeway grade on a hot day, so I did a bunch of cooling work next including replacing all of the heater hoses, replacing thermostat, replacing fan clutch with new 95F/6500cst-modded clutch, replacing radiator, and adding a temperature sensor to the upper radiator hose.

I went to do a short test drive to also re-set the drag link properly and...got a death wobble a short distance before my house. Well crap. I finished dialing in the drag link length and tightened the jam nuts to basically the gripping limit of the vice grips, then drove the same 38 mile loop. No death wobbles, but still a bunch of "incipient shimmies".

So, I don't really know what to do. I don't think tightening the drag link jam nuts should have made the difference between wobble and no wobble since I wasn't getting wobble on the big circuit even when the drag link was loose. But, it's also now apparently hard to actually reproduce the wobble. I feel like I can't take the LC on trips because I'll probably see wobble at some point since it was still present after all the fixes (not taking it on the trip I'm leaving for today because of this).

Configuration
When I bought the LC, it already had:
  • 37" Cooper Discoverer STT Pro tires with most of their tread life remaining
  • Method 105 beadlock wheels
  • OME 419 Comp Coils in front, unknown OME coils in back, resulting in ~5" lift based on DeltaVS's panhard bolt method when lightly loaded (but still have front & rear bumpers + winch on front + full-size spare on back)
  • Front sway bar removed
  • 5.29 diff gears (net result from 37" tires + 5.29 gears = truck travels 92% as far as speedometer/odometer thinks it went, so slightly lower gearing than stock)
  • Air locker front, Detroit locker rear
Not very many miles before the picnic, I installed new DeltaVS radius arms for a 4" lift. I tried to get before & after caster numbers, but no shop around here will measure alignment on beadlock wheels, and I gave up trying to measure the caster accurately.

I had recently removed all wheels (one at a time), deflated, carefully and progressively torqued all 120 beadlock bolts, reinflated, and reinstalled.

Both the previous owner and the one before that are members of my offroad group (I joined shortly after getting this truck). The previous owner had a bunch of stuff put on the truck (including air locker), but drove it only a few hundred miles over 2 years. The second-previous owner (an experienced amateur mechanic) said the front axle "is basically all new" -- he said he thought he did the rebuild at 13Xk, but based on CarFax, I don't think he owned it until 145k (he works on a lot of cars, so not surprising his memory may not be perfect).

Possible things to try
I can think of a number of things that hypothetically might address the issue:
  1. New non-beadlock wheels + new smaller (35"?) tires
  2. Knuckle rebuild, including new wheel bearings
  3. Install steering damper
  4. Add a front sway bar
  5. Replace some of the front axle components (not sure which ones)
I'd be happy to do any of these to fix the issue, but doing all of them would be very expensive, especially when it seems like there's no guarantee that even doing all of these things would fix it. #2 seems like the leading candidate to address any wheel bearing problems, but it seems like the fact that there's no play in the wheels wiggling at 12 and 6 would suggest that the wheel bearings aren't the issue (plus, the wheel bearings were probably replaced 20k ago). #3 will probably "help", but if it were just hiding the underlying issue, that seems like it would actually make things worse by making the underlying problem harder to find. Could #4 actually affect death wobble? I'm not sure what I would be targeting in #5; are there any components that might be causing the wobble? #1 seems like the most likely solution (but I don't really know what I'm talking about yet), but $3k-$4k is awfully steep for "most likely". I want to get non-beadlock wheels eventually in any case, but I really like the Coopers and would like to keep 37s if I can figure out this death wobble issue.

Thanks for reading; thoughts?
 
@bjp that's a lot to unpack in that reply! :lol:

A couple of things

Caster changes by 1.7⁰ per inch of lift.
I drew the geometry out years ago to calculate it accurately because the rule of thumb if 1⁰/1" at the time didn't match what i was seeing whether trying to figure out how much to rotate knuckles for a 'cut and turn'.
Others have come up with the same figure.

Is wobble before or after steering box?
My thoughts here are that the steering box provides a buffer through mechanical advantage. Even if there is movement at the pitman arm/sector shaft, there's a steering ratio of something like 18:1 (vague memory) through the box that a little wobble is not gonna overcome immediately.

I'm not questioning that loose panhard bushings can cause rotation in the knuckles, but I would like to understand/picture the mechanism and don't/can't currently.
Lay on the floor under the truck, have someone turn the steering wheel back and forth and watch panhard rod ends, tie rod ends etc wiggle.

There's a lot of joints in the front end with bushings, ball joints, bearings, knuckles, radius arms etc. There's inherent play in all of it. When the play gets excessive somewhere is when you'll start getting death wobbles. Add tall flexible sidewalls on large tires and you have a lot of flex and bounce within the system.

I agree with comments to remove the panhard rod and inspect bushings with a pry bar AFTER the bar is out.
FWIW, your buddy is wrong about the panhard. Panhard bushings is probably the most common fix for death wobbles, particularly with aftermarket panhard rods, and aftermarket bushings. New aftermarket bushings have been known to fail in months.
 
Thanks for your patience; I have very little experience with LCs & cars generally so this kind of explanation is definitely appreciated. It's still a challenge because there's conflicting info, so I (with less knowledge and experience than all the other commenters) have to figure out which thing I think is most likely even though I'm probably the least qualified person here to do that :) In this case, I have a buddy who suggests the panhard has nothing to do with death wobble and I've read a couple comments to that effect in some Facebook groups which is why I was asking for more explanation, but I'm convinced by yours (and others') explanation.

So, I'll jack the front up by the frame, remove both front wheels, remove the two bolts, remove the panhard rod, and take some pictures?

Does anyone recognize which panhard rod this is so I can order new bushings?
AM-JKLWhKm4Q6nccN3N0OkfmV8puMcmdO4bH07OKZ5W8ZRg9T5QgGeP_SMa_PRxN7azZrPYXnbBVwPfr370Yd3b_Z-p3gAJeT6PXIC0mqf-Pn7e5xznI3WfvqqI85TMMMI1GgUlqZNnhnaYe4igSE_vmQBgUuA=w2614-h1960-no


The sensors are old MPU6050 accelerometer/gyros. They're connected to an ESP32 Arduino which is just plugged into a laptop (via USB) that records the data. I wrote the Arduino firmware, Windows logger, and Python-based analyzer/plotter. I'd be happy to share if someone was interested, but I assume no one else actually wants to do this. Marginal parts cost for someone else would probably be around $50, but I already had everything lying around from past projects.
OK first, I'd like to point out that I am not a mechanic or highly experienced with land cruisers. I do own one though and I just recently solved death wobble on mine. So, all of that to say this: take what you read with a grain of salt. Many guys and gals on here know their stuff but even then we can easily get something wrong. My explanation was based on my understanding of the system and my own experience fixing it.

Second, I would agree that the panhard has nothing to do with CAUSING the wobble but part of the reason it exists is to prevent these wobbles from progressing. The trigger can be a number of things. For me, it was old dry rotted tires that weren't round or predictable anymore. But my worn panhard bushings allowed that trigger to cause a wobble that built into a full-on shake in the front end and almost put me in a ditch. So yeah, the panhard isn't going to say to it's suspension buddies "hold my beer" and all of a sudden give you death wobble. But if it isn't controlling axle location then there's nothing good that will come of that.
 
I’ll take my angle measurements again out of my own curiosity because it does seem strange that your pinion flange is up only half that of mine unless your rig is not as tall as I’m assuming it is.

My claim of 5" lift is based on measuring 6" height difference between the two panhard bolts (after attempting to level the vehicle by putting wood underneath the tires) and observing that the DeltaVS caster spreadsheet has a height difference of ~1" between these bolts on stock vehicles. I definitely could have made a mistake measuring or recording values. Visual sanity check (the ground slopes toward the camera and to the right):
AM-JKLUH5UUqCqd92buZ2DcrBuSviUN_fdC2qm5scvsJAMa1hRhwiXLPxj9dDmWGvz3FXfurA0Fs4TLNGsJBE2r-rLAE3XAmPEmZETCt03Vl1iPVKYLxj1kDaEEGZWjOU9-zcKKfp2_xoCE6tJ3WsAN3caDm_g=w2614-h1960-no


You labeled before and after pics as left and right which isn’t easily discernible given the fact that they post one below the other and the pics themselves look identical other than the number on the tool. We’re both pics of the same knuckle?

Before is the first picture (4.3 degrees forward), after is the second picture (3 degrees backward). They'll appear side by side if you monitor is big enough. This is the same (passenger) knuckle, and the car was not moved (apart from pushing and pulling the axle to line up holes) in between the pictures. Only intended difference is stock arms versus DeltaVS 4" arms.

Your front transfer case flange should be about 2* up and the rear about 2* down. Your measurement of 6.8* up is worth looking into.

I'll put that on the list. The transfer case side of my Tom Woods drive shaft has a very small gap between the nuts and a feature of the drive shaft, so it's a bit of a pain to take off and reinstall/torque. I of course could have made a mistake measuring or recording these values too.
 
Only time I ever experienced wobble on and 80 was first time I tried out 37" Super swampers. Went back to a 35" Toyo Radial M/Ts and it just disappeared.

Something is pushing your front end into an unstable state. You may be riding on the verge of instability because of caster, bushings, poor dampening or worn components but don't know it until you hit the right bump or reach the right speed, then DW hits.

Personally, and has been mentioned - try out someone elses quality known 35" A/Ts or M/Ts, or some other tire.
 
Your picture shows basically the same lift as mine. The pinion flange angle differences definitely don’t make sense but the our knuckle angle difference is close to making sense. I did think that yours would be closer to 1* positive with the 4” arms but it’s showing 3*. Both knuckles are not the same angle on purpose from the factory. My right shows 5.5 and left 5.0. I’m curious to here what your actual castor angle is. I’ve never have mine checked with these 6” arms.
 
More likely at zero degrees. My understanding is that either positive or negative caster is stable, but negative caster will wander more than positive.

This seems pretty key -- I'll hopefully know more precisely on Saturday, but I'm almost certainly much closer to 0 degrees than I was. I'm not super excited about doing the definitive test of temporarily swapping back to stock arms to verify, but this seems to fit as a root cause pretty well. How do people run 2" lift without correction though in that case, since 2" lift should subtract about 3.5 degrees of caster from a starting point of 3 degrees, leaving nearly zero caster?

What steering damper are you running? I could swear that I saw someone (@cruiserdan ?) mention replacing an OME damper with a stock Tokico to eliminate very small oscillations.

None right now. Pre-wobble and initial wobble I had the stock stabilizer (I think) which turns out to have pretty much been done -- loose spring only, no detectable damping. Part of the Trail Gear heavy duty steering kit is a ProComp steering stabilizer, but I haven't installed that new damper yet because it sounds like a steering damper is never the root cause(?) and I don't want to hide the root cause until I've resolved it.

I would be interested in your setup and would gladly pay for the details on the setup. You responded as I wrote the comment above.

Ha, sweet; I didn't think anyone would be interested :) I'll happily post some info and all the code when I have the chance. In the mean time, the parts list is:
  • 4x MPU6050 (I got them here, but any similar product should work -- like this)
  • 1x ESP32 (I got mine here, but any similar product should work -- like this)
  • 1x breadboad, for expediency (like this)
  • 60ft 22 AWG wire (I have fancy multi-colored spools like this to keep track of the 5 different wires going to each sensor, but that's unnecessary)
  • 1x project box ~6x4x2", dimensions not critical (kind of like this, but that's more expensive than it needs to be)
  • 4x cable glands with ~1/4" ID (like this)
  • 1x microUSB cable
  • 1x USB extension cable ~5' or more
  • 1x USB GPS (optional; for logging speed -- I had one of these lying around)
  • Laptop running Windows
The basic idea is that you solder 5 wires to a sensor (GND, VCC, SCL, SDA, AD0), then run that 5-wire bundle ~3' into the project box through a cable gland; repeat for remaining sensors. Cut the breadboard in half, mount the ESP32, stick the breadboard to the bottom of the project box, then put the wires in the holes for the correct pins. Consider hot-gluing the breadboard wires in place (I didn't though and it seems to be fine). After testing software, mount the project box on the axle with duct tape, mount the sensors to the desired places with hot glue (making sure orientations are as desired), and run the USB cable out of the project box into the car's interior. Note that the setup is finicky; the ESP32 tends to disconnect from the laptop periodically (I'm guessing because the microUSB connector vibrates enough to break the electrical connection in one of the pins) which requires unplugging the USB cable from the laptop and plugging it back in to fix. This is a thing I hacked together in a couple hours, not a commercial product :) I have no experience with these, but you may want to consider them as an easier option.

To do things my way, you'll need to solder wires to the sensors, download code from GitHub, upload firmware from the Arduino IDE, run Visual Studio, and I'll probably make the analysis accessible with Docker rather than trying to describe how to set up a Python environment. None of these things is hard and the documentation will be good, but it's potentially a lot of new stuff if you haven't used any of those tools before.

AM-JKLVuQlr-ZJe3MHPbdJNImEGJcUzCfAph2MrEassun8l7stZMswyAqFQ-6rggic4Th0P-vbGmPgV_WnL--PcxFzm2Nu9LaZGfFlkX9Dt4ccMNQckgdGv1esZ7ae7ypBP7nvdtw-tjKAfWsNRgZX-eU3koew=w1470-h1960-no


Personally, and has been mentioned - try out someone elses quality known 35" A/Ts or M/Ts, or some other tire.

Arranged with a buddy to do this on Saturday.

Your picture shows basically the same lift as mine. The pinion flange angle differences definitely don’t make sense but the our knuckle angle difference is close to making sense. I did think that yours would be closer to 1* positive with the 4” arms but it’s showing 3*. Both knuckles are not the same angle on purpose from the factory. My right shows 5.5 and left 5.0. I’m curious to here what your actual castor angle is. I’ve never have mine checked with these 6” arms.

Will hopefully have caster measured professionally on Saturday (with different wheels), and I'll try to remeasure some other angles when I have a chance.
 
This seems pretty key -- I'll hopefully know more precisely on Saturday, but I'm almost certainly much closer to 0 degrees than I was. I'm not super excited about doing the definitive test of temporarily swapping back to stock arms to verify, but this seems to fit as a root cause pretty well. How do people run 2" lift without correction though in that case, since 2" lift should subtract about 3.5 degrees of caster from a starting point of 3 degrees, leaving nearly zero caster?


None right now. Pre-wobble and initial wobble I had the stock stabilizer (I think) which turns out to have pretty much been done -- loose spring only, no detectable damping. Part of the Trail Gear heavy duty steering kit is a ProComp steering stabilizer, but I haven't installed that new damper yet because it sounds like a steering damper is never the root cause(?) and I don't want to hide the root cause until I've resolved it.


Ha, sweet; I didn't think anyone would be interested :) I'll happily post some info and all the code when I have the chance. In the mean time, the parts list is:
  • 4x MPU6050 (I got them here, but any similar product should work -- like this)
  • 1x ESP32 (I got mine here, but any similar product should work -- like this)
  • 1x breadboad, for expediency (like this)
  • 60ft 22 AWG wire (I have fancy multi-colored spools like this to keep track of the 5 different wires going to each sensor, but that's unnecessary)
  • 1x project box ~6x4x2", dimensions not critical (kind of like this, but that's more expensive than it needs to be)
  • 4x cable glands with ~1/4" ID (like this)
  • 1x microUSB cable
  • 1x USB extension cable ~5' or more
  • 1x USB GPS (optional; for logging speed -- I had one of these lying around)
  • Laptop running Windows
The basic idea is that you solder 5 wires to a sensor (GND, VCC, SCL, SDA, AD0), then run that 5-wire bundle ~3' into the project box through a cable gland; repeat for remaining sensors. Cut the breadboard in half, mount the ESP32, stick the breadboard to the bottom of the project box, then put the wires in the holes for the correct pins. Consider hot-gluing the breadboard wires in place (I didn't though and it seems to be fine). After testing software, mount the project box on the axle with duct tape, mount the sensors to the desired places with hot glue (making sure orientations are as desired), and run the USB cable out of the project box into the car's interior. Note that the setup is finicky; the ESP32 tends to disconnect from the laptop periodically (I'm guessing because the microUSB connector vibrates enough to break the electrical connection in one of the pins) which requires unplugging the USB cable from the laptop and plugging it back in to fix. This is a thing I hacked together in a couple hours, not a commercial product :) I have no experience with these, but you may want to consider them as an easier option.

To do things my way, you'll need to solder wires to the sensors, download code from GitHub, upload firmware from the Arduino IDE, run Visual Studio, and I'll probably make the analysis accessible with Docker rather than trying to describe how to set up a Python environment. None of these things is hard and the documentation will be good, but it's potentially a lot of new stuff if you haven't used any of those tools before.

AM-JKLVuQlr-ZJe3MHPbdJNImEGJcUzCfAph2MrEassun8l7stZMswyAqFQ-6rggic4Th0P-vbGmPgV_WnL--PcxFzm2Nu9LaZGfFlkX9Dt4ccMNQckgdGv1esZ7ae7ypBP7nvdtw-tjKAfWsNRgZX-eU3koew=w1470-h1960-no


Arranged with a buddy to do this on Saturday.


Will hopefully have caster measured professionally on Saturday (with different wheels), and I'll try to remeasure some other angles when I have a chance.


Thank you for taking the time to share that, I sincerely appreciate it.
 
So...

FSM:
RemoveLateralControlRod.png


Me:
NotSimple.png


The bolts came out without much trouble. And, the upper nut was already loose, so that seems like a candidate for contributing cause. But, the rod and bushings are REALLY wedged in there; this is after a number of whacks with a dead blow hammer:
AM-JKLXEtgaDQaRBL3wjVuBt_LQpLJxm192W0Y7J5hAA2JyYcj1ZEdIukXDY-QxcX5j5Y97TvHpj6J53WkhGujk-qXLqO_INFBek-TEaaiZszJcmYftN0UG_-kKDdIApc9RminnCPfFMV1VJ5CTOaljU4oAUmg=w2614-h1960-no
AM-JKLXFIfYnExo2oFTh01iMdXVFbVjv1XHOo0VeNHNPajTHNzsQ3Na7XYGXGpBp-ysvvgQspOSB0c1OzqaNjlHhz8kmRSgKSxJDZebGgtvv0xxfZvgoZ551SaeFbEPN9TRozz61-A0jheZkQxQsHk6Jq3Eg4g=w2614-h1960-no


Any hints on how to get the bar out? Is it supposed to be this tight in the mounts?

Any guesses on what kind of adjustable front panhard rod it is? Looks like maybe ARB based on internet pictures? Where can I find bushings for that rod? Does anyone know if they are OEM-compatible?
 
So...

FSM:
View attachment 2823952

Me:
View attachment 2823955

The bolts came out without much trouble. And, the upper nut was already loose, so that seems like a candidate for contributing cause. But, the rod and bushings are REALLY wedged in there; this is after a number of whacks with a dead blow hammer:
AM-JKLXEtgaDQaRBL3wjVuBt_LQpLJxm192W0Y7J5hAA2JyYcj1ZEdIukXDY-QxcX5j5Y97TvHpj6J53WkhGujk-qXLqO_INFBek-TEaaiZszJcmYftN0UG_-kKDdIApc9RminnCPfFMV1VJ5CTOaljU4oAUmg=w2614-h1960-no
AM-JKLXFIfYnExo2oFTh01iMdXVFbVjv1XHOo0VeNHNPajTHNzsQ3Na7XYGXGpBp-ysvvgQspOSB0c1OzqaNjlHhz8kmRSgKSxJDZebGgtvv0xxfZvgoZ551SaeFbEPN9TRozz61-A0jheZkQxQsHk6Jq3Eg4g=w2614-h1960-no


Any hints on how to get the bar out? Is it supposed to be this tight in the mounts?

Any guesses on what kind of adjustable front panhard rod it is? Looks like maybe ARB based on internet pictures? Where can I find bushings for that rod? Does anyone know if they are OEM-compatible?
Try using my favorite tool, the pry bar…
 
I second the panhard bushings. It’s a good cheap place to start. Jamb a screw driver between the mound and the panhard and see if you can get some movement🤷🏽‍♀️
Also a good idea to use a pry bar to see how much you can move it.

I didn't notice any movement, but I'm not totally sure I was levering in the right place (see response to @roadstr6 below).

Check panhard bushes (remove panhard rod for a thorough check over)
Panhard rod bushings have been mentioned over and over so let's see their condition!
Remove the Panhard and look at the bushing itself.

AM-JKLXSBdFqGqX-zV7A59qH2odhg4o94sXbN6B2VobBbARrvHyuUAaZaQL9yfk-QP2R0cyNxMkNcnOwSaAUeKAHZGOaFxlukyXFVQDnBZnKLurXHixVAKHA-KlhZXtXex-n_eiMxLppiMWqfpZxRBKmhPGENA=w2614-h1960-no
AM-JKLUlN-A0OeUKDDszv2ZsKjYxG50ihZmXi4AH7ftbzmo9oVKsN5uv-r5K4txqMakrf5si4GQDCj8n5ab1YgBepcW8iAZ45Vr6QI51pJU1ddAdhDPeFiHiJufXBdtmv-q7TLPzhSCoYXLbkVE0WpZNuYimFg=w2614-h1960-no

AM-JKLWMrJtUvaL74ohKf1DFq4rT9ycEQJXD_KxbeL-t6q2VvQPbQT_r5Xw99SXRZJ64PsTSvkOXbsT3RKEI5avpeQkwxokKMgHMrSJxSDkTS_1Uo6vBgJjAY7U9zHpZ2TNKurf8GdSaCtlqw9lgzajVcGVIqg=w2614-h1960-no
AM-JKLVDIqpXN6M38rSjt_XePJ3_BlKHe02-uv7bjNNhrbnbkp6VyW7RzJoaTLcDEOQdVefbiXsv_KqsrwDNKpw-Chkvh1IVK1es01ax1MEVd5LxQGdAmb9DvQ9NZefVH6UuPcLfH5L0chSKwJnH9LUwJ33DUA=w2614-h1960-no


I'm not sure how to evaluate how they look...they seem ok?

Look at the panhard bushings as well as the fitment of the bolts through the metal sleeves of the panhard bushings. The bolt should be a snug fit through those bushings. Any slop there will cause problems. I've seen some aftermarket adjustable panhard bars that had bushings that were too large for the factory panhard bolts.

Seems like this may be a winner? I measure the hole in the bushing at 0.63" and the diameter of the bolt at 0.585". I don't think videos will embed, so see here. Strange that the wobble would start recently since they've been like this since I got the vehicle in March. Perhaps the combination of close-to-zero caster + looseness here (+ maybe other things like wheel balance).

Does anyone know if OEM bushings will fit in this rod? I don't want to ruin these by pulling them out to measure (since then I'd be down until I could find replacements and get them shipped). Of course the OEMs look totally different (don't have the bushing extend past the rod's tube mount at the full diameter of the tube), but a dealer near me has them in stock if they'll work.
 
.045" isnt particularly a concern for bolt to sleeve fitment. How big is the hole in the frame? The bushings look good to me.

Those sleeves get sandwinched in the mount. Torqued to spec, the sleeve shouldnt move once its clamped. The bushing allows the bar to have some degree of cushion and/or movement but if the bolt is torqued to spec, then the sleeve is stationary and not moving about. Bolt diamter really shouldnt play much of a role here other than to not shear and to be able to be torqued tight enough to hold the bar. If the sleeve was moving it would be egg shaped, and the holes in the brackets would be hammered out. The only way the panhard bar moves is by pivoting and how much the rubber can compress.

Speaking of the panhard bar pivoting. If the panhard geometry and the draglink geometry is not one with each other, as the suspension loads and unloads the panhard will introduce bumpsteer into the drag link.

Do you have death wobble, or bump steer?
 
Last edited:
I didn't notice any movement, but I'm not totally sure I was levering in the right place (see response to @roadstr6 below).


AM-JKLXSBdFqGqX-zV7A59qH2odhg4o94sXbN6B2VobBbARrvHyuUAaZaQL9yfk-QP2R0cyNxMkNcnOwSaAUeKAHZGOaFxlukyXFVQDnBZnKLurXHixVAKHA-KlhZXtXex-n_eiMxLppiMWqfpZxRBKmhPGENA=w2614-h1960-no
AM-JKLUlN-A0OeUKDDszv2ZsKjYxG50ihZmXi4AH7ftbzmo9oVKsN5uv-r5K4txqMakrf5si4GQDCj8n5ab1YgBepcW8iAZ45Vr6QI51pJU1ddAdhDPeFiHiJufXBdtmv-q7TLPzhSCoYXLbkVE0WpZNuYimFg=w2614-h1960-no

AM-JKLWMrJtUvaL74ohKf1DFq4rT9ycEQJXD_KxbeL-t6q2VvQPbQT_r5Xw99SXRZJ64PsTSvkOXbsT3RKEI5avpeQkwxokKMgHMrSJxSDkTS_1Uo6vBgJjAY7U9zHpZ2TNKurf8GdSaCtlqw9lgzajVcGVIqg=w2614-h1960-no
AM-JKLVDIqpXN6M38rSjt_XePJ3_BlKHe02-uv7bjNNhrbnbkp6VyW7RzJoaTLcDEOQdVefbiXsv_KqsrwDNKpw-Chkvh1IVK1es01ax1MEVd5LxQGdAmb9DvQ9NZefVH6UuPcLfH5L0chSKwJnH9LUwJ33DUA=w2614-h1960-no


I'm not sure how to evaluate how they look...they seem ok?


Seems like this may be a winner? I measure the hole in the bushing at 0.63" and the diameter of the bolt at 0.585". I don't think videos will embed, so see here. Strange that the wobble would start recently since they've been like this since I got the vehicle in March. Perhaps the combination of close-to-zero caster + looseness here (+ maybe other things like wheel balance).

Does anyone know if OEM bushings will fit in this rod? I don't want to ruin these by pulling them out to measure (since then I'd be down until I could find replacements and get them shipped). Of course the OEMs look totally different (don't have the bushing extend past the rod's tube mount at the full diameter of the tube), but a dealer near me has them in stock if they'll work.
I watched your video and it is no bueno. Exactly the same scenario that I have seen before with aftermarket panhards. Sleeve is too big for the bolt. If you want my .02, ditch that panhard and go back to OEM. If you insist on having an adjustable panhard, modify the stock piece by cutting and welding in a threaded section for adjustability. Somebody sells a kit for this. I can’t remember who. The factory rubber bushings are supple, yet supportive and they outlast anything else. The sleeves fit the thru bolts like they are supposed to.
 
I didn't notice any movement, but I'm not totally sure I was levering in the right place (see response to @roadstr6 below).


AM-JKLXSBdFqGqX-zV7A59qH2odhg4o94sXbN6B2VobBbARrvHyuUAaZaQL9yfk-QP2R0cyNxMkNcnOwSaAUeKAHZGOaFxlukyXFVQDnBZnKLurXHixVAKHA-KlhZXtXex-n_eiMxLppiMWqfpZxRBKmhPGENA=w2614-h1960-no
AM-JKLUlN-A0OeUKDDszv2ZsKjYxG50ihZmXi4AH7ftbzmo9oVKsN5uv-r5K4txqMakrf5si4GQDCj8n5ab1YgBepcW8iAZ45Vr6QI51pJU1ddAdhDPeFiHiJufXBdtmv-q7TLPzhSCoYXLbkVE0WpZNuYimFg=w2614-h1960-no

AM-JKLWMrJtUvaL74ohKf1DFq4rT9ycEQJXD_KxbeL-t6q2VvQPbQT_r5Xw99SXRZJ64PsTSvkOXbsT3RKEI5avpeQkwxokKMgHMrSJxSDkTS_1Uo6vBgJjAY7U9zHpZ2TNKurf8GdSaCtlqw9lgzajVcGVIqg=w2614-h1960-no
AM-JKLVDIqpXN6M38rSjt_XePJ3_BlKHe02-uv7bjNNhrbnbkp6VyW7RzJoaTLcDEOQdVefbiXsv_KqsrwDNKpw-Chkvh1IVK1es01ax1MEVd5LxQGdAmb9DvQ9NZefVH6UuPcLfH5L0chSKwJnH9LUwJ33DUA=w2614-h1960-no


I'm not sure how to evaluate how they look...they seem ok?


Seems like this may be a winner? I measure the hole in the bushing at 0.63" and the diameter of the bolt at 0.585". I don't think videos will embed, so see here. Strange that the wobble would start recently since they've been like this since I got the vehicle in March. Perhaps the combination of close-to-zero caster + looseness here (+ maybe other things like wheel balance).

Does anyone know if OEM bushings will fit in this rod? I don't want to ruin these by pulling them out to measure (since then I'd be down until I could find replacements and get them shipped). Of course the OEMs look totally different (don't have the bushing extend past the rod's tube mount at the full diameter of the tube), but a dealer near me has them in stock if they'll work.

Your panhard bushings look like two piece poly bushes with a loose sleeve in the middle.
Stick a bar until the sleeve, and lever the bar so you push pull the sleeve on the she acid it wood move in the vehicle. If the sleeve opens up the bushing around it as you never on it, it's no good. I can see from your pic the sleeve is loose in the bush.

You want OEM style rubber bushes. They are a single piece the rubber is vulcanised to the inner and outer steel sleeves. These need to be pressed in with a 12 tonne press.
Screenshot_20211029-160027_eBay.jpg


Aftermarket bushes are often loose, push fit by hand, and they inherently have slop in them. Plus the poly compound tends to crumble/ crush very quickly.
Screenshot_20211029-160054_eBay.jpg
 
Poly is a pretty hard material. Not much room for compression. Even If the poly is only a .001" interference fit into the panhard and the sleeve is a .001" interference into the bushing, I bet the total allowable movement by poly compression is the same or less than a rubber bushing.

With it torqued in place tight, I'd wager a small bet that it moves less than a rubber bushing. Thats why poly bushings are known for being rigid and allowing less movement.

That being said, I dont know the tolerances of this exact set up. My experience in general with poly bushings definitely hasnt been sloppy or allowing excessive plate.
 
I didn't notice any movement, but I'm not totally sure I was levering in the right place (see response to @roadstr6 below).


AM-JKLXSBdFqGqX-zV7A59qH2odhg4o94sXbN6B2VobBbARrvHyuUAaZaQL9yfk-QP2R0cyNxMkNcnOwSaAUeKAHZGOaFxlukyXFVQDnBZnKLurXHixVAKHA-KlhZXtXex-n_eiMxLppiMWqfpZxRBKmhPGENA=w2614-h1960-no
AM-JKLUlN-A0OeUKDDszv2ZsKjYxG50ihZmXi4AH7ftbzmo9oVKsN5uv-r5K4txqMakrf5si4GQDCj8n5ab1YgBepcW8iAZ45Vr6QI51pJU1ddAdhDPeFiHiJufXBdtmv-q7TLPzhSCoYXLbkVE0WpZNuYimFg=w2614-h1960-no

AM-JKLWMrJtUvaL74ohKf1DFq4rT9ycEQJXD_KxbeL-t6q2VvQPbQT_r5Xw99SXRZJ64PsTSvkOXbsT3RKEI5avpeQkwxokKMgHMrSJxSDkTS_1Uo6vBgJjAY7U9zHpZ2TNKurf8GdSaCtlqw9lgzajVcGVIqg=w2614-h1960-no
AM-JKLVDIqpXN6M38rSjt_XePJ3_BlKHe02-uv7bjNNhrbnbkp6VyW7RzJoaTLcDEOQdVefbiXsv_KqsrwDNKpw-Chkvh1IVK1es01ax1MEVd5LxQGdAmb9DvQ9NZefVH6UuPcLfH5L0chSKwJnH9LUwJ33DUA=w2614-h1960-no


I'm not sure how to evaluate how they look...they seem ok?


Seems like this may be a winner? I measure the hole in the bushing at 0.63" and the diameter of the bolt at 0.585". I don't think videos will embed, so see here. Strange that the wobble would start recently since they've been like this since I got the vehicle in March. Perhaps the combination of close-to-zero caster + looseness here (+ maybe other things like wheel balance).

Does anyone know if OEM bushings will fit in this rod? I don't want to ruin these by pulling them out to measure (since then I'd be down until I could find replacements and get them shipped). Of course the OEMs look totally different (don't have the bushing extend past the rod's tube mount at the full diameter of the tube), but a dealer near me has them in stock if they'll work.
You are only talking about .045 which comes to .0225 all the way around the bolt. This is standard tolerance on a truck bolt hole and is not the cause death wobble.

Your bushings don’t look terrible. What brand adjustable bars are you showing us in the pics? They look just like my Old Man Emu adjustable track bars which I’ve been beating the heck out of for nearly 7 years with no problems. I’ve had both track bars of at one time or another during the past year and I was very impressed with the condition of the poly bushings given how much rock crawling they have done.

I run an aftermarket (won’t mention the brand) rear links which came with Johnny joints at the frame end and a sloppy ass Poly bush set up for the axle end. I tore up the first set in one year and I could feel my rear axle steering the truck. Handling got hairy sometimes. They sent me another set and those were toast a year later because they were also sloppy from the start like someone else mentioned.

A high quality poly bush and steel sleeve set up that is tight, so tight that you have to freeze the parts to get them together, will last.

Have you removed the shocks to see if one is blown out? This is the easiest thing to start with and a very common cause of death wobble.
 
Poly is a pretty hard material. Not much room for compression. Even If the poly is only a .001" interference fit into the panhard and the sleeve is a .001" interference into the bushing, I bet the total allowable movement by poly compression is the same or less than a rubber bushing.

With it torqued in place tight, I'd wager a small bet that it moves less than a rubber bushing. Thats why poly bushings are known for being rigid and allowing less movement.

That being said, I dont know the tolerances of this exact set up. My experience in general with poly bushings definitely hasnt been sloppy or allowing excessive plate.

Not all poly bushes are create equal.

Being hard is part of their downfall. They can crush and crumble with the loading an actively used 4x4 puts on them.
Others are to soft.
I've had OEM style rubber bushes, and poly bushes in arms on the bench and played with both with a pry bar.
I'll choose rubber every time.
That being said, I've had rubber bushes where the vulcanising at the inner steel bush had let go, and steering became noticeably sloppier

I see what youre saying. Some fly by nights poly formula might be as good as garbage.

I'm inclined to be application based, and or brand based. I think energy supsension poly pushes are created fairly well. The downfall could be a flybynight company creating a bore size that doesnt fit to an existing energy suspension dimension. Or a company using an ill fitting bore size to whatever bushing. Or using a junk bushing.

I have energy suspension poly bushings that are 10 years old and feel like a new out of the box poly bush.

Application based. If a bore is too loose for the bush, its no good. In any application I've used(body mounts, spring eye mounts, trans mounts) everything has been tight.

If the bolt is only used to clamp a sleeve that locates a bush, that bolt cold be .187" undersize as long as it holds the sleeve stationary by clamping force. Any play on the otherside of the sleeve is fair game for manufacturing tolerances.
 
Has the OP made moves to end the DW? Are we just talk might each other?
 
Has the OP made moves to end the DW? Are we just talk might each other?

Tattle-tale says he was on today / 0705.


My skim take of it all is nothing anybody hasn’t already chimed - save maybe verify wheel balance & tire roundness.

That & unless you’re mounting new wheels w/ tires, and have a ultra-clean surface to put furnace foil tape over stick-on weights, get clip-ons if you’re single-beadlocked.

My Tundra throws the weights in time for a rotation if they use stick-ons & it’s noticeable @ ~65+ on my 37’s w/ 20’s wheels/no beadlocks.

If swapping the panhard bushes doesn’t fix it - I’m w/ @baldilocks about using a ~16” lineup/pry bar & test for slop/play everywhere from the ball-joints to all 8 bushing on the back axle.

—— I skimmed, but have you personally re-greased all the universals & even put that whiff of new grease in the shaft splines?

—— Didn’t see mentioned, but didn’t read all 3pgs either

—— If you can’t get a prybar in certain spots - the other way is the “shake the $hit” -method of just grabbing shock bodies, & all steer linkage with both hands & shake like an ex-wife :D

(I kid, but really - both hands & swing for the fence)

The places you can get a prybar (real one, not a 16” screwdriver) -if you can make noticeable play with moderate force, it’s a “used to point of replace“ - part.


HTH
 

Users who are viewing this thread

Back
Top Bottom