Builds Here we go (FJ-40 getting a 3B/Turbo/H55f)... (1 Viewer)

This site may earn a commission from merchant affiliate
links, including eBay, Amazon, Skimlinks, and others.

Following all of that, I built two runner out of the same square tubing to support the weight of the tool box....

You can see how far below the frame it sits (not very) here. It's a full 8 inches deep beneath the bed floor. Should be able to hold all the important trail tools pretty easily I think.
bed 5.jpg

And here you can see the support runners and one of the walls I cut and bent a flange on resting in place...
bed 6.jpg

Of course, that's the as far as I got on the tool box/bed project before I had to head down for bed...
bed 5.jpg
bed 6.jpg
 
Then there's the rusty amby door project.... I'll let the pictures do the talking for Dad...
door 1.jpg

Then the first patch panel cut... (look carefully, you can also see the cancer on the side of the door)
door 2.jpg

And both patch panels for the corner tacked up...
door 3.jpg
door 1.jpg
door 2.jpg
door 3.jpg
 
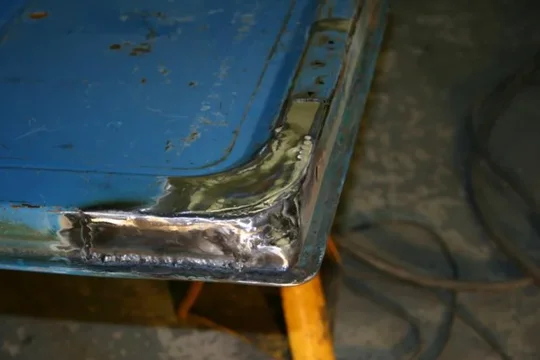
And a parting picture of the welds somewhat ground down. With a little more work, this will be good as new!
door 4.jpg

We also lined up a soda blaster, bedliner company, and a paint shop for this. I'm worried that we are getting close to cold/wet season, and my schedule at work just might not let me paint it until next spring. So for that reason, we'll have someone else paint it (and hopefully I can just put it back together, drive it, and enjoy it).

Dan
door 4.jpg
 
Dan I loving your build and I'm glad your back from your trip up here. I've been anxiously awaiting updates. If your ever up this way again I'd love to chat with you and pick your brain as I'm doing essentially the same build. Keep up the great work!
 
Dan I loving your build and I'm glad your back from your trip up here. I've been anxiously awaiting updates. If your ever up this way again I'd love to chat with you and pick your brain as I'm doing essentially the same build. Keep up the great work!


Crap! I was in Kalispell all weekend :doh:

Always interested in meeting a fellow cruiserhead.

Kevin
 
Glad I'm not the only one liking the truck... ;)

Isaac: I am sure at some point I'll be back up that way. I used to live in Missoula, and my brother lives in Helena. I'm hoping to drive this truck up there sometime next spring, so may just get your wish. You'd have some notice on here.

The top to the toolbox is currently a slight question mark. I will NOT be using the ribbed section cut out of the floor. Mostly because I don't have any more "ends" of the ribs, and because the section out of Dad's truck is rusted through--badly. These are my options:
  • Just make a flat panel out of 16GA
  • Make a flat panel and have some ribs, ring, or something rolled into it by a hotrod shop.
  • Make a flat panel out of wood/fiberglass.
  • Modify a 55 tailgate panel I have to fit--it's ribbed, but not the same pattern as this floor.
  • Ask Kevin Rowland pretty please to make me a one off panel???

What say you guys? I was going to make it hinged, but came to the realization that it was simpler to just make it a panel that lifts out (it will lock, however). Either way to access it you've got to empty everything out of the back, so...

I really like the idea of storing tools in general, and keeping them that low makes me pretty happy. No need to make the truck any more tippy than necessary.

Dan
 
Hello Dan,

Thanks for the pics, thinking of doing the same in the cargo floor.
Wel not for tools but for an onboard air tank and other equipment I dont want hanging under the truck (lots of bad weather and use of salt here).
Don't have your fab skills and experience so need to get as much info as I can.:confused::hmm::idea:
Hope you don't mind if I pick your brain in the near future:rolleyes:
Like your stuff.:cheers:
 
Dan,

What is the layout of the ribs - approx width of flat top, flat bottom and c to c - what approx angle of the slopes and how tall are they. Oh, and how many. Do you want a non ribbed area for a recessed/ lockable handle?

or maybe they don't have flat tops - I have seen some older 45's with round ribs (in cross section)

I could make a door for you if you can wait a little while - like til Halloween - scary, I know....

I've got stainless recessed lockable T-handles and piano hinge too

This might be the best idea of all.

I'll PM you Kevin....

Dan
 
what about a boat hatch? water proof and light weight and strong ... but not cheap.

Because I didn't think about that, then cut the metal and the opening whatever size I did, instead of something that would work with one of the boat hatches I'm seeing (and would be an EXCELLENT choice here). The flange I'm going to make to set up some kind of weather seal is MUCH more complicated than if I would have just planned to use one of the boat hatches....

But what can I say: I was on a roll with the plasma cutter and welder. :hillbilly:

Now the burning question in my mind.... Do I need to add a drain, and if so: what kind should I use?

Dan
 
one way valve will work...

and as for the hatch, check the available sized and close the top in to fit... easy, simple, fast, ...
 
Dan, during my year and a half resto i really played with this same idea but chickened out as i was wanting to get to paint. I wish i would have spent alittle extra time as it would be a worth while mod. I lift out top is a good idea. As far as a drain, i would weld a small NPT thread bung onto the bottom and then screw in a plug. If i remember, Aqaulu tubs use a storage box in there retro beds. Take a look-see at there site and steal some ideas. Infact, yoiu might call them and ask to buy a whole enclosure. Keep up the great work.
 
I was thinking of using a small corner iron around the edge off the cover (good reinforcement to) which will fit into a small gutter (drained) with a rubber on the inside rim off the gutter.
Hope I'm making sense here.
 
Too bad for you guys I've only got cell phone pics to show, but I have gotten some time to work on it between work lately.... SOOOOOOO close to going to paint!!!!

Here's the sides all done, and the floor set in place. Amazing how just that floor makes it look so much more "finished."
box 1.jpg

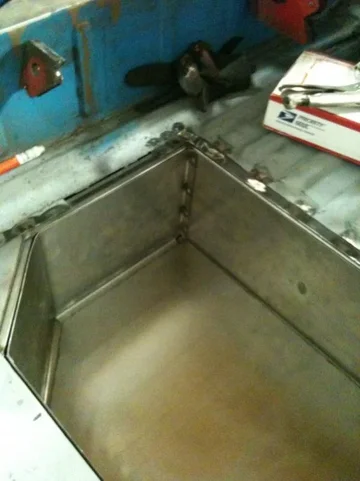
And the right side. I cut out this section to make room for the exhaust, and build a box around the cutout (which you can see in this pic). On top of the box there is just enough room to store a bottle jack, so you can see the bracket I bent up to hold the bottle jack in there...
box 2.jpg

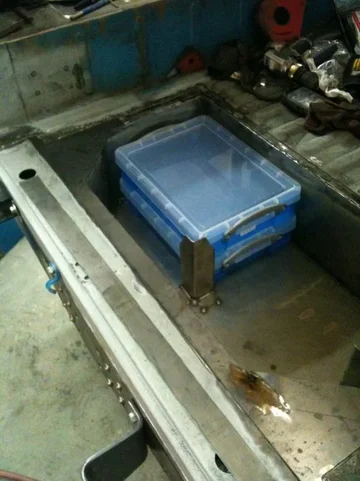
And the left side again. I bought these plastic boxes from the office supply store. They are roughly 10"x13"x2 1/2." These two should be able to hold a small socket set, a set of gear-wrenches, pliers, and the other essential tools. I'm all about efficiency of space here, and keeping things from rattling around is always a good idea, IMHO. The tools will be shadowed with foam inside those boxes too.
box 3.jpg

I only have a few hours to work on it tomorrow, and I burned my hand like an idiot tonight, so I don't know just how productive I'll be, but I'm going to try and knock out the last bits of bodywork before it can be fully stripped down and painted.

Dan
box 1.jpg
box 2.jpg
box 3.jpg
 
Looks great Dan ! That jack idea I like as I have a problem there.
:eek:

In a fleeting moment of stupidity I welded up the 2 wheelarch jackholder bracket holes and now I am not keen to drill them out ... :mad:
 

Users who are viewing this thread

Back
Top Bottom