Builds Here we go (FJ-40 getting a 3B/Turbo/H55f)... (3 Viewers)

This site may earn a commission from merchant affiliate
links, including eBay, Amazon, Skimlinks, and others.

Then I cut the holes out for the gauges themselves...
pod 4.jpg

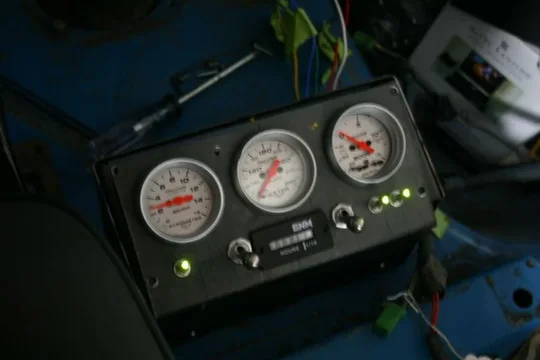
And because the holes were there I was obviously obligated to put the gauges themselves into the panel...
pod 5.jpg

I then started on the box that hold this fancy pants panel. Our of 16GA, I bent a 3 sided box (slightly angled from front to back). Added to this I bent some tabs and spot welded them onto the three sided box to act as the flange for the panel to mount. You'll notice that in this picture that the cuts are ugly, which isn't just because they'll be under a panel--I just eyeballed the first set of cuts...
pod 6.jpg
pod 4.jpg
pod 5.jpg
pod 6.jpg
 
Here it is sitting in the truck...
pod 7.jpg

You'll notice that it's almost flat. It is real easy to see them from the driver's seat this way. The only downside I can think of is that they'll probably collect dirt at that angle. Meh.

Here's the view from the driver's seat. Even with the transmission in reverse there's plenty of room so you don't smack your hand onto the gauge pod.
pod 8.jpg

And here's a picture showing just how much space there is inside the gauge pod for wiring. I hate wiring in cramped spaced!
pod 9.jpg
pod 7.jpg
pod 8.jpg
pod 9.jpg
 
I also added some more flanges to the bottom (to bolt the whole assembly to the tub--all hidden though :) ) and to the back side. On the back side I then added another removable plate to enclose the box.
pod 10.jpg

I also did a lot of wiring today. Wiring pictures just aren't all that interesting, so I didn't take many, but here's the wiring for the headlights (including the upgraded headlight harness stuff).
wiring.jpg

Wayne: you said you liked the attention to detail.... Well, here's some serious anal-retentive stuff from me. I needed to add wire to the headlight harnesses for the fancy headlight harness/relay I added. But what do you do since you can't buy Red-Yellow wire? If you are me, you've got a box with 99% of the wiring harness from a Hilux Surf, so you go rooting around until you find some Red-Yellow wire and use THAT to splice the original wiring harness.
wiring 2.jpg

Well that's all the pictures for today. Tomorrow I'll be wiring as much as I can before I have to head to work tomorrow night sometime.

Dan
pod 10.jpg
wiring.jpg
wiring 2.jpg
 
i like your panel build, outside the box and looking good. i hope it clears the shifter when in reverse...
 
i like your panel build, outside the box and looking good. i hope it clears the shifter when in reverse...

It looks a lot closer than it is. In reverse I can sloppily take my hand off the shifter and still not hit it. I'm guessing that moving the whole drivetrain forward that couple of inches is again looking to be a good idea I had. ;) Shoot, I was looking at it and actually thought about making some cupholders to mount on the front face of the gauge pod (underneath the shift lever) but then I thought: why? If I want cupholders I'll buy an 80 or something. Haven't missed having them on this truck in the past, so why start now?

Dan
 
cupholders are so "mall queen"

Funny, we were talking about it today, and Dad wants a cupholder. So, I guess I'll figure out how to fab up a single cupholder on the front side of the gauge pod. I can see his point, it would be nice to not have to worry about spilling your coffee (or hot chocolate) every time you go around a corner.

I get three whole days at home, so today I was busy. I did get sidetracked with another truck for a little bit, but I got a lot done on the 40. Not that it makes for a lot of good pictures here, but it's very good to get it done....

First off, you thought the exhaust up through the hood was booty-fab: how about putting the pyro in it with the hose clamp method? Yeah, we did that.
pyro.jpg

Then I spent a few hours with a soldering iron, a heat gun, a bunch of wires and some wire strippers and I came up with this:
wire mess.jpg

I like it. Most of the fancy wiring is done inside the gauge pod, so between the pod and the dash I have the 5 super small wires for the gauges, the thermocouple lead, and 6 additional wires. That's it. Not a huge bundle to add to the truck. Basically theres:
  1. IGN switched power (runs the hour meter and gauges)
  2. ACC switched power (runs the fuel heater, the air compressor, diff locks, and aux lights)
  3. Fuel heater
  4. Aux Lights
  5. Dash/Gauge pod lights
  6. Ground

With all of that wiring done, I just had to hook up a power supply and look at the toggle switches for the aux lights and diff locks light up...
switches.jpg

I also tested it all. I have to figure out why the diff lock switches only sort of work. The front works when the ground supplied in the ARB harness (I kept the truck-side harness without modification) is grounded (it is grounded through the gauge pod harness additionally), but the rear does not (and when the switch is flipped it seems to have an internal short). But if I disconnect the ground (from the ARB harness, at the end designed to go straight to the ground) the rear locker doesn't work, but the front does.

Wierd, eh?

Either way, here's another little video of the gauge needles moving. Yep, the pyrometer and the boost gauge both work!

YouTube - Gauges working...

Tomorrow will depend on if a certain Toyota dealer gets some parts in in the morning or not, but if not I'm going to keep plugging away at the wiring.

Dan
pyro.jpg
wire mess.jpg
switches.jpg
 
Hi Dan, i like that gauge panel. Looks real neato. :)
Any reason you've mounted the EGT probe so far along your exhaust? Ideally you want it mounted close to the turbines exit, to give you a more accurate reading. Pre-turbo, in the exhaust manifold, is probably ideal...especially if you want to keep an eye on actual temps entering the turbine housing. I would imagine the exhaust gases would have lost a fair amount of heat energy by the time they reach you pyro where it is now.

It was the easiest place to drill this afternoon.

Really, when I strip the truck down to paint the frame and whatnot is when I'll have the exhaust manifold off, and I'll drill and tap the manifold for the permanent pyrometer installation then. Today I really just wanted to see the needle move and indicate something that correlated to EGT.

Glad you like the gauge pod. I'm real happy with how it is turning out.

Dan
 
lol, no worries. I was thinking after that post that it might just be a temporary fitting. It's always good to check if stuff works before you commit to final installing, especially gauges.

You should leave the exhaust like that though, the turbo would sound great! :hillbilly:
 
lol, no worries. I was thinking after that post that it might just be a temporary fitting. It's always good to check if stuff works before you commit to final installing, especially gauges.

You should leave the exhaust like that though, the turbo would sound great! :hillbilly:

How do you think it's going to get to the exhaust shop in town? :hillbilly:

That'll be one sweet sounding 40 mile drive.... I wouldn't want to be a passenger though, something tells me you'd get a faceful of exhaust the whole way.

Dan
 
Well, got a lot more wiring done today. Mostly I tied the gauge pod into the truck's harness. That means that all I have to do is pop in some fuses, hook the truck's harness up to the battery and they should be working....

Also, a good bag of goodies arrived at American Toyota today.

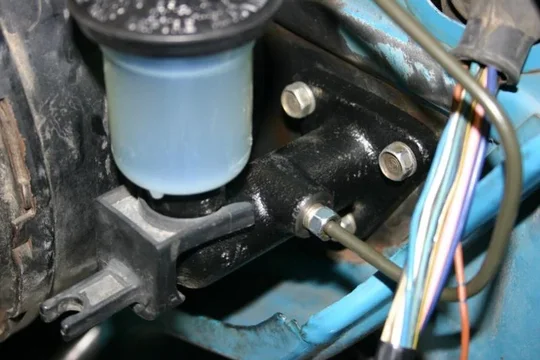
A new brake master cylinder...
brake master.jpg

A new clutch master cylinder. Indeed it works beautifully. Took less than a minute to bleed and now we've got a working clutch!
clutch master.jpg

We also installed the Marlin universal pinion flange on the front axle (and replaced the pinion seal with the HD Marlin unit). Of course, once that was done we realized that the Marlin universal pinion flange doesn't have the FJ-60 pattern on it. So I get to remove that (and probably better buy a new nut too, since we staked this one) and call Kurt tomorrow to get some Land Cruiser patterned flanges on the way. Either way, they look pretty spiffy...
flange.jpg

I'll be able to get a little bit done tomorrow, but I have to head off to work tomorrow evening, so it won't be quite so productive, and it'll have to wait for another week or two before I will have a few days to work on it.

Dan
flange.jpg
brake master.jpg
clutch master.jpg
 
Well, I finally quit procrastinating and mounted the fuel control relay (EDIC relay) where the original emissions control computer was, and wired the EDIC up to the truck. It was much easier than I was expecting.

First I built a test rig with a jungle of wires with the whole thing exposed so I could check it out in the open...
edic test.jpg

Here's the EDIC box mounted...
edic box.jpg

With all that in place, here's testing it out with the engine off...
YouTube - 3B EDIC wiring mocked up

And with the engine running. Not that watching the key turn the engine off is a big deal, but it's the little things, you know?
YouTube - They key does work

The only other thing I got done yesterday (besides cleaning up the shop a little) was that I drilled the holes for the Metal Tech cage plates. Not a huge job, but it needed to get done so I can soon finish the cage and weld up the cage tie tot he frame.
cage plates.jpg

Of course now that the wiring is nearly finished (about all that remains is to replace the fuse box, connect the vehicle harness to the battery, test it, and then take it out to seal the harness back up) I have to be back at work. I won't get back to the 40 until the 18th at the earliest. Oh well, it'll give me time to get some parts on the way, I guess.

Dan
edic box.jpg
edic test.jpg
cage plates.jpg
 
Awesome! I figured if I waited long enough you would figure it out so I don't have to :D

I'll go back over your posts but I'll ask anyway - what harness did you start with. I'm plannig to start with my original FJ45 harness and rebuild the whole thing adding EDIC wiring and other accesories as I go. What did you do for glow? - wilson switch?

Kevin

I started with the original FJ-40 harness and have added the other stuff to it. I bought the EDIC pigtails from Radd Cruisers, and they were actually very easy to wire up. It really is just power from the battery, a ground, a wire from the oil pressure switch, an IGN switched wire, and a START switched wire. The other four wires go between the EDIC relay and the EDIC motor.

I've also had to extend some wires (like the coolant temp) but that's about it. Most of the wiring I've done is to add things that aren't in the factory harness (like the fuel heater, gauge pod, air system, etc...)

I'll do the same on my 45, BTW. I figure I'd rather deal with the few things like the EDIC than rewire the turn signals and junk. ;)

So far the glow is just a wilson switch under the hood. Next time I'm home I'll add the custom (from Amaurer) glow plug switch to the dash--which will also be a wilson switch, but only powered when the IGN switch is on. It will replace the choke cable, and the button looks just like the choke cable did, just with a glow plug "squiggly" on it. I'm still debating if I want to wire it so that anytime you crank the plugs get glowed too.... I'm just using the simple plugs, instead of the fancy pants super-ultra-glow systems.

Dan
 
Nice work Dan !


.. Not that watching the key turn the engine off is a big deal, but it's the little things, you know?
..

Untill it fails to switch it off ...:eek:

BTW did I mention that your exhaust note drives me nuts :clap:
 
Great job with the edic, makes me want to do my swap this way. anymore details on the wiring bit?
 
also can i ask what you paid for the pig tails?

I think $30. It was part of a larger order, but I've got another request for a pigtail (the Alternator) in to Radd, so maybe I'll remember what exactly they set me back. It wasn't much though, that's for sure. I needed the pigtail that plugs into the EDIC motor and the EDIC relay.

It could be done without them, by just wiring directly to the pigtails from those components and eliminating the plugs altogether, or using other forms of plugs, but I'm a sucker for the factory stuff... This way the plugs and pins match the B engine manual.

Speaking of which, here's the only real diagram I need to wire it in. The only thing I don't know about is the EX wire. I still don't see where it goes or what it does, but either way it works just fine without it.
operating diagram.jpg

The pic here was posted on another thread where I was asking about the EDIC relay and whatnot, and I just saved it (and of course then purchased the B engine manual), so I can't take credit for it. But uploading it again can't hurt, I figure...

Dan
operating diagram.jpg
 
thanks dan, that's a great help. All of this is. I was steering away from the edic because i thought it was complex and interwoven into the diesels wiring harness.
 

Users who are viewing this thread

Back
Top Bottom