Electrolysis Advice (1 Viewer)

This site may earn a commission from merchant affiliate
links, including eBay, Amazon, Skimlinks, and others.

Vae Victus

Posting more than I know
Joined
Mar 7, 2013
Threads
87
Messages
3,186
Location
Nashville, TN
EDIT: More electrolysis threads around the inter web:

http://www.smokstak.com/forum/showthread.php?t=28471
http://www.oldengine.org/members/orrin/rustdemo.htm
http://www.instructables.com/id/Electrolytic-Rust-Removal-aka-Magic/
http://users.eastlink.ca/~pspencer/nsaeta/electrolysis.htm
http://myweb.tiscali.co.uk/andyspatch/rust.htm
http://www.jalopyjournal.com/forum/showthread.php?p=4576556


After reading CoolerMan's web page (http://www.globalsoftware-inc.com/coolerman/fj40/rustremoval.htm) on how to do electrolysis rust removal, I set a rig up today. I have it hooked to a Craftsman battery charger that does 2 amps minimum. I have a smaller one that can do 750 mA but that seems too low.

Does anyone know the right range for amperage? Is too aggressive bad? Will it eat the metal and not just the rust?


image-3222225100.jpg
Used 3 x 16-14 ga steel strips


image-3976320013.jpg
The blue lead is a 316L TIG welding rod - stainless. Putting copper leads in the solution is bad.


image-49309271.jpg
12 ga copper leads from positive to electrodes (anodes). Cathode to the part.


image-865347500.jpg
Hooked to Battery Trickle Charger


image-1853906505.jpg
Used 2 empty plastic bottles with top and bottom cut out, stacked to keep the metal electrodes from touching the part
image-3222225100.jpg
image-3976320013.jpg
image-49309271.jpg
image-865347500.jpg
image-1853906505.jpg
 
Last edited:
About all I have ever gotten out of a 10 amp charger is about 4 amps initially , falling back to under 2 amps after some time. I have used wash soda as well as PH + in a 5 gallon bucket and a 20 gallon tank. I usually let it cook overnight and up to 24 hours and never had a problem.
 
About all I have ever gotten out of a 10 amp charger is about 4 amps initially , falling back to under 2 amps after some time. I have used wash soda as well as PH + in a 5 gallon bucket and a 20 gallon tank. I usually let it cook overnight and up to 24 hours and never had a problem.

Interesting. How much pitting do you get? Coolerman was trying to keep it under 1 amp.

I can set mine to 10 amps - maybe I'll try that and see what results I get.
 
FWIU, 15-20 is supposed to be optimal, but I'd agree that starting slow and low is best and if need be turn it up to 11. I got a box of wash soda just this afternoon for a set of manifolds that were supposed to be here today(dang rural delivery drivers:mad:) good luck with your rig:cheers: and keep us posted with befores and afters
 
FWIU, 15-20 is supposed to be optimal, but I'd agree that starting slow and low is best and if need be turn it up to 11. I got a box of wash soda just this afternoon for a set of manifolds that were supposed to be here today(dang rural delivery drivers:mad:) good luck with your rig:cheers: and keep us posted with befores and afters

Well, I just did a couple of things:

1. Stuck in the mostly rust free but painted (factory) parking brake backing plate for about 10 minutes on 2 amps setting. Literally just long enough to wash off the first part that had been in about 3 hrs. Check it out:

image-782654901.jpg
You can see the paint bubbled up. It turned to mush.

image-3374076755.jpg
I gave it a quick wipe with that paper towel of the right side.

image-2250162159.jpg
It just wiped away. Clean as a bell. I'm sure after an hour it would all wipe off.

image-38036204.jpg
This is using some PH+ type Soda Ash. 1 heaping Tbsp/gallon.

image-941082894.jpg
The water is really dirty now. Especially coming off the 3 electrodes - you can see it gathered inside the bottle I cut to insulate the electrodes.

2. Word of caution: I didn't make a good connection on the backing plate at first. When I turned on the power, the blue 316L lead got very hot quickly. The copper line coming from the negative terminal that connects to the 316L lead did not get hot at that point (good thing). I could tell something was wrong because the charger made a louder sound, like it was struggling. In reality, it was shorting out I guess. So, make sure you grind a clean spot before starting!

3. I put the other part back in (air intake nozzle) on 10 amps. We will see the difference in the morning.


EDIT: may be significant, may not. I read on CoolerMan's web site that he couldn't get [EDIT: to be precise - "firmly adhered"] paint off easily with electrolysis. Mine came right off. I realized that my painted part has soaked in diesel the day before and I had not washed it off yet. Perhaps that helped break down the paint. Just thought I'd mention it.
image-782654901.jpg
image-3374076755.jpg
image-2250162159.jpg
image-38036204.jpg
image-941082894.jpg
 
Last edited:
Nice work!

The current depends on the size of the piece. Looks like 200mA per square inch is optimal:

De Rust discussion

I just hooked up a battery to my bucket, with a battery minder to float charge it. I couldn't get it to run more than 6A on my big front end pieces: brake drum/backing plate, etc...

Just got to keep monitoring it and brushing it down then pull it when clean enough. I was pretty happy with the process. Some pieces it's hard to get a grinder/brush in there so having it done this way requires a lot less work and mess in the garage....
 
I use electrolysis frequently for cast iron, Coleman items and rusty small cruiser parts. It works crazy well as you can see. The whole point is that the alkaline solution protects the good metal from further corrosion and the current donates an electron and converts the surface iron oxide back to iron. Pretty slick.

One very important and infrequently discussed step. You need to "passivate" the steel surface after it's cleaned up. I do the electrolysis, wash/scrub it up and then passivate with a buffered phosphoric acid solution. Metal Etch and similar products are buffered phosphoric acid. The changes the surface iron to iron phosphate, which will inhibit rust under your paint for years to come. It will also inhibit the flash rust that tends to occur overnight after the electrolysis treatment.

Electrolysis is a super good technique for stopping and eliminating rust, and it's cheaper than any of the alternatives. BTW-Arm and Hammer washing soda is a cheaper source of the sodium carbonate you need to make your electrolyte solution. $3 per box at Ace Hardware.

What do you use to passivate with? Hopefully you are buying something or have a simple recipe, instead of this: http://chemistry.about.com/od/acidsbases/a/phosphatebutter.htm (hmmm, naval jelly is made with phosphoric acid. Didn't know that).

Arm & Hammer - good to know! Was buying the 3x more expensive Pool Chemical version.


I think the stuff I use is called Metal Prep and prime, then I dilute it 1:1 and apply with a spray bottle. Then let is sit on the surface for 30 minutes and rinse off. Dry the part completely. Ospho is the same thing. Look around in your local hardware store.

The phosphoralated iron is a perfect surface to make paint stick.

Naval jelly won't work. It isn't buffered. It will make iron phosphate on the surface but the pH is too low and the metal will eventually corrode.

Dilute it with water?
 
I use the Jasco prep and prime diluted with water. It really works well in this application.

Never used POR stuff.

The Kleen Strip stuff looks like the same thing.
 
bacon grease cure on cast iron bits works to preserve as well. gunna do bacon manifolds this week!
 
Pulled my parts out today. Came out pretty clean. A gentle wire wheel with a stranded wire (not braided) on a rechargeable Dewalt made the parking brake backing plate look very clean. Air intake horn too.


image-3534724442.jpg
After overnight for parking bake, and another 8 hours for air intake horn.


image-1040002121.jpg
After a quick dusting off with a wire wheel


image-2007787185.jpg
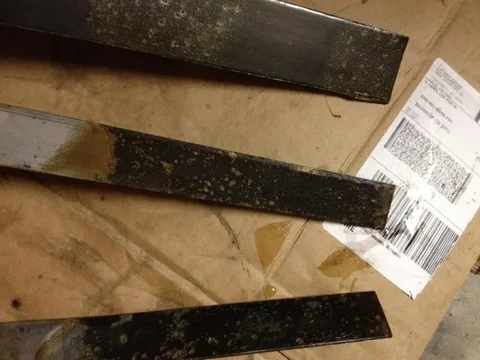
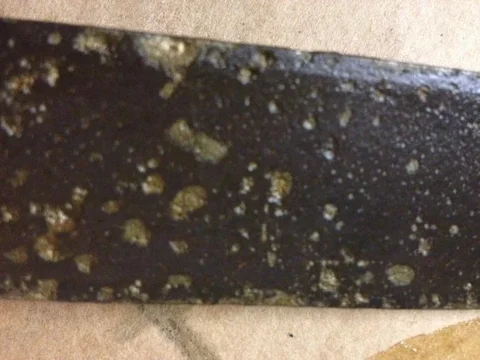
Electrodes were very pitted however.


image-3691754409.jpg
image-3534724442.jpg
image-1040002121.jpg
image-2007787185.jpg
image-3691754409.jpg
 
Your set up is working great!:clap:

Though not necessary, you can improve it by removing the plastic shields from the cathodes. This is a line of sight process, and the shields are blocking some of this.

Current is not that important. Higher current will not speed up the process, it will just produce more gas which can be a bit dangerous. :D What will speed it up is more cathode surface area compared to the part being de-rusted.

I think I said that FIRMLY adhered paint will not be removed but paint that is in poor shape or cheaply done will easily come loose. If it has rust under it it lifts easily.

The process itself will NOT pit the metal regardless of how long you leave a part in the tank. The pits are already there from the rust, and are made very visible when the process removes the rust from them.

You will need to clean your cathodes often of the "rust" that builds up on them to keep them working at their peak. Be aware that if you let the sludge build up on the bottom of your tank it can short out your cathodes or short your part to the cathodes. For this reason most of my cathodes are mounted a couple of inches from the bottom of the tanks. I use a siphon hose to the bottom of my tanks to remove that layer of sludge every so often.

Good job on this!
 
Self etching primer - is that as good as a Prep & Prime type product?

Apples and oranges. Two different products used for two different purposes.

I have to say, why not just have the parts blasted and epoxy primed? Can't beat that combo.
 
Apples and oranges. Two different products used for two different purposes.

I have to say, why not just have the parts blasted and epoxy primed? Can't beat that combo.

Well, I can do the small parts as I need them with electrolysis. I've been wire wheeling parts galore, which is difficult and dangerous, and messy, and time consuming, plus you cannot get complex parts clean.

I looked at a blast cabinet but haven't done that, and would love to have the whole big setup to do body and all, but I don't think that will be economical. I will have body and other big parts blasted and primed by a professional, or at least someone who claims to be one.

Another part of it was the fascination of building this from stuff I had in the garage plus $10 for the soda ash. I admit to being an alpha geek.
 
Your set up is working great!:clap:

Though not necessary, you can improve it by removing the plastic shields from the cathodes. This is a line of sight process, and the shields are blocking some of this.

Current is not that important. Higher current will not speed up the process, it will just produce more gas which can be a bit dangerous. :D What will speed it up is more cathode surface area compared to the part being de-rusted.

I think I said that FIRMLY adhered paint will not be removed but paint that is in poor shape or cheaply done will easily come loose. If it has rust under it it lifts easily.

The process itself will NOT pit the metal regardless of how long you leave a part in the tank. The pits are already there from the rust, and are made very visible when the process removes the rust from them.

You will need to clean your cathodes often of the "rust" that builds up on them to keep them working at their peak. Be aware that if you let the sludge build up on the bottom of your tank it can short out your cathodes or short your part to the cathodes. For this reason most of my cathodes are mounted a couple of inches from the bottom of the tanks. I use a siphon hose to the bottom of my tanks to remove that layer of sludge every so often.

Good job on this!

So the pitting on the electrodes - they were clean and new metal. Why did they pit? Is that part of the chemical reaction that the cathode loses metal and helps convert the rust on the anode?

The paint on that brake backing plate was in excellent shape, but again, I think the kerosene soak weakened it.

I fear removing the plastic shields as I don't want to short the thing out. The main electrode that receives the positive charge from the charger has spots of pitting, and then would be clear a couple of inches down. It was strange. The two satellite electrodes were pitted/encased on the entire length where they were under water.
 
Sorry I thought you were asking about pitting on the part being de-rusted! Yes, the pitting on the cathodes is normal. The cathodes are sacrificial ie they are used up as part of the chemical process.
 

Users who are viewing this thread

Back
Top Bottom