
Even when uou run a dehumidifyer you still have to drain a compressor just not as oftern but compressed air priduces condensation even in phoenix arizona.
Navigation
Install the app
How to install the app on iOS
Follow along with the video below to see how to install our site as a web app on your home screen.
Note: This feature may not be available in some browsers.
More options
Style variation
You are using an out of date browser. It may not display this or other websites correctly.
You should upgrade or use an alternative browser.
You should upgrade or use an alternative browser.
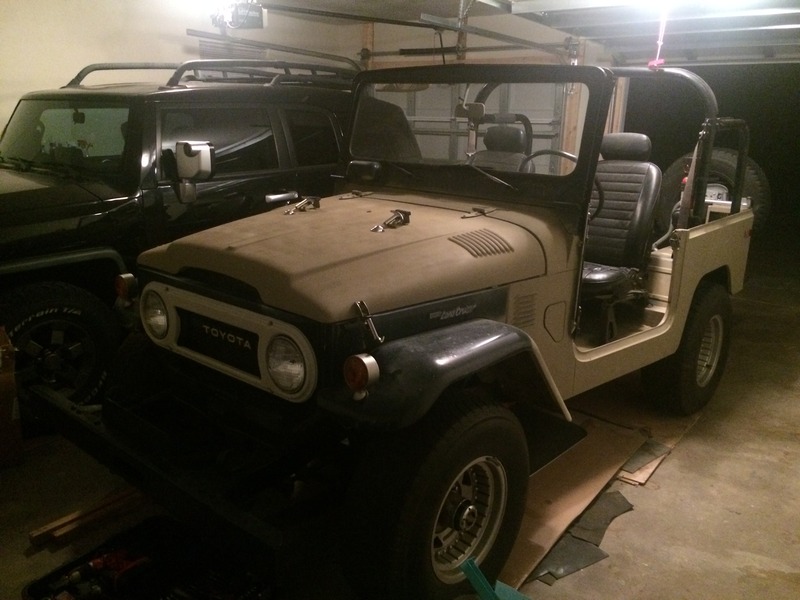
78 FJ 40 project Frank
- Thread starter alabamatacomaguy
- Start date
This site may earn a commission from merchant affiliate
links, including eBay, Amazon, Skimlinks, and others.
- Joined
- Mar 9, 2014
- Threads
- 48
- Messages
- 1,289
- Location
- FL Panhandle. Pcola/Miramar Beach
- Website
- forum.ih8mud.com
- Thread starter
- #142
I was thinking more for other tools and the 40 in the garage. But I figure it wouldn't be worth the trouble
I try to use either Performax or Royal Purple compressor oil , change at least once a year or more if you run it hard and hot . Do not neglect the air filter , Briggs and Stratton mower filter material can be used as a replacement if you need it .I usually remove the factory drain valve in the bottom of the tank and use a short nipple , elbow and a ball valve - helps clean out moisture better than those t-handle factory valves that like to plug up over time .
Sarge
Sarge
- Joined
- Mar 9, 2014
- Threads
- 48
- Messages
- 1,289
- Location
- FL Panhandle. Pcola/Miramar Beach
- Website
- forum.ih8mud.com
- Thread starter
- #144
Shot a couple pics of one of the jacks I brought back with me from his garage. It was the biggest of the ones he had except for a smaller 3 ton but I forgot to grab it.
It's a beast.


I'll give it a little tlc and maybe a wipe down with some oil to keep it in good shape. I haven't found a brand or maker yet but I also haven't looked to hard.
It's a beast.
I'll give it a little tlc and maybe a wipe down with some oil to keep it in good shape. I haven't found a brand or maker yet but I also haven't looked to hard.
- Joined
- Mar 9, 2014
- Threads
- 48
- Messages
- 1,289
- Location
- FL Panhandle. Pcola/Miramar Beach
- Website
- forum.ih8mud.com
- Thread starter
- #145
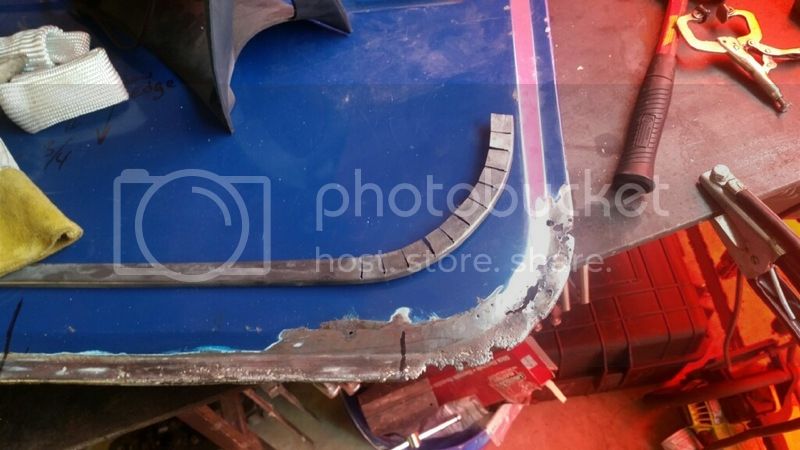
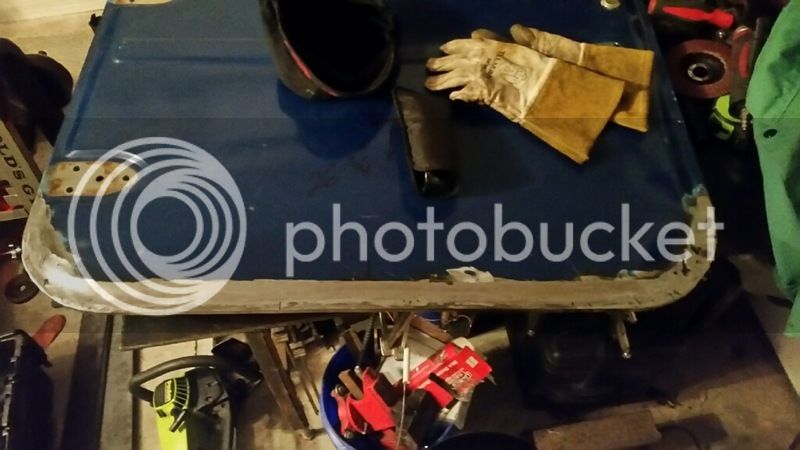
Not much going on last few months. The welder is working on the driver side door bottom. Im casually looking for front bibb, side aprons and oem fenders that are ready to paint.
Right now the 40 is half disassembled but put together enough I can still make runs to local places for something quick and stretch its legs once a week or so.
Between work and trying to plan a wedding life doesn't leave much cruiser time. I think in the next month or so Ill start getting free afternoons to dive into things.


Last edited:
ut oh, you know that marriage is the number one reason for the death of perfectly good '40s? ")
and congratulations - girls are better then cars (most times).
and congratulations - girls are better then cars (most times).
- Joined
- Mar 9, 2014
- Threads
- 48
- Messages
- 1,289
- Location
- FL Panhandle. Pcola/Miramar Beach
- Website
- forum.ih8mud.com
- Thread starter
- #147
I got a little update from the welder. He is doing the work in his spare time so sometimes it gets put on the back of the list. Hes working on the drivers side door now it was a little worse off than the passenger.
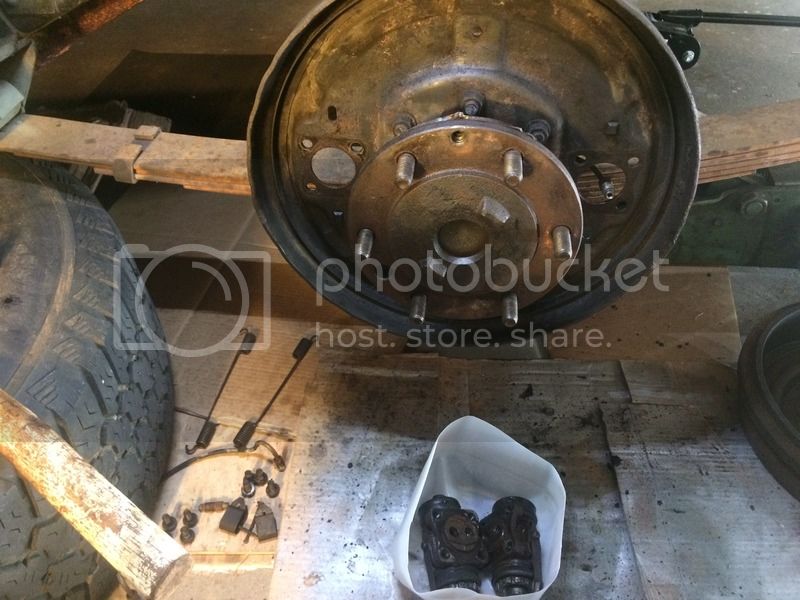
Im planning on taking tomorrow off of work and doing the rear brake cylinders. Hopefully Ill have a successful day of 40 work to post up tomorrow evening. Last time I tried to work on it the drivers side drum wouldnt let loose but now I have my tools un packed and a bigger hammer.

Im planning on taking tomorrow off of work and doing the rear brake cylinders. Hopefully Ill have a successful day of 40 work to post up tomorrow evening. Last time I tried to work on it the drivers side drum wouldnt let loose but now I have my tools un packed and a bigger hammer.
- Joined
- Mar 9, 2014
- Threads
- 48
- Messages
- 1,289
- Location
- FL Panhandle. Pcola/Miramar Beach
- Website
- forum.ih8mud.com
- Thread starter
- #148
I was able to spend a couple hours with the cruiser today. It has been about 3 weeks since I last drove it. I try to get the motor running at least to operating temp every 2 weeks or so. The battery was dead but a quick charge had it going again.
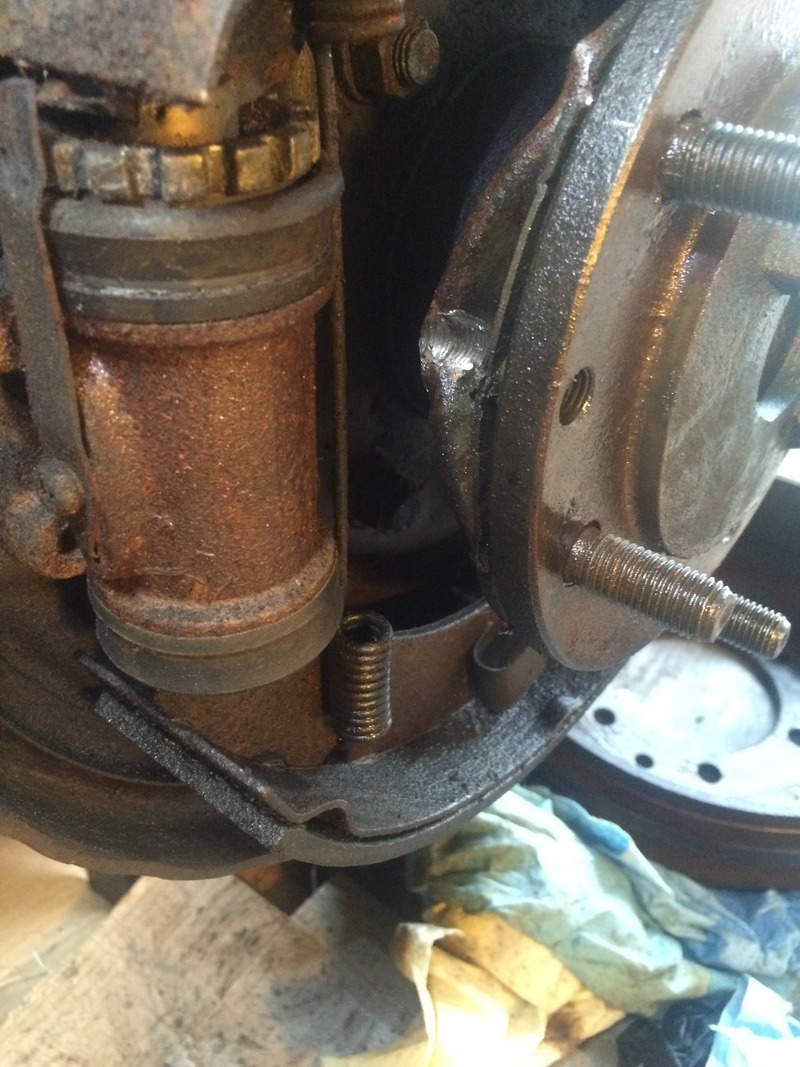
The rear driver drum is the one with the suspected leaking wheel cylinder. I spent the better part of 2 hours trying to get the drum off but no success. Does anyone have any tips?
I was able to turn the notch part on the cylinders inside the drum from the backing plate, I've also got it soaking in penetrant fluid but beating the drum with a heavy mallet is doing nothing but giving me a headache
I am able to spin the hub any direction when the other sides wheel is jacked off the ground but the drum is seized on completely I can't even get it to wiggle.

I did this method to try and make sure the wheel cylinders weren't making the shoes grip, as far as I can tell they are not as I can spin it.
I need to figure out what bold size goes in the front of the drum and try screwing a bolt in to help free it up
The rear driver drum is the one with the suspected leaking wheel cylinder. I spent the better part of 2 hours trying to get the drum off but no success. Does anyone have any tips?
I was able to turn the notch part on the cylinders inside the drum from the backing plate, I've also got it soaking in penetrant fluid but beating the drum with a heavy mallet is doing nothing but giving me a headache
I am able to spin the hub any direction when the other sides wheel is jacked off the ground but the drum is seized on completely I can't even get it to wiggle.
I did this method to try and make sure the wheel cylinders weren't making the shoes grip, as far as I can tell they are not as I can spin it.
I need to figure out what bold size goes in the front of the drum and try screwing a bolt in to help free it up
Last edited:
- Joined
- Mar 9, 2014
- Threads
- 48
- Messages
- 1,289
- Location
- FL Panhandle. Pcola/Miramar Beach
- Website
- forum.ih8mud.com
- Thread starter
- #149
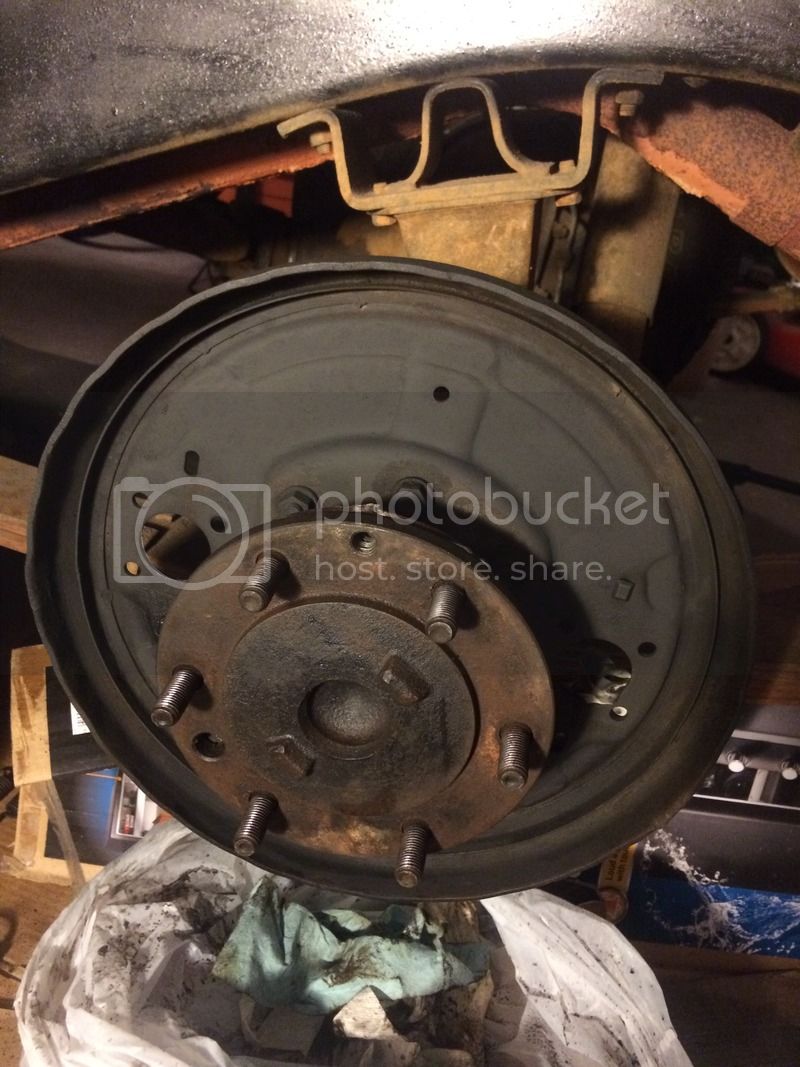
I was able to get the stubborn drum off right before I started thinking of throwing in the towel and taking it somewhere and paying for it. I ended up using a bolt to try separate the drum from the axle. It was an pricey little bolt at ace 2.80 for a 10x1.25x60. It did help me get the drum separated but damaged the backing plate. I ended up using the tried and true pissed off 3 lb mallet beating to get it off after trying other methods. It worked but I probably lost some hearing in the process.
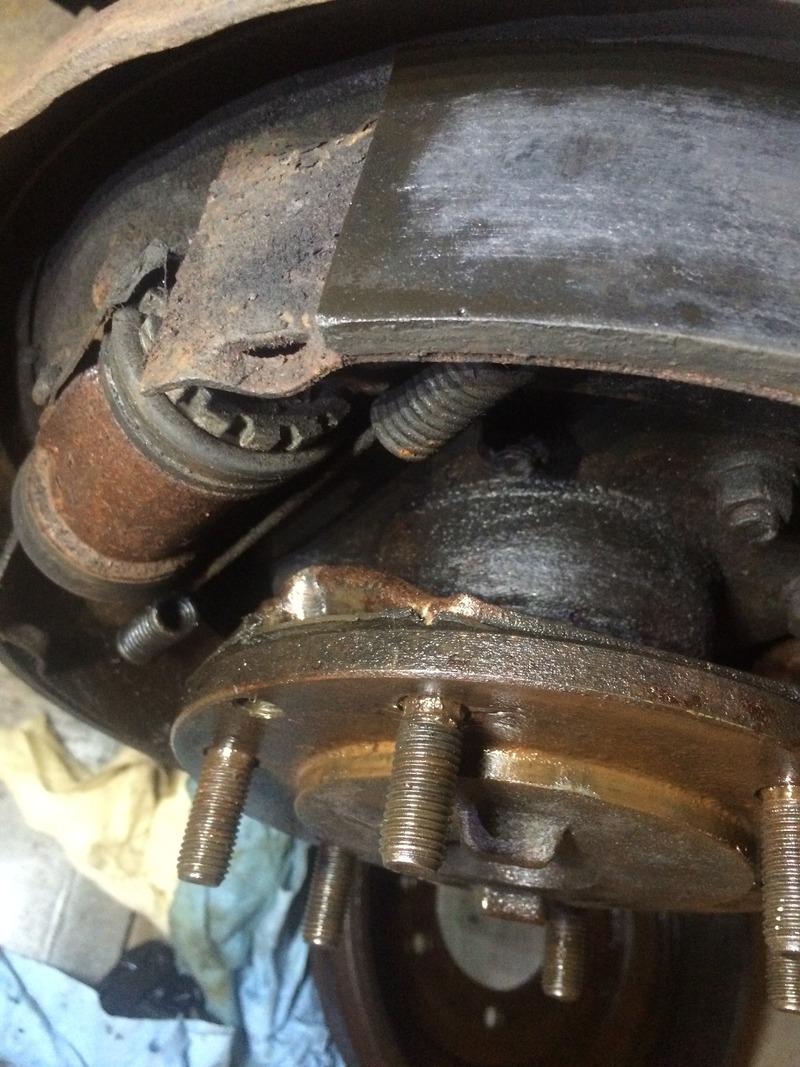
I was thinking I could bend it back into shape as much as I can and it should clearance everything. It seemed like a wiper type thin fabric material similar to the front axles that tore. I am at work and havent researched it more but Im hoping I havent done much damage. I figure at worst I could probably replace everything with new from cruiser outfitters.
I only had 30 mins extra to play around with today before work but I took tomorrow off so if things go as planned I can spend all day trying to get things in good order.
I am going to go home and research late this evening what the purpose of the damaged area is for but if anyone wants to post up what they would do I would gladly take the advice. Im hoping I don't have to separate the third member and pull the shafts but if I do It'll give me a reason to refresh everything while in there and replace axle seals and wheel bearings. I think I opened up a little worm can but I think a rear axle build as long as I stay away from the 3rd is something I can do.
the threaded holes in the drum shouldn't line up with that hole.
that hole hole lines up with the non-threaded hole in the drum. the jack bolts are intended to hit the axle flange.
that hole hole lines up with the non-threaded hole in the drum. the jack bolts are intended to hit the axle flange.
I was able to get the stubborn drum off right before I started thinking of throwing in the towel and taking it somewhere and paying for it. I ended up using a bolt to try separate the drum from the axle. It was an pricey little bolt at ace 2.80 for a 10x1.25x60. It did help me get the drum separated but damaged the backing plate. I ended up using the tried and true pissed off 3 lb mallet beating to get it off after trying other methods. It worked but I probably lost some hearing in the process.
I was thinking I could bend it back into shape as much as I can and it should clearance everything. It seemed like a wiper type thin fabric material similar to the front axles that tore. I am at work and havent researched it more but Im hoping I havent done much damage. I figure at worst I could probably replace everything with new from cruiser outfitters.
I only had 30 mins extra to play around with today before work but I took tomorrow off so if things go as planned I can spend all day trying to get things in good order.
I am going to go home and research late this evening what the purpose of the damaged area is for but if anyone wants to post up what they would do I would gladly take the advice. Im hoping I don't have to separate the third member and pull the shafts but if I do It'll give me a reason to refresh everything while in there and replace axle seals and wheel bearings. I think I opened up a little worm can but I think a rear axle build as long as I stay away from the 3rd is something I can do.
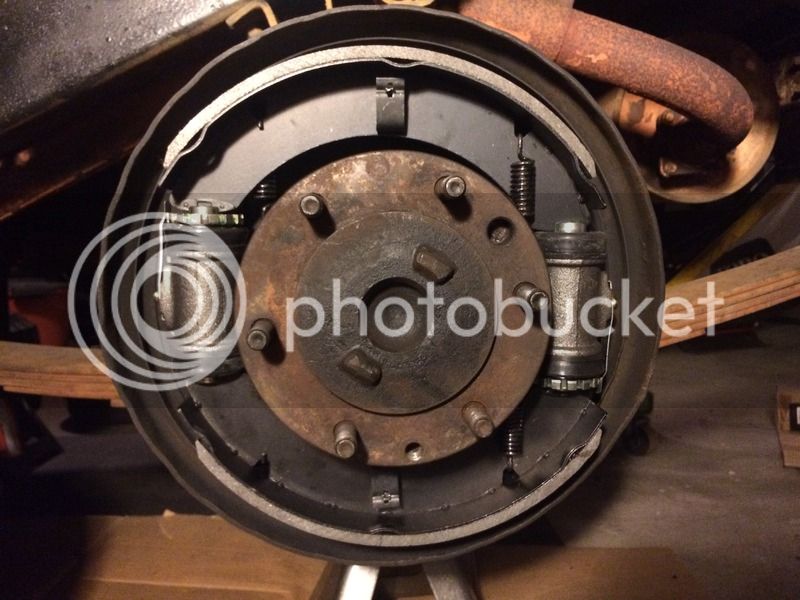
Bearings and seals are really easy. The most challenging part was getting the spider gears back in after they fell out.
The part you damaged is called a oil deflector if I remember correctly. Pm me when you get everything together I have a spare that I will send you. There is a gasket between the deflector and the wheel flange.
- Joined
- Mar 9, 2014
- Threads
- 48
- Messages
- 1,289
- Location
- FL Panhandle. Pcola/Miramar Beach
- Website
- forum.ih8mud.com
- Thread starter
- #152
Thanks for the tip I'll remember when re assembling so I can do it the correct way.the threaded holes in the drum shouldn't line up with that hole.
that hole hole lines up with the non-threaded hole in the drum. the jack bolts are intended to hit the axle flange.
Thanks that's very cool!Bearings and seals are really easy. The most challenging part was getting the spider gears back in after they fell out.
The part you damaged is called a oil deflector if I remember correctly. Pm me when you get everything together I have a spare that I will send you. There is a gasket between the deflector and the wheel flange.
I'm going to assess more tomorrow since I took the day off. Though I'm sure I'll find a honey do list and more work in the yard than I want.
I'm considering replacing all the bearings and axle seals to since it's likely getting close to 40 years that they've been on there. I've already got a pinion seal somewhere to replace the leaky rear one.
- Joined
- Mar 9, 2014
- Threads
- 48
- Messages
- 1,289
- Location
- FL Panhandle. Pcola/Miramar Beach
- Website
- forum.ih8mud.com
- Thread starter
- #153
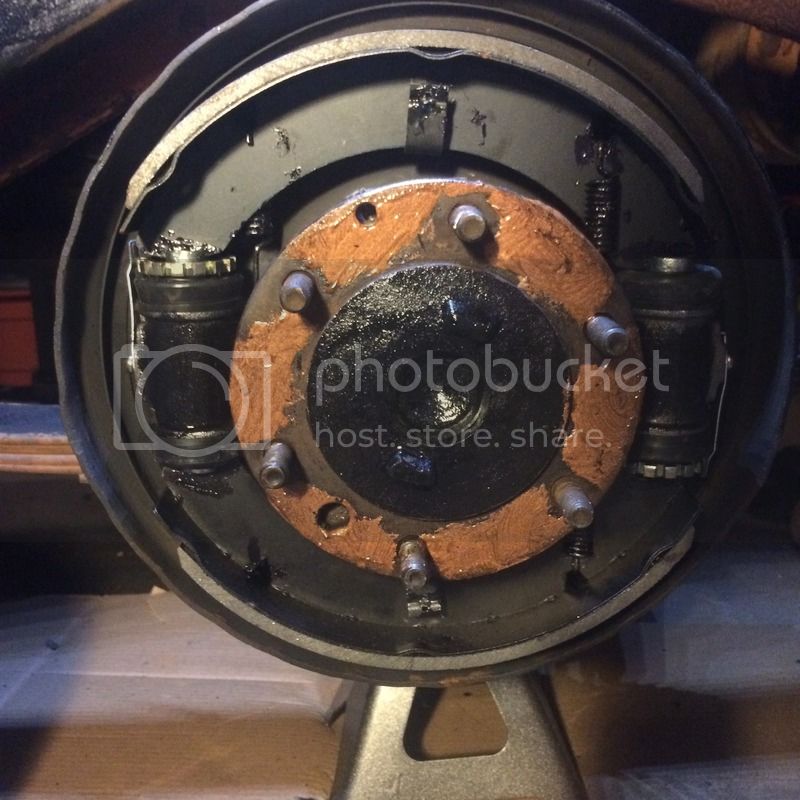
I finished the drive side rear last night. I spent a lot of time cleaning and de-greasing before installing new shoes and cylinders and springs. The drums are in pretty good shape so I reused them. the shoes were as well but I already had the new ones and the old ones had been soaked in brake fluid for at least a year.
I ve got to get some grease for them and more fluid so I can figure out how to bleed and adjust them.
Most of the time went to cleaning. I probably used 3 cans of brake parts cleaner to get them looking clean and new. I used some high heat paint to make things look nice before re-assembling.
After a day of work then 5 hours of yard work I only could muster the energy to complete one side. Hopefully I'll find an evening in the next week to finish the passenger side, adjust them and bleed the system.
I ve got to get some grease for them and more fluid so I can figure out how to bleed and adjust them.
Most of the time went to cleaning. I probably used 3 cans of brake parts cleaner to get them looking clean and new. I used some high heat paint to make things look nice before re-assembling.


After a day of work then 5 hours of yard work I only could muster the energy to complete one side. Hopefully I'll find an evening in the next week to finish the passenger side, adjust them and bleed the system.
oh memories... my first '40 had brake problems - thanks for the reminder? lol
- Joined
- Mar 9, 2014
- Threads
- 48
- Messages
- 1,289
- Location
- FL Panhandle. Pcola/Miramar Beach
- Website
- forum.ih8mud.com
- Thread starter
- #155
Finally finished up and got everything together. I'll adjust the cylinders this weekend. Also gotta replace two wheel studs on the same wheel, can't seem to get one to thread correctly and a previous owner tore another one up.
Some paint to clean up and Alittle anti seize to make next time easier

Back on all tires

Some paint to clean up and Alittle anti seize to make next time easier

Back on all tires

- Joined
- Mar 9, 2014
- Threads
- 48
- Messages
- 1,289
- Location
- FL Panhandle. Pcola/Miramar Beach
- Website
- forum.ih8mud.com
- Thread starter
- #156

I haven't been able to spend much time on the cruiser the last few months. I'm trying to find time to get back on it. I just got an oem pass side fender from beno and a bolt kit made by Davework from someone on here that was selling some parts from their project.
I'm working 7 days a week right now until things catch up but eventually I'll get working on the cruiser again soon and get the new fender on and a few other things.


Heard back from the welder. He was able to find time to finish up the drivers side door bottom. He's to busy for now but I'm hoping to get the hard top sides to him within a few months. I'm thinking they will be much easier repairs for him. I keep going back and forth thinking I could learn to weld on them. But time being a factor it would be years.
Last edited:
- Joined
- Mar 9, 2014
- Threads
- 48
- Messages
- 1,289
- Location
- FL Panhandle. Pcola/Miramar Beach
- Website
- forum.ih8mud.com
- Thread starter
- #157

Spent an hour getting the new oem pass side fender on tonight. Hoping to spend some more time on next week. I've had to spend a lot of time in the yard which isn't is fun but that's life when having a house, I count yard work as my gym visit. I'm excited for cooler weather this fall, the 90 degree plus garage isn't ideal to spend time in after coming home from work.
A few of the things that were rigged by previous owners no longer reach due to wire length so I'll have to get into that to clean up, I think the main part is the coil that bolts on top of the fender. It is about 6 inches to short on wire length now going to the distributor.
My goal for this week is get a good list of things I can do and get started. I've accumulated enough parts to stay busy for a while I just have to get stuff done. I also have been jumping around a good bit and not finishing up. I'm liking the road kill garage style way of using a pizza box to create a list that can be done to get things in motion so that is to come.
Also it looks like oil is coming out of the top of the pcv valve. I'm thinking this could be from the hose not fitting tight enough. It's a new pcv valve and gasket from cruiser corps but it has sprayed the side cover. Any idea on a fix or recommendation. I'm thinking a better fitting hose is a start.
Last edited:
- Joined
- Mar 9, 2014
- Threads
- 48
- Messages
- 1,289
- Location
- FL Panhandle. Pcola/Miramar Beach
- Website
- forum.ih8mud.com
- Thread starter
- #158
Doing my best to get started back up on working on the cruiser.
Done with my wedding and holiday stuff so might be able to find a few hours a week.
I have ordered a couple more parts and read through the awesome threads others have posted on here to try and get motivation.
I bought a set of what I believe are nos kyb brand stock height shocks to put on the front but as I was comparing lengths compressed and stretched out the full length the replacements seem shorter than what I'm replacing. Anyone familiar with these particular shocks. From my research this brand is a stiffer shock than most but I'm ok with that. I want to make sure I'm not risking any damage.
Being older parts for an older vehicle searching for a couple hours hasn't given any results.
Last edited:
- Joined
- Mar 9, 2014
- Threads
- 48
- Messages
- 1,289
- Location
- FL Panhandle. Pcola/Miramar Beach
- Website
- forum.ih8mud.com
- Thread starter
- #159
I picked up a new oem passenger side fender from beno back in the summer. When putting it on I found previous owner repairs such as sheet metal screws into the fender holding the charcoal canister and a bibb full of bondo patches. I picked up a used canister bracket from Wadesters and found some time to clean it up and properly mount it. Which lead to replacing the fuel hose connecting to it, the ones on it were pretty brittle from age. I also needed to extend the wires from the coil to the distributor since the coil was also just crudely screwed to the fender instead of bolted on properly.

Evaporust worked very well on the brackets. The charcoal canister to fender hardware looked new after a night soaking in it. I didn't take pics but after soaking it and cleaning it I sprayed it with rattle can self etching primer and some epoxy paint.
I am finishing up the wiring but does anyone see a problem with using the yellow card harware on the coil bracket that also had grounding wire going to it.
I keep the evaporust in a tupplewear type container and reuse it since I mainly do small parts. I found my ash tray screws that I put in over two years ago they have slowly been reduced to almost nothing.... whoops. Now I have to find new screws to fit the ashtray to dash bracket.
I'm going to research a bit more to see how Toyota did it and get as close to that as I can.
I'm doing my best to spend a few hours a week on the 40 to get it moving. I've got a new oem drivers side fender on the way from Germany and talking with a vendor for a sandblasted bibb.
Last edited:
- Joined
- Mar 9, 2014
- Threads
- 48
- Messages
- 1,289
- Location
- FL Panhandle. Pcola/Miramar Beach
- Website
- forum.ih8mud.com
- Thread starter
- #160
My new wife decided to get active in the garage so I've had to share my cruiser space with her. I'm pretty organized and put tools back once I'm done so I will know where they are next time I need them. My new wife not so much...
She found a good deal on a 30 year old dresser on craigslist and then stripped the top, stained it darker to match my mahogany furniture, painted, and replaced the hardware. I played supervisor when she let me and gave power drill and wood filer advice haha. I think it came out pretty good from where it started. I'm very particular on what furniture I like which has been one of the harder parts of marraige but I think shes coming around somewhat to my preference of dark mahogany woods and claw feet chairs. She's redone a few pieces over the years we've been together I may upload those at times to brag on her and show them off.

I came across this parts washer by mistake today when deleting emails. If anyone has experience with post up the good,bad,ugly, If a better deal is out there. I'm thinking it would be useful in my small to me Florida garage. Especially with a front knuckle rebuild getting closer on the checklist I'm thinking I could use it. I beleive it was 70 dollars which didn't seem to bad.

On the landcruiser front I picked up a new blower motor and housing for a good deal on eBay after realizing my current one was missing a chunk out of the bottom and the top has a crack in it. I'm looking for front upper shock mount bolts/pins if anyone knows a good source. I've found one vendor that has aftermarket available and the hardware but I want to see what else I can find.
She found a good deal on a 30 year old dresser on craigslist and then stripped the top, stained it darker to match my mahogany furniture, painted, and replaced the hardware. I played supervisor when she let me and gave power drill and wood filer advice haha. I think it came out pretty good from where it started. I'm very particular on what furniture I like which has been one of the harder parts of marraige but I think shes coming around somewhat to my preference of dark mahogany woods and claw feet chairs. She's redone a few pieces over the years we've been together I may upload those at times to brag on her and show them off.
I came across this parts washer by mistake today when deleting emails. If anyone has experience with post up the good,bad,ugly, If a better deal is out there. I'm thinking it would be useful in my small to me Florida garage. Especially with a front knuckle rebuild getting closer on the checklist I'm thinking I could use it. I beleive it was 70 dollars which didn't seem to bad.
On the landcruiser front I picked up a new blower motor and housing for a good deal on eBay after realizing my current one was missing a chunk out of the bottom and the top has a crack in it. I'm looking for front upper shock mount bolts/pins if anyone knows a good source. I've found one vendor that has aftermarket available and the hardware but I want to see what else I can find.
Last edited: