1978 LPB Teardown and Rebuild

This site may earn a commission from merchant affiliate
links, including eBay, Amazon, Skimlinks, and others.

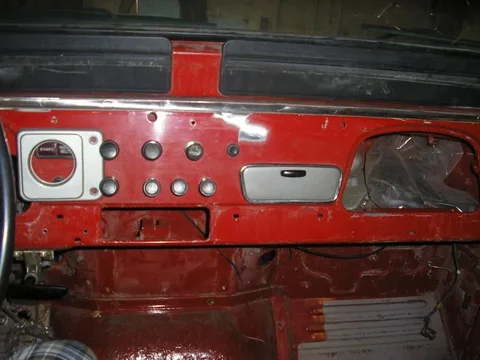
i am thinking move the light switch to the other side and stick the bezel on the left...
 
Seats are comfortable and have a good support, perfect for a DD... have still a Recaro seat mounted in my 43
Take care of your 45, Kevin. ;)
Have seen in one of your pics, that your foreman ;)
can reach the door lock....:D
Cheers
Peter


:lol: He kept running back and forth until he was caught in that shot. He keeps trying to take the keys and play with them - I stopped him three times. I only have the one key.


Glad it got there - I can't wait to see it installed.

I love the wooden seat mounts - very ghetto. I say keep those to give the rig something of Budweiser Berigade look.

Josh

Yes, thanks again! Josh is one of those strange fellows that travels with spare parts. He sent me that from New York :confused:

i am thinking move the light switch to the other side and stick the bezel on the left...

I have already pulled the light switch out for the roll cage mount through the dash on the left side. So I will use the bezel with a 60 series tach just to the right of the stock cluster. I will move the hazard switch to the right and delete the lighter and choke and add the headlight switch in there too. Basically only the heater controls will stay put. If I have to I'll lose the ashtray also - never been a smoker.
P1010005.webp
P1010005.webp
 
As mentioned, I want to mount the Toybox in order to properly size the hole in the cab floor and, by extension, properly mount the seats.

So... it's all gotta come out
P1010002.webp
Some goes in the back
P1010003.webp
And some on the bench
P1010001.webp
P1010002.webp
P1010003.webp
P1010001.webp
 
Stood on end
P1010007.webp
What we have here is a serious PO mod.
The fifth gear actuator rod coming out of the top plate has been torched off and the fifth gear is locked out with this tab bolted to the nearest bolt. I guess the fuel economy of a 5spd is lost on those miner guys
P1010005.webp
She was also locked in low range in a similar manner with a bolted tab holding the hi/low shifter in low (already removed)
P1010006.webp

All evidence shows this system was only ever used in the 4 lowest gears during it's work life. I wonder how many times it actually ran at high speed before going into service :hhmm:
P1010007.webp
P1010005.webp
P1010006.webp
 
As this will be my first splitcase removal I am doing some reading and trying to decide if now is the time to rebuild the tranny and case as well or if I should just "throw" the toybox on there and do the rebuilds all at once later when I pull the axles off.
 
As this will be my first splitcase removal I am doing some reading and trying to decide if now is the time to rebuild the tranny and case as well or if I should just "throw" the toybox on there and do the rebuilds all at once later when I pull the axles off.

If you mount the toybox you have to take the drivetrain apart anyway might as well rebuild it. Otherwise you have to take it apart a second time.:idea:

Great stuff so far, love your work.:cheers:

2x on the tach bezel.
 
i would test the tranny before actually going to the expense of rebuilding it.
rebuild the t/case if you see signs of issues.

it is going to be quite the truck when you are done.

seems i might be delivering the troopy to Calgary in the spring and if i do i want to stop by and check out the shop and enjoy some fabricatting chats.
 
:idea:

I was thinking since you are so handy, why not take dims of that tach bezel so you or someone else can start fabricating them?

I would definitely buy one!

:beer:

I thought they were stamped steel until Josh told me they were plastic. The shape is a bit too complex for me to reproduce at a price anyone would pay but someone out there may have a small flywheel press and some time to play with a die.

If you mount the toybox you have to take the drivetrain apart anyway might as well rebuild it. Otherwise you have to take it apart a second time.:idea:

Great stuff so far, love your work.:cheers:

2x on the tach bezel.

Yes, the transfer must come apart anyway...

i would test the tranny before actually going to the expense of rebuilding it.
rebuild the t/case if you see signs of issues.

it is going to be quite the truck when you are done.

seems i might be delivering the troopy to Calgary in the spring and if i do i want to stop by and check out the shop and enjoy some fabricatting chats.

I would test the tranny if I had another vehicle - or do you mean get it "bench" tested at a tranny shop? I already have the rebuild kit and the overall plan with this build was to have everything "new" or "zero timed" after she's done.

Post up on the list when your hitting town and I would love to chat.

Kevin
 
Hello Kevin,

Doesn't everyone carry spare parts with them? What do they do if they come upon a Cruiser in needs of bits and they don't have a suitcase full of them?:D I knew someone would want it, you were just the first person to ask for it.

As for your tranny - may be a bit late, but when you stand it on end, you should always do so with the shifter in place. Without the shifter, your Reverse selector is likely to pop out requiring you to pull the top loader to get it back on the track.

When you do take that top loader off, be certain to place it under lock and key; they have been known to walk away before(c:

Josh
 
Hello Kevin,

As for your tranny - may be a bit late, but when you stand it on end, you should always do so with the shifter in place. Without the shifter, your Reverse selector is likely to pop out requiring you to pull the top loader to get it back on the track.
Josh


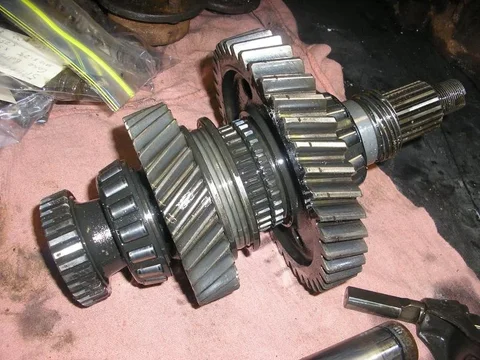
Good to know, thanks. It's gonna come apart anyway as soon as I get enough time to gather my nerve and enough pullers. I have to lay it back down still - never drained the oil yet :lol:
 
I had better post up before this thread hits page three!

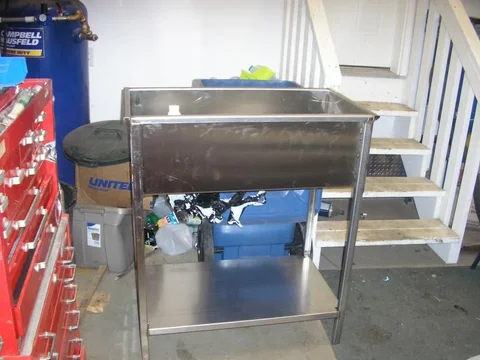
I followed the FSM and pulled off the transfer case. My first one. Pretty simple really, just took my time and a few pictures for reference. She looks fine with no obvious issues, no chunks in the oil. I haven't inspected everything closely yet cuz I had to build myself a parts washer/ wash basin - I'm too cheap to buy one :hillbilly:

P1010010.webp

P1010011.webp

We got some new material racks at work and were doing some clean up/ tossing out/ recycling of smaller scraps. I pulled enough stainless out to make this parts washing basin 36x18x12 deep. I made it nice and tall cuz I hate being hunched over when working. I just put a simple drain at one end and let the slope of the garage floor get the fluid into a bucket with a cheap submersible pump. Works pretty good. I started cleaning the splitcase case with a "simple green" type water based degreaser but it was taking way to long to cut through the grime. So I grabbed another bucket and switched to good old varsol - much better and faster. My basin design makes switching back and forth between varsol and water based environmentally better solvent as simple as pulling the pump out and swapping buckets.
P1010017.webp
P1010011.webp
P1010010.webp
P1010017.webp
 
My tranny sorta exploded all over my bench

I have to clean up so I can keep everything straight and finish pulling the tranny apart

P1010014.webp

P1010016.webp

P1010015.webp
P1010015.webp
P1010014.webp
P1010016.webp
 
i have found that soaking the parts in diesel works pretty well.
Home Despot used to sell a orange colored cleaner that smelled very nice and cleaned parts wickedly. run the stuff through a filter and reuse often.

just suggestions.
 
Thanks for the input Wayne - yeah, the citrus or pine smelling water based stuff would likely work good on the gears and internals but these cases were caked in some kind of sticky oil/dirt/potash mixture and it was slow at disolving it out of the nooks and crannies. The varsol was just faster. I will most likely use the water based stuff most of the time and save the varsol for tougher applications. It (varsol) is tough on the nose and a bit flammable right beside my welding/grinding bench. It will be kept in a sealed container when not in use and I'll have both doors open or a VOC mask on.


related question - should I blast and clear the aluminum to look purdy? - Easy to do and I am looking for that kind of finish even though it's going straight to the trails when she's built. I ask cuz someone told me not to blast the aluminum for some reason I can't remember...
 
glass bead it.
clear P/C works to keep it looking purdy for a long time and much easier to clean after playing in the clay.
 
OK, so glass is ok, thats good cuz thats all I've got anyway. I thought maybe it shouldn't be blasted at all for some reason - thanks
 
Great link Dan - never did a search on the subject :o

Thanks!

Glass bead and powder is perfect, I have easy access to both. I notice you didn't blast your 3B alum parts but just did a clean and clear powder. Those are the parts that I was told not to blast by an aquaintance of mine - he specifically said "don't blast the aluminum" - and that was why I was asking about it above. without having spoken to him yet I suspect it just comes down to his personal preference. I can't see blasting doing any damage to the covers or cases as long as you don't hit the seal areas etc. to hard.
 

Users who are viewing this thread

Back
Top Bottom