A lot work on my cruise new clutch new fly whel


Navigation
Install the app
How to install the app on iOS
Follow along with the video below to see how to install our site as a web app on your home screen.
Note: This feature may not be available in some browsers.
More options
Style variation
You are using an out of date browser. It may not display this or other websites correctly.
You should upgrade or use an alternative browser.
You should upgrade or use an alternative browser.
What have you done to your 100 Series this week? (40 Viewers)
- Thread starter SHUSH
- Start date
This site may earn a commission from merchant affiliate
links, including eBay, Amazon, Skimlinks, and others.
More options
Who Replied?Hey strangers!! 

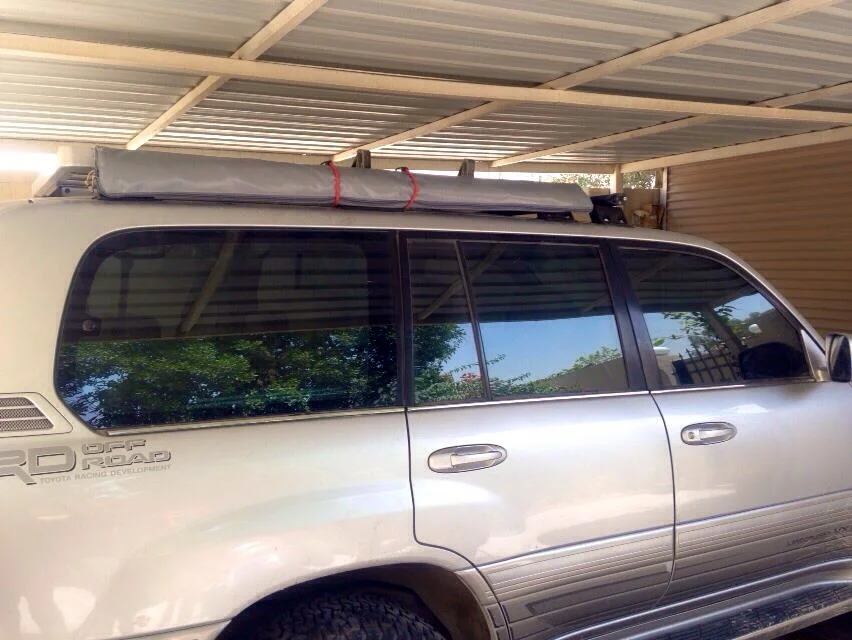
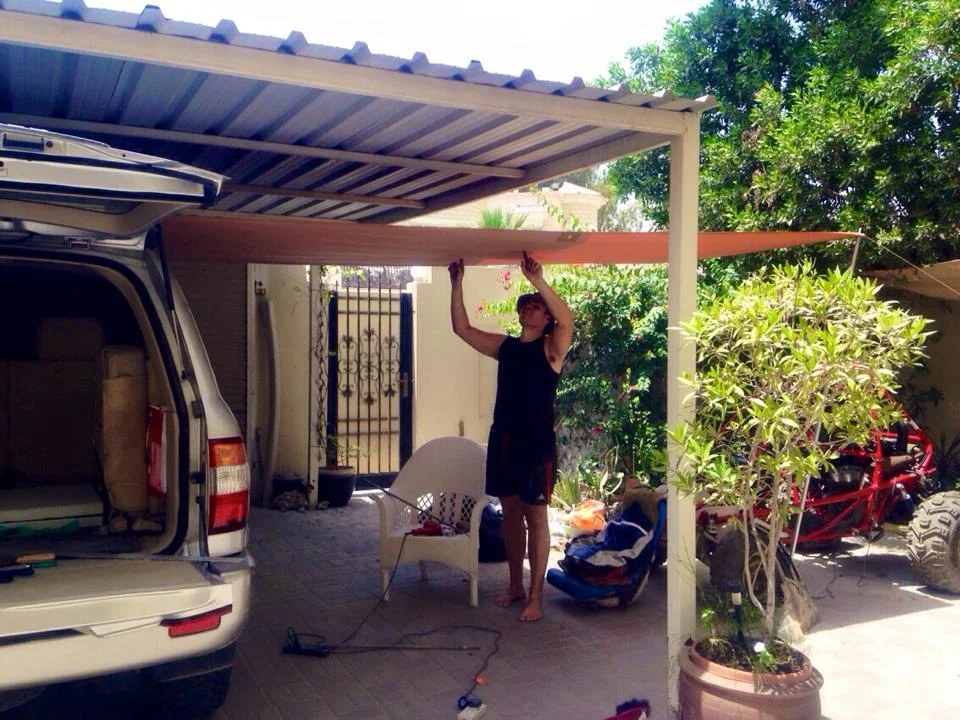
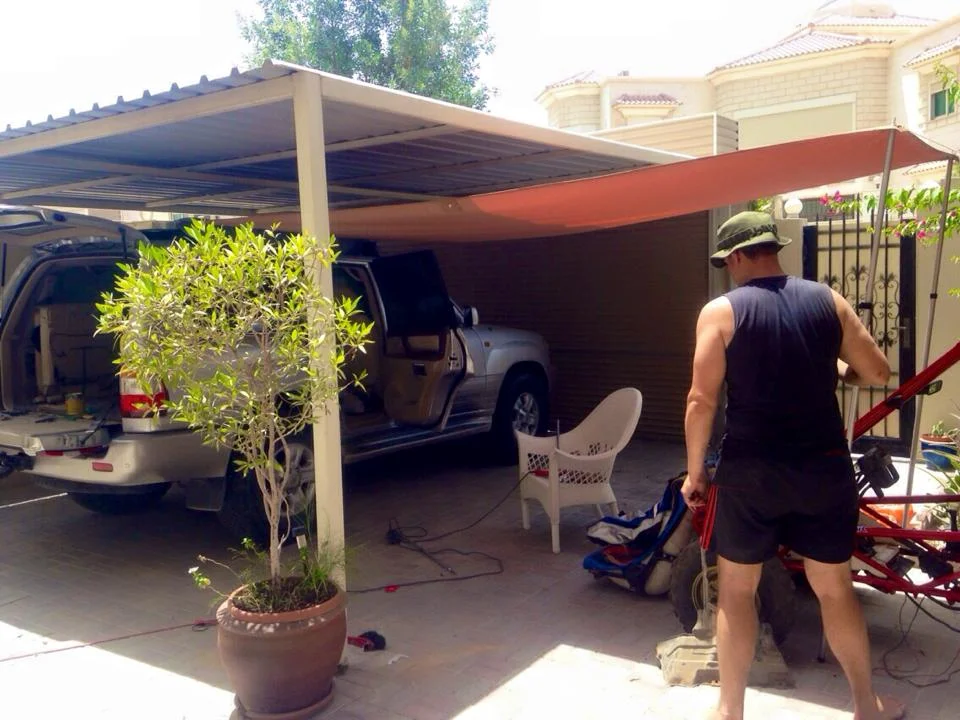
Its been a while. The princess got an awning last weekend. They don't sell them commercially over here so I had a tent maker sew together everything from UV resistant and water resistant umbrella fabric, got some extendable aluminum poles with some 550 para-cord as guide ropes and had a heavy duty synthetic bag made up for it... much like the Howling Moon ones you can get in South Africa.
My Roof Rack is very short (front to back) so its only about 1.5m wide but I made it 4m long for extra shade with grommets half way along so it could be tucked in and taken to the ground if it got windy.
The extra long 4m material means I can take it to the ground like this if its windy.
Bolted on some poser stuff today. Rotopax gas and storage cans. Also added some LEDs for lighting under the awning.
View attachment 1064792 View attachment 1064793
Just finished my awning and want to do the same thing with an LED light. I found BlitzPro lights to be quite popular but they are out of stock. Where did you get yours?
thanks
G
Replaced my front, upper console (58804-60131) today. For the past two years I had my old one covered with double-sided tape and black fabric which looked okay but I figured it was time to just replace it.
One thing to note, it came with the updated cupholder style with the larger recesses and butterfly cupholder thing. Now if only I could figure out how to remove the shift knob and replace the awful looking shifter surround...
Old style:
Old console with fabric cover:
Key In, Ignition on. (No need to start the truck)
Hand Break up.
Shift into neutral.
On the front of the shifter you will find a small star screw.
Put your thumb on the shift knob and undo that screw.
The shift knob will now pop out with its surrounding assembly (its spring mounted so catch all the parts).
There will be a wire with it for the OD button. (You can pull the dash panel off below the shift knob and see if you can find the connector for that wire. I just cut it and then re-soldered it when I was done)
Once the knob assembly is out you can remove the shifter and the shifter panel below it will just pull off.
View attachment 1052439
And
View attachment 1052440
And found thisView attachment 1052441
Either AHC or power steering.
We are all friends here so I say this in the nicest way possible. Please put your fire extinguisher somewhere else (on the floor). I have made this mistake myself with a Mag Light mounted in a 75 series and it when straight through the windscreen in a small fender bender.
If you have a big crash that extinguisher will become absolutely deadly to people in your second row. I would strongly advocate it goes at your front passengers feet in the foot well.
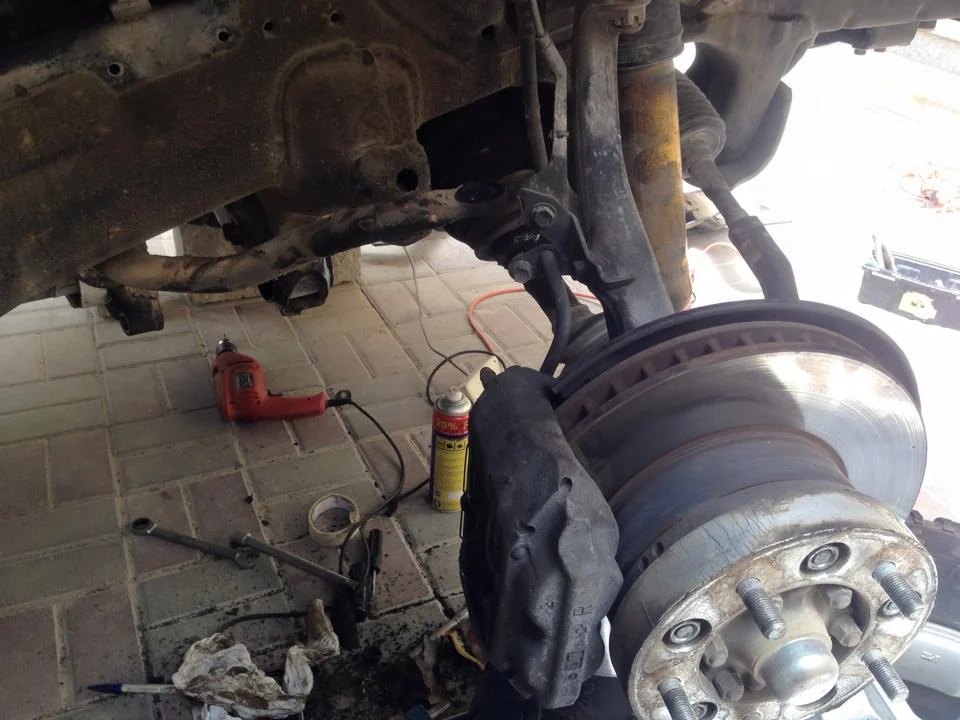
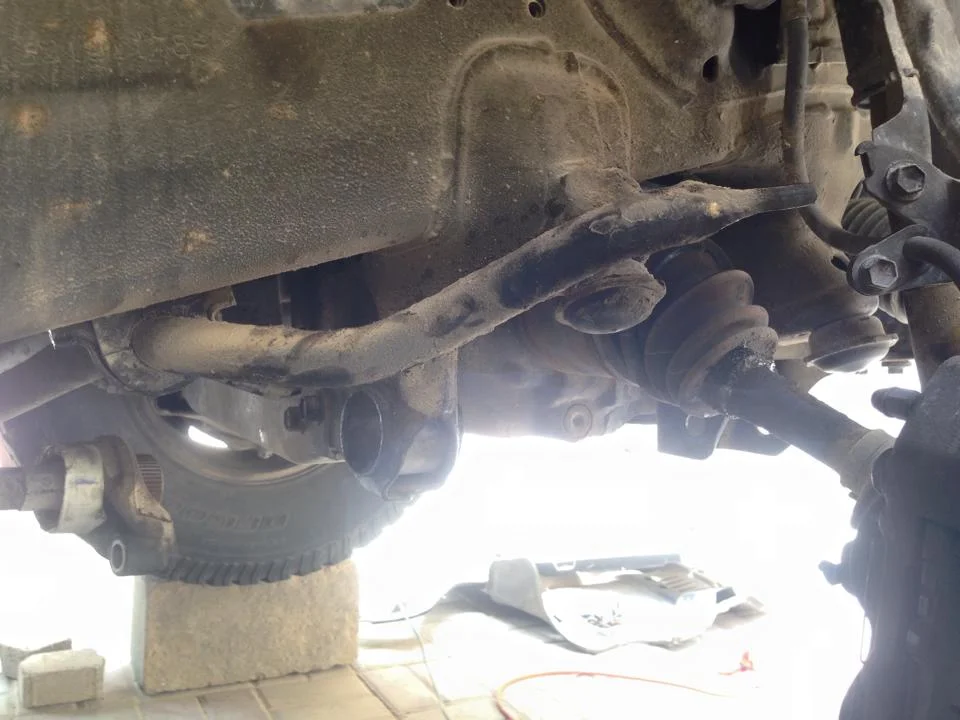
My front end was getting pretty shot and I wend through everything to work out I needed new LCA bushings and new ball joints.
Toyota Qatar wanted USD 1,000 a side in parts alone to change the LCA bushings (+labor).
(They actually pissed me off to no end because they first refused to press in new bushings, insisting that the whole arm must be replaced. Then when I told them that the No2 busing was in the chassis and they would have to either press in a new one or try to sell me a new chassis they told me I dint know what I was talking about and they just replace the arm).
I went to the TOYOTA parts department (imagine that) and they where more than happy to sell me No1 and No2 Bushings for less than 150usd including new hardware.
It was not easy but I put them in myself over the weekend and now have a nice tight front end. I have some re-boxed spicer ball joints in the post at the moment for another 100usd and my local garage will press them in for me.
(My Boots are loose and leaking grease... no one is perfect )
)
Toyota Qatar wanted USD 1,000 a side in parts alone to change the LCA bushings (+labor).
(They actually pissed me off to no end because they first refused to press in new bushings, insisting that the whole arm must be replaced. Then when I told them that the No2 busing was in the chassis and they would have to either press in a new one or try to sell me a new chassis they told me I dint know what I was talking about and they just replace the arm).
I went to the TOYOTA parts department (imagine that) and they where more than happy to sell me No1 and No2 Bushings for less than 150usd including new hardware.
It was not easy but I put them in myself over the weekend and now have a nice tight front end. I have some re-boxed spicer ball joints in the post at the moment for another 100usd and my local garage will press them in for me.

(My Boots are loose and leaking grease... no one is perfect
)Hi gunney, I have a similar awning, 2m x 4m and love it.
jemsec
Mach lll Club
Gunney, are you a local or a transplant there? You really know your Land Cruiser. Been reading your posts for quite a while.
Key In, Ignition on. (No need to start the truck)
Hand Break up.
Shift into neutral.
On the front of the shifter you will find a small star screw.
Put your thumb on the shift knob and undo that screw.
The shift knob will now pop out with its surrounding assembly (its spring mounted so catch all the parts).
There will be a wire with it for the OD button. (You can pull the dash panel off below the shift knob and see if you can find the connector for that wire. I just cut it and then re-soldered it when I was done)
Once the knob assembly is out you can remove the shifter and the shifter panel below it will just pull off.
Thanks a lot Gunney, it seems this is common as I've seen a lot of older Cruisers that have the same delaminating shift indicator bezel. It detracts from a clean interior, kind of like how cloudy, yellowed headlights make a car look so much older.
Would anyone know the part number by any chance?
Thanks,
Rich
Technically I didn't do it. But got my exhaust manifold fixed. Oh the sweet sound of no more ticking. Thanks to CruiserDan for the parts and my local muffler shop for the repair.
Thanks to CruiserDan for the parts and my local muffler shop for the repair.The locker and compressor were about $1000 on the free compressor with ARB locker promo, I had the locker installed at Rob Thomas Differentials http://robertthomasdifferentials50.com/roberts_web_page_005.htm at
17920 Mojave St
Hesperia, CA 92345
(760) 956-1970
Thanks! - looks like a good shop. How much was installation?
Gil
for the front locker ,installing the compressor on my ext batt bracket, wiring the two switches, and some misc parts about 1000
Complete evacuation of the A/C system. Used the loan a tool program at autozone to get a vacuum pump and gauges to properly recharge the system. Had used the "hack method" as others have called it (quick can of A/C pro) in what I thought would be finding the leak. When I got the LC the A/C didn't work at all, compressor not engaging, PO told me they had tried charging it with a DIY but quit after a week. I recharged to proper level according to the can 2+ months ago and system was working fine ever since but still bothered me. So had the old refrigerant pulled out, took it home and attached the vacuum for an hour. After creating the vacuum let it sit for an hour - needle didn't move - woohoo! no leaks! Recharged to the correct amount of refrigerant according to the FSM. Then pulled the front cover off the evaporator and cleaned it best I could in there.
In retrospect - wish I had taken it apart first. If I had known how dirty that was I most likely would have ordered a new evaporator core and just replaced it, then added the cabin filters the LC has never had. Oh well, air blows pretty well and getting a pretty consistent 25-30 degree temp drop from 90 degree intake air. This morning with the air only around 65 system was pushing out 40 degree air - felt good! Also replaced the dessicant bag and strainer so if there was any last moisture in there it should be gone by now.
In retrospect - wish I had taken it apart first. If I had known how dirty that was I most likely would have ordered a new evaporator core and just replaced it, then added the cabin filters the LC has never had. Oh well, air blows pretty well and getting a pretty consistent 25-30 degree temp drop from 90 degree intake air. This morning with the air only around 65 system was pushing out 40 degree air - felt good! Also replaced the dessicant bag and strainer so if there was any last moisture in there it should be gone by now.
Installed the Slee group 31 kit and the Dua lbattery kit...... and then realized that the Dekka 31 AGM is taller then a sears....... loca Sears store doesn't even carry the Plat. series so have to chase one down tomorrow.... the 34 fits perfectly in the Slee 2nd kit. planning to use a Blue seas ACR and 120 amp Blue seas circuit breaker.... and 2ga cable... forgot that West Marine closes Sunday...
Next up are my rock lights....
Next up are my rock lights....
40Habits
Sure... why not
Seems like I spend most of my time just waiting on parts but the end is with in sight.

SweetnessSeems like I spend most of my time just waiting on parts but the end is with in sight.
Hey!Took a Beer Trek (#3) up north and hit some great breweries. 1,500 miles in 5 days, very relaxed trip. On the way back from Grand Rapids today, I noticed a couple of dash gauges acting wonky (that's the technical term) and pulled out my new tablet running techstream to see what it showed - everything was fine according to the OBD port. Passenger noticed some water in the floorboard and said the bottom of the coils were wet - figured it was some water in some wiring, and sure enough as the day cooled and AC ran less, gauges came back.
This was the setup to watch for anomalies:

What phone mount is that?
Gunney, are you a local or a transplant there? You really know your Land Cruiser. Been reading your posts for quite a while.
South African expatriate.
Similar threads
Users who are viewing this thread
Total: 41 (members: 15, guests: 26)