What did you do with your 60 this weekend? (22 Viewers)

This site may earn a commission from merchant affiliate
links, including eBay, Amazon, Skimlinks, and others.

I got mine here, from a MUD member:


Thats where I got mine as well. Painted it with some texture coating and brown paint to match the texture and color of the original center console. My console is pretty sun baked so would look better on one thats not as faded:

IMG_5594.jpg


IMG_5595.jpg
IMG_5596.jpg
 
Starting a mud flap restoration. They're in pretty rough shape. Significant rust that needs to be stabilized, reinforced and coated.

Started by cutting away a lot of rubber to get at the metal with a wire brush before hitting it with rust converter. Plan is to use a light coat (thinned) of JB Weld to stabilize the corroded metal, reinforce with stainless mesh and more JB and then coat the repaired areas with brush-on PlastiDip.

The metal is completely gone on the top mount of one of the fronts, plan to embed a washer in addition to the wire mesh for strength...

IMG_20200703_155513.jpg
IMG_20200702_231226.jpg
IMG_20200702_231206.jpg
 
I got mine here, from a MUD member:


Yep...it is not weighted but rather has two screws you attach to the console in the center of each holder. Perfect for drinks and your phone. I worked with the guy and had him make one that had a larger mouth for larger Yeti cups, but it just didnt work....this one works great for what it was designed for.
 
I figured since I spent $400 on a nice new OEM dash pad, I may as well invest in a new gauge surround too. Since I had to fix wiring issues related to my electric fan that I discovered when servicing my A/C I decided to go ahead and go ham on cleaning up & repairing the dash & gauge wiring and put in the new surround. So much nicer than the 32 y/o original. I was able to snug down the screws without the sound of plastic shattering. Very satisfying to NOT hear that sound when reinstalling a plastic part. Still keeping fingers crossed for a 62 variant of the Trail Tailor aluminum HVAC surround trim....

(the clock and vent had already been swapped over)
Cluster 01.jpg


Cluster 02.jpg


Cluster 03.jpg


Cluster 04.jpg


The small LED next to the check engine light is the indicator for my electric fan controller. When the fan's not running it glows green and as the fan ramps up (it's a variable speed PWM style controller) it will fade from green to yellow to solid red depending on the fan's speed. Also yes I know I still have to get rid of the tranny temp gauge now that I have an H55F behind the engine.
Cluster 05.jpg
 
Adjusted the power steering box I installed a few weeks back. 3/4 inch of free play and it’s dead on perfect now.
Reset the shift point in the trans via a kickdown cable adjustment.
Re-balanced front/rear brake distribution via the LSPV. Had too much rear brake. Much better confidence in stopping now.
AND THE MOST IMPORTANT THING?
Got the rig back from its restoration work. Windows out, doors off repaint. Every panel worked over. Not a ripple, wave or misalignment in sight.

4C907B1A-7C76-44DD-A94F-9A999EC513E5.jpeg


DD0DCD1F-436B-41FA-98B0-B5586E614149.jpeg


414E96B7-0AEC-4665-AC88-FA403B2B5A03.jpeg


25B5A6C0-EF9C-43DA-B240-2C6959D55129.jpeg


C2D4B1CD-2CAD-4E8D-B92A-EC0505AA8DDF.jpeg
 
Since my cruiser is new to me, I did the following:
1. Replaced air filter And fuel filter
2. PM’ed the rear brakes, replaced a sticky piston and flushed the whole brake system, what an improvement!
3. replaced battery terminals, they weren’t crusty, just old and tired
4. Replaced all the windshield wipers.


Adjusted the power steering box I installed a few weeks back. 3/4 inch of free play and it’s dead on perfect now.
Reset the shift point in the trans via a kickdown cable adjustment.
Re-balanced front/rear brake distribution via the LSPV. Had too much rear brake. Much better confidence in stopping now.
AND THE MOST IMPORTANT THING?
Got the rig back from its restoration work. Windows out, doors off repaint. Every panel worked over. Not a ripple, wave or misalignment in sight.

View attachment 2369446

View attachment 2369447

View attachment 2369448

View attachment 2369449

View attachment 2369450
Great looking truck! If you ever find yourself out in the northwest corner of CT, let me know. We have a few fun areas to explore.

cheers, James
 
Since my cruiser is new to me, I did the following:
1. Replaced air filter And fuel filter
2. PM’ed the rear brakes, replaced a sticky piston and flushed the whole brake system, what an improvement!
3. replaced battery terminals, they weren’t crusty, just old and tired
4. Replaced all the windshield wipers.


Great looking truck! If you ever find yourself out in the northwest corner of CT, let me know. We have a few fun areas to explore.

cheers, James
Will do James
Thx
Ben
 
Adjusted the power steering box I installed a few weeks back. 3/4 inch of free play and it’s dead on perfect now.
Reset the shift point in the trans via a kickdown cable adjustment.
Re-balanced front/rear brake distribution via the LSPV. Had too much rear brake. Much better confidence in stopping now.
AND THE MOST IMPORTANT THING?
Got the rig back from its restoration work. Windows out, doors off repaint. Every panel worked over. Not a ripple, wave or misalignment in sight.

View attachment 2369446

View attachment 2369447

View attachment 2369448

View attachment 2369449

View attachment 2369450
refurbished the wheels? re-chromed or just cleaned up?
 
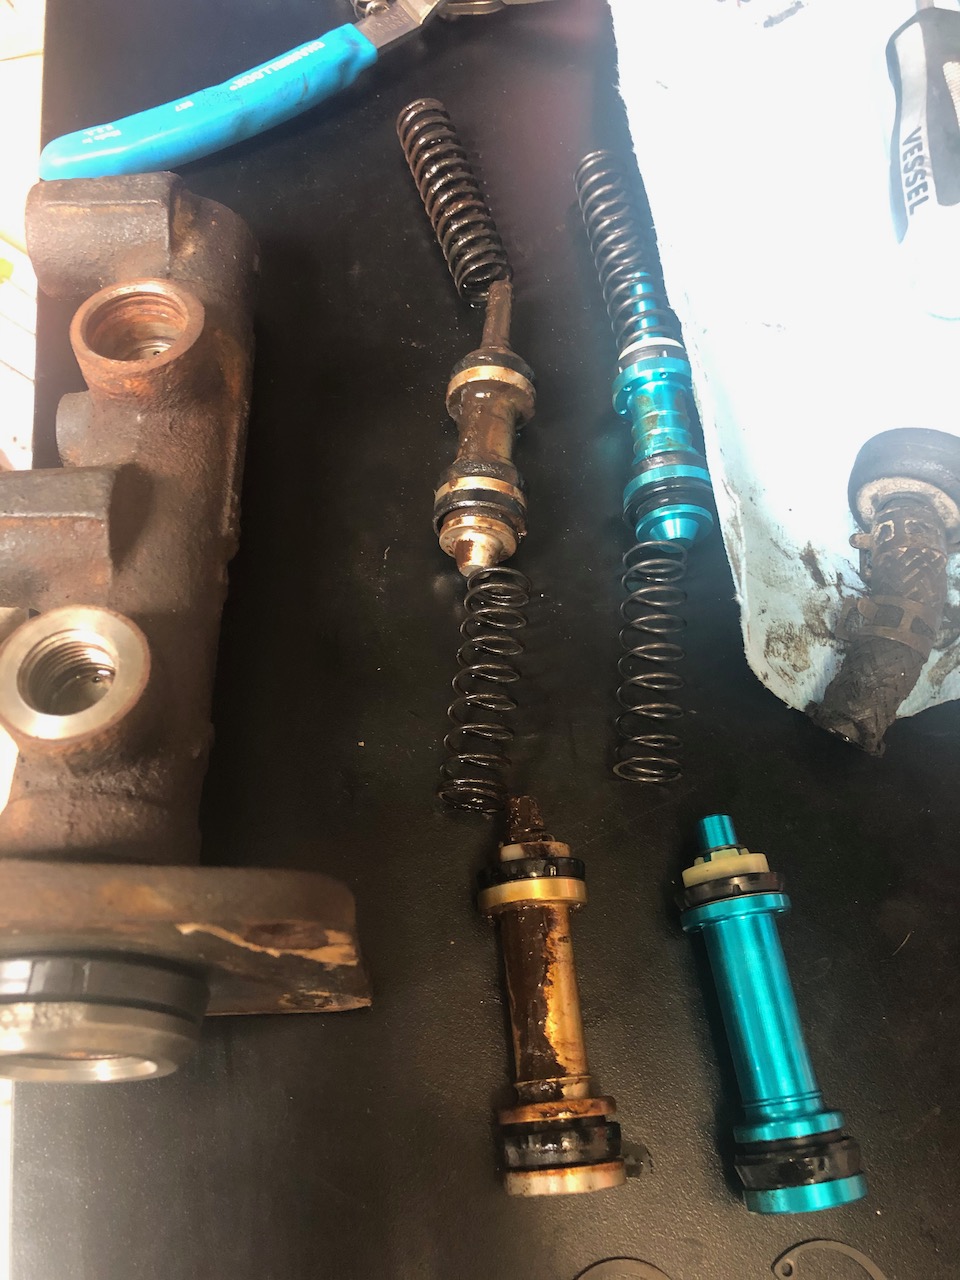
Despite flushing, bleeding, repeating, the brakes on Lefty still felt a bit mushy. So, with some extra time on my hands, I decided to rebuild the master cylinder.

No amount of flushing would get that 35 year old gunk off
rebuiltmaster1.jpeg


Painted the master cylinder with some Toyota gray I had on the shelf, then jammed it in the vice for bench bleeding
rebuiltmaster2.jpeg


Temporarily the shiniest bit under the hood. And good news, the brakes work better!
rebuiltmaster3.jpeg
 
refurbished the wheels? re-chromed or just cleaned up?
Great question. I’m biting this restoration off one step at a time. Next winter I’ll have the wheels ad bumpers re-chromed and I’ll also replace a large part of the exhaust.
as for now, I just cleaned the wheels up and used a paint pen from the craft store to cover up the rust on the rims. It actually works pretty well albeit from 3 feet away 😀
 
Packed up the family for a bit of camping only to have my alternator die on me while on freeway. Fortunately, I was near my parents so I can put the family up (and tow the truck). Unfortunately, I ended up between the #1 lane and a very fast on-ramp.
IMG_1149.JPG

After an ordeal to get an alternator and new battery, was back on the road. Lost a day camping but got more familiar with my FJ62. Slow lane is my friend. Also finding more things to fix/correct from previous owner. List is getting longer each time out but hasn't taken the smile off my face. 😁
The temporary pain lead to beautiful trip at a new to me site.
IMG_8192.JPG

IMG_1139.JPG
 
Installed new hood insulator on the fj62,
Rodents got to the old one..no more holes and the liner hanging down,,
Also reattached hood to rails with seam sealer..
 

Users who are viewing this thread

Back
Top Bottom