Thanks for the offer! I ordered one at my local dealership. Don't have much time to waste on the project and I'm hoping to do it later this week. I'm going to try to remove mine reuse it, then return the new one if I'm successful. If I spend more than an hour or two banging on my old one, I'll just cut my losses and install the new one on the new box.
Navigation
Install the app
How to install the app on iOS
Follow along with the video below to see how to install our site as a web app on your home screen.
Note: This feature may not be available in some browsers.
More options
Style variation
You are using an out of date browser. It may not display this or other websites correctly.
You should upgrade or use an alternative browser.
You should upgrade or use an alternative browser.
Steering box replacement - documented
- Thread starter amagnono
- Start date
This site may earn a commission from merchant affiliate
links, including eBay, Amazon, Skimlinks, and others.
More options
Who Replied?Just finished new steer gear box install. New steer shaft, pitman, and lower u joint too. Only hard part getting the relay rod end from the pitman arm. Used a tie rod/pitman arm puller from autozone. The smaller size one is just small enough at 2 3/8" opening. I left the pitman on the old box so I dont know the true joy of that job. Oh well.
No crows foot needed for the lines. Wrench fits through the wheel well.
No play in the steering, drives straight and no leaks.

No crows foot needed for the lines. Wrench fits through the wheel well.
No play in the steering, drives straight and no leaks.
Last edited:
Great write-up, looking to install my new Redhead box next week. Definitely watch those hoses ending up in the wrong hole. I spent 4 hours trying to get the big one to fit the small hole after accidentally swapping their location during the new hose install. Doh!
I read somewhere on the forum that removing the pitman arm is easier if you put tension on it with a puller (I'm using this one heavily recommended on Mud: Amazon product ASIN B00061SMS0) then smacking the arm where it mates to the gearbox a few times with a 3lb sledge then proceeding to finishing the pulling process. Reports are it pops off with little effort ordrama this way. I suppose it's like smacking the cone nuts on the hubs to dislodge the fit. Going to try it regardless. Installing my new HD Marlin drag links and TRE's too. Should be fun!
I read somewhere on the forum that removing the pitman arm is easier if you put tension on it with a puller (I'm using this one heavily recommended on Mud: Amazon product ASIN B00061SMS0) then smacking the arm where it mates to the gearbox a few times with a 3lb sledge then proceeding to finishing the pulling process. Reports are it pops off with little effort ordrama this way. I suppose it's like smacking the cone nuts on the hubs to dislodge the fit. Going to try it regardless. Installing my new HD Marlin drag links and TRE's too. Should be fun!
Great write-up, looking to install my new Redhead box next week. Definitely watch those hoses ending up in the wrong hole. I spent 4 hours trying to get the big one to fit the small hole after accidentally swapping their location during the new hose install. Doh!
I read somewhere on the forum that removing the pitman arm is easier if you install and tighten the puller (I'm using this one heavily recommended on Mud: Amazon product ASIN B00061SMS0) then smack the center bolt on the puller. Usually a couple good smacks with a 2# hammer then tighten 1/4 turn and repeat. It should pop off on the 2nd attempt. Do NOT HIT THE PITMAN ARM. You can bend the sector shaft or screw up the seals. Also, don't use heat, that can fry the seals (not sure that matters on an old box but...)
Installing my new HD Marlin drag links and TRE's too. Should be fun!
Thank you @amagnono . This made life so much easier. It was time to replace rubber cover in wheel wheel do those came off. Changed oil , so filter was removed during the steering box rebuild and upgrade via redhead steering in Washington. I also removed the battery box and had all kinds of room and highly recommend. Even washed the battery box while I waited on steering box to come back. Having it out the way made replacing the steering pump easy as well as firewall seal. The new steering is absolutely unbelievable. Hope this info helps someone as a way of thanking y’all who post to help us all .


- Thread starter
- #27
ATF is what you want. Not PS fluid. Check OEM recommendation.Curious to know, why do you suggest ATF rather than power steering fluid? I didn't see any comments on that and I'm in the process of doing this job currently. I don't want to end up adding the wrong fluid. TIA!
brettk
SILVER Star
ATF is what you want. Not PS fluid. Check OEM recommendation.
...or you can check the cap on the power steering reservoir. Type IV.
Thank you @amagnono . This made life so much easier. It was time to replace rubber cover in wheel wheel do those came off. Changed oil , so filter was removed during the steering box rebuild and upgrade via redhead steering in Washington. I also removed the battery box and had all kinds of room and highly recommend. Even washed the battery box while I waited on steering box to come back. Having it out the way made replacing the steering pump easy as well as firewall seal. The new steering is absolutely unbelievable. Hope this info helps someone as a way of thanking y’all who post to help us all .
View attachment 2418470
View attachment 2418471
View attachment 2418472
View attachment 2418473
View attachment 2418474
No issues with pre-load...was it a night and day difference?
I just received a redhead box with the upgraded sector shaft. Hoping all goes well on the first try.
I wanted to chime in on this thread as I just completed the replacement on my steering box as well. This thread was helpful, and I sourced my box from RedHead Steering. I replaced the high and low pressure lines while I was at it, as well as the power steering pump. The truck truly drives night and day difference. I'm very happy that I did this. I also didn't need the crows feet for the lines, as wrenches fit through the wheel well just fine. Thanks for all the help this forum provides, it is truly an asset!
-Andy
-Andy
Absolutely!!! It was easy to do in my driveway. Removing battery/box made a HUGE difference in access. I took off the rubber flaps in wheel well too. Zero play in steering is a joyNo issues with pre-load...was it a night and day difference?
I just received a redhead box with the upgraded sector shaft. Hoping all goes well on the first try.
")
mingles
GOLD Star
After having the parts on my shelf for nearly three years, I finally decided to tackle replacing my steering gear this past week. New OEM pump, new OEM box, all new hoses , and new reservoir. No more "active driving" to keep it going straight down the road on uneven pavement . Thanks to the OP, the other posters in this thread, and @jonheld for his tip on just starting the motor briefly and bleeding the system that way. Other than the paperclip, my system was totally dry and I was not able to bleed with just turning the wheel lock to lock with the engine off.
I sourced my new OEM box from Partsouq. It was $1300 then, and looks to be about $1600 now. Still less than half of what you can get it for here in the States. If you go this route, be sure to get the new matching Pitman arm, as your original one wont fit. (Box 44110-60212 needs Pitman arm 45411-60360)
PartSouq Auto Parts Around the World - https://partsouq.com/en/catalog/genuine/unit?c=Lexus&ssd=%24%2AKwFeantmOFUcUgohUht2AwYSMjUrWlVYWUtVZxdPHklWTzBKGRlETldYFhIYAwx1QAUPBA5JVl9GSlNSQ05XSF9ZXV9KGRlOAk9QSSEuIVkBCWZOEBQdBQkqExdYRE5XSklbVFhcAQsFQE1IAhhPUEgXa2Y-LCdJQE1IBVYZHUxPLDEmVVokGHxpPCohKk5BSkpDWAVWTQQeAAFGSBddTghPUEtdEAAAAABcxL4d%24&vid=0&cid=2&uid=353188&q=


. Thanks to the OP, the other posters in this thread, and @jonheld for his tip on just starting the motor briefly and bleeding the system that way. Other than the paperclip, my system was totally dry and I was not able to bleed with just turning the wheel lock to lock with the engine off.I sourced my new OEM box from Partsouq. It was $1300 then, and looks to be about $1600 now. Still less than half of what you can get it for here in the States. If you go this route, be sure to get the new matching Pitman arm, as your original one wont fit. (Box 44110-60212 needs Pitman arm 45411-60360)
PartSouq Auto Parts Around the World - https://partsouq.com/en/catalog/genuine/unit?c=Lexus&ssd=%24%2AKwFeantmOFUcUgohUht2AwYSMjUrWlVYWUtVZxdPHklWTzBKGRlETldYFhIYAwx1QAUPBA5JVl9GSlNSQ05XSF9ZXV9KGRlOAk9QSSEuIVkBCWZOEBQdBQkqExdYRE5XSklbVFhcAQsFQE1IAhhPUEgXa2Y-LCdJQE1IBVYZHUxPLDEmVVokGHxpPCohKk5BSkpDWAVWTQQeAAFGSBddTghPUEtdEAAAAABcxL4d%24&vid=0&cid=2&uid=353188&q=
So I have an LS, 5.3l vortec. Do you think I should use ATF also? My gear box is leaking and am about to remove it for rebuild. Have been using PS fluid.
brettk
SILVER Star
I imagine it being the same, but I’m no engineer. I just do what Mr T tells me too.So I have an LS, 5.3l vortec. Do you think I should use ATF also? My gear box is leaking and am about to remove it for rebuild. Have been using PS fluid.
This might be a stupid question. Aside from the Pitman arm, is the gearbox the same on RHD or LHD models?Okay boys,
I've recently worked through changing out my power steering box and I wanted to post the process here. I can say that this swap made an incredible difference in eliminating slop in the steering wheel for my rig. It went from being genuinely terrifying at highway speeds to feeling like a brand new car.
[Now with Pics!]
First, below are the tools you'll need to make this happen:
- Five feet or more of clear >=3/8" inner diameter (ID) plastic tubing (to help draining without a terrible mess) - I used 1/2" ID hose as that is what I had lying around
- Plastic tubing coupler 3/8" (ID of PS drain hose) to X" (ID of your hose - 1/2" in my case)
- Assorted sockets and socket wrench
- Long socket extension
- 17mm crow foot adapter (for getting PS hoses off and on the steering box)
- Breaker bar (for getting steering box bolts loosened)
- Tie rod end puller (for disconnecting drag link from pitman arm)
- 1 Gallon Automatic Transmission Fluid (I didn't need a full gallon but I got it just in case)
- 1 German aircraft mechanic's jump suit - best $25 I've spent on keeping me and my clothes clean on these projects!
Step 1 - Prep the truck
Step 2 - Drain the power steering system
- Jack up front end on Jack stands (don't trust your life to an O-ring by just using a jack!) and chock the rear tires.
- Center the front wheels with the steering wheel
- Lock steering wheel by turning off ignition and removing key
- Remove the left wheel to gain access to the box and pitman arm
(may not be necessary but I did to minimize the mess)
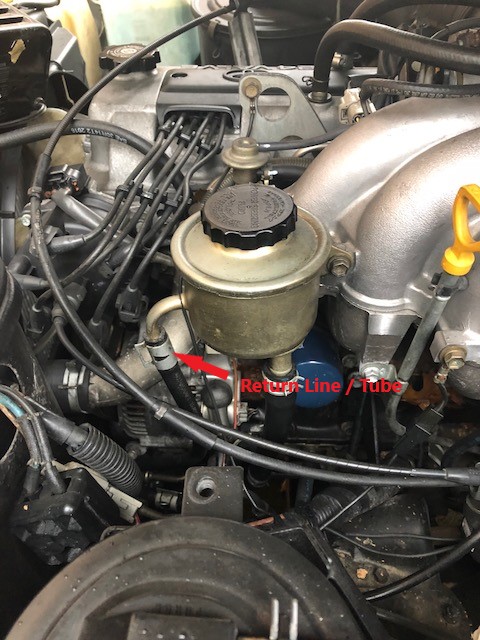
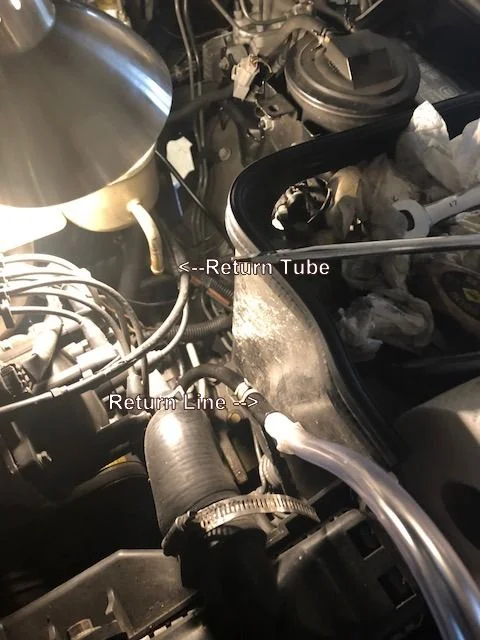
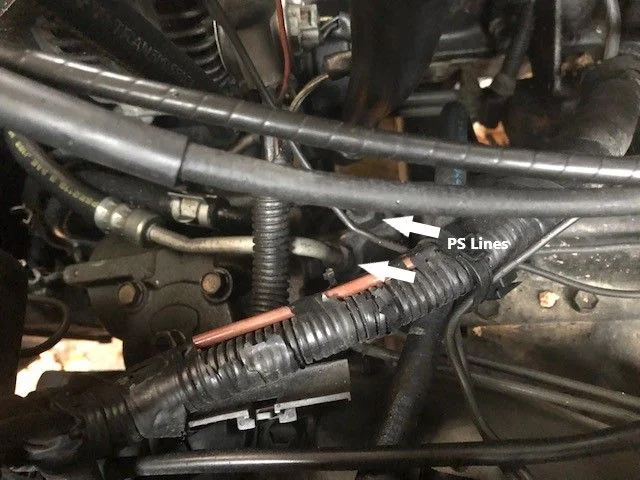
- From within the engine bay remove the hose clamp and disconnect the return line (it's the smaller line on the side that attaches to the downward facing bent, metal tube - not the large one on the bottom of the reservoir) from the power steering reservoir and allow reservoir to drain into cup. I also set some towels down underneath the catch the inevitable overflow.
- Attach your drain line hose (1/2" ID in my case) to the plastic coupler and then to the return line (3/8" ID). Place other end of drain hose in bucket or whatever you want to catch fluid in.
Step 3 - Remove old gear box
- With the key turned to the on position but the truck not running begin turning the wheel fully left and right. This will force the PS fluid out of the system, down your drain line and into the bucket
- Once system is drained, you can move on to removing the gear box
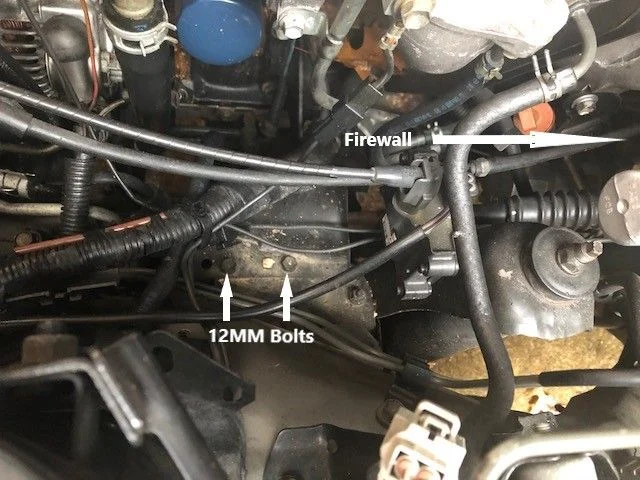
- From the top of the engine looking down at the gear box (just beneath and behind battery on right side of bay), you'll see a small black cover held in place by (2) 12mm bolts. Remove these and the metal cover. This will expose the universal joint that connects the steering shaft to the gear box.
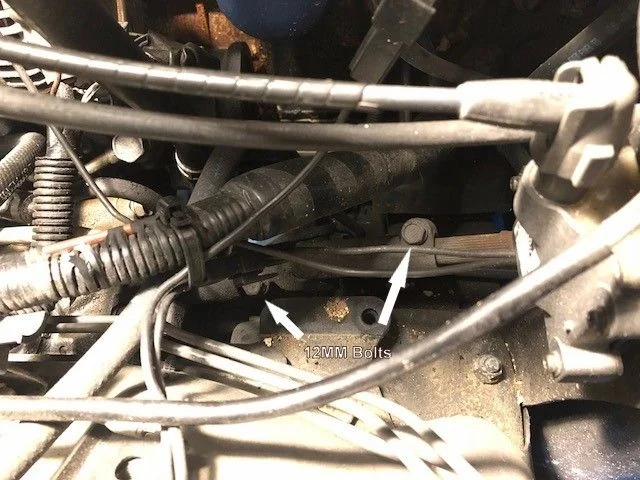
- There are (2) 12mm bolts on the universal joint that need to be loosened and removed (just loosening is not enough). Note that you will need a rather long socket extension to get to these bolts.
- After removing the two bolts, work the universal joint up the steering shaft toward the firewall, disconnecting it from the gear box. You may want to hit it with a little penetrating oil to help this process go a bit more smoothly.
- Next, using the socket extension and crow foot adapter, loosen and remove the two PS lines running into the top of the gear box. Make sure to fully remove the lines as they set fairly deeply into the box.
- From the underside of the gearbox, remove the cotter pin and castle nut that hold the drag link to the pitman arm.
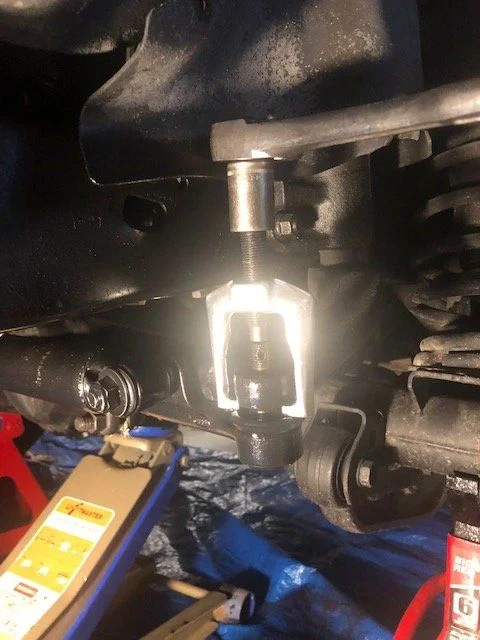
- Using the tie rod end puller, disconnect the drag link from the pitman arm
So, at this point you may need to disconnect the pitman from the box. Fortunately for me, my new box came with a new arm already centered (though not tightened) and I didn't have to mess with that little bundle of joy.
- At this point, it you need to remove the pitman arm from the box, you will want to loosen the retaining nut prior to removing the box from the frame. This will likely require a breaker bar.
- Next, using a socket wrench or breaker bar, loosen all 4 nuts attaching steering box to the frame - note that there are bolt heads on the opposite side of the frame member that you will need to hold with an open faced wrench in order to fully loosen the bolts
- At this point, CAREFULLY remove the VERY HEAVY steering box from the frame. I don't recommend doing this while lying down under the truck. The box would do some serious f'ing rearranging of your face if it falls on you. Also, as mentioned above, make sure that the PS lines are fully removed at the top before pulling the box. They set down into the box fairly deep and will catch if not fully removed.
If you need to remove the pitman arm, you should be able to do so with a tie rod end puller. If you need more instructions, there are several posts here on the forum that provide guidance on that portion and the manual seems to indicate that there are alignment marks for centering the arm to the box on re-installation. You can also use your old box as a guide for how the arm needs to be aligned.
The arm should be tightened to 130 ft lb.
**I'm open to any additional information here to flesh out this section.
Step 4 - Install new box
- Carefully install the new box onto the 4 bolts on the frame.
- Using an open face wrench and a torque wrench, tighten the 4 bolts down to 105 ft-lb
- Attach the drag link to the pitman arm with the castle nut and torque wrench. The book says 67 ft-lb but I just got as close as possible while making sure that the hole lined up with the nut in order to get the cotter pin inserted. At exactly 67 ft-lb the hole wasn't quite aligned. Use your best judgement here.
- Insert and secure cotter pin
- Install PS lines with crow foot adapter, making sure to get correct line in correct hole (it's fairly obvious but double check to be safe). Tighten to 33 ft-lb.
- With your steering wheel centered (which it should be from beginning of this process), slide the universal joint down onto the steering box linkage.
- Insert and finger-tighten universal joint bolts and tighten with torque wrench to 25 ft-lb. Note here that the universal joint may need to be wiggled a bit up and down the shaft to get the bolts to align. I didn't do this and tore the threads up on the bolts and had to order new ones.
- Reinstall the universal joint cover with the (2) 12mm bolts. Not entirely sure on ft-lb here. It maybe 9 ft-lb if I'm reading manual correctly but I'm not sure on this. I just got it "tight" by hand with socket wrench.
Step 5 - Install new fluid and bleed the system
- With the return line still connected to the drain hose via the coupler, make sure that the return tube (the downward facing tube coming from reservoir) is sealed up. I used a little rubber stopper but you could probably use a variety of things (tape, etc) - open to other suggestions here.
- Fill the PS reservoir to the top with automatic transmission fluid (not PS fluid!)
- With the truck in the on position but the engine NOT RUNNING, have someone turn the wheel from stop to stop as you add fluid to the reservoir. This can be done alone - but just f'ing ask someone to turn the wheel. It makes life so much easier!
- This will pull fluid from the reservoir and ultimately out the return line. Note that I used a little suction at first on the drain line to get the fluid going (using vacuum pump) but I'm not sure that is really necessary. Turning the wheel should create enough suction to make it all happen.
- Once you have clear (clear-red that is) ATF running into drain line you can disconnect the return line from your coupler and drain line and reconnect the return line to the return tube. This takes a little jostling as you remove the plug from the tube and reconnect the line. Some fluid is bound to spill but do your best. Make sure to reattach the hose clamp.
- Continue bleeding the system by turning the wheel from stop to stop with the engine OFF, adding ATF as necessary.
- Once you have things looking good, start the engine and see how it goes. The first time I started then engine, the pump made a lot of cavitation noises (squealing). I let it run for a second and then turned it off and went back to bleeding for another few minutes. The next time I started it, it ran perfectly.
- Continue to check your PS levels and inspect system for leaks.
At this point, hopefully you have a fully-functional, new steering box. For me, it made a huge difference in the steering responsiveness.
Again, let me know if I've missed anything or if anyone has any suggestions for improvement.
Good luck!
I am also curious since I own a RHD that could use a new gearbox.This might be a stupid question. Aside from the Pitman arm, is the gearbox the same on RHD or LHD models?
Where might I source one living in the States?
I stuffed up a little,
I took my title rod off then moved the steering wheel to drain the system.
I think I returned back to Center but it was an afterthought…
So I’ll be out of alignment for the steering box.
Will the easiest way be to reconnect the uni, Center the steering box to my tie rod. Then either reconnect uni, or remove steering wheel and recenter steering wheel?
Appreciate the feedback!
NorCalFJ100
SILVER Star
Great write up here OP. This was much quicker than I thought it would be. I got everything put back together and the drag link doesn't align with the new pitman arm. I replaced my box with a brand new OEM and corresponding 105 arm. Installed it on the center point. I also made sure to keep the uni joint on the steering wheel linkage centered.
I know there's a center point in the steering box and I'd like to make sure I keep that in tolerance. I didn't know if I should move the steering wheel or adjust the drag link.


I know there's a center point in the steering box and I'd like to make sure I keep that in tolerance. I didn't know if I should move the steering wheel or adjust the drag link.
Similar threads
Users who are viewing this thread
Total: 1 (members: 0, guests: 1)