
I think the hardest part is Putin the piston back in without Fing up the teflon seal. The freezer is your friend.I think I'm going to give it a shot myself...did a 6 speed transmission swap on my Audi RS6, so this can't be that bad, right?
Here's a great thread on it...
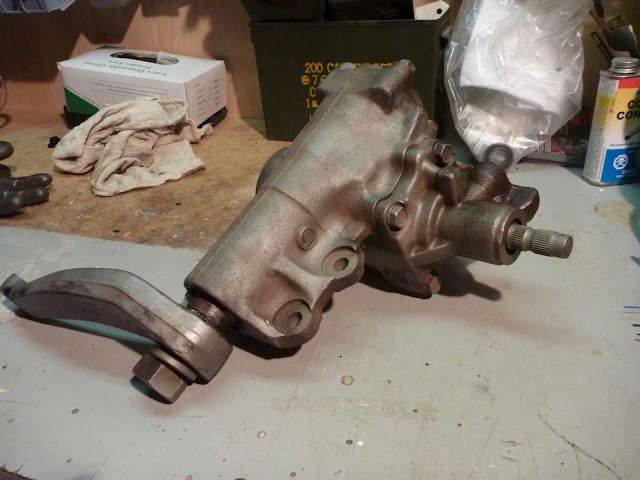
Steering gear box rebuild
This is the second time I’ve seen the inside of an 80 series gearbox. I bought a used box this summer and rebuilt it with the help of a good friend and Lexus mechanic. Then we swapped it onto the truck in place of the original box, which was leaking from the input seal. Unfortunately, I managed...forum.ih8mud.com
-
North American Clubhouses - East RegionCA.ON- SOTEC CA.ON- Upper Canada Land Cruisers CA.QC- Club TORQ CA.QC- Quebec Cruisers AL- DixieLand Cruisers AL- Hot South Cruisers FL- Florida Land Cruiser Association FL- Northwest Florida Toyota 4WD FL- Tampa Bay Land Cruiser Association GA- Pavement Pounders GA- Georgia Cruisers GA/FL/AL- Red Hills Land Cruiser Club GA- YOTA IL- Windy City Land Cruisers IN- Hoosier Cruisers IN- Indiana Land Cruisers KY- Kentucky Landcruiser MA/NH- Yankee Toys MI- Lake Michigan Land Cruisers MS- CottonLand Cruisers NC- Olde North State Cruisers NJ- Garden State Land Cruisers NY/CT/MA- FJNortheasters NY- Gotham City Land Cruisers OH- The Buckeye Birfield Syndicate PA- Keystone Cruisers PA- Steel City Land Cruiser Club SC: Land Cruisers: Charleston SC- Palmetto State Land Cruiser Association SC- Upstate Cruisers SC- Swamp Fox Land Cruisers SC- Low Country Land Cruisers TN- Appalachia Cruisers TN- Bluff City Cruisers TN- STLCA VA- Bay to Blue Ridge Cruisers VA- COVA CRUISERS VA/DC/MD- Capital Land Cruiser Club VA/NC- Mid-Atlantic TLCA VA- Star City Land Cruisers VT/NH/MA/ME Acadian Overlanders WI- Land Cruiser Legends WV- Mountaineer Cruisers
-
North American Clubhouses - Central RegionCA.AB- Oil Country Cruisers CA.AB- Rocky Mountain Land Cruiser Association CA.AB- Toyota Ghost Wheelers AR- Razorback Land Cruisers AR/MO- Ozark Mountain Cruisers CO- BookCliff Cruisers CO- Colorado Land Cruisers CO- Derailed Cruisers CO- Rising Sun 4WD Club CO/WY- Horsetooth 4 Wheelers Cruiser Club IA- Tall Corn Cruisers KS/MO- Tornado Alley Cruisers LA- Bayou State Land Cruisers LA- Louisiana Land Krewesers MO- Gateway Cruisers MT- 406 Cruisers MT- Big Sky Cruisers NE- Flat Land Cruisers NM- High Desert Cruisers OK- Green Country Cruisers SD- Dakota Territory Cruisers TX- Alamo City Land Cruisers TX- Bayou City Land Cruisers TX- Lone Star Land Cruisers TX- Lone Star Land Cruisers - Austin Chapter TX- The White Trash of the Elwood Chapter TX- Toyota Trail Riders
-
North American Clubhouses - West RegionCA.BC- Coastal Cruisers CA.BC- Okanagan-Similkameen Land Cruisers CA.BC- Peace Canyon Toyota Swamp Donkeys CA.BC- Calgary Chapter: Swamp Donkeys
CA.BC- Vancouver Island Cruisers AZ- Copper State Cruisers CA- Beach-n-Toys CA- Central Coast Land Cruisers CA- Central Valley Crawlers CA- Gold Country Cruisers CA- Inland Empire Cruisers CA- L.A. County Trailcrew CA- Mountain Transit Authority CA- Pacific Mountain Cruisers CA- San Diego Cruisers CA - Santa Cruz Land Cruisers CA- SoCal 80's CA- Southern California Land Cruisers CA- Toyotally Awesome Cruisers HI- Hawaiian Island Land Cruisers ID- Treasure Valley Land Cruisers NV- Battle Born Cruisers of Northern Nevada NV- Southern Nevada Land Cruisers OR/CA- Jefferson State Cruisers OR- Cascade Cruisers OR- Central Oregon Cruisers OR- Portland Metro Cruisers UT- Red Rock Cruiser Club UT- Wasatch Cruisers WA- Central Washington Cruisers WA- North Sound Cruisers WA- South Sound Cruisers WA- Spokane Land Cruisers
Navigation
Install the app
How to install the app on iOS
Follow along with the video below to see how to install our site as a web app on your home screen.
Note: This feature may not be available in some browsers.
More options
Style variation
You are using an out of date browser. It may not display this or other websites correctly.
You should upgrade or use an alternative browser.
You should upgrade or use an alternative browser.
Pretty quiet in here... what are you working on?
- Thread starter Stumpalama
- Start date
This site may earn a commission from merchant affiliate
links, including eBay, Amazon, Skimlinks, and others.
CrabCake
SILVER Star
Good thoughts...since I don't have any leaks now, wondering if I could get away with just the selector shaft without rebuilding the entire box. Or I may just grab a spare and do it at my leisure without feeling the pinch if there is an issue. OP of the rebuild thread mentioned having a second set of rebuild gasket/o-ring parts, so I did get a spare for an extra $20. One pinched o-ring or scratched teflon seal and I could see getting held up. Having a spare to just bolt in would also shorten the down time so I could focus on the gusset welding, making the project as a whole a little less daunting by splitting up....I think the hardest part is Putin the piston back in without Fing up the teflon seal. The freezer is your friend.
Finally got a couple hours to work in the power steering pump relocation. As mentioned, I dropped the assembled pump so had to order a new pump and pulley for it. For some reason it took a couple weeks to get a new pump shipped.
This is the @65swb45 bracket for power steering pump that essentially replicates the smog pump mount but for a "canned ham" P Series GM Power steering pump. The adjustment arm mounts to a water pump bolt. All in all it is very clean, and a unique product. Note that although marketed as made for application, this mount required substantial modification mount to get a pump on it, and give the pump enough pivot distance. I also had to use spacers and a much longer bolt than included with the kit to locate the pivot arm properly.
Dorman press-on pulley P/N 300-122 seemed to be the best fit, as is moved the belt far enough back so as not to run out of "travel" between the mount bracket ears.
I found that this mount put the PS pulley so close to crank (not a bad thing IMO, saves a lot of space) that I did not get much belt wrap on the PS pulley routing it PS pump -> Water Pump -> Balancer. I had a lot of belt squeal problems with my old system with a similar amount of wrap so got a shorter belt and routed only PS Pump -> Balancer.
This leaves only the main belt on the water pump, and not a lot of wrap on it. Assuming this should be fine as the WP is a low resistance accessory?
I would recommend getting 2 seal kits and getting another box to do it at your leisure is a solid plan. I cut my teflon seal and had to wait for a second kit to finish. On my scout box.Good thoughts...since I don't have any leaks now, wondering if I could get away with just the selector shaft without rebuilding the entire box. Or I may just grab a spare and do it at my leisure without feeling the pinch if there is an issue. OP of the rebuild thread mentioned having a second set of rebuild gasket/o-ring parts, so I did get a spare for an extra $20. One pinched o-ring or scratched teflon seal and I could see getting held up. Having a spare to just bolt in would also shorten the down time so I could focus on the gusset welding, making the project as a whole a little less daunting by splitting up....
Is anyone interested in doing some work for cash?
Somehow (corrosion) my tie rod just snapped…wtf. Thankfully just when pulling into my garage when my FIL was driving.
Could easily do this myself but completely useless now with my bum arm. Had my first physical therapy session this morning.
If not I’ll hit up @aylestock
 forum.ih8mud.com

Somehow (corrosion) my tie rod just snapped…wtf. Thankfully just when pulling into my garage when my FIL was driving.
Could easily do this myself but completely useless now with my bum arm. Had my first physical therapy session this morning.
If not I’ll hit up @aylestock
Broken Tie Rod (not the link)
Ever see this before? I’ve heard of bending the tie rod but not it breaking like this. Looks like it napped right where the link ends. Thank goodness this happened when pulling into my garage but so bizarre. Who makes the best replacement rod kit? Might as well upgrade but I don’t need...
forum.ih8mud.com
Forgot to say…..check yer rods fellows. 
Not automotive, but I need help, lol. The shower has a triple knob setup. The center knob, the diverter cartridge is leaking like a mofo back into the wall and down into the laundry room when turned to tub-filling mode. Usually these cartridges have a six-sided nut section that you can use a shower valve socket (mine came in a pack of six) to unscrew the cartridge.
Of course mine is different. In the photo you can see that the six-sided section is tight to the inner pipe wall…wtf is that about?!? I verified by looking at another shower and that one is a regular model that one of the sockets fits on. This one is just a round shaft until the very back and then…there is no way to get a socket onto it, there isn’t enough room. How in the #### did it get screwed in? And how do I remove it? Is there a super special socket with 6 extended teeth that “reach” into those slots? This has me stumped.

Of course mine is different. In the photo you can see that the six-sided section is tight to the inner pipe wall…wtf is that about?!? I verified by looking at another shower and that one is a regular model that one of the sockets fits on. This one is just a round shaft until the very back and then…there is no way to get a socket onto it, there isn’t enough room. How in the #### did it get screwed in? And how do I remove it? Is there a super special socket with 6 extended teeth that “reach” into those slots? This has me stumped.
@kevin in okinawa Perhaps the tube is just pressed into the hole? Or does the nut actually clamp down onto it? It's difficult for my eyes to tell in the pic.
Do you have access to the fitting from the wall behind it? There is often an access panel if the other side is in a closet, but just as often you'll have to cut a hole for access back there. It's just kind of expected.
Do you have access to the fitting from the wall behind it? There is often an access panel if the other side is in a closet, but just as often you'll have to cut a hole for access back there. It's just kind of expected.
@JohnVeeno access. It’s this type of setup with standard-looking pipe coming from the main water line…I'm certain that it’s threaded in.

I'd say 99.9% chance that the chrome trim piece is also threaded into the valve body and needs to be unscrewed to replace the cartridge. Thats how the one in my1930s rental house went together and it looked very similar to that. In my experience though, if old stuff like that doesn't like to come apart, you're going to have problems when it goes back together. If you have access from the back it may be better to just replace the entire thing.
you need a cartridge or a stem tool... they look like long thin walled sockets but they will slide down the rod onto the fitting... you can get different sixes and lengths.. plus you can get extensions to make them longer as well

 www.harborfreight.com
Shower Valve Socket Wrench Set
Amazing deals on this Shower Valve Socket Wrench Set at Harbor Freight. Quality tools & low prices.
CrabCake
SILVER Star
Yeah, unfortunately I had to cut a big hole for mine as the 25+ year old valve that I installed way back when was corroded and leaking...tool wouldn't budge it. Mine was on the hot water valve, but same thing basically...ended up putting in a single handle center unit for now and need to re-do the whole shower and really bathroom at this point. Was my first home project about 26 years ago, so I can't really complain.you need a cartridge or a stem tool... they look like long thin walled sockets but they will slide down the rod onto the fitting... you can get different sixes and lengths.. plus you can get extensions to make them longer as well
Shower Valve Socket Wrench Set
Amazing deals on this Shower Valve Socket Wrench Set at Harbor Freight. Quality tools & low prices.
Timely topic... I replaced the anode rod in my water heater today. Shoulda been done many years ago. There was literally nothing connected to the cap.
State (AO Smith) buries the access to the rod under 2-3" of solid foam. What a pain in the ass to get it cleaned through a small port out so no debris falls into the tank.
If you haven't replaced yours in the past couple of years, get on it.
State (AO Smith) buries the access to the rod under 2-3" of solid foam. What a pain in the ass to get it cleaned through a small port out so no debris falls into the tank.
If you haven't replaced yours in the past couple of years, get on it.
@kevin in okinawa What the Captain and Svennille said above ^^^. Just be warned that any tampering can literally unleash a flood of problems. Both because you might not have a device shut off and you might just be opening a can of worms beyond what's already known. The hardest part of plumbing is gaining enough access to do what's needed and then fixing the damage done while doing what's needed. Having the right tools makes the job way more better.
If you can, you might want to find where the hot and cold lines can be accessed easily and install shut offs on each line before doing any work if they're not already there. They might come from the sink or they might feed the sink from the shower. Ideally, they'll be in a dropped ceiling underneath or in an unfinished basement or crawlspace.
PTF (push to fit/Sharkbite) fittings and PEX make plumbing almost easy nowadays. Copper line can also be used with PTF. I'm not sure if code allows PTF to be used inside walls in the DMV area but that should be easy to find out. I've had zero issues with any of my PTF's in the 7 years I've had them installed (but I feared it for the first few years). Having access via dropped ceilings or crawlspace to every water line to every fitting, I also put 90* ball valve shutoffs everywhere because of issues that some of my 55-year old connections had developed prior to buying the place.
Main water shutoff valve in basement doesn't anymore. Anyone ever tried to replace theirs? I know a special long shaft t-handle with socket is needed to shut off water going into house. Wish I knew a plumber in Rockville for this...
my plumber's socket is not enough for the one cartridge; it is skipping/rounding off because the thing is "stuck" frozen on the threads it seems (I'm looking for a stronger 5/8" deep socket). The original diverter doesn't respond to any of the sockets that I can get in there. It's hard to tell from the photo but I can eyeball that there is essentially no space around the six-sided section. FML. I may need to just live with the other-than-ideal up plumbing until I'm ready to replace the entire shower it seems.Yeah, unfortunately I had to cut a big hole for mine as the 25+ year old valve that I installed way back when was corroded and leaking...tool wouldn't budge it. Mine was on the hot water valve, but same thing basically...ended up putting in a single handle center unit for now and need to re-do the whole shower and really bathroom at this point. Was my first home project about 26 years ago, so I can't really
my plumber's socket is not enough for the one cartridge; it is skipping/rounding off because the thing is "stuck" frozen on the threads it seems (I'm looking for a stronger 5/8" deep socket). The original diverter doesn't respond to any of the sockets that I can get in there. It's hard to tell from the photo but I can eyeball that there is essentially no space around the six-sided section. FML. I may need to just live with the other-than-ideal up plumbing until I'm ready to replace the entire shower it seems.
Like I said earlier if you can open up a bit of drywall and get to the backside of the valve, you can replace the entire thing with a single handle. They make single shower valves with big oval trim that will cover all three holes. I ended up using something like this so I didnt need to mess with the tile in the shower. Doesn't look the best but its easier than the alternative
Yes, there should be a shut off valve in your front yard at the water meter that you might need the long T-handle wrench for. You might also just be able to use a pair of pliers if the valve isn't too deep or too stuck. Be warned that you probably don't own that outdoor fixture (the water utility should) and you're gonna be screwed if you break it. If you have any doubt, hire a licensed pro.Main water shutoff valve in basement doesn't anymore. Anyone ever tried to replace theirs? I know a special long shaft t-handle with socket is needed to shut off water going into house. Wish I knew a plumber in Rockville for this...
The gate valve in your basement can possibly be rebuilt depending on the reason it doesn't fully close anymore. You'll still need to kill the water at the street first.
A full flow ball valve (has a 90* lever instead of a round handle) can be swapped in for the old gate valve. You can research the differences in the two and decide for yourself. Personally, while I generally like PTF fittings, I would lean towards a traditional, sweated connection for a main shut off since the fallout from a failure can be catastrophic. You will need to consider the type of existing valve, access, how much play you have in the main line*, and the size (length, not just correct diameter - see *play) and type of the replacement. You'll also need to know how to correctly sweat a fitting and do it safely around wooden structure! If you have any doubt, hire a pro.
This should be the kind of job where you'll be pissed at having to pay for such a fast visit from a pro but peace of mind is worth something, too. Reading back over this, I'm sorry if it seems that I'm implying you can't do this. If you're the kind of guy that Murphy never calls the law on then you can easily handle this. But if your headlights stopped working after you checked your tire pressure........

Thanks, but I know all that. I was kinda hoping someone knew a reasonably priced plumber in my area.Yes, there should be a shut off valve in your front yard at the water meter that you might need the long T-handle wrench for. You might also just be able to use a pair of pliers if the valve isn't too deep or too stuck. Be warned that you probably don't own that outdoor fixture (the water utility should) and you're gonna be screwed if you break it. If you have any doubt, hire a licensed pro.
The gate valve in your basement can possibly be rebuilt depending on the reason it doesn't fully close anymore. You'll still need to kill the water at the street first.
A full flow ball valve (has a 90* lever instead of a round handle) can be swapped in for the old gate valve. You can research the differences in the two and decide for yourself. Personally, while I generally like PTF fittings, I would lean towards a traditional, sweated connection for a main shut off since the fallout from a failure can be catastrophic. You will need to consider the type of existing valve, access, how much play you have in the main line*, and the size (length, not just correct diameter - see *play) and type of the replacement. You'll also need to know how to correctly sweat a fitting and do it safely around wooden structure! If you have any doubt, hire a pro.
This should be the kind of job where you'll be pissed at having to pay for such a fast visit from a pro but peace of mind is worth something, too. Reading back over this, I'm sorry if it seems that I'm implying you can't do this. If you're the kind of guy that Murphy never calls the law on then you can easily handle this. But if your headlights stopped working after you checked your tire pressure........