lookin good....i wish i could be done in a month
Navigation
Install the app
How to install the app on iOS
Follow along with the video below to see how to install our site as a web app on your home screen.
Note: This feature may not be available in some browsers.
More options
Style variation
You are using an out of date browser. It may not display this or other websites correctly.
You should upgrade or use an alternative browser.
You should upgrade or use an alternative browser.
Builds Keeping it low with Rockwells (a.k.a. under the knife again)
- Thread starter Eskimo
- Start date
This site may earn a commission from merchant affiliate
links, including eBay, Amazon, Skimlinks, and others.
More options
Who Replied?Eskimo
SILVER Star
- Thread starter
- #142
Newbie Question on the Rockwell Brakes, Why did you opt for the Brakes at each corner rather than the pinion style brakes that Proffits runs, i think that they run a stock toyota rotor and Caliper, just one per axle.. I was talking with them in moab and he said that sucker would put him thru the windshield if he layed on the brakes!
And it will do that...once. pinion brakes are fine for a trail-only rig. Wheel brakes up front gave me room that I wouldn't otherwise have, and let me keep it low. Also, with a locker in the front, the braking will be smoother.
Plus, there are times when I'll putt around town with it, and I don't want the brakes overheating.
Oh, and since most guys run hubs in, they can't run wheel brakes even if they wanted. I'm hubs out, so why not?
Nolen - I'm still *thousands* ahead of a pair of locked, geared, upgraded 60's.

who's setup did you get? when I was planning on Rocks I got the setup from Chucks Trucks
Eskimo
SILVER Star
- Thread starter
- #144
I got 'em from the vendor who shall remain nameless... I think you can figure it out... Looks like he raised the price on the adapter though, it went up $70.
I've got exactly $483 into the front brakes including the adapter, calipers, rotors, pads, and shipping.
I've got exactly $483 into the front brakes including the adapter, calipers, rotors, pads, and shipping.
That's a pretty good deal espeacially with Wilwood stuff. I've got a set of Super 8s on the way but I'll be running pinion brakes until I can afford a taller wheel.
Eskimo
SILVER Star
- Thread starter
- #147
Started work on the cable shifters.. Had really no choice because the pivot would have to sit right on the 205 itself. Ordered the parts from McMaster-Carr, and I'm using the sticks and some pieces from the JB Fab twin-stick I already had. Here's the t-case area..

Cut a notch out of the frame for the rear crossmember (2" .250 box), and reinforced the inside area with these plates.

The fuel cell / rear winch / toolbox mounts are done. The tall bracket is for the winch, since it's sitting 90* of how it's designed. Fuel cell sits up front, with the toolbox at the back. The cooler will go to the left of the fuel cell, I'm going to recycle the mount from the last build for that.
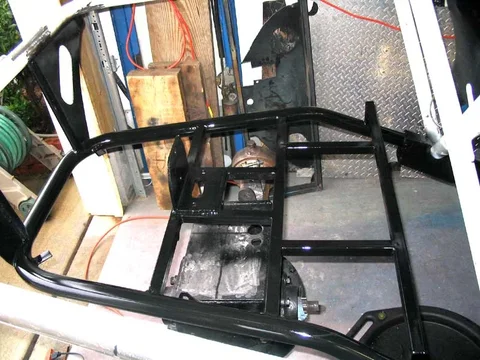


Cut a notch out of the frame for the rear crossmember (2" .250 box), and reinforced the inside area with these plates.

The fuel cell / rear winch / toolbox mounts are done. The tall bracket is for the winch, since it's sitting 90* of how it's designed. Fuel cell sits up front, with the toolbox at the back. The cooler will go to the left of the fuel cell, I'm going to recycle the mount from the last build for that.

You going to make it to Greyrock for the Cruiser Crawl in October?
Eskimo
SILVER Star
- Thread starter
- #149
You going to make it to Greyrock for the Cruiser Crawl in October?
Hmmmm.. Quite possibly! Sounds like fun. Didn't even know about it. As far as making it out of the garage, my current deadline stands..
On a side note, the wife is fed up with the amount of time I'm spending out there, but just wants it to be done, which equates to "Spend as much time as you need to get finished, but you owe me once it's done" ;p
Spa weekend at the Homestead....you will be back in black.
Bring you ass to Greyrock.
- Joined
- Sep 26, 2005
- Threads
- 38
- Messages
- 1,824
- Location
- Port Orchard, WA
- Website
- www.projektenterprises.com
Thanks Eskimo.
Much appreciated.
awp
Much appreciated.
awp
great looking cross member
Eskimo
SILVER Star
- Thread starter
- #154
The 'Cruiser is now officially 4-linked, front and rear!
I think it's gonna perform great, I nailed the specs I was shooting for, (except the front roll center is lower than the rear and there isn't much triangulation in the front links), but something had to give:
FRONT:
Anti-squat - 25% (only changes 7% through 12" of vertical travel)
Roll center - 27"
Roll axis -2°
REAR:
Anti-squat - 61% (only changes 5% through 12" of vertical travel)
Roll center - 33"
Roll axis -3°
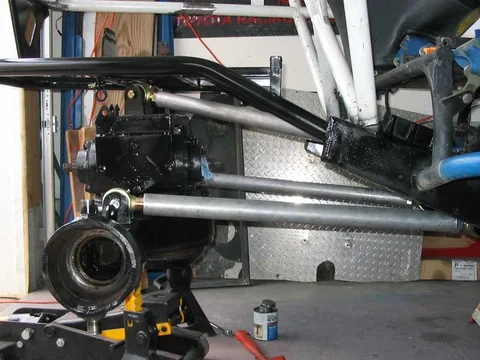
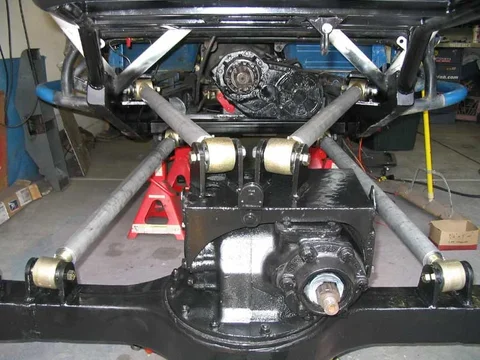
When I say "fully compressed", I mean it.. The uppers are close to everything up there!


I think it's gonna perform great, I nailed the specs I was shooting for, (except the front roll center is lower than the rear and there isn't much triangulation in the front links), but something had to give:
FRONT:
Anti-squat - 25% (only changes 7% through 12" of vertical travel)
Roll center - 27"
Roll axis -2°
REAR:
Anti-squat - 61% (only changes 5% through 12" of vertical travel)
Roll center - 33"
Roll axis -3°


When I say "fully compressed", I mean it.. The uppers are close to everything up there!

Last edited:
Eskimo
SILVER Star
- Thread starter
- #156
And finally, a few odds and ends...
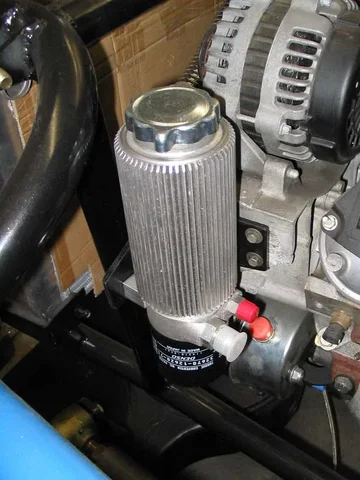
Steering reservoir mounted... Thanks GM for giving me 2 conveniently placed threaded holes right above the PS pump! (And yeah baby, I ditched that POS Fram filter for a gen-u-ine Toyota one.. It actually says "Torque Converter oil filter" on it.. My forklift repair buddy gave it to me.. )
And made the tabs to mount the rear steer valve within easy reach. I may put a longer / angled back handle on it eventually, but we'll see how it works out like this.


Steering reservoir mounted... Thanks GM for giving me 2 conveniently placed threaded holes right above the PS pump! (And yeah baby, I ditched that POS Fram filter for a gen-u-ine Toyota one.. It actually says "Torque Converter oil filter" on it.. My forklift repair buddy gave it to me.. )


And made the tabs to mount the rear steer valve within easy reach. I may put a longer / angled back handle on it eventually, but we'll see how it works out like this.

What's the valve you're using for the rear steer? Mine wil be just a standard powerin/power out valve. When I have the coin I might look into a return to center setup but it's a bit pricy for now.
Eskimo
SILVER Star
- Thread starter
- #158
I think it's the older version of PSC's "Competition rear steer pilot valve"..
A shop here bought a bunch of them damn cheap when PSC changed styles, and I got a good deal from them.. DAMN sure didn't spend anywhere near $265 on it..
It doesn't return the tires to center or anything though.. that would require electronics, and the $500 Station electronic valve.. Firend of mine put that bling valve (without he return to center) on on his buggy, but I can't really see the need. (You probably saw it, it's the "Narrowed rockwell buggy" build that was in PBB Gen 4x4 here in NC)
Wait.. you're doing rear steer on yours now? Cool!
Eskimo
SILVER Star
- Thread starter
- #159
I've been using a really neat disc for your Roloc sander.. the "Surface prep" discs.. removes paint, light rust, etc, without taking off any metal.
It's GREAT for cleaning up the sealing surface of an axle shaft, for example. even the wear line from the seal all but disappeared after a quick going-over with this pad... Top part hasn't ben done yet, bottom has.


It's GREAT for cleaning up the sealing surface of an axle shaft, for example. even the wear line from the seal all but disappeared after a quick going-over with this pad... Top part hasn't ben done yet, bottom has.

Last edited:
Eskimo
SILVER Star
- Thread starter
- #160
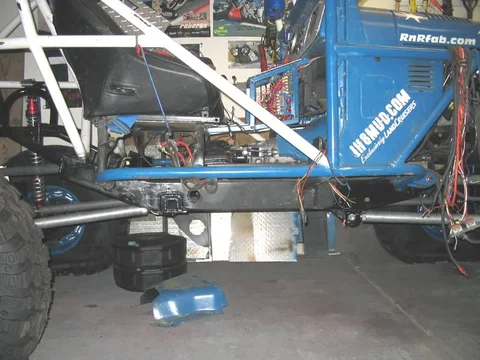
I was getting a little burned out and needed some motivation... So, I somehow managed to squeeze the tires on (the left side was ridiculous, lots of marks on the wall now, and it will take 4 wheel steer to get out of the garage!)..
So obviously, the rear shock hoops are done, the rear axle is assembled, you can see the pinion brake installed..
Currently sitting with 6" of uptravel, 22" at the frame, with the tires at 15.5" radius... meaning, once aired up, fueled and full of fluids, me, Nicole, etc.. Should be 25-26" belly with 5-6" uptravel. Looks like the springs I ordered were too stiff (preload adjusters are all the way up), but they'll probably settle in some. We'll see once it's fully put back together.
All in all, the bitch looks bad..


Similar threads
- Replies
- 0
- Views
- 564
- Replies
- 212
- Views
- 20K
Users who are viewing this thread
Total: 1 (members: 0, guests: 1)


