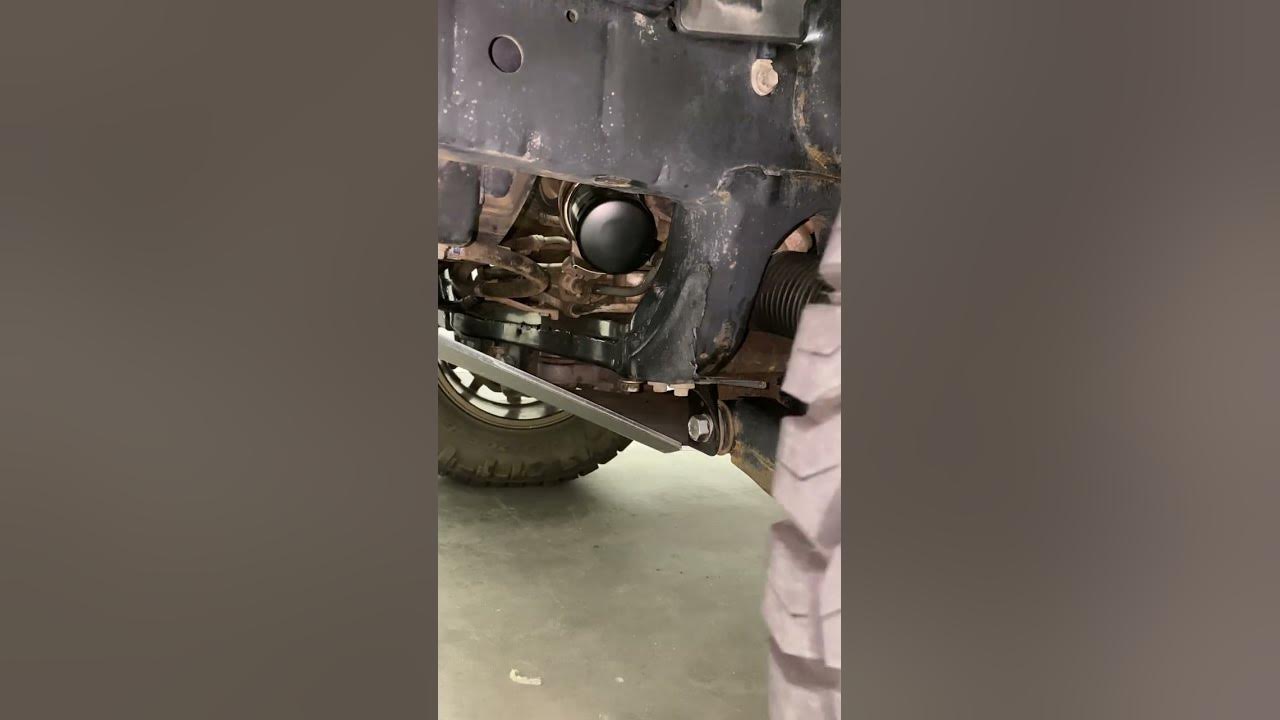
The dealership probably attached the steering shaft to the rack one spline off of center. It's very easy to do. This would allow the rack to turn further one direction than the other. It's a pain to correct and I am sure the dealer does not want to deal with it. An alignment will center the steering wheel inside the cabin and the tie rod's would be adjusted to make up the difference in the rack to make it drive perfectly fine, except at full lock.Maybe this will help, I tweaked the color a bit and you can see it better. It supposed to contact flush and kind of hit that flat part of the metal. But for some reason you can see to the left of that circle it's getting snagged up and starting to chip away at the metal only after a few turns.
Something is seemingly a few degrees off and it's not lining up right , it's like an inch or two off from where it should contact. Hard to accept " just grease it " as a solution . Any ideas ? I begged the alignment guy today to take another look .....
Sorry for taking over this thread , someone else must have encountered this.
View attachment 3230514
Navigation
Install the app
How to install the app on iOS
Follow along with the video below to see how to install our site as a web app on your home screen.
Note: This feature may not be available in some browsers.
More options
Style variation
You are using an out of date browser. It may not display this or other websites correctly.
You should upgrade or use an alternative browser.
You should upgrade or use an alternative browser.
How To: Replace your own steering rack (1 Viewer)
- Thread starter ENGINE er
- Start date
This site may earn a commission from merchant affiliate
links, including eBay, Amazon, Skimlinks, and others.
More options
Who Replied?I was wondering if that was a possibility, but how would being off a few splines change the angle that the stopper is supposed to make contact? Maybe it would affect how far it turns but my current problem appears to be it's missing where it supposed to hit all together.The dealership probably attached the steering shaft to the rack one spline off of center. It's very easy to do. This would allow the rack to turn further one direction than the other. It's a pain to correct and I am sure the dealer does not want to deal with it. An alignment will center the steering wheel inside the cabin and the tie rod's would be adjusted to make up the difference in the rack to make it drive perfectly fine, except at full lock.
I was going to call the shop it's currently at to see if they came up with anything better than to slap some grease on it. I will see what they think about this being a possibility.
Last edited:
2001LC
SILVER Star
A few spline off dead center (rack to intermediate shaft), TRE's (Toe) adjust easily corrects. This would not change contact point of knuckle stops. How far we can turn left or right is determined, by the knuckle stops. If stopped removed, steering wheel/wheels would turn further. Even further if TRE disconnected, but then steering wheel can be turned so far, clock spring will break. Knuckle stop set turn radius.I was wondering if that was a possibility, but how would being off a few splines change the angle that the stopper is supposed to make contact? Maybe it would affect how far it turns but my current problem appears to be it's missing where it supposed to hit all together.
I was going to call the shop it's currently at to see if they came up with anything better than to slap some grease on it. I will see what they think about this being a possibility.
Greasing knuckle stop is just a test. If sound changes, than you'll know it's the stop!
Consider:
Very often someone has adjusted T-bars to raise the front, to level stance of vehicle front to rear. Taking out the stink-bug look or rake. We need rake! This reduces HWY wandering. Lower front (rake) is like adding caster.
You stated your front fender to axle measurement is 21". Do this; measure rear axle to fender, while on level ground, full tank of gas, 3rd row in and nothing else or no one in vehicle. As a centering tool when measuring rear axle to fender. I use the chrome bar in tool kit, with magnetic level attach to it. Take care that your consistent in the way and points you measure from/to, like rear fender outer lip and center of axles and drop tape measure straight down. Then cross level front, by adjusting T-bars. If less than 3/4" drop in front as compared to rear. Reduce height of front end by evenly CCW T-bar adjuster turns, so your front lower by 3/4" or more (some lower front by 1 1/2").
Note:
When front cross level (side to side the same), rear should come in cross level. If not; either sloppy in measuring, or accident damage. The fender measuring technique, is short-cut field measurement. The alignment shop has tools, to measure factory method. But that is rarely done unfortunately.
>>> Thanks, specialty alignment shop is telling me over and over how "normal" this is on all toyotas. They greased it and said the noise went away. I asked them over and over to figure out a fix and they said " there is no fix , that's like asking me to give you an oil that never needs to be changed "A few spline off dead center (rack to intermediate shaft), TRE's (Toe) adjust easily corrects. This would not change contact point of knuckle stops. How far we can turn left or right is determined, by the knuckle stops. If stopped removed, steering wheel/wheels would turn further. Even further if TRE disconnected, but then steering wheel can be turned so far, clock spring will break. Knuckle stop set turn radius.
Greasing knuckle stop is just a test. If sound changes, than you'll know it's the stop!
I also came across this
>>Spindle Steering Stop Cap | Marlin Crawler, Inc. - https://www.marlincrawler.com/steering/parts/spindle-steering-stop-cap
Toyota screwed something up but I don't know what. I suspect something to do with level / rake / torsion bar adjustments
Consider:
Very often someone has adjusted T-bars to raise the front, to level stance of vehicle front to rear. Taking out the stink-bug look or rake. We need rake! This reduces HWY wandering. Lower front (rake) is like adding caster.
Toyota said their alignment tech screwed with torsion bars but the alignment shop said it all looks good in regards to cross level but I don't think they give a s***.
The reality is I don't have the time, tools, or know-how to deal with this and it seems like no one who does this for a living is able to figure it out. Pretty disappointing.
Last edited:
Can you please elaborate more onFew tips (assumes LH engine lift method):
1) Spray penetrating oil in advance on: LH engine mounts bolts and Intermediate to input shaft bolt and splines.
2) Turn steering wheel 180 degrees RH, to make loosen bolt of Intermediate to Input shaft bolt easier to remove. Once bolt loosened or out, you can turn wheel back 180 degrees LH to center and lock. Having center for straight forward travel, will aid late during install. New rack has marks for center. Rebuilt, measure that inner TRE extent on each side is equally out.
3) Remove fan should bolts. Lifting engine can break shroud otherwise.
“New rack has marks for center.”
2001LC
SILVER Star
Have you read the thread?Can you please elaborate more on
Do you have a specific question?
This thread is a great resource…  started on mine a couple of days ago

started on mine a couple of days agoI was asking about marking on the rack for centering but I saw th last night - blue and yellow marking on the boot and blue marking on the shaft. Thanks for mentioning as otherwise would have not known.Have you read the thread?
Do you have a specific question?
Thanks for the pdf instructions and a great thread.
This was not easy for sure. It took my son and I 3 evenings to complete.
Couple of pointers:
1. Make sure raise the engine enough that 2x4 can squeeze in under motor mount. We were struggling to remove and to put it back because it was not high enough. Of course watch out for the fan shroud.
2. Rear line was much easier to remove using this tool in the pic.
I will double check the toe alignment with the string for now before I take to alignment shop.
Perfect time to change tie rod ends as well.
It was expensive and difficult but it was/is all worth it.
Thanks again for all contributors.
Last edited:
Need a little help with a decision.
The rack bushings on my ‘06 are absolutely blown out. I believe this is the original rack, so it’s time for the rack to be retired, HOWEVER, I’m not ready to replace the rack yet. Would replacing the bushings with poly help with vagueness of the steering? I'm starting to get random power steering outages (not locking up) for a second when turning the rack quickly. I think it's shifting so much it's rolling forward and binding a little. I can move the rack pretty easily with a 3 and 6 o'clock test.
What is the consensus? It’s not fun to drive right now, but I’m also not ready yet as I plan to replace pretty much every bushing/control arm upfront in 6-8 months. I can't keep doing the steering thing until then, and I don't want to tear into it twice. I think I can just get underneath, blast the bushings out and toss new ones in?
I personally don’t think changing bushings is worth it at this point and probably will not help much.
2001LC
SILVER Star
If not leaking, then bushing are the way to go. If leaky rack at out put shaft(s), I'd replace the rack.
IMHO 3 and 6 o'clock isn't very revealing of mounting bushing health. Why: The rack should move side to side some, with factory rubber bushing.
No leaks add up the clues:
03-07 bushing cup has turned.

This is a newer rack in perfect condition. Hard to see bushing. But look close. Rubber is not split.
Here's a 03-07 rack with about 200K miles. Bushing are earlier stage of failure. See how rubber splits. I've seen worst!
IMHO 3 and 6 o'clock isn't very revealing of mounting bushing health. Why: The rack should move side to side some, with factory rubber bushing.
No leaks add up the clues:
- Wonders on HWY. If so and ball, wheel bearings, TRE, tires and alignment all good. -1.
- 03-07 Look down from above, at PS rack mount bushing steel cup. You'll see what look like a washer cut flat on front side. The line of the flat cup should be parallel with the rack. Turned indicates bushing is turning. -1
- Is steering slow response to steering wheel and lack on the return. -2.
- Both tire on the ground, turn steering left than right. Watch or video mounting bushing between frame and rack. Do lift high and do you see the rubber separate. -2
03-07 bushing cup has turned.
This is a newer rack in perfect condition. Hard to see bushing. But look close. Rubber is not split.
Here's a 03-07 rack with about 200K miles. Bushing are earlier stage of failure. See how rubber splits. I've seen worst!
If not leaking, then bushing are the way to go. If leaky rack at out put shaft(s), I'd replace the rack.
IMHO 3 and 6 o'clock isn't very revealing of mounting bushing health. Why: The rack should move side to side some, with factory rubber bushing.
No leaks add up the clues:
If all 4 fail, I'd call it a -6 total score. -3 or great without leak, replace the bushings.
- Wonders on HWY. If so and ball, wheel bearings, TRE, tires and alignment all good. -1.
- 03-07 Look down from above, at PS rack mount bushing steel cup. You'll see what look like a washer cut flat on front side. The line of the flat cup should be parallel with the rack. Turned indicates bushing is turning. -1
- Is steering slow response to steering wheel and lack on the return. -2.
- Both tire on the ground, turn steering left than right. Watch or video mounting bushing between frame and rack. Do lift high and do you see the rubber separate. -2
03-07 bushing cup has turned.
This is a newer rack in perfect condition. Hard to see bushing. But look close. Rubber is not split.
Here's a 03-07 rack with about 200K miles. Bushing are earlier stage of failure. See how rubber splits. I've seen worst!
@2001LC,
Thanks for the insight, as well as a checklist. I went through visually and recorded a short video for your opinion.
1. It does not wander on the highway, but does require larger than required corrections. I could be playing this out, as my other car is extremely tight. It does wonder under medium>heavy acceleration. I have reduced this by lowering the front end from 22.5" to 21.75" but I am going to take it down to 21" (hub to fender). I am going to get the front end height dialed in then align it.
2. The PS bushing is not rotated that I can see.
3. The wheel returned to near center, however at near lock (75%+ steering lock or greater) it certainly feels like it wants to unload more than continue to turn. I *think* this may be too much castor(?)
4. Attached a video. I'll need my wife to turn the wheel while I look, but what are your thoughts on the rack movement in the video?
2006 Rack Play
 www.youtube.com
Thank you again for your insight and help! I'm thinking it's going to be front end height + alignment = 90% better.
2001LC
SILVER Star
I should have mentioned rake under wondering, which is part of alignment. Alignment should check, but they never do in my experience.
Height of front in relation to rear key. We like to see front end a minimum of 3/4" lower than rear. Using the cheat, of axle center to fender.
If wonders or pulls in direction of road canter, then pulls other direction on under medium>heavy acceleration. Check the ball joints.
This is early stage of bad ball joints, usually not enough to cause acceleration pull/wondering.
This is late stage which likely will cause wondering:
I should have mentioned rake under wondering, which is part of alignment. Alignment should check, but they never do in my experience.
Height of front in relation to rear key. We like to see front end a minimum of 3/4" lower than rear. Using the cheat, of axle center to fender.
If wonders or pulls in direction of road canter, then pulls other direction on under medium>heavy acceleration. Check the ball joints.
This is early stage of bad ball joints, usually not enough to cause acceleration pull/wondering.
This is late stage which likely will cause wondering:
You are a wealth of extremely helpful information. I'll check at lunch. Do I need to support the LCA (a more neutral position) with a jack or can I check at full droop?
I should have mentioned rake under wondering, which is part of alignment. Alignment should check, but they never do in my experience.
Height of front in relation to rear key. We like to see front end a minimum of 3/4" lower than rear. Using the cheat, of axle center to fender.
If wonders or pulls in direction of road canter, then pulls other direction on under medium>heavy acceleration. Check the ball joints.
This is early stage of bad ball joints, usually not enough to cause acceleration pull/wondering.
This is late stage which likely will cause wondering:
So it doesn’t appear to be lower ball joints, but I do have significant play in what I assume is the wheel bearing. The entire wheel and brake disc rock back-and-forth a fair bit when grabbing at 12 and six. So much that I can make the metal clank if I rock hard enough.
I’m thinking wheel bearings + alignment would help a good bit
2001LC
SILVER Star
I place bottle jack under LCA, near ball joint. Then 6" 20 pound pry under tire. Lift up and down genitally on pry bar. Be very very careful. As bottle jack can slip off LWA. Do not hold pry with a grip. Just finger tips, so bar can easily pull away from fingers, if jack slips.You are a wealth of extremely helpful information. I'll check at lunch. Do I need to support the LCA (a more neutral position) with a jack or can I check at full droop?
2001LC
SILVER Star
Here's very lose wheel bearings, ~2k miles after bad wheel bearing service.So it doesn’t appear to be lower ball joints, but I do have significant play in what I assume is the wheel bearing. The entire wheel and brake disc rock back-and-forth a fair bit when grabbing at 12 and six. So much that I can make the metal clank if I rock hard enough.
I’m thinking wheel bearings + alignment would help a good bit
This as an epic thread, thanks for everyone that has contributed!
Started on my swap today but seem to be stuck at the separating the TREs. I’ve broken two pitman pullers, heated smashed and repeated with no luck. Anyone got any extra tips?
Started on my swap today but seem to be stuck at the separating the TREs. I’ve broken two pitman pullers, heated smashed and repeated with no luck. Anyone got any extra tips?
2001LC
SILVER Star
TRE can be a real bear to pop from knuckle. Some heat from a torch or induction coil, may help! Although I've never found the need for heat, and I've pop some really tough ones.This as an epic thread, thanks for everyone that has contributed!
Started on my swap today but seem to be stuck at the separating the TREs. I’ve broken two pitman pullers, heated smashed and repeated with no luck. Anyone got any extra tips?
If not replacing TRE, which I almost always do with R&P replacement (OEM TRE). You can just leave the TRE attached to steering knuckle.
But when replace/removing outer TRE. I've pressed out even the worst of them with a parts store loner "Evertough 67025 (found at Advance Auto and others). It, as most pullers, will require removing the brake dust shield. Be very careful if you plan on reusing TRE. To not damage the threads.
You can step up your game, with a big boy toy. Like the OTC 7310A. Used with a 3/4" breaker bar is one badass combo.
Or the OTC 513405
Today I have a customized (increased ID) JTC 1258, which I can use brake dust shield on.
Similar threads
Users who are viewing this thread
Total: 2 (members: 0, guests: 2)