Builds Here we go (FJ-40 getting a 3B/Turbo/H55f)...

This site may earn a commission from merchant affiliate
links, including eBay, Amazon, Skimlinks, and others.

OK, back to the tease...
tease.webp

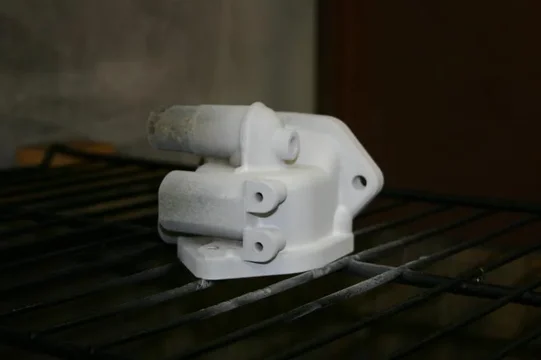
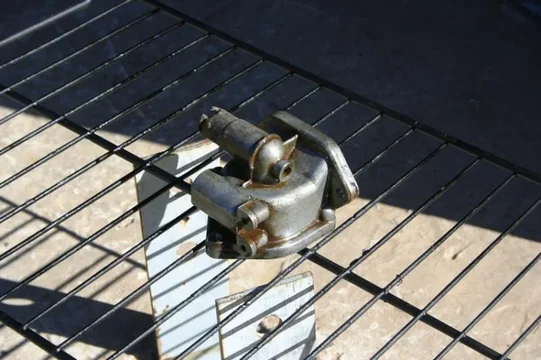
That's powder coat. Specifically, clear powder coat. We wanted a test to see how it would come out, I've never cleared over plain aluminum before, I've always bead blasted it first. We've got another thermostat housing coming anyway, so we did a little cleaning, then put the clear powder on to see how it would turn out...
tease 2.webp

So, the test piece came out just fine. The clear powder just makes it look "wet," and should end up making it much easier to keep clean over the years.
tease.webp
tease 2.webp
 
But I'll come back to that....

First I put in the new exhaust studs.
engine 1.webp

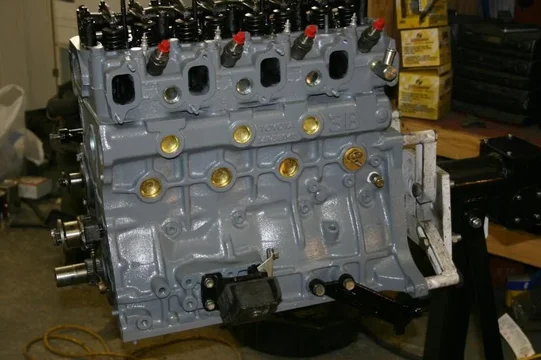
And new glow plugs.
engine 2.webp

I also got all of the expansion plugs in/replaced. The 21mm plugs were simply impossible to find (I had what looked like a good part number, but definitely not according to beno), so I ended up using 13/16 freeze plugs. They fit just fine.
engine 3.webp
engine 1.webp
engine 2.webp
engine 3.webp
 
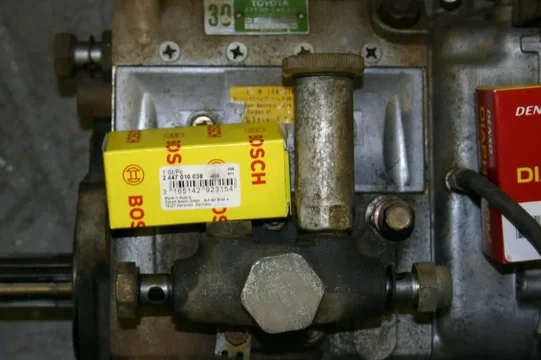
I also got busy with the IP. Picked up a new diaphragm (the old was was fine, but getting dry), and a new primer pump.

The number in the FAQ parts thread has superceded to a newer design, by the way. The new part number is 2 447 010 038, from Bosch.
primer 2.webp

primer 1.webp

Works fine though, even though it looks different. This one is spring loaded back to the up position, and is supposed to be better at leaks.
primer 1.webp
primer 2.webp
 
But back to that super uber sexy stuff....

The clear powder coat on top of clean parts!
engine 4.webp

What I like about this is that it's not perfect by any means. You can still see the imperfections in the metal, and some of the dirt is now encapsulated forever, but overall it should stay looking real nice and clean for a long, long time.
engine 5.webp

And an overview. I have not yet cleared the valve cover. I will do that today though. In this picture, it has simply been cleaned.
engine 6.webp

OK, more to do today... I should post more tonight.

Dan
engine 4.webp
engine 5.webp
engine 6.webp
 
Dan and his powder coat...

Looking great man!
 
I love the powder coat! It's just so easy and fast (especially on Aluminum!).

I think we're going to make it to CM11 with this as well...

So, what did I do today? Basically reassembled 99% of the engine.

The timing set. These gears were kind of a pain to get back together. Amazing how little movement of the crankshaft it takes to get the gears to mesh.
engine 7.webp

The IP was obviously installed to get the gears together, but.... The pulleys look good on there.
engine 8.webp

And sitting outside just for a good view of it. Notice the new water pump? I didn't even open the box until today. I'm kind of amazed the color pretty much matches the block (I probably would have painted the block blue or something had I known.) The valve cover is not yet PC'ed in this picture...
engine 9.webp
engine 7.webp
engine 8.webp
engine 9.webp
 
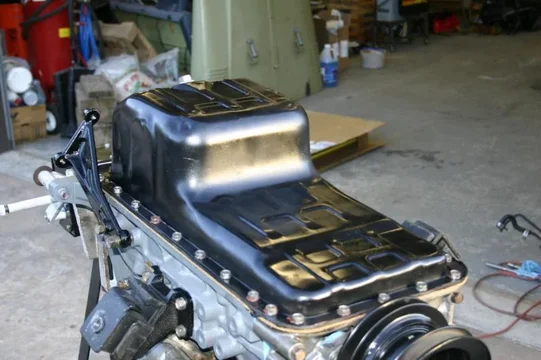
Got the oil pan repainted, and then installed. Have I mentioned how much I love this engine stand?
engine 10.webp

And then this happened in the oven...
engine 11.webp

Here's a closeup shot of the finish that's left on the parts. I can't get enough of it really. Looks AMAZING in person. Feels neat too.
engine 12.webp
engine 10.webp
engine 12.webp
engine 11.webp
 
A nice view of the valve cover and intake manifold installed.
engine 13.webp

Then the injection lines. These were repainted a graphite kind of color.
engine 14.webp

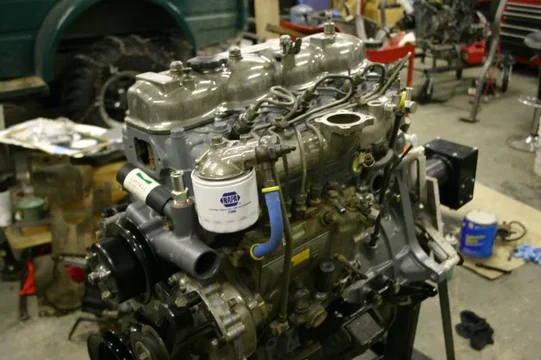
And an overview of the engine. New fuel line (of course), new fuel filter, etc...
engine 15.webp
engine 13.webp
engine 14.webp
engine 15.webp
 
Remember when I installed the block heater in the rearmost plug? Don't do that. The EDIC motor bracket occupies the same spot. So, out it came to get moved forward, and Dad will install a new freeze plug in that hole.
engine 16.webp

So really, aside from the oil cooler cover and the thermostat housing, this thing is ready to go! Both of those are in transit as I type (thanks Bob!), and will get the clear PC treatment when they get here, and then we'll button up the rest of the engine.

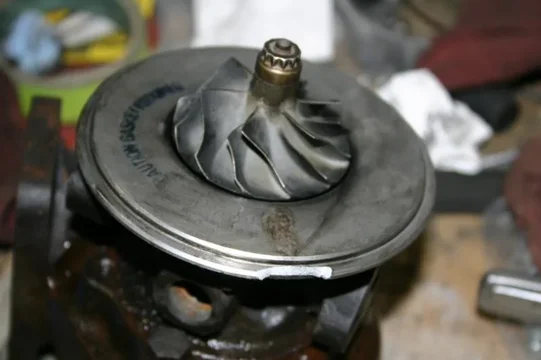
Unfortunately, there's a small setback. In the "Frankenturbo" thread I was asking about the Safari turbo that was on there. I just wanted to open it up to clean it a bit and stuff, but in the process of doing that it broke. Not sure how the compressor housing broke like this, it never got hit, and it never touched the vise. It just broke.
turbo.webp

With all the other problems this turbo has given me we're in the market for a new turbo. Of course, the manifold we have is a T3 (and we're NOT changing manifolds), so we could go with an eBay special. But this truck doesn't have an intercooler, so a ComChi turbo might be a little worrisome. In that case, we'd gladly put on a GT2052 or 2056, but those are T25 flanges. In that case, we'd need to get a T3-->T25 adapter plate, and perhaps make some changes to the intake piping if it's not a 3" inlet on the compressor....

One last option, and I might like this one. Garrett lists a ball bearing T series replacement core. Can I just use that with our existing compressor housing and turbine housing? Anyone done this? I like the idea of using genuine Garrett parts (what can I say, a couple of Garrett engines flew me around the hinterlands of Alaska for quite a while), but retaining the existing housings, because then I wouldn't have to modify any of the intake to accomodate the changes.

That's it for now. I have to go to work tomorrow. :frown: But I will be back early next week and I will have a good four days to get more done. With any luck, the engine will be in the frame, and perhaps the tub might be back from paint!

Dan
engine 16.webp
turbo.webp
 
This looks amazing. Itll be ALMOST too nice to drive and wheel, almost.

That sucks about the center section of your T3. There are so many T3 center sections available you should have no problem finding a center section. Theres no reason to replace the entire turbo unless you dont like the way it was acting with that turbo on there. Im looking at going with a T3 on my BJ60.
 
So purdy! I am taking notes for my rebuild! You're going to bring that engine stand back to CO with you when you are done right? ;-)
 
So purdy! I am taking notes for my rebuild! You're going to bring that engine stand back to CO with you when you are done right? ;-)

Good, good. I kind of wish I would have painted the injection lines an even darker color (I guess I still could) for just a little more contrast. You know, if you're taking notes...

On the turbo front Central Motive Power (which is the big diesel shop in CO and NM) got the turbine housing off for us. I'm not sure what is different about their press and ours, but either way.... They measured our turbo, and they can match either the hot or the cold section with a new Garrett CHRA, but not both at the same time. But, they think they can order a new intake piece (the one that broke), and then we'll just get a rebuild kit and put this one back together. So far that's the plan.

For the record, the ball bearing CHRAs are roughly $1200, and the journal bearing CHRAs run about $700. Pretty steep, but if one could bolt right up, we'd probably get one of those two. Not sure just how much different a ball bearing turbo would make to a slow little cruiser or not, but it's kind of a moot point for us at this moment.

Dan
 

Users who are viewing this thread

Back
Top Bottom